I have a simple reclaimed wood apple caddy to share with you today, and I am so excited! I have several great tips all rolled into this one easy to make apple caddy. The best part? I was inspired by my friends’ projects. I have the most creative and smart friends, and when I see what they do I have those “thump your forehead” kind of moments!
It all started out as just a project to keep me busy on a sort of hot day and to fill my time while I was probably waiting for some paint to dry!
 I love using reclaimed wood, and believe me I have a lot of it. I’m still using the wood from this haul last year.
*this post contains affiliate links*
 I cut the makings of a “box” on my compound miter saw. The measurements aren’t really important, you can make yours any size you want. I made the sides the same and the ends the same.
 A simple construction, using Gorilla Wood Glue and quick clamps and I was on my way in no time.
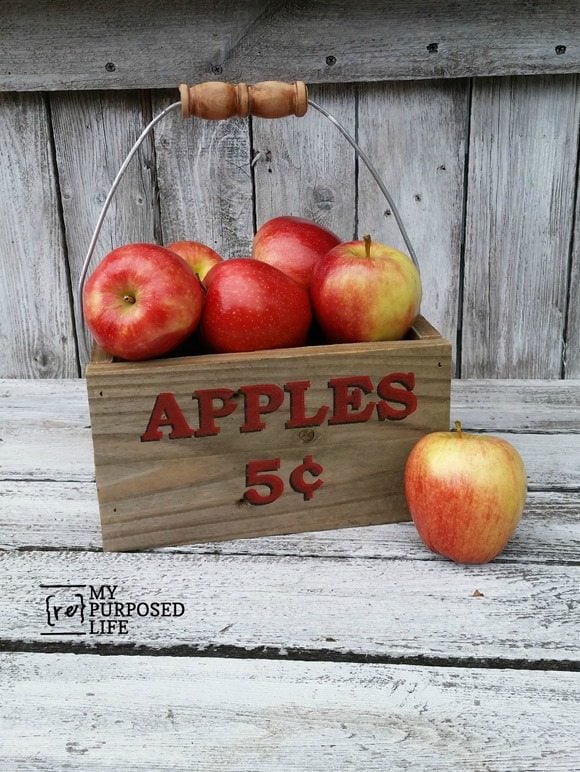
 I was inspired by Mindi’s Coca Cola Crate to use a bucket handle. This handle came off the five gallon bucket of paint that I used to paint my DIY picket fence. I removed the plastic piece and added a spindle.

While I was waiting for the glue to set up, I cut the spindle to size on the compound miter saw. I used a quick clamp to hold the spindle so I could drill a hole through it in order to slide it on the handle. (not shown)
DO NOT try to hold anything in your hand while you drill a hole in it.
After the glue set up, I added a few brad nails to the apple crate for good measure.
 I’m really good at drilling holes, but I’m NOT good at making the holes match. Enter this brand new jig from my friends at Kreg, their new Cabinet Hardware Jig. It’s sooo incredibly handy, compact and pretty much fool-proof!
You can see how easy it is to use on this video. It’s fabulous for pulls and knobs, and even holes to hold bucket handles!
 A couple of weeks went by, and although I love my new caddy, but I felt like it needed a little something!
 I decided it should be an apple caddy! (but you already knew that because of the title of this blog post)
You can see that I used Bookman-Old Style font, and I cut two stencils out of contact paper. I love using contact paper stencils. I even did a facebook live showing how to use contact paper stencils.
 You can see I applied the entire piece of contact paper stencil, then weeded the letters out. After that I used the paper backing to smooth everything out.
I have been wanting to try this technique from my friend Jennifer Allwood. While I was describing the technique to my daughter Jamie, she was like “oh yeah”. Now mind you, she doesn’t do a lot of stenciling—but she does a LOT of work in photo shop for her employer. She then told me that she does this all the time for their images. duh! Maybe you already know it too, but if not, I’m about to rock your world. okay, that might be a LITTLE much.
 I squirted a little bit of the deco art black paint onto the stencil and used my Martha Stewart foam pouncer to stencil the letters black.

Looks great eh? But wait! There’s more!
 Remember I cut TWO stencils? I placed this stencil on top of the black painted letters . . . . .
 . . . a little to the right and slightly higher. Can you see the gray wood to the right of the letters?
 Using the same technique with another pouncer I painted the letters red.
 Can you see it . . . a slight shadow appears!
 It’s magical!
After the paint dried on the apple caddy, I sanded the paint VERY lightly to age it a little and remove the bubbles the pouncer left behind.
This is my first time using the shadow stenciling technique, but you can bet it won’t be the last!
 I took some photos outside on my diy reclaimed potting bench, I love how it looks with the white backdrop.

 I’m so happy that it finally “feels” like Fall here! Too bad I’m not a baker, because an apple pie would look great in this picture along with the apply caddy.
Won't you pin this and share it with your friends?
I love using reclaimed fence wood, and I still have a lot of it left! What have you made using reclaimed wood?
gail
Gail Wilson is the author and mastermind behind My Repurposed Life. She is obsessed with finding potential in unexpected places and believes that with a little hard work and imagination, any old thing can be made useful again, including herself!
Gail reinvented herself during a midlife crisis and has found purpose again. She hopes you will find new ideas for old things and pick up a few tools along the way.
Bliss
This might be one of those techniques I have to try to fully grasp it. I’ve been hand doing my shading and thats time consuming and messy when you don’t have very good lettering skills!
Gail Wilson
Ohhh, you really need to try this Bliss. It's so easy! The shading (when stenciling) really adds to the look for sure!
Let me know how it goes!
gail
Lea
This is such a cute project and it looks easy to do. I've pinned it.
Gail Wilson
So happy you like my project Lea and I so appreciate you pinning!!!
gail
Catherine
GREAT project Gail! Especially love and will be using that bucket handle idea!
I have GOT to get a Silhouette so I can make some stencils like you always show!
Catherine
Serena @ Thrift Diving
Hey, Gail! Very cute project! I love the shadowed lettering! And can I just say, I NEED that Kreg cabinet tool?!?
Gail Wilson
That jig for cabinet door hardware is the bomb Serena! I've used others, but this one is so incredibly easy, and compact. It takes up so little room.
Christina in FL
Way to rock the reclaimed wood Gail! I love this! Thanks for all the tips and your stenciling looks GREAT!
There was a day when no one considered tossing out wood. 🙂
Deepak
I really like your stenciling technique. I do these kind of techniques at my home. By reusing things you save money and also reflects your creativity.
Mindi
This is just the cutest thing ever Gail!! Jam packed with great tips!! I am so glad you used the bucket handle trick and totally took it to the next level with the spindle, genius! And the shadow technique!? What? That is soooo cool! Now I want to go and make some crates, cause they make me happy! Pinned!
Gail Wilson
Thank you Mindi for your enthusiastic comment. It made me smile. I'm so happy you learned something new about the stenciling technique, I thought I might be the last to know. 🙂
thank you so much for pinning, you're the best!
gail
Sarah B.
Do you ever reuse your contact paper stencils? I'd like to try to make multiples, but don't know if it can be done.
Gail Wilson
Sarah,
Because they are so cheap and easy, I never reuse them. The way I apply my stencils "whole" and then weed them, it's not worth trying to save them for a second use.
gail
Wendi@H2OBungalow
Oh my gosh, you really DID have several good tips in this post! The shadowed letter one is mind bowing! I do that all the time in my graphic program and never thought to do it with painting! .. Love the handle and love your video too! I need a Kreg handle guide too!
Gail Wilson
Wendi,
thanks so much! My favorite part about blogging is sharing what I learn from others, including my blogging friends. 🙂
The shadow stenciling is so "slight" that you really don't notice it, but you do notice how the letters pop, right?
I hope you find a project to use it on.
gail
Donna O'Shaughnessy
hi Gail, Love your blog and I visit often. My husband and I built a home from a metal grain bin last year and this week we finished up the window trim using all reclaimed wood. My website is below if you'd like to see, Thanks so much for all you do and all the great instructional pictures. Your apple tote is so so cute!
Gail Wilson
Donna,
Thanks for stopping by and leaving a comment on my apple crate. 🙂 I admire what you're doing on your farm. Your blog header gave me a chuckle. Wishing you all the best!
gail
girlfromwva
thanks for showing us your shadow stenciling technique! the letters & numbers look SO good. i think your apple caddy is just the cutest!
Gail Wilson
Nova,
Thanks so much for your comment. I really am so happy I tried this new stenciling technique.
See you at Glendale?
gail
girlfromwva
we will be coming to Glendale as far as i know/fingers crossed for decent weather!