I love this diy toy box project! I’m going to show you how I made it out of 10 cabinet doors from the ReStore.


How to Make a DIY Toy Box out of Cabinet Doors
 Don’t you love it? Would you think it was cabinet doors?

 These are the doors I used. I’ve lost count of how many I’ve actually purchased. Just looking at the picture makes me want to go buy more.
 ![]()
Kreg Jig Joinery
 I used my Kreg Jig to make pocket holes to attach the sides together. You can see a “br” and and “bl” on the edges. That’s for back right and back left. These particular doors have a couple of flat edges and a couple of beveled edges. I ripped the beveled edges off using my table saw.
Use Clamps to Hold Project
 I assemble the DIY toy box, clamps make it easier since I work alone.
 This is the box all put together, with the lid just setting on it to make sure it all works.
Fill Pocket Holes and Sand
 I used some 3M Spackling (with primer) to fill all the holes, then I gave everything a light sanding.
Finish Max Paint Sprayer
 I recently received this new HomeRight Finish Max
![]() . Doesn’t it look so pretty and new? The diy toy box has been given a coat of my own version of chalk paint as primer. I actually mixed some Plaster of Paris into some latex primer. It turned thick and goopy immediately. It’s the only time I’ve had that happen, so NOTE to self—don’t use primer as DIY chalk paint.
. Doesn’t it look so pretty and new? The diy toy box has been given a coat of my own version of chalk paint as primer. I actually mixed some Plaster of Paris into some latex primer. It turned thick and goopy immediately. It’s the only time I’ve had that happen, so NOTE to self—don’t use primer as DIY chalk paint.
 I readied the paint booth. I have a piece of plastic hanging on a wall, draped over the floor. Generally, I use some 1x2’s around all sides to keep the plastic from flying around, and then I actually put my pieces on a pallet.
When done, I fold up the plastic, and lean the pallet against the wall.
 To make things go smoothly, I strain all paint that has already been opened and used.
 I use a ladle and find that if I dip the ladle into my bucket of water first, that less paint actually sticks to the ladle. After adding the paint, I add a little water to dilute the paint.
I had asked Jamie what color she thought I should paint it, and she said white. As soon as I imagined it white, I knew immediately that it would look super cute as faux ABC blocks.
 and… I’m ready!
White DIY Toy Box
 It was really hot and humid, so I brought the diy toy box indoors for a few days so it could cure properly. It really takes about 30 days for any item (not manufactured) to cure all the way.
Add Faux ABC Blocks
 To give the look of the faux abc blocks to the diy toy box, I knew I needed to get a nice border on each of the doors. I used some Scotch Blue Painter’s Tape.

To get the bright primary colors, I used DecoArt Americana Paints in Calico Red, Cadmium Yellow, True Blue, and Holly Green. I used 4 sponge applicator brushes, one for each color.
 To insure a crisp line, I put a quick coat of the white around all the borders. After the white was dry, I got busy with the colors. I gave two light coats to each one. This may seem like an extra step, but when you want a really crisp line, it's worth the extra work.
 I made some alphabet stencils using contact paper and my Silhouette Portrait.
 Aren’t the dabbed letters cool looking?
After I got all the details painted onto the toy box, I gave it a coat of Polycrylic for durability.
Using a Shirt for Cushions
 To make a cushion, I picked up this men’s shirt at my local Goodwill store for $3.00.
 The piano hinge I bought was too long, so I cut it with my jig saw.
Hardware for Toy Box
 I attached the piano hinge and a slow closure hinge.
 So, I wish I had a place to stage it with some cute little kiddos, but I don’t, so here it is in the staging area for MRL.
 It’s hard to say which of the colors I like best… I’m leaning towards the blue or the green I think.
 I made a box cushion (not my best sewing job) for the top. (Thanks to a good friend that helps me make these decisions.)

 Originally I was going to make these little cushions. I made one, and wondered if the box cushion would do better. After a text to my friends, the unanimous decision was the box cushion instead.
 I even painted the back of the DIY toy box.
 What do you think? Do you think it was a good use of 10 $1.00 cabinet doors?
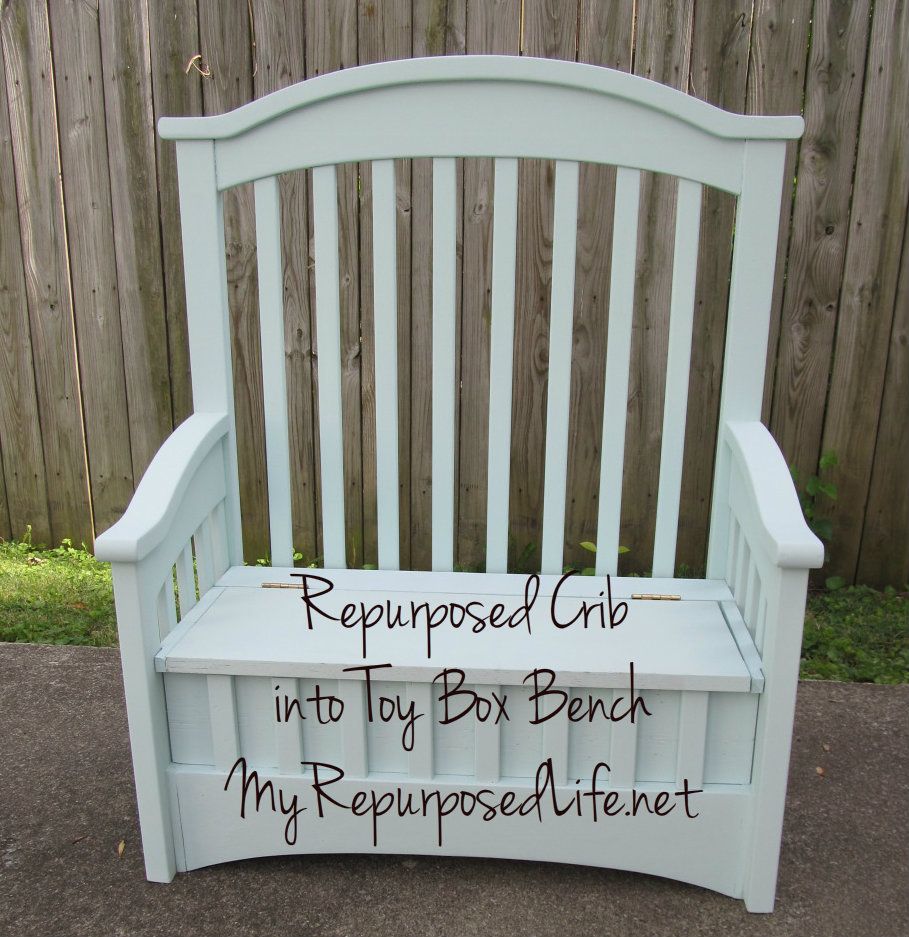
have you seen my other toy box made from a crib?
Which do you like better?
gail
Edited to add:
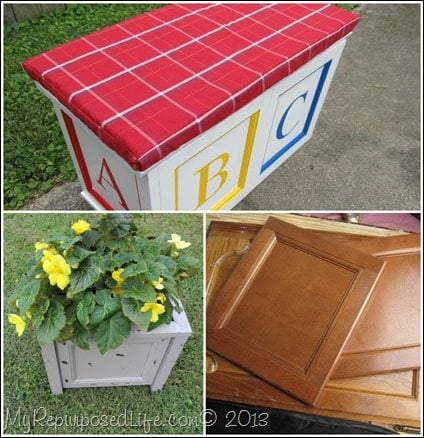 I've made another project using these $1 cabinet doors... it's that sweet little gray DIY Easy Planter with begonias.
Disclaimer: I have received some of the above mentioned products from my favorite brands. All thoughts, words and opinions are my own. This post may contain affiliate links which won’t change your price but will share some commission.
Gail Wilson is the author and mastermind behind My Repurposed Life. She is obsessed with finding potential in unexpected places and believes that with a little hard work and imagination, any old thing can be made useful again, including herself!
Gail reinvented herself during a midlife crisis and has found purpose again. She hopes you will find new ideas for old things and pick up a few tools along the way.
Victoria
Amazing I really want to build one for my son but I think I’m just scared that it won’t come out nice. I have no tools and just don’t know where to begin but I love it
Lindsey
This is so awesome! Thank you for sharing! I hope to make 3 of these soon for my kids and nephew. How long did it take you? I have a 10 month and 3 yr old, so I'm trying to figure out when to do it. Thanks!!!
gail@myrepurposedlife.com
Lindsey,
Using the Kreg Jig, this was a quick and easy project. I would try to find doors without a beveled edge unless you have some way to cut them flat. It definitely took me longer to paint and decorate it than it did to build it. Please use the appropriate hinges to keep little fingers safe.
I looked at the timestamps on the pictures-it took me an hour and 10 minutes to put the box together (not counting hinges).
Good luck, have fun!
thanks for stopping by and taking the time to leave a comment on this cabinet door toy box.
gail
Steven R.
Love it! Great job. Repurposing wood it most creative, best and inexpesive way for me to build. It doesnt hurt when I make a mistake either!
gail@myrepurposedlife.com
I love the adventure of designing my stuff using reclaimed stuff. And you're right, mistakes don't matter as much.
gail
Patricia ridgell
How are you connecting the doors? Wood glue and then clamping until dry?
gail@myrepurposedlife.com
Patricia,
Thanks for stopping by to check out my toy box project!
I used a Kreg jig and pocket hole screws to join all of my pieces together. You can see a photo near the top of the post.
gail
Yvonne Lee
Thank YOU soooo much for your kind words. You are truly inspiring!. I Am excited about taking my life back. You can't imagine how much this has helped me!
Continuously Grateful,
Yvonne
Yvonne Lee
I think I misspelled my last email address
Yvonne Lee
You are so creative. Thank you so much for sharing. You have inspired me to be creative again. I lost myself in a tragedy but slowly coming back around. thank You So Much for all of your amazing inspiration!
gail@myrepurposedlife.com
I'm so sorry you've suffered Yvonne. Thank you for stopping by and taking the time to leave a comment. I truly wish you all the best and a bright future. I'm here if you ever have any questions. Hoping things get better real soon.
gail