These signs are everywhere. I think they are so cool. I wanted one for my living room. You know I’m all about using what you have. I did not have a wide board, but I have a lot of luan.
Build up the Family Rules sign with a frame

I cut the piece of luan. See that green blob? You know what that means. I paid .51 cents for the entire sheet. It was the piece I blogged about Monday. I still have a lot left. I just used some off the end.

Because I wanted it to look like a thick piece of wood rather than thin luan, I ripped some 1x’s and made a little frame on the back.
Paint your DIY sign

Design the layout for your stencil

This is where it gets detailed. I cut my phrases out of construction paper on Cathy’s Cricut. I used different colors so that I could try to keep track of the bubbles and inside pieces to the letters. Cathy has one font cartridge, so I used the fonts as many ways as I could. Cathy hasn’t used her Cricut much and I have never used one so it was a challenge for us to get this right. The only thing I can remember is we used 12 inch wide construction paper and used the “fit to length” feature. That gave me different heights on the fonts.
 I laid the strips out on my board and taped them together with painter’s tape.
Spray diy stencil with adhesive


I used Elmer’s Craft Bond to get a temporary bond. Following the directions it says to spray a light coat, wait 3-5 minutes then apply.
Protect painted board with painter's tape

After applying the stencil to my board I made sure I covered up every speck of black board. I tediously put in all the little missing pieces on the e’s, a’s, o’s, etc. A glue stick was used a to adhere those little bits.

Use spray paint for DIY stencil

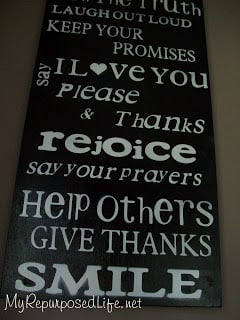
I took it outside and sprayed it with white paint. You can see that I apparently didn’t spray the adhesive well enough on SMILE. I’ve learned that when you spray stencils, you spray it straight on, being careful not to tilt the can. (If you tilt the can, the paint can sneak under your stencil)


I used a dish cloth with some slightly soapy water on it to soak off the remaining paper and glue stick.

DIY Family Rules Sign


I know I am certainly not the first to make one of these. I was going to cut it all out by hand, but decided to borrow Cathy’s Cricut instead. I’m glad I didn’t do it by hand, because I am so pleased with how it turned out.

I have one spot that I sit at on the couch to do my blogging business. Every time I look up, this is looking right back at me!

My number one goal in life is simply to “be happy”, that’s why I put it at the top. All the other phrases mean a lot to me too. I try very hard to follow all of these rules. Wouldn’t it be a better world if everyone did?
gail
Related Content:
See more stenciling projects here
Gail Wilson is the author and mastermind behind My Repurposed Life. She is obsessed with finding potential in unexpected places and believes that with a little hard work and imagination, any old thing can be made useful again, including herself!
Gail reinvented herself during a midlife crisis and has found purpose again. She hopes you will find new ideas for old things and pick up a few tools along the way.
Gretchen
Your family rules sign turned out incredibly and you were so creative with how you did it. Great look and fabulous job.
Gretchen Schaumann
Mimi-Toria's Designs
Brandi
Holy cow- you read my mind. Was laying in bed last night & randomly decided I needed one of these AND you have almost every 'rule' I would use. Woo hoo! Thanks for the inspiration!!
April Moffatt
Love it! You are very industrious and determined. I think I would of cried when the paper got stuck to the board:) It looks awesome though and was obviously worth it!
Megan
awesome job! I love it! I'm featuring this in a post tomorrow on crazydomestic.com. feel free to grab our "I was featured" button!
Barn Owl Primitives
Great Job! I paint these signs for a living and yours turned out beautifully! Stop by my shop and take a look around when you have a minute!
http://www.barnowlprimitives.etsy.com
xoxo ~ kristi
Mel
Fantastic! A great tutorial and a fabulous sign. Thanks so much for sharing and inspiring us all.
Candace@craftysisters-nc
Great words to use! I need one just like that in my house too. 🙂
I♥naptime w/ Chocolate Sundaes
looks great! I love it!
-Jamielyn
http://iheartnaptime.blogspot.com/
~ Regan
Wonderful job, Gail! I have SO been wanting one of these! I have the perfect place for it, too... It was just a matter of getting the words cut out... My cousin has a cricut... I wonder if I can con (uh, I mean, ask politely) 😉 her into cutting me some stencils? Hmmm...
Thanks for the tute on how to make one on the cheap!
FrouFrouBritches
I am also desperate to win a Silhouette or Cricut. DESPERATE! That turned out GREAT! I love it! I especially loved that your "say" is sideways for both of the phrases beside it. AWESOME IDEA!
Kelli
I love your sign! I want all those phrases and words, and more! You are awesome!!!
Simplegirl
That is wonderful. You did an awesome job! Visiting from Feature yourself Friday. I would love to make one too:-)
Lindy
I love the way you are building this project up on the edges giving the piece depth. I paint a lot on 1/4" masonite and I'm going to use this idea on my very next painting... L.
Amber Dawn
This is wonderful. I have GOT to get myself a cricut!
Cathy @ The Far Fifty
It's so happy, it makes me smile!
De Javu Crafts
wow....i just spent the last hr or so looking through your blog....i love LOVe all your ideas....and your like me..your a bench makeing mania...thanks for all the ideas!!!
Jan @ bobbypins boardwalk
I love it! It's a great piece of art! I can think of a dozen places where this would work in my home. I will have to figure out a way to do it without a cricut, however. I also like the way you built the woodup with the boards on the side!
Nana's Fun Stuff
Oh Gail it turned out great!! I love it 🙂 I have yet to try these but just may have to put it on the "To Do" list to see what I can come up with 😀 Have a great day Sweetie!
Maryann @ Domestically-Speaking
LOVE your sign!!
Suzanne@Meridian Road
I think it looks great, and I really like the phrases you used. I'm going to have to try this.
Jill
That turned out great! I made one a while back using a small canvas, and because I don't have a cricut, I cut all my letters out of white cardstock.
This week Tatertots and Jello is having a subway art party. You should add yours to it! http://tatertotsandjello.blogspot.com/2010/08/subway-art-party.html
Attic Rat
Oh, Crud! Now I want a Cricut. LOL
Your sign came out beautifully. Where did you find that 51 cent luan? What a great find.
I like Bev's idea of using freezer paper. Will that work okay in the Cricut?
Bev
Great idea! FYI, next time try using freezer paper. It will iron onto your board. Paint and peel it off. Fun!
LisasCreativeHome
GReat sign! I have never seen one like that before. Love it:)
A Pretty Pastime
Great job Gail! I love the way this turned out and it looks really nice against the painted wall. Nice work!
Katy
Cassie @ Primitive & Proper
it turned out beautifully! i have been wanting to make one, but it seems like a whole lot of work... am i lazy or what? it really looks smashing!
Cassie @ Primitive & Proper
it turned out beautifully! i have been wanting to make one, but it seems like a whole lot of work... am i lazy or what? it really looks smashing!
Granny J
The sign looks great in with the crisp white on the black background.
Sharon @ Elizabeth & Co.
Love this sign! Thanks for such a detailed tutorial!
Sharon @ Elizabeth & Co.
Love this sign! Thanks for such a detailed tutorial!
Rose @ Confessions of a Curbshopaholic
That's the best sign I've ever seen! Great job, and you just gotta smile at the perfectly imperfect "SMILE" at the bottom.
I hope you win one of the silhouettes too! (but good use of Cathy's, it's nice that you have friends nearby that can share)
Something Nice and Pretty
That is so neat, love that you used spray paint and thanks for the tip on how to hold the can while spraying!
Rondell
Proper Prim
Oh Gail, I want one of those so bad... I have been eyeballing them for so long too... I don't have a Cricut and I really don't want to have to use stencils, it would take forever... I love that you spray painted it, wow does that save some time. You did an awesome job and I love each one of your sayings.
Fantastic job...
Hugs, Deb
Maria Gridley
wow you did an amazing job! I love how it turned out! 🙂 Great idea on how to make it look like a thick board. so clever. 🙂
I too need a cutting machine.. dont have one.. and I entered every silhouette giveaway I could find as well. LOL 14 of them(posted a list on my blog)!! Im hoping I win one too. Hopefully you will be a winner too!!