You know I love a good headboard project. It’s been awhile since I’ve made a sign, so I thought it was time to get busy. I chose the phrase “What I Love Most About My Home”.

In a hurry? Save & Share this project on Pinterest!
Free Headboards

Rodney (my neighbor) picked up these pieces for me right around New Year’s. I barely even looked at them before they got stored in the garage. There they waited.and.waited.and.waited.
 headboard")
While I was looking for something to do, I almost grabbed the one that wasn’t broken, and thought to myself, that’s no fun. Why not get the one that needs work, so I can show you a work around for it. You can clearly see that it’s not real wood. ![]()
Trim Broken Headboard to Make a DIY Sign
*this post contains affiliate links, read more here*

If you guessed I would be cutting the headboard, you’re right. You could use a jigsaw, but I chose to use my circular saw. I measured from each end and marked a line with a straight edge.
Safety First

A couple of things to remember. Make sure you won’t run into any hardware, screws or nails. (I removed the smaller piece of trim across the bottom). You must set the depth of your blade to accommodate the wood you’re cutting. I had to set the blade deep enough to cut through the chunkier trim on the headboard. I actually cut from the bottom up, until the saw guide hit the chunky trim. Then I came around and started from the top.
I did the same on the other side of the headboard. Problem solved!
Notice how rough the pressed wood is that was cut. It won’t paint very well, so I set out to cover it up.
Add Side Trim to Hide Raw Edge

Seriously, I found a piece of scrap wood that worked perfectly. I was able to cut it in half and miter the top of the left and right side. I used Gorilla Wood Glue and my nail gun to secure this new trim piece in place.

The orbital sander was used to sand the new trim piece AND the old chunky trim piece to make them blend together better.
Using Wood Putty

Using a wide putty knife, I spread wood filler to fill the small gap where the new trim meets the headboard.
 The orbital sander was used to make the dried wood filler nice and smooth.
Over Sized Headboard Ideas
 After sanding I played around with the idea of adding a bottom trim piece and possibly some shelves (instead of making this headboard into a sign).
Plan B Make a headboard sign What I Love Most About My Home, because the headboard is so large!
Paint Headboard Sign

I mixed up some diy chalky paint primer with plaster of paris and used a cheap chip brush to paint a couple of light coats. Then I did 2 more light coats of the satin paint straight from the can. I know you’ve heard it before, but for those who don’t know why I love these brushes, here’s why. They’re inexpensive, they are easy to clean, with very little wasted paint during clean up. Yes, they do shed when they’re new, but the more you use them, the better they get.
What I Love Most About My Home

I got this design from my friend Tanya from My Funky Farmhouse. I love her designs. This is the original design, but it’s too large to cut out like this.

Because I was cutting the 9” vinyl with my Silhouette Portrait, I needed to 1) remove compound path 2) group each section 3) copy and paste into another document.
I added the arrow because I had dead space with the last line and I didn’t want to waste the vinyl. I cut each of these out separately, one at a time, changing the size of the box to fit the text.
Applying What I love Most About My Home Stencil

Here are each of the three sections I cut out. I found the center with my self centering tape measure, and arranged the pieces to look like the original design above. Because the top two pieces were difficult to apply straight (due to their letters not being straight across) I decided to start at the bottom—to estimate the overall placement.

While removing backing from vinyl, it’s best to lay the piece upside down, and pull the backing paper to one side or the other.
Gold Vinyl for Large DIY Sign

Sometimes, vinyl doesn’t feed in perfectly straight, therefore you can’t apply the transfer tape to the edge of the backing in order to get a perfect placement. Because I always draw a box around my text, I was able to line up the transfer tape with the edge of the box, then I removed the excess vinyl.
How to Apply Large Vinyl Phrases

First, I applied the second line, then reused that transfer paper for the top section. To make things easier, I use painter’s tape to make “hinges”. I flip the entire piece down . . .
 While the piece is upside down, I peel away the backing paper, and carefully fold it back up in place to burnish the lettering onto the headboard sign.

I did the same thing with the last section. The blue tape on the right is because I ran out of transfer tape on the roll, so I substituted with tape. Again, there are a couple of hinges allowing me to fold the piece back up in place.
Large Headboard Sign What I Love Most . . .

I leaned the large sign up against the diy picket fence to take a picture.
Add Coat Hooks
I drilled pilot holes and added some Ball Hooks from D. Lawless Hardware to make the sign a handy coat rack.
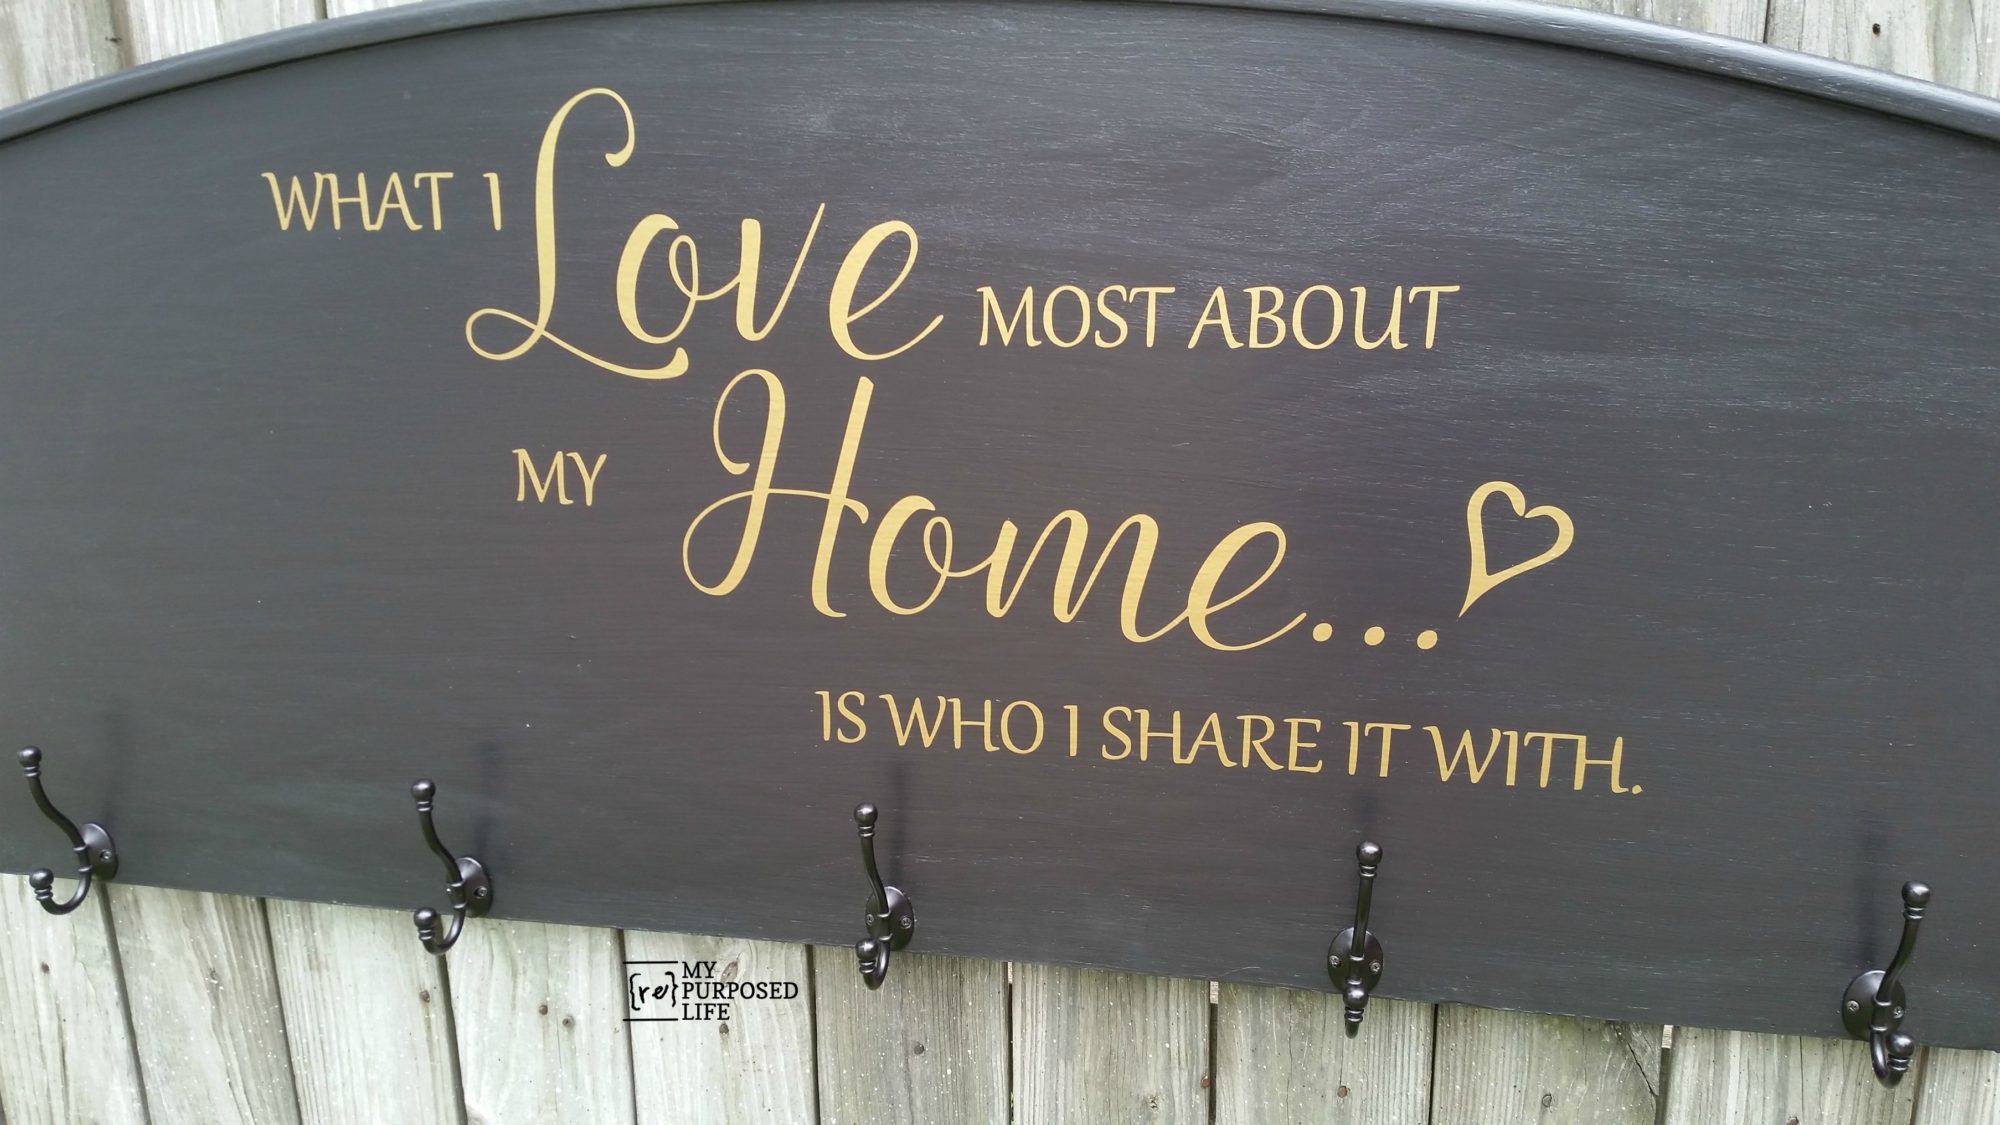
This headboard sign is very heavy, so I hung it on the fence to take the pictures. It just goes to show you that even a damaged headboard can be salvaged and repurposed.
PIN IT!
I love cutting up all kinds of furniture, especially headboards. What have you cut up lately?
gail
Gail Wilson is the author and mastermind behind My Repurposed Life. She is obsessed with finding potential in unexpected places and believes that with a little hard work and imagination, any old thing can be made useful again, including herself!
Gail reinvented herself during a midlife crisis and has found purpose again. She hopes you will find new ideas for old things and pick up a few tools along the way.
Tisha Clapp
This is so creative! I've got a headboard in storage just waiting to be transformed. Thanks for the inspiration!
Gail Wilson
Cool! Happy to inspire you Tisha!
gail
Jan the Man
Can you give us what the width of the cut headboard was please? How did you choose that size for a coat rack? Yes, just picking your thought process.
Gail Wilson
Great question! I chose that size due to the damaged portion of the headboard. Cutting it off one side, and matching the same amount of headboard on the other side. The headboard is currently about 54 inches.
Hope this helps!
gail
Carol S
Just finished using a king-size headboard/footboard to make a banquet for our kitchen. There were pillars on the ends that were cut off. Built a box for the base with hinged top for storage. Used the Home Right sprayer to prime and finish sprayed with Annie Sloan Old Ochre. My friend made the seat cushion. Turned out awesome. Now have to make a custom farmhouse table for it since it's 6 feet long. And then, our favorite part, digging out 3 chairs out of my chair stash for the opposite side. They will be fun to finish and so easy with the paint sprayer! As always, thanks for sharing your great ideas, Gail. This one is really, really good.