Army Footlocker into Coffee Table with Storage
As an Amazon Associate, I earn from qualifying purchases.


 Would you believe I forgot to take a before picture? I got so busy tinkering and tweaking the army footlocker that I didn’t even think about it. I found a picture of one similar online. (above)
 This entire army footlocker was put together with rivets. The handles are long gone, but the cleats on the inside that held the handles on, and provided a resting place for the insert needed to come off. I used my cordless ryobi reciprocating saw to quickly and easily cut through the rivets.
 I will reuse the cleats, so I set them aside for now, but remove all the unwanted rivets.
 Remember all of the free flooring I got in the Spring? I used a bunch of it on my Ikea Hack (hutch). I decided to use some more of those boards to update this army footlocker into a trunk.
 This trunk makeover from Better with Age was my inspiration. This trunk was a regular trunk that got a makeover with new paint. So, my goal was to make the old army footlocker “look” like a trunk.
 I cut my flooring boards to size, then sanded them and stained them with these Minwax Wood Finishing Cloths in Walnut. You can see the before and after in this photo.
 After staining, I used some wipe-on poly for protection.
 I bought this storage chest handle at Home Depot. After reinstalling the cleats on the inside with Gorilla Wood Glue and my nail gun, these screws had a nice piece of wood to be secured to. The footlocker is made from plywood, so the screws were too long to put in the bottom. I plan to buy some shorter screws for the bottom portion of the handle (eventually)
 I wanted an off white, so I chose Behr Polished Pearl and mixed it up with some plaster of paris for my own version of DIY Chalk Paint.
 I gave it all about 3 light coats of the chalk paint, including all the hardware and handles.
 I applied some Country Chic wax with a foam applicator using my AutoRight buffer, then I buffed the wax using the blue bonnet on the buffer.
 I used Gorilla wood glue, clamps and carpet tacks (for looks) to attach the flooring to the footlocker.
 It’s beginning to look a little more like a trunk, don’t you think?
 I rested the new trunk on some 4×4’s so I could test out some leg/wheel options. I tried some small tapered legs, and some legs I got the same day I picked up the free flooring. I then tested some wheels, but they were too large (top right). Now I have a story, and it’s not one you’re likely to believe, but I promise it happened just this way. I hoisted the trunk up onto a workbench to make a few adjustments to the wood trim. As I was doing that, a neighbor walked over carrying those four wheels you see in the bottom right corner. While I had been testing the legs and wheels I was in the back, out of sight, so I’m pretty sure he had no idea what I was working on. But nonetheless there he was standing there with four perfectly size locking wheels! Problem solved! He had bought them for a cabinet, but they were too large, and raised his cabinet too far off the floor.
 I had to add some 1x scraps in order to support the screws of the wheels. Drilling pilot holes is absolutely necessary during this step in order to keep the 1x scrap from splitting. I used glue and a screw to hold the scrap, then drilled the pilot holes through the bottom.
 The bottom view to show the locking wheels.
 The new trunk coffee table hung out with us over the Thanksgiving weekend so Jamie and Andy would have a place to put their drinks etc.
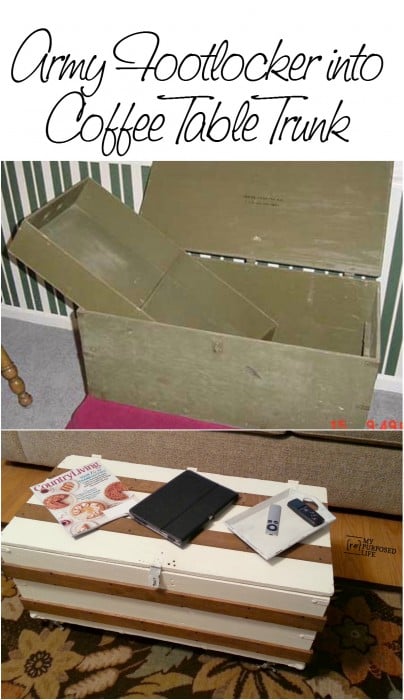
 It’s a very handy piece with lots of storage area to hold throws, pillows, remotes, magazines and more!
 I’ve done this before using a repurposed Ammo Box, by adding a lower shelf. I wish I had another box to transform!
gail
sharing here:

Oh cool, I love unique coffee tables!
I love how this turned out. Such a cool way to update a plywood trunk.
The trunk looks great of course, but I’d never heard of wipe on stain cloths. Hmmmm.
I’ve got three of these that belonged to my grand father from WWII. I always wanted to use them, but never could quite figure out what to do with them. This is a great idea, I’ll have to try.
love the mix of white and wood! it’s fabulous!
Love it, especially how you added the wood and carpet tacks! That is amazing that your neighbor just walked up and handed you those wheels which is just what you needed! I wish that would happen to me!!
love it! and what a great storage idea!
I like the way this turned out! I have a trunk with a rolled top so coffee table is outfir me. But if I came a ross a foot locker on the cheap this would make a fun project or gift! My grandsons would love something line this for their HERO COSTUMES – they have a ton!
Patricia
What a great makeover. Love all that extra storage!
I love the mix of white and natural wood. Can’t believe your neighbor came to your rescue with wheels at that exact moment! Stalker maybe? Just kidding.
Such a great idea! I love the new look.