Chest of Drawers Bookshelf
As an Amazon Associate, I earn from qualifying purchases.


Chest of Drawers
 Wow! do you remember that ugly chest of drawers I got from my friend Cathy? It was in very rough shape and had been mistreated terribly.
Sand Away Damage
 The very first thing I did was grab my Ryobi orbital sander and some 80 grit sandpaper to deal with the top of the chest of drawers. Can you believe the difference?
Add Shelves to Turn Chest of Drawers into a Bookshelf
 The drawers were in good shape, but the glides were plastic and all messed up—so I decided to remove them and replace them with shelves. The shelves needed notching. I’m not the best at notching, so I used a piece of scrap for the first cut then used that as a template to make all of the other notches with my jigsaw.
 As I was adding the shelves I realized that replacing each drawer with a shelf (4 shelves total) would make each of the shelves too shallow, not really allowing room for displaying/storing items. To make the changes, I had to remove the front facings of all of the drawers.
 Because of the construction of the chest, I had to trim off a little of each of the front facings.
Bookshelf
 It went from 4 drawers to 3 shelves. I removed the chunky 2×4 from across the bottom front, I’m not really sure why it was there.
 You can see that I added some small cleats to support the shelves. Because the chest of drawers is a little on the husky side, I used a 1×6 (ripped to size) for the bottom trim.
Paint and More
 I taped of the top of the chest, and moved it to the paint booth for the Finish Max treatment using ASCP Old White.
 Another view
 The chest of drawers looks nothing like the ugly beast I started with, eh?
 Staining the top was easy, using Minwax dark walnut. However I wanted to add some trim under the top to bring it all together. The top of the chest is probably pine, and I think the trim might be oak. It took quite a bit of work to get the trim to match the dark walnut (pine) top.
There are no pictures of the process . I haven’t figured out how to take pictures by myself while I’m staining. ![]() To get a good match, I ended up using some Ebony mixed with Dark Walnut on the trim to get it dark enough. I also ended up using a small amount of Ebony on the chest top. It’s really a trial and error kind of thing.
To get a good match, I ended up using some Ebony mixed with Dark Walnut on the trim to get it dark enough. I also ended up using a small amount of Ebony on the chest top. It’s really a trial and error kind of thing.
 I used some Minwax Polycrylic to protect the top and give it some shine.
 Loving the shine, and the dark top with the ASCP Old White.
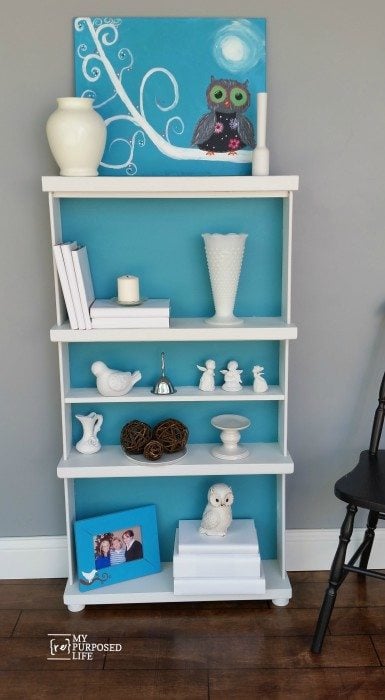
Old Chest of Drawers | New Bookshelf
 Although it looks like it’s on wheels, it is sitting on a furniture dolly. For something that should have been an easy fix, I sure spent a lot of time on this thing! I would do things differently the next time. Sometimes when a piece is in such rough shape, I just don’t give it the time and attention it deserves.
I would have removed that piece down the back, and used a new back, or even turned this one around. So, I don’t like how it looks empty, but honestly after it’s filled up, I don’t think that will be noticeable so much.
I think you’ll agree anything would have been an improvement.
And, I still have the four drawers nagging at me. I keep moving them out of my way in the garage. Maybe someday soon, I’ll get to them, or they may end up at the curb. hehehe
EDITED to ADD! I did NOT put them to the curb….. I made a Repurposed Drawers Bookcase
gail
Need more project ideas? See great makeovers here
I repurposed an 1930’s chest of drawers into a bookcase several years ago. Stained it all though. It is useful in my sewing room shelves are nice and deep and it holds a lot.
I love both of these.
Just started my subscription with you and so grateful I did. Your transformations are amazing. Thanks so much on the tutorials I am learning a lot.
Sue,
I so appreciate you letting me know you’re new to MRL. I love what I do, and YOU are why I do it. So I can share what I learn with my new friends. I’m always here if you have any questions.
gail
I’m wondering what I can do with my mothers old sewing machine cabinet. I would like to make a desk
Diane,
I have done several sewing machine cabinets. Simply GOOGLE My Repurposed Life Sewing Machine Cabinet, and it will show you those items. Or, you can use the search function on the sidebar. One last way to find something is the drop down “CATEGORIES” menu.
Thanks for stopping by!
gail
wow…what an amazing difference….well done
Gail, I love “watching” you repurpose and build things and this is another of your successes!
I love it and thanks for the wonderful idea!!