Chest of Drawers Repurposed into an Entertainment Center
As an Amazon Associate, I earn from qualifying purchases.

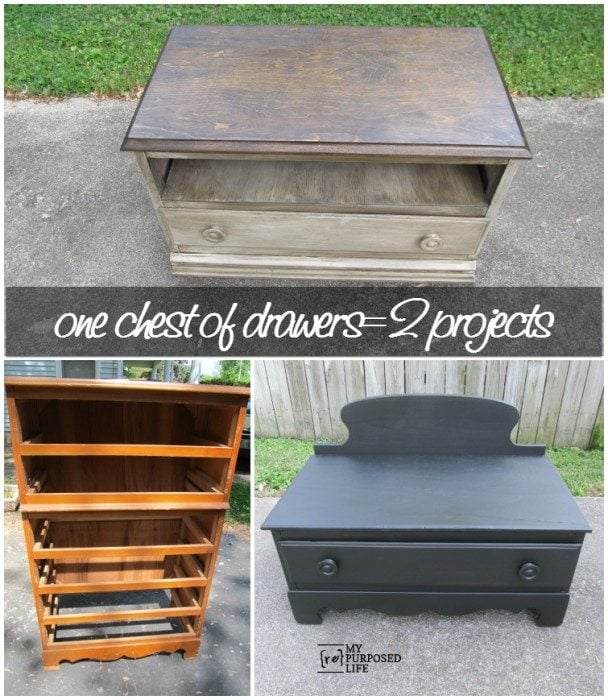
Get ready to find out how I cut a chest of drawers and made one of two projects. If you follow me on facebook, you’ve already been teased with the a photo of this chest of drawers.
Beware—it is a long post.

 Cathy and I curbed this chest of drawers a long, long time ago. I can’t even remember exactly where it came from. It only had two drawers with it.
 I wanted to make a bench or something from it, so I . . .
") . . . . cut it apart with my circular saw—freehand! I just followed the line and was very please with how well it looked.
. . . . cut it apart with my circular saw—freehand! I just followed the line and was very please with how well it looked.
") Suddenly it is so petite!
Suddenly it is so petite!
") Looking at the bottom, you can see that some support needs to be added.
Looking at the bottom, you can see that some support needs to be added.
") This is a section of the chest of drawers that I was not using. I used all of the parts of this unwanted piece except the two side sections. Note that it has three long “cleats” with tenons that fit into the mortises (grooves). There are four short cleats (two on each side) that were also used.
This is a section of the chest of drawers that I was not using. I used all of the parts of this unwanted piece except the two side sections. Note that it has three long “cleats” with tenons that fit into the mortises (grooves). There are four short cleats (two on each side) that were also used.
") I added one long cleat across the back and a short one on each side. I added the extra pieces for strength, because of the thin luan plywood.
I added one long cleat across the back and a short one on each side. I added the extra pieces for strength, because of the thin luan plywood.
") This is the inside view looking at the original top of the chest. It is held on with pocket hole (screws). I removed the screws and the top of the chest.
This is the inside view looking at the original top of the chest. It is held on with pocket hole (screws). I removed the screws and the top of the chest.
") The pocket holes toward the back were not accessible, so I drilled some new ones so that I would be able to re-attach the top when the time came.
The pocket holes toward the back were not accessible, so I drilled some new ones so that I would be able to re-attach the top when the time came.
") Now the top is off, it’s time to give it a facelift.
Now the top is off, it’s time to give it a facelift.
") Tools of the trade. Sander, protective eyewear, mask and the much needed gatorade. It’s been really warm off and on here, and I must drink it. Long time friends will remember that I landed in the hospital twice from lack of electrolytes.
Tools of the trade. Sander, protective eyewear, mask and the much needed gatorade. It’s been really warm off and on here, and I must drink it. Long time friends will remember that I landed in the hospital twice from lack of electrolytes.
") I sanded the finish off and chose Jacobean by Minwax for my stain.
I sanded the finish off and chose Jacobean by Minwax for my stain.
While the stain dries, I work on some trim for the bottom of my new piece…
") I measured the width of the front, then I cut my first piece.
I measured the width of the front, then I cut my first piece.
") If you already know how to trim out, skip over this because I’m going to give my explanation of how I keep track of the right miter cut. I needed an outside corner on each side of the front trim pieces. As I lay it on my saw, I say to myself “don’t see wood”. What that means is that I need the long cut in the front. See the piece in the foreground? That would be for an inside corner and I would say to myself “see wood”. (as in see the wood that was just cut).
If you already know how to trim out, skip over this because I’m going to give my explanation of how I keep track of the right miter cut. I needed an outside corner on each side of the front trim pieces. As I lay it on my saw, I say to myself “don’t see wood”. What that means is that I need the long cut in the front. See the piece in the foreground? That would be for an inside corner and I would say to myself “see wood”. (as in see the wood that was just cut).
") I generally cut my trim pieces a little long. You can always trim some off, but you can’t put it back on. (That’s why my hairdresser always tells me when I ask her to take some extra length off my hair) Look closely and you can see that I drew a line right up against the edge of the side.
I generally cut my trim pieces a little long. You can always trim some off, but you can’t put it back on. (That’s why my hairdresser always tells me when I ask her to take some extra length off my hair) Look closely and you can see that I drew a line right up against the edge of the side.
") As I start to put the trim on the front, I realize that I need a little more support to help steady the trim piece.
As I start to put the trim on the front, I realize that I need a little more support to help steady the trim piece.
") This is where I used one of those long cleats with the tenons.
This is where I used one of those long cleats with the tenons.
") Now the trim piece has something for me to nail/glue it to.
Now the trim piece has something for me to nail/glue it to.
") Of course I used my Gorilla Wood Glue.
Of course I used my Gorilla Wood Glue.
") I also used some finishing nails from my nail gun. You can see that there is a small “overbite” on this left side.
I also used some finishing nails from my nail gun. You can see that there is a small “overbite” on this left side.
") Nothing that a little sandpaper can’t take care of.
Nothing that a little sandpaper can’t take care of.
") On this side there is a small gap, nothing a little caulk won’t hide. I’m not perfect with trim, nor is this chest of drawers in perfect shape. I worked through it.
On this side there is a small gap, nothing a little caulk won’t hide. I’m not perfect with trim, nor is this chest of drawers in perfect shape. I worked through it.
") That piece up there earlier in the post-#19-I used another long cleat to support the new shelf I made out of the back of said piece in #19.
That piece up there earlier in the post-#19-I used another long cleat to support the new shelf I made out of the back of said piece in #19.
") New cleat in the back . . . .
New cleat in the back . . . .
") . . . for the shelf to rest on.
. . . for the shelf to rest on.
") It’s shaping up, eh?
It’s shaping up, eh?
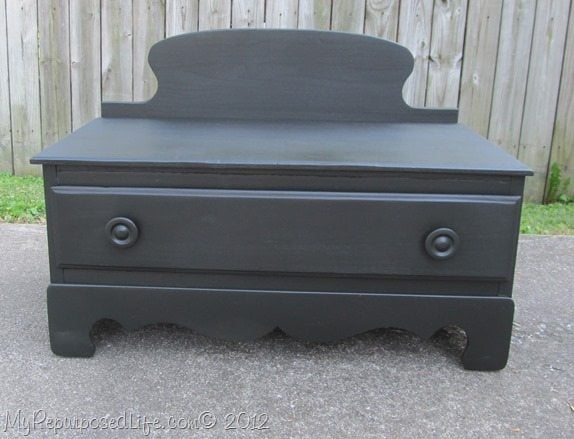
 I tested the top to see how it looked. (after staining the top, I applied two coats of wipe-on poly)
") Off it went to the paint booth to get a coat of paint with my HomeRight Finish Max Fine Finish Sprayer
Off it went to the paint booth to get a coat of paint with my HomeRight Finish Max Fine Finish Sprayer
.
") Time for some glazing.
Time for some glazing.
") Then it was time for the bottom to get glazed. Notice there aren’t any pictures of the glazing process? It is impossible to stop and take pictures when your hands/gloves are covered with stain. I used the Jacobean stain to glaze the white.
Then it was time for the bottom to get glazed. Notice there aren’t any pictures of the glazing process? It is impossible to stop and take pictures when your hands/gloves are covered with stain. I used the Jacobean stain to glaze the white.
") I re-attached the top with the original pocket holes and the 3 new ones I made toward the back.
I re-attached the top with the original pocket holes and the 3 new ones I made toward the back.
") Because the top was on, I was unable to get a nail gun inside to attach the shelf. I used Gorilla Wood Glue on all of the cleats. Additionally I used my nail gun to shoot a few nails in the front rail.
Because the top was on, I was unable to get a nail gun inside to attach the shelf. I used Gorilla Wood Glue on all of the cleats. Additionally I used my nail gun to shoot a few nails in the front rail.

 I love the stained top and glazed bottom look.
 I’m calling it an entertainment center. It’s a great height for a flat screen tv, with space for a cable box or dvd player. What purpose do you think it could serve?
I used the bottom of the chest of drawers for another project, Chest of Drawers Repurposed into a Bench.

gail
see more ideas below:
[categorythumbnaillist 176]
[categorythumbnaillist 116]
Awesome….two for one! Great job.
This is amazing!! I have a sewing table I just bought for $40 that I want to refinish. I want it to be an “eyecatcher”, if I send you a photo, could you make some suggestions? donnaunderscorelynnunderscorewoodsathotmaildotcom
This is just adorable and so is your blog…so glad I found it. I’m your newest follower!
Hi Gail,
Very cool transformation!
Dee
That’s a great TV stand! I love the stained top. I could really use something like that.
I think it would be good for shoe storage too. The ones you wear the most in the space on top, the others in the drawer. It looks like just the right height to sit on while putting on shoes, too.