
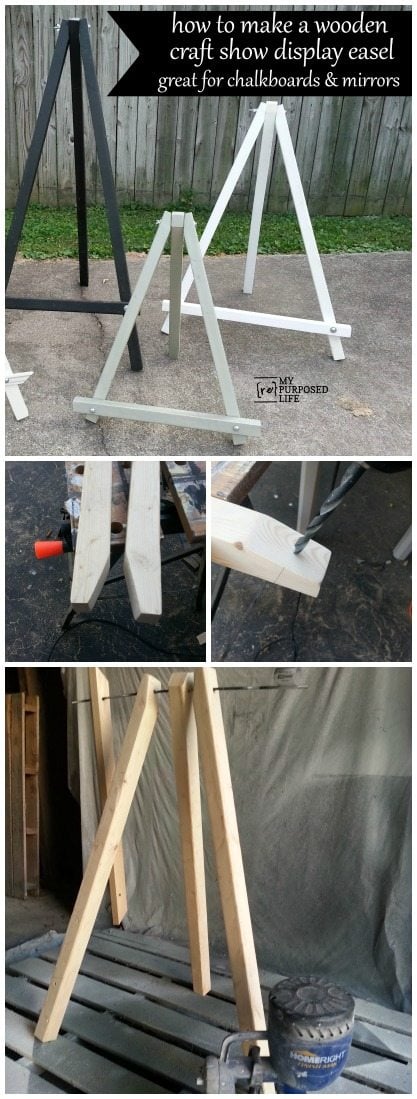
Craft Show Display Easel
As an Amazon Associate, I earn from qualifying purchases.

A couple of years ago, I made a few large wooden display easels out of 2×2’s. I made them to display chalkboards and mirrors, with no plan to sell them. People asked to buy them, but I priced them very high so that I wouldn’t accidentally sell them and have to make more.
I recently decided it was time to perfect my wooden display easel plan, and do a tutorial so you too can make one if you’d like.
This small display easel can be made from one 2×2 and a scrap piece of trim. If you want to make a larger easel, you’ll need to buy two 2×2’s.
I start by cutting 2 pieces at 32” and one at 31” out of the 96” length of 2×2.
 I have made a pattern out of a scrap piece of 2×2 to draw my angle. I also wrote on it what size bit I need to use. (yeah, I’m a little forgetful)
click this link 2×2 cut template for easel to download a template.
 I cut the angle with my jigsaw.
 I have this great little clamping work bench that works perfectly for this project.
 Doesn’t it look great after I sanded it?
 This is how I get the right angle for drilling. I lay a paint stick on the straight edge of the middle piece and draw a line.
 I used the 9/32 bit to drill the holes trying to follow the angle of the pencil line.
 If you want your piece to lay flush, you can draw a line and cut the small corner off of the back leg.
 I only bought one 2×2 for this project, so I used a piece of molding for the cross piece. I cut the end on a 45° angle.

The bolt for the top is 1/4” by 5” long. I used a washer on each side and a wing nut. The bolts for the cross piece (molding) are 3 1/2”. If you use a 2×2 for the cross piece you’ll want your bolts to be 1/4” by 4”.
It’s also totally up to you where you want the cross piece. High? Low? I suppose it depends on what you want to display.
 Here’s the best tip!! I bought a small rod (1/4”) to thread the pieces on for painting. It works for small and large easels. You could paint it with the bolts in place, but then they would get yucky. So, after threading the pieces onto the rod, it gets 2 coats of paint with my HomeRight Finish Max .
If you have a Finish Max or A Finish Max Pro, be sure to check out my post Safety Tips for using a Finish Max on the Homeright Blog. If you haven’t visited the Homeright Blog, you should because it’s filled with inspiration from some of THE best bloggers (Homeright Brand Ambassadors).
 While I was at it, I made a few more. The tall black one in the middle is from my original batch, but I reconfigured it using bolts on the cross piece instead of screws. Being able to take it apart will make it easier for me to transport to my craft show in Glendale later this month.
I actually made some small chalkboard easels in the Spring of 2013, but didn’t give full details on how I made them.
There are so many uses for these display easels at outdoor shows. Have a large piece that generally hangs on the wall? Use one of these diy easels to display it. Not to mention they work great for mirrors and or chalkboards.
gail
I’m so happy that you found this! You may want to check out these smaller ones I made that can be tabletop easels. https://www.myrepurposedlife.com/how-to-make-small-display-easels/
gail
I’m so happy that you found this! You may want to check out these smaller ones I made that can be tabletop easels. https://www.myrepurposedlife.com/how-to-make-small-display-easels/
gail
I’m so happy that you found this! You may want to check out these smaller ones I made that can be tabletop easels. https://www.myrepurposedlife.com/how-to-make-small-display-easels/
gail
I’m so happy that you found this! You may want to check out these smaller ones I made that can be tabletop easels. https://www.myrepurposedlife.com/how-to-make-small-display-easels/
gail
I’m so happy that you found this! You may want to check out these smaller ones I made that can be tabletop easels. https://www.myrepurposedlife.com/how-to-make-small-display-easels/
gail
I’m so happy that you found this! You may want to check out these smaller ones I made that can be tabletop easels. https://www.myrepurposedlife.com/how-to-make-small-display-easels/
gail
I’m so happy that you found this! You may want to check out these smaller ones I made that can be tabletop easels. https://www.myrepurposedlife.com/how-to-make-small-display-easels/
gail
I’m so happy that you found this! You may want to check out these smaller ones I made that can be tabletop easels. https://www.myrepurposedlife.com/how-to-make-small-display-easels/
gail
I’m so happy that you found this! You may want to check out these smaller ones I made that can be tabletop easels. https://www.myrepurposedlife.com/how-to-make-small-display-easels/
gail
I’m so happy that you found this! You may want to check out these smaller ones I made that can be tabletop easels. https://www.myrepurposedlife.com/how-to-make-small-display-easels/
gail
I’m so happy that you found this! You may want to check out these smaller ones I made that can be tabletop easels. https://www.myrepurposedlife.com/how-to-make-small-display-easels/
gail
I’m so happy that you found this! You may want to check out these smaller ones I made that can be tabletop easels. https://www.myrepurposedlife.com/how-to-make-small-display-easels/
gail
I’m so happy that you found this! You may want to check out these smaller ones I made that can be tabletop easels. https://www.myrepurposedlife.com/how-to-make-small-display-easels/
gail
I’m so happy that you found this! You may want to check out these smaller ones I made that can be tabletop easels. https://www.myrepurposedlife.com/how-to-make-small-display-easels/
gail
I’m so happy that you found this! You may want to check out these smaller ones I made that can be tabletop easels. https://www.myrepurposedlife.com/how-to-make-small-display-easels/
gail
I’m so happy that you found this! You may want to check out these smaller ones I made that can be tabletop easels. https://www.myrepurposedlife.com/how-to-make-small-display-easels/
gail
I’m so happy that you found this! You may want to check out these smaller ones I made that can be tabletop easels. https://www.myrepurposedlife.com/how-to-make-small-display-easels/
gail