DIY Laundry Cart
As an Amazon Associate, I earn from qualifying purchases.
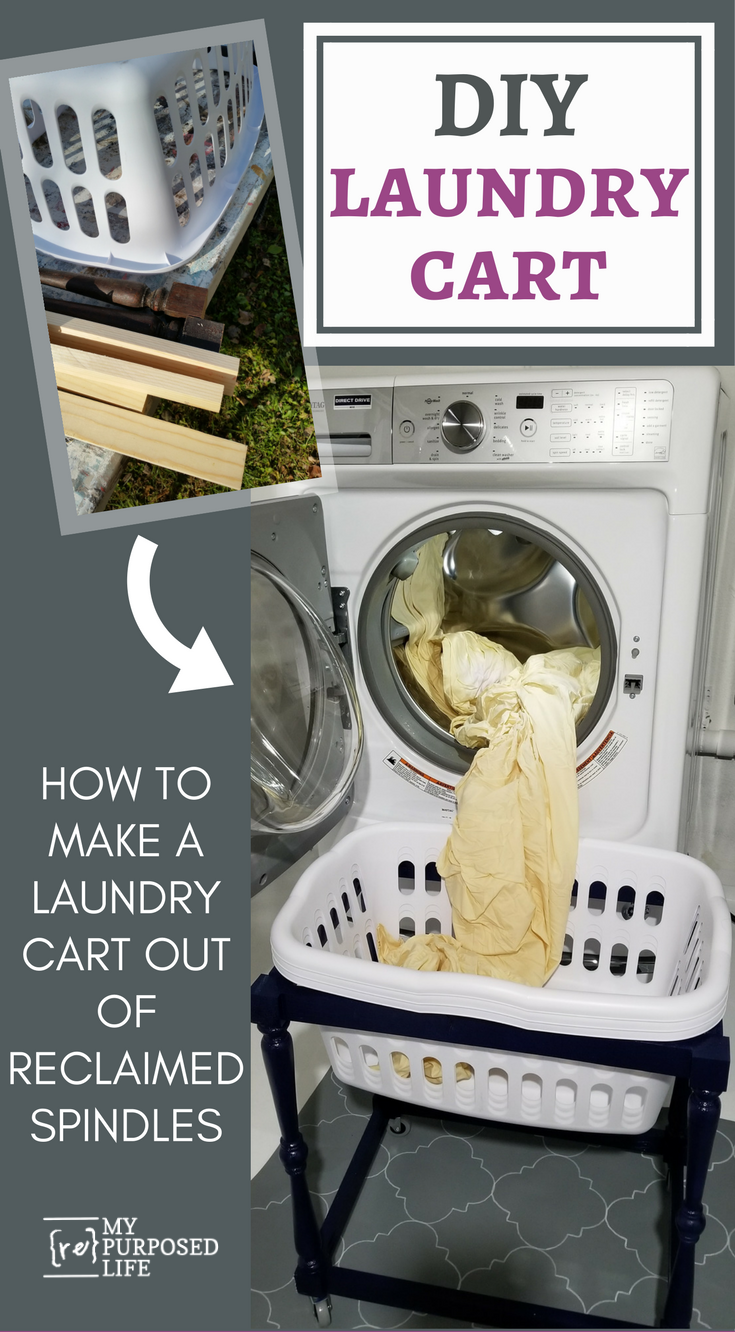
I made a DIY laundry cart. Why? Ever since I got my new washer and dryer I have struggled with dropping clothes on the floor. Soon I’ll share a laundry room stenciled rug that helps when I do drop items, but now that I have a laundry cart it rarely happens anymore.
After getting the new appliances, I polled my friends and asked “do you drop laundry on the floor when you transfer it from the washer to the dryer”? The answer was always YES! Good to know I’m not the only one. I thought about the design for the laundry cart for weeks. I did make one small mistake. I’ll explain as I go so you can avoid making the same mistake.
Rip boards on table saw

I ripped some scrap 1x’s down to size to match the size of my spindles. Your project may differ.

See the two tall bedposts? To the right of them are some porch spindles I chose for this laundry cart project. This view is in the shed after it got cleaned up.
Measure the laundry basket you plan to use

This was the design stage. It all had to be based on the size of the laundry baskets I would be using. I wanted the basket to rest on the inside diameter of the cart.

Pin It!
Drill pocket holes for assembly

The simple construction of the cart stars with my favorite Kreg Jig. I marked the holes on each end of the board so that I don’t mess up and drill them on the wrong side of the ripped 1×4. Voice of experience talking. ![]()

Whenever I make an apron or a skirt for a project with legs, I use a scrap piece of wood as a spacer so that the apron is positioned in the middle of the leg (spindle) instead of the very front or back. With the scrap wood in place I secure the two pieces with pocket hole screws.
You should have two matching sections

I made a set of two identical leg sections using four boards and four spindles cut to size.
Affix Side Rails

After securing the two sections, I cut more ripped 1×4’s to size for the top and bottom sides. I secured these the same way as I did the others. I couldn’t wait to slip the laundry basket in place to see how it fits! Voila! Perfect!
Mark and install wheels

I marked the holes for the wheels/casters.

You can’t have a cart without wheels, right? I picked these up a few months ago on a trip to IKEA just to keep on hand. Smart move!

It’s best to pre-drill holes in such a tight space to keep the wood from splitting.

Slowly secure screws to hold wheels in place. HINT: Do this AFTER you paint. I was so anxious to see this project come together I sort of got ahead of myself.
Test fit of diy laundry cart

I immediately took it to the basement to try out the design. Oops! Here is where I miscalculated and made a slight design mistake. I wanted the door to swing freely with the cart in place but because the laundry basket has such a large lip the door will not swing. That’s okay, I love it and I’ll go with it.
Paint Laundry Cart

I grabbed a bright blue spray paint and did a couple of light coats.

I decided to go with a darker navy blue. You can see I have the wheels taped off to prevent overspray.

I use it to load the washer, take clothes out of the washer and to remove AND fold clothes from the dryer.

After folding my clothes in the laundry basket I just grab it and carry it upstairs. That leaves me two more baskets loaded in the laundry cart for the next load. I LOVE it. I no longer dread doing laundry. Folding and putting away clothes is my very least favorite thing to do. But now that I do it as I pull it out of the dryer, I don’t have baskets of laundry all over the house waiting to be folded.
Do you think a DIY laundry cart like this would keep you from dropping laundry on the floor?
gail
Get the details on the EASY stenciled rug here
I like it but would probably have made the bottom with a shelf across.
I understand what you’re saying Cathy, but I didn’t have a need for a bottom shelf on my laundry cart. But you’re right–it would be very simple to add one.
gail
Genius solution!
Thanks Bambi!
It really makes my life easier in such a small way. It’s those little things that make me smile.
gail
Wish I could do this but I do not have the pedestals under my washer. I refused to pay the $400 each for them. God Lord half the price of the washer. My laundry room is really small and would not accommodate a basket. But love the idea. Your projects are always brilliant.
Certainly nicer than the one at the laundry mats! When I moved into my house, the first thing I did was add a rod across my laundry closet (it’s just wide enough for the machines). I hang all my clothes straight from the dryer and drip dry articles from the rod.
very clever. glad it has helped you out.i put a small laundry basket on the floor to help me because i am always dropping something. top loading washer/front loading dryer.
Nova,
Duh! That’s a great idea-placing the laundry basket on the floor. 🙂 I never dropped clothes very much with my top loader. That’s a great tip!
gail
Very clever, Gail. I just love how the DIY mindset can solve so many of life’s little problems.
Thanks so much Sandy, After a couple of months of dropping clothes, I just couldn’t stand it anymore.
gail
That’s brilliant. If I drop something I us the 5 second rule. If it’s on the garage floor longer I might rewash but the garage is is clean so. I do love the stands the washer and dryer sit on.
That’s what I was doing before the laundry cart Jennie, but that basement floor needed some TLC. Details on that coming soon. My friends had pedestals for their washer and dryer, so I don’t really know what they look like without them. I’ve seen a lot of tutorials online for making your own.
gail
What an awesome idea, Gail! I know you are so pleased to no longer have the problem of dropping laundry on the floor when you transfer it from your washer to your dryer. Stacking three baskets in your caddy is also so smart!
Paula,
I’m so happy I picked up 3 baskets. If I buy any more than three I tend to abuse them! hahaha That’s how I got in the bad habit of having baskets of laundry all over the house. lol
gail
Now thats doing laundry with style! Love it! Gail you think of everything! (((HUG)))
Thanks so much! I really pondered and searched online for the perfect purchase, but couldn’t find anything to suit my needs, so I made my own laundry cart!
gail