• Skip to primary navigation
  • Skip to main content
  • Skip to primary sidebar
  • Start Here
  • Shop Favorites
  • About
    • Welcome To My Repurposed Life Home of Repurposed Furniture
    • More About Gail
    • Disclosure
    • Privacy Information
  • Gallery
    • Repurposed Furniture
  • Repurposed Items
    • Building Supplies
    • Miscellaneous Household Items
    • Picture Frame/Chalk Board
  • DIY
    • Home Reno
    • outdoor living
    • Painting
    • Shop Talk
    • Tips for Around the House
    • Build It
      • Furniture
      • Home Decor
      • Storage
    • Crafts
      • Dollar Store
      • Easy
      • Holidays Seasonal
  • Furniture
    • Chair
    • Desk
    • Dresser/Chest
    • Headboard | Bed Parts | Cribs
    • Kids Furniture
    • Table
    • Kids Furniture
My Repurposed Life® Rescue Re-imagine Repeat
menu icon
go to homepage
subscribe
search icon
Homepage link
  • About
  • Start Here
  • Project Index
  • Furniture
  • Subscribe
    • Email
    • Facebook
    • Instagram
    • Pinterest
    • RSS
    • Twitter
  • ×

    Home » DIY » Build It » How to build: DIY Barn Doors

    How to build: DIY Barn Doors

    Published by Gail | Published May 30, 2012 | Updated July 12, 2021
    As an Amazon Associate I earn from qualifying purchases.

    Pin
    Share
    Tweet
    How to DIY barn doors for your home. Don't be intimidated, it's much easier than you think it is. Building two narrow doors to resemble one larger door was my goal. #MyRepurposedLife #diy #barndoor via @repurposedlife


    I have been wanting some diy barn doors in my kitchen for a long, long time. When I searched online for hardware, I found that it is way out of my price range. Then I saw The Accent Piece used hardware from Tractor Supply. I decided even though it was very expensive, it was worth a splurge. This post will explain how I built my doors. If you want to use an existing door as a barn door, read this.

    The design process of building interior barn doors

    design process of diy interior barn doors

    When I decided to build my doors, I bought the hardware (more on that in another post). This is the bracket. I wasn’t sure if using 1x’s would make a thick enough door for the brackets. I laid out some boards to try to get a feel for what I wanted.

    how to design interior barn doors

    Because my doors were going to be narrow, I thought I would prefer two doors that resembled ONE door when closed. I was having a difficult time trying to find a place to work on them. This is in the bed of a pickup truck.

    diy barn doors cross brace

    Fast forward to a few day's later…
    I decided to work on a drop cloth in the carport. During the few days off, I did some ciphering and concluded that I could make them slightly wider than originally planned, therefore being less narrow. I played around with different configurations.

    What lumber should I use for my interior barn doors?

    narrow interior barn doors you can make

    PIN IT!

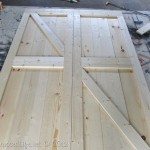
    This is what I decided on. The door consists of (from left to right) 1x10, 1x4, 1x6, 1x10. The frame consists of 1x4 on each side, with 1x6 pieces going horizontally on the top, bottom and middle. I went with this configuration because I wanted them to appear “pieced” together, and I didn’t want to rip any of the boards. I used the wider boards on the left and the right to be more supportive of the frame.

    how to make your own barn doors

    More dry fit before I start attaching all the pieces.

    Assemble your barn doors

    how to assemble your diy barn doors

    I used my Gorilla Wood Glue to secure all the pieces. It was crucial to clamp the boards  in several spots all the way down the door to make sure they were pulled together.

    using a nail gun instead of a clamp

    After I applied the glue, I used my nail gun to hold the frame pieces temporarily.

    diy faux barn doors

    Everything glued and nailed. (note the safety glasses by the nail gun. I always wear them when I’m sawing and nailing)

    It's all in the details

    make your own interior barn doors

    DIY Barn Doors, It's all in the details!!

    The cross pieces are 1x4’s. I angled the top board to fit across the top of the frame. To get the angle alongside the inside frame I laid a board on top of the frame and drew a line on the 1x4. I used my jigsaw to cut this angle. I did the same for the board on the right hand side.

    use wood screws when making your own barn doors

    Then I turned the board over, drilled pilot holes and inserted screws for a permanent hold. The wood glue and the nail gun made it easy  to do this.

    Sand and paint DIY barn doors

    sand and paint your interior barn doors

    After sanding, I painted the doors, with the paint that matches the walls in the kitchen. It’s Sweetened White (almost white), in a satin finish. I didn’t like the finish, so I used Mythic Paint (Bright White) in a Semi-gloss.

    Kitchen Doorway

    This is where the diy barn doors are going to be installed. It’s a wide doorway from the kitchen to another room that is hard to describe. It’s the last room in the house that needs a makeover, so you won’t be seeing any pictures right now. That is a sheet hanging up, because I don’t heat/cool that room.

    Your material list will depend on your doorway
    Materials I used:

    • (4) 1x10x8 (11.41 ea)  45.65
    • (4) 1x6x8  (7.78 ea)   31.12
    • (7) 1x4x8 (4.77 ea)  33.39
    • Screws and nails (1 ¼”)
    • Gorilla Wood Glue
    • Sandpaper
    • Paint

    Each door is 27 ¾ x 84”
    Tools:

    • self centering tape measure
    • Compound Miter Saw
    • Jigsaw
    • Drill
    • Drill Bits
    • Nail Gun
    • Quick Clamps

    The lumber for these diy barn doors cost about 115.00. yikes! I had some, and bought some, I didn’t know how much it totaled until now. I had the screws, nails, glue, and paint on hand.

    See how I installed the doors in the post Tractor Supply Barn Door Hardware (how to)
    gail


    Pin
    Share
    Tweet

    Related Content:

    • Sliding Barn Door for the Bathroom
      Sliding Barn Door for the Bathroom
    • Installing Real Carriage Barn Door
      Installing Real Carriage Barn Door
    • Bench Made From a Door
      Bench Made From a Door
    • Kitchen Island Table Top and More
      Kitchen Island Table Top and More
    • Door Bench
      Door Bench
    • Wall to Wall Closet | French Doors using Bi-Fold Doors
      Wall to Wall Closet | French Doors using Bi-Fold Doors

    Reader Interactions

    Comments

      See comments Cancel reply

      Your email address will not be published. Required fields are marked *

      This site uses Akismet to reduce spam. Learn how your comment data is processed.

    1. Elizabeth Constance

      January 03, 2017 at 3:18 pm

      Your barn door plans are great! Can you better describe the hardware that you used from Tractor Supply?

      Reply
      • Gail Wilson

        January 04, 2017 at 8:05 pm

        Elizabeth,

        Please visit this post for all the details on the hardware. https://www.myrepurposedlife.com/tractor-supply-barn-door-hardware/

        gail

    2. Lydia

      November 26, 2016 at 3:57 pm

      I love the doors

      Reply
      • Gail Wilson

        November 27, 2016 at 4:03 pm

        Thank you Lydia! They are still providing me service and I'm still loving them.

        gail

    3. Jimmy Johnson

      January 23, 2016 at 3:52 am

      Very cool! I ended up using your plans to make my barn doors and they came out beautifully! I used a barn door hardware kit from http://www.OffTheHinges.net instead of tractor supply, because I liked the look better. Anyway, thank you for your advice!

      Reply
      • gail@myrepurposedlife.com

        January 24, 2016 at 10:21 am

        I'm so happy you found my plans helpful!

        gail

    4. Robyn

      September 27, 2015 at 8:38 pm

      These doors look great! I like the way that you varied the wood widths and put the diagonal piece across. You make it look easy to get everything to line up so well.

      Reply
    5. Patricia Truel

      June 06, 2015 at 11:27 am

      I love the white and silver!

      I just built two barn doors for my house. the hardware for mine were about $25 (including track and all)

      for the smaller door, i used free pallet wood and bought the trim pieces at home depot. the entire door cost about $46.

      for larger 4ft door for my dining room, was built using a 4'x8' sheet of shed siding (cut to size). then i trimmed it out with wood as well. The entire door was about $80.

      here's the link to how i made the smaller door.
      https://www.pinterest.com/pin/275915914647754276/

      I haven't posted a pic of the larger (shed siding) door yet. But i built in using the same concept.

      Reply
    6. Dan

      October 28, 2013 at 12:28 am

      Was searching for diy shed doors and I stopped when I found this page. What a great idea, so easy to get different widths. I went with 1x8s on the sides and three 1x4s in the middle and bam - 25" wide on the nose. They're perfect, they look great. Thanks for posting!

      Reply
      • gail@myrepurposedlife.net

        October 28, 2013 at 8:58 am

        Dan,

        So happy that you found My Repurposed Life! Thanks so much for leaving a comment to let me know you stopped by and were able to use my little tutorial to achieve the perfect doors!

        gail

    7. Anonymous

      January 28, 2013 at 5:42 pm

      how did the doors end up being only 27and 3/4 if you used two 1X10's, one 1X4 and one 1X6. thats 30 inches?

      Reply
      • Gail Wilson

        January 28, 2013 at 6:44 pm

        check out this site http://www.bluehorizonfarm.com/repair/lumbersizing.html
        You'll see that the actual width of a
        1x10 is 9.5
        1x6 is 5.5
        1x4 is 3.5
        Why? I have no idea..... that's a good question. 🙂
        gail

      • Anonymous

        January 29, 2013 at 2:03 am

        It's because lumber is cut when's it's green or still fresh and wet with moisture and it shrinks when it drys.It's not really 1 inch after that either more like 3/4 inch.

    8. Seattle Garden Design

      January 25, 2013 at 8:35 am

      I love your barn doors. My husband and I are doing home renovations and would like to put barn doors between our living room and front hall entrance. My question is, how did you decide how wide to make each door? Thank you.

      Reply
    9. Misty McFadden

      June 05, 2012 at 4:26 pm

      I absolutely LOVE this! Great project, I actually went to Tractor to price out hardware for my very own 🙂 My hubby thinks I'm nuts! I'd love for you to link up to my first ever linky party, Ta-Da Tuesday 🙂 check it out here !

      Reply
    10. Bliss

      June 05, 2012 at 2:16 am

      Awesome and pinned!

      ~Bliss~

      Reply
    11. Rose @ Confessions of a Curbshopaholic

      May 31, 2012 at 4:04 pm

      So THAT's the secret room....good to have a picture of it, I was having trouble visualizing the entry.
      You really worked hard on these doors, but they came out amazing and in comparison they really aren't as expensive as you think they were. If you had bought new doors off the shelf(not even barn doors) it would have cost you way more than this.
      Great job on the tutorial too!

      Reply
    12. Jessi

      May 31, 2012 at 6:06 pm

      Those doors are AMAZING! I love that barn door look and you totally captured it 🙂 I have a brand new link party going on right now and I'd be thrilled if you'd share this over there so everyone can see how you did it!

      http://practicallyfunctional.net/2012/05/the-fun-in-functional-link-party-1/

      Reply
    13. Kristin

      May 31, 2012 at 12:36 pm

      Love how these turned out! Beautiful =)

      Reply
    14. Mimi@blueroofcabin

      May 31, 2012 at 3:50 am

      So awesome! I love reading your thought process! So what's in that room I'm dying to know 😉

      Reply
    15. Stephanie

      May 31, 2012 at 3:24 am

      Oh you rocked this project. The tutorial makes it look easy! Lol. I know how hard you worked on these and I tell ya, they are worth every ounce of back breaking sweat and tears, they are awesome!

      Reply
    16. freddyandpetunia

      May 31, 2012 at 2:13 am

      Really nice job! They look great!
      Catherine

      Reply
    17. Sharon @ Elizabeth & Co.

      May 31, 2012 at 2:03 am

      Awesome Gail!

      Reply
    18. Erin Spain

      May 31, 2012 at 12:33 am

      Awesome, Gail! Can't wait to see them after you install them. They are going to look great!

      -Erin @ DIY On the Cheap

      Reply
    19. kelly@refresheddesigns.

      May 30, 2012 at 8:08 pm

      This is a dynamite project and thanks so much for the tutorial.

      Reply
    20. Michele {The Scrap Shoppe}

      May 30, 2012 at 7:22 pm

      These are fantastic, Gail!! I can't wait to see them hung in place. This would be a fun idea for my pantry when/if we ever give it a country kitchen makeover!

      Reply
    21. Suzanne@Meridian Road

      May 30, 2012 at 3:02 pm

      They look great!

      Reply
    22. Korrie Bastian

      May 30, 2012 at 1:59 pm

      WOW! Love it so far, and can't wait to see the rest!

      Reply
    23. Full Circle Creations

      May 30, 2012 at 1:45 pm

      It's looking good so far! Can't wait for the rest.

      Holly

      Reply
    24. Anne

      May 30, 2012 at 1:32 pm

      Nice job! What a great look!

      Reply
    25. Terri

      May 30, 2012 at 1:29 pm

      Wow...amazing! I cannot wait to see them hung! These are so fun, makes me wish I had someplace to put some!

      Reply
    26. Pam

      May 30, 2012 at 1:18 pm

      Holding my breath to see how this turns out....I know it will look great.

      Reply
    27. Proper Prim

      May 30, 2012 at 1:14 pm

      Thanks so much for sharing your tute... I am madly in love with those doors. I walk around my house lately trying to figure out where they could work... so far I am safe unless I want to remove 2 french doors. Not likely to happen anytime soon though...lol

      I especially love your awesome tip to use the nail gun to hold it all together. I wish I had a gun when I did the shutters it would have made things so much easier.

      You did an amazing job yet again Gail... such perfection. Love, love, love them.

      Hugs,
      Deb

      Reply
    28. Peggy

      May 30, 2012 at 1:08 pm

      Thank you Gail! I am so excited about these doors. They are truly stunning and exactly what I've wanted for years.... Can you keep us updated on how well the track holds up with wear? We are going to do this for the house in NY in a few years. Thanks!

      Have a wonderful week!!

      Reply
    29. Paige @ Little Nostalgia

      May 30, 2012 at 1:01 pm

      Gail, your timing is perfect. My husband and I are trying to figure out where we can put one of these in the new house!

      Reply
    30. Pine Tree Home

      May 30, 2012 at 12:30 pm

      These are beautifully done. I know building these can be such a pain. I built one out of a standard luan door and tons of trim for my bathroom. I'm still holding out for a handle that I want to use.

      Great job.

      Reply
    31. Jamie@OwlReally.com

      May 30, 2012 at 12:25 pm

      very nice!

      Reply
    32. Sue

      May 30, 2012 at 12:00 pm

      Thanks Gail for the great tutorial! Love it, it looks awesome!
      Sue

      Reply
    33. Cassie @ Primitive & Proper

      May 30, 2012 at 11:53 am

      gorgeous! i love that style! i can't wait to see them in action! 🙂

      Reply

    Primary Sidebar

    Hi, there! I’m Gail Wilson, the author and mastermind behind My Repurposed Life. I’m obsessed with finding potential in unexpected places and believe that with a little hard work and imagination, any old thing can be made useful again—myself included! I hope you’ll enjoy the journey and pick up a few tools along the way… literally!

    More about me →

    Join Our Mailing List

    ​

      Click the topics you're interested in below:

      Subscribing above means you agree to our Privacy Policy​

      Footer

      ↑ back to top

      SEEN ON

      Might I Suggest

      • Start Here
      • Furniture Makeovers

      Newsletter

      • Sign Up! for emails and updates

      About

      • Gail's Favorites on Amazon
      • About

      As an Amazon Associate I earn from qualifying purchases.

      Copyright © 2023 My Repurposed Life · Privacy Policy · Disclosure