How to Patch and Paint Ceiling
As an Amazon Associate, I earn from qualifying purchases.

I recently changed out my kitchen light fixture from a ceiling fixture to a hanging fixture. To do that, an electrician had to install a new box, leaving me with a hole in my ceiling.
I know my limits when it comes to home DIY—electricity is one of them. However, I was not about to hire someone to patch and paint ceiling.
 I picked up some supplies, and gathered a couple of old friends. HINT: if you are in need of some drywall mud, be sure to shop the builders section at Home Depot. It’s a lot cheaper there than it is in the paint dept. I use it a lot for my projects, so I buy a larger container to use for patching holes in headboards etc.
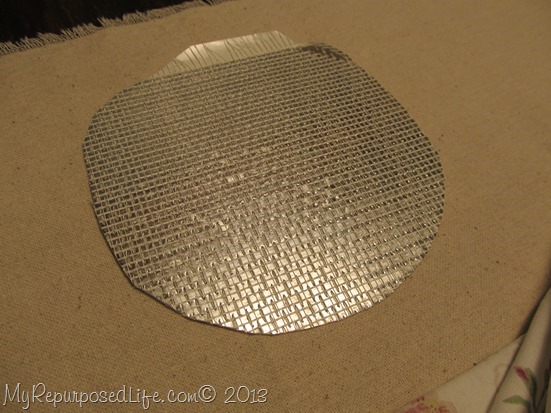 I am not an expert, but I decided to cut my patch in a circle so that it wouldn’t be so much larger than the hole in my ceiling.
 This patch was a self adhesive patch, but it wouldn’t adhere to the awful popcorn ceiling. I added a little mud all around the edges to give it some staying power.
 I pushed it onto the ceiling.
 I got some ooze, but I needed that to make sure it stuck to the ceiling.
 Did you wonder why I had an old paint brush in my supplies? I cut off the bristles to make is shorter. I used it to stipple the ceiling, by dipping the bristles right into the mud.
 Much cheaper and handier than buying a brush to do such a small patch spot.
 It’s hard to match the random pattern of this ceiling. There seems to be no pattern at all actually.
 After the ceiling dried, I broke out my new toy. It’s a PaintStick EX-Twist from my friends at HomeRight.
 A lid is included for your paint can that has a tube that goes down into the paint.
 I inserted the PaintStick onto the tube to draw up the paint into the handle.
 You can see I have the splatter shield attached to keep the drips to a minimum. I didn’t want any white paint on my newly painted kitchen floor.
 I was surprised that it took emptying most of the handle to get the paint to actually flow onto the ceiling. (to get the roller primed with paint)
 This is the PaintStick after I emptied the handle to paint the ceiling. I was AMAZED that there is absolutely NO paint left in the handle. To be honest, I wondered how I was going to hold the twisted handle with paint all over it…so imagine my surprise when the “o” rings worked so well to keep the paint where it was suppose to be.
I give this PaintStick EZ-Twist two thumbs up! If you have a lot of painting to do, I would highly recommend it. To just touch up the ceiling, I’m not sure it was worth the trouble.
 I still haven’t decided what I’m going to put on this wall in the kitchen. I put this sign up for a few days…
 Then I picked up this artwork at Lowes. I loved the grays and shades of orange/red. I have it hanging on the original nail since I was just test driving it. It was the only one they had, so I sort of bought it on a whim. I have since returned it, and the wall is naked again.
Someday soon, I hope to figure it all out.
I hope you learned a little something about patching and painting from this post.
gail
I need to get busy ,,thanks for sharing this….
I don’t see an after foto of the painted ceiling. Cool patch..I’ve never seen them before.
You’re making me feel guilty…I still have two holes in my ceiling waiting to be patched, and I think I’ve had my new light longer than you have!
I needed to know how to do this, thanks for the tips Gail!
I’ve done this type of patching before…and even have matched the stipple (somewhat) like you~ It is a pretty easy technique! That magic wand thingy(ez twist paint stick) is totally awesome and makes it that much simpler!
— Along with clean up!!! Thanks for posting. You have some of the neatest toys!!!
Patricia
Thank you for your post! Love your idea! #cbias
oh sure, NOW she posts how to do that. I had to figure it out all on my own! lol Only my hole was because I stepped in the wrong spot in my attic :o!
lol!
I love your artwork much better than the one you got at Lowes. Guess I just love ‘homemade’ better than anything from a store. Nice job on the ceiling…I’ve wondered how good those paint sticks would be.
Nicely done!