How to repair a garden hose
As an Amazon Associate, I earn from qualifying purchases.
Today, I have a simple project for you—how to repair a garden hose. How many times have you had a piece of hose that was ruined? Maybe by the lawnmower? I like to buy high quality hoses and throwing them out when they need repair is senseless. I have been repairing my hoses off and on over the years and I want to make sure that you know what’s available and how easy it is to repair a damaged garden hose.

Recently as I was cleaning out the wood shed I found several damaged water hoses. Maybe you would have thrown them out, but not ME! Repairing a garden hose is pretty easy.
*this post contains affiliate links for your convenience, read more here*
How To Repair A Garden Hose

Materials to repair a damaged garden hose
Work Gloves
Utility Knife
Screwdriver
Hose Repair Kit
A cup of warm water
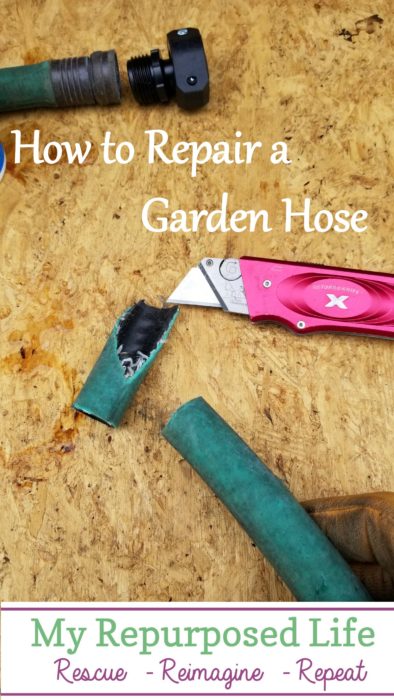
Step 1 Inspect the garden hose
Take a good look at your old garden hose to see if it is worth saving. Look closely to make sure there are no small holes. Determine if the good portion of the hose is long enough to be useful.

I was in the middle of repairing this damaged hose and realized that I should have cut the hose several more inches further down. I had to start over again.
Step 2 Cut Off Damaged Portion of Hose

Carefully cut the garden hose with your utility knife. If you have a sharp blade in your knife this should be a very easy task. A dull blade makes accidents happen when trying to hard to cut objects.
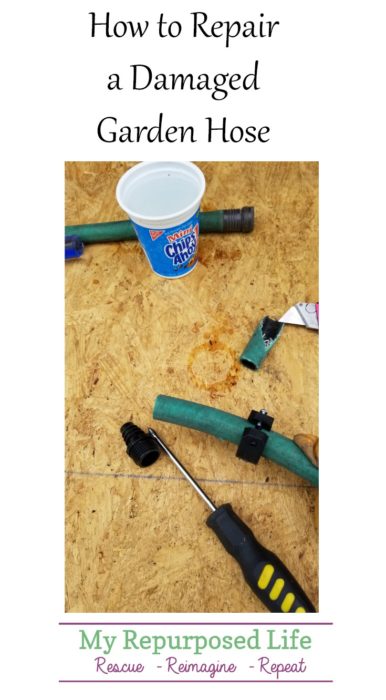
Step 3 Determine whether you need a male or female repair part

The good end of this hose has a working female end, so the repair I’ll be making will use the male end.
Step 4 Slide Sleeve onto Hose End

Loosen screws on sleeve and slide it over the end of the hose you are repairing.
Step 5 Soak Garden Hose in Warm Water

Soaking the end of the hose in warm water will make it easier to insert the hose fitting.
Step 6 Insert Proper Hose Fitting

The fit will be tight. The image on the left shows that the hose fitting is not fully inserted into the hose. Grasp the hose tightly and tap, tap, tap it onto a surface such as a piece of wood to get the fitting properly seated in place.
Step 7 Replace Sleeve over Hose Fitting

You may have to loosen the screws a little more to slide the sleeve over the hose fitting.
Step 8 Tighten Screws on Repair Sleeve

Using a phillips screwdriver hand tighten the screws equally, switching from one side to the other as you tighten. NOTE: depending on the size of your garden hose you may not need to tighten the sleeve completely.

There may be a small gap in the hose repair sleeve.
This kit also came with a hose repair kit where you could attach two pieces of a hose together. You know—if you accidently run over the middle of your hose with the lawn mower!!!

Gail, I just had to laugh…this week I cut up a whole pile of roadside garden hoses and created a Garden Hoses Wreath! Guess my repurposing trumps my fixing skills! I was just linking up to this week’s TOT and was laughing at the irony!
That is too funny Lora!!! I’ve seen those wreaths before. They are cute!
gail
i have never repaired a garden hose before. i always took it to my Dad. lol. i think with ur instructions and pictures,i could actually do it myself. 🤔✔
yay Nova! It really isn’t difficult. Seating the repair piece inside the hose takes a little muscle. 🙂
gail