• Skip to primary navigation
  • Skip to main content
  • Skip to primary sidebar
  • Start Here
  • Shop Favorites
  • About
    • Welcome To My Repurposed Life Home of Repurposed Furniture
    • More About Gail
    • Disclosure
    • Privacy Information
  • Gallery
    • Repurposed Furniture
  • Repurposed Items
    • Building Supplies
    • Miscellaneous Household Items
    • Picture Frame/Chalk Board
  • DIY
    • Home Reno
    • outdoor living
    • Painting
    • Shop Talk
    • Tips for Around the House
    • Build It
      • Furniture
      • Home Decor
      • Storage
    • Crafts
      • Dollar Store
      • Easy
      • Holidays Seasonal
  • Furniture
    • Chair
    • Desk
    • Dresser/Chest
    • Headboard | Bed Parts | Cribs
    • Kids Furniture
    • Table
    • Kids Furniture
My Repurposed Life® Rescue Re-imagine Repeat
menu icon
go to homepage
subscribe
search icon
Homepage link
  • About
  • Start Here
  • Project Index
  • Furniture
  • Subscribe
    • Email
    • Facebook
    • Instagram
    • Pinterest
    • RSS
    • Twitter
  • ×

    Home » Crafts » How To: Reverse Canvas

    How To: Reverse Canvas

    Published by Gail | Published June 5, 2018 | Updated April 9, 2019
    As an Amazon Associate I earn from qualifying purchases.

    Pin
    Share
    Tweet

    Have you heard about how to do a reverse canvas? I purchased a large pack of 8x10 canvases for a dollar each and got right to work!

    *this post contains affiliate links, read more here*

    how to do a reverse canvas project step by step video tutorial MyRepurposedLife.com

    Tools needed to make a reverse canvas project:

    Painter’s tool

    Needle nose pliers

    Exacto Knife (optional)

    Paint

    Cheap Chip Brush

    Scissors

    Sanding sponge

    Staple Gun


    Step 1 Pry staples out with painter’s tool

    remove staples

    You can pry the staples out as is, or you can use the exacto knife to cut around the canvas. I prefer to just tackle the staples. Pry the staples up with the painter’s tool.


    use painters tool to pry staples on canvas frame

    First, pry the staples.

    Step 2 Pull staples out of frame

    needle nose pliers remove staples

    Then, use needle nose pliers to remove all staples from the wooden canvas frame.


    Step 3 Remove canvas from wooden frame

    remove canvas from wooden frame


    Step 4 Trim Canvas Material

    trim canvas material

    Finally, trim the canvas. It’s recommended that you trim the canvas slightly. After attaching it to the back of the frame, trim the canvas close to the staples.


    Step 5 Inspect Wooden Frame

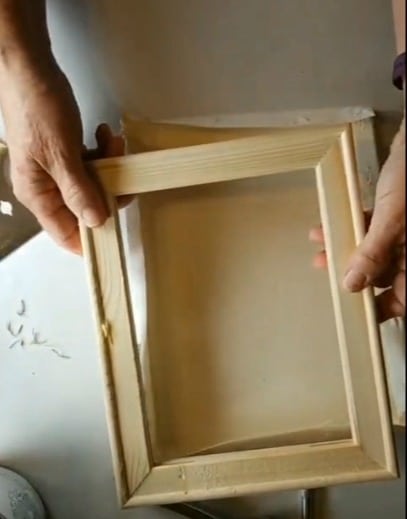
    Take a close look at the front of your new frame. It may need sanding.


    Step 6 Paint Frame

    paint reverse canvas frame

    You may want to paint or stain your new frame. There will be small joints in all the corners. Painting helps to disguise these joints and make them less noticeable. Allow paint/stain to dry.


    Step 7  Reattach Canvas


    stretch canvas and reattach with staple gun

    This canvas was trimmed close. You may find it easier to leave extra material as you reattach the canvas. Carefully trim material close to staples.


    Step 8 Display your new artwork using a reverse canvas

    summer is my happy place chalk couture transfer reverse canvas MyRepurposedLife.com

    I am addicted to reverse canvas projects. I love the look. This Summer is my Happy Place transfer is one of my favs.

    I would love for you to share this on Pinterest with your friends!

    I did a video for those who prefer watching how things are done.


    Have YOU done a reverse canvas project? Did you already know how to do it? Or is it on your to-do list?

    Have you heard about our new Club Couture subscription service?

    gail

    More from The Junky Chalker here

    Pin
    Share
    Tweet

    Related Content:

    • Shutter Mail Organizer
      Shutter Mail Organizer
    • Small Footstool Makeover For Camper
      Small Footstool Makeover For Camper
    • Mission Style Headboard Bench with Storage
      Mission Style Headboard Bench with Storage
    • Dollar Store Garland Christmas Tree
      Dollar Store Garland Christmas Tree
    • Baseball Bat Grow Chart
      Baseball Bat Grow Chart
    • Tips for using a jigsaw | DIY Cutting Board
      Tips for using a jigsaw | DIY Cutting Board

    Reader Interactions

    Comments

      See comments Cancel reply

      Your email address will not be published. Required fields are marked *

      This site uses Akismet to reduce spam. Learn how your comment data is processed.

    1. Cathy

      June 06, 2018 at 9:18 am

      Why not just buy unstretched canvas, cut it to size, decorate, and frame? Or did your canvas already have the saying on it when you purchased it? I’m confused .

      Reply
      • Gail Wilson

        June 06, 2018 at 7:35 pm

        Cathy,
        While you think that is a great idea, I think spending a dollar and getting the canvas material AND the frame is better. 🙂 I'm not a framer, nor am I an artist.

        I think this is a great idea for those who have done those wine and paint classes and wish their paintings were framed. To each his own I guess. lol

        gail

    Primary Sidebar

    Hi, there! I’m Gail Wilson, the author and mastermind behind My Repurposed Life. I’m obsessed with finding potential in unexpected places and believe that with a little hard work and imagination, any old thing can be made useful again—myself included! I hope you’ll enjoy the journey and pick up a few tools along the way… literally!

    More about me →

    Join Our Mailing List

    ​

      Click the topics you're interested in below:

      Subscribing above means you agree to our Privacy Policy​

      Footer

      ↑ back to top

      SEEN ON

      Might I Suggest

      • Start Here
      • Furniture Makeovers

      Newsletter

      • Sign Up! for emails and updates

      About

      • Gail's Favorites on Amazon
      • About

      As an Amazon Associate I earn from qualifying purchases.

      Copyright © 2023 My Repurposed Life · Privacy Policy · Disclosure