• Skip to primary navigation
  • Skip to main content
  • Skip to primary sidebar
  • Start Here
  • Shop Favorites
  • About
    • Welcome To My Repurposed Life Home of Repurposed Furniture
    • More About Gail
    • Disclosure
    • Privacy Information
  • Gallery
    • Repurposed Furniture
  • Repurposed Items
    • Building Supplies
    • Miscellaneous Household Items
    • Picture Frame/Chalk Board
  • DIY
    • Home Reno
    • outdoor living
    • Painting
    • Shop Talk
    • Tips for Around the House
    • Build It
      • Furniture
      • Home Decor
      • Storage
    • Crafts
      • Dollar Store
      • Easy
      • Holidays Seasonal
  • Furniture
    • Chair
    • Desk
    • Dresser/Chest
    • Headboard | Bed Parts | Cribs
    • Kids Furniture
    • Table
    • Kids Furniture
My Repurposed Life® Rescue Re-imagine Repeat
menu icon
go to homepage
subscribe
search icon
Homepage link
  • About
  • Start Here
  • Project Index
  • Furniture
  • Subscribe
    • Email
    • Facebook
    • Instagram
    • Pinterest
    • RSS
    • Twitter
  • ×

    Home » Repurposed Furniture » Cabinet Made from Reclaimed Shutters

    Cabinet Made from Reclaimed Shutters

    Published by Gail | Published October 26, 2022 | Updated December 5, 2022
    As an Amazon Associate I earn from qualifying purchases.

    Pin
    Share
    Tweet
    How to make a shutter cupboard out of repurposed shutters. Step by step directions will have you finished with this project in one weekend. Do It Yourself! #MyRepurposedLife #repurposed #upcycled #shutter #cupboard #diy #project via @repurposedlifeHow to make a shutter cupboard out of repurposed shutters. Step by step directions will have you finished with this project in one weekend. Do It Yourself! #MyRepurposedLife #repurposed #upcycled #shutter #cupboard #diy #project via @repurposedlife

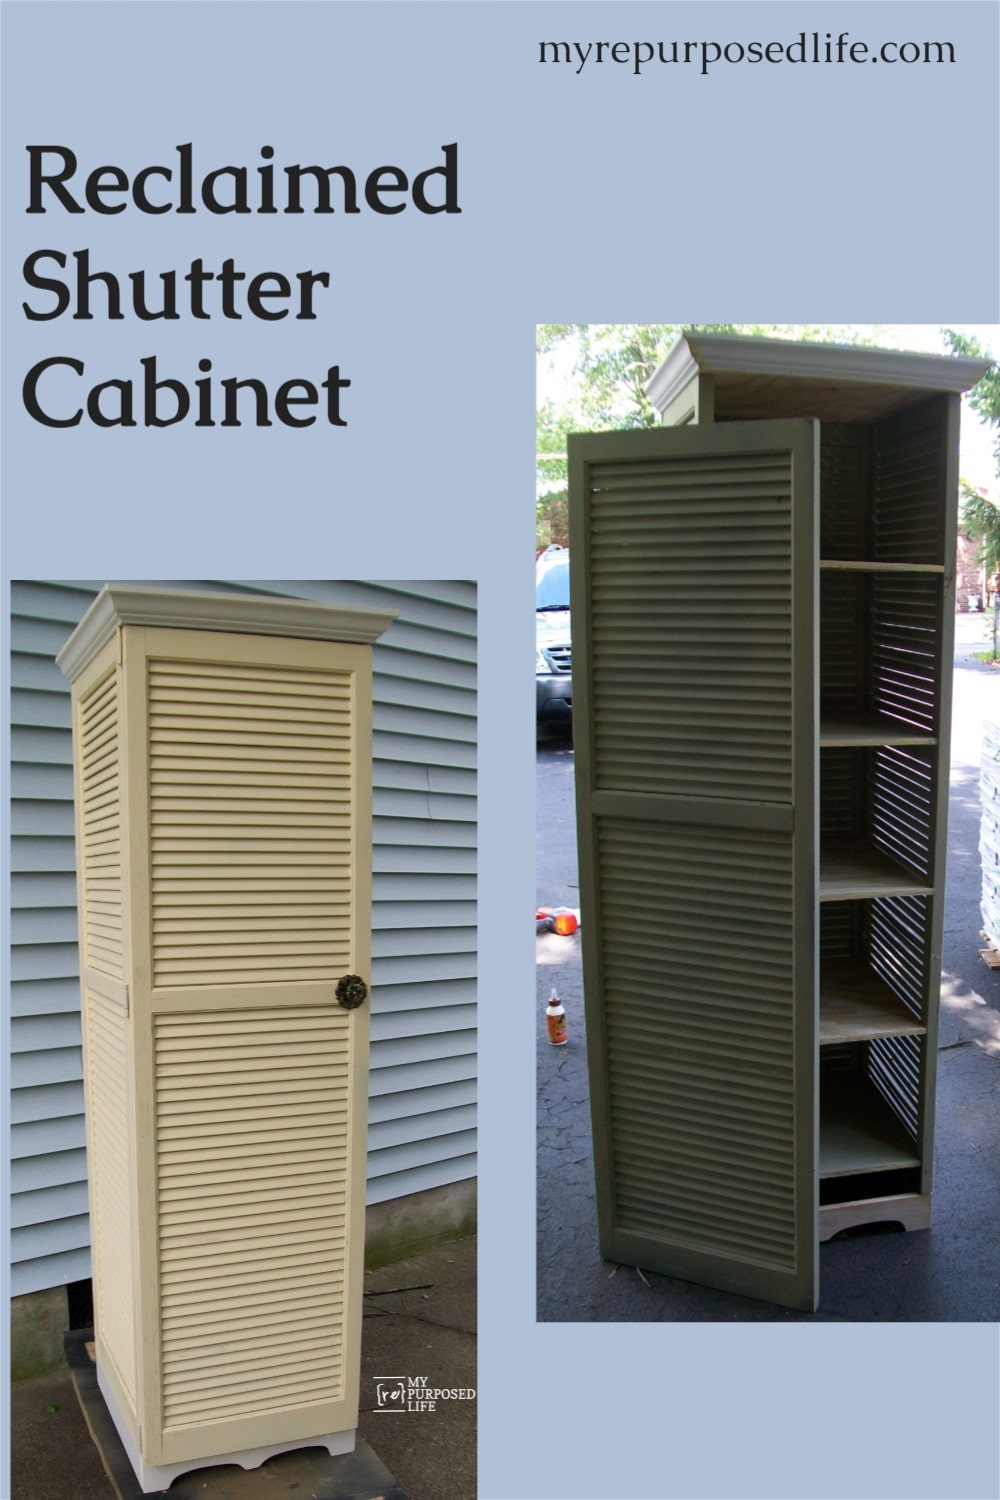
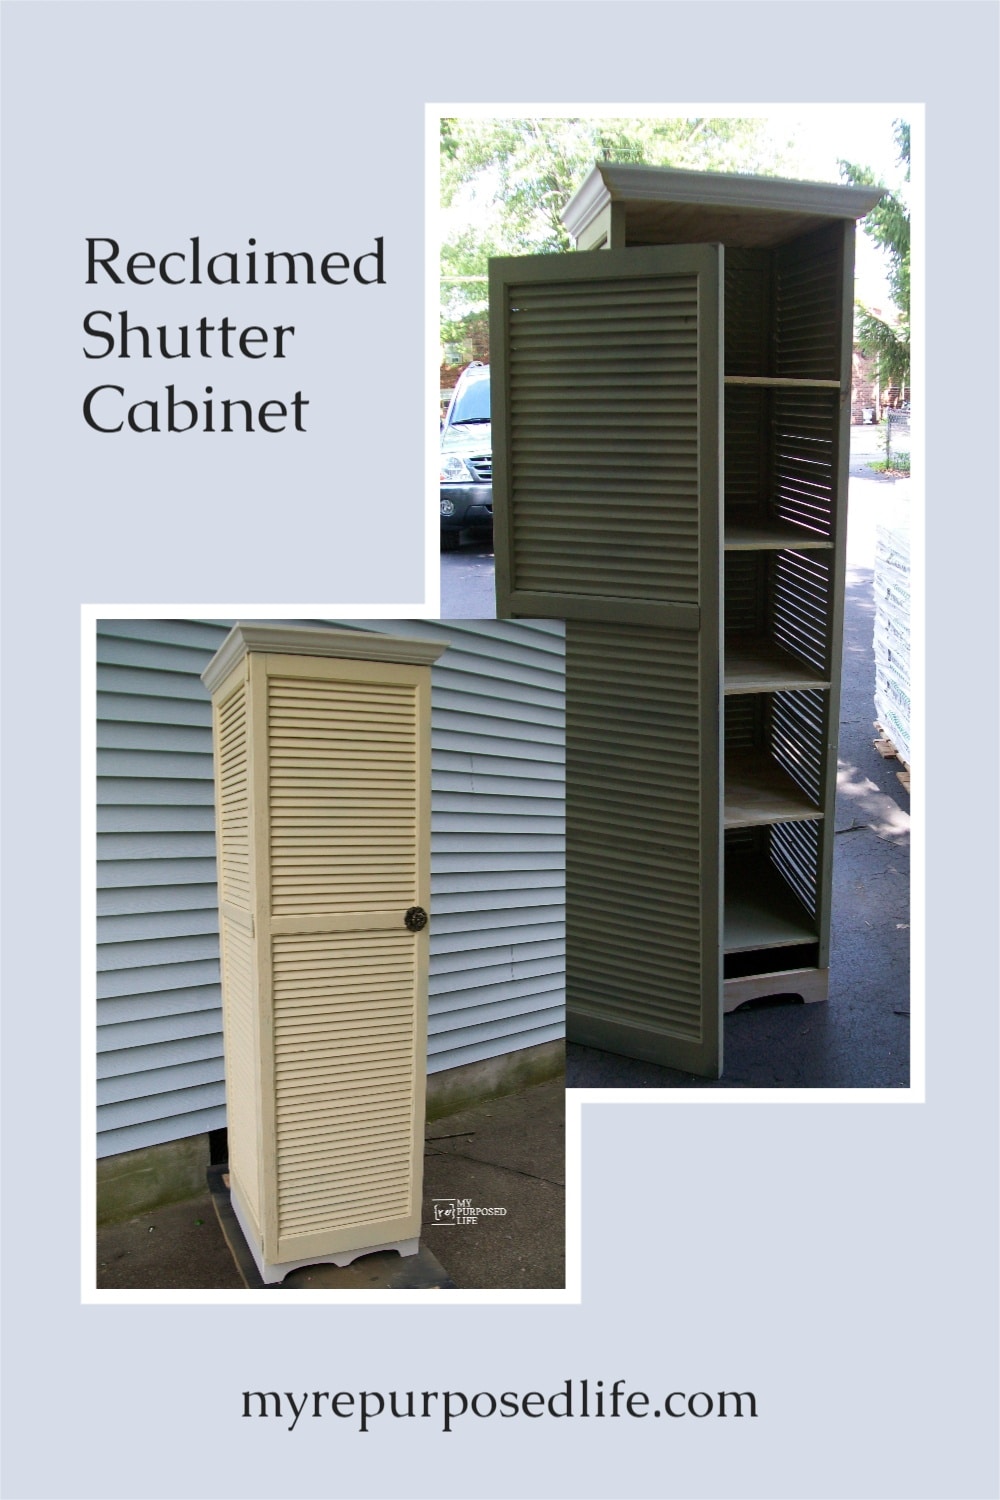
    What can you do with four reclaimed shutters? Use them to make a shutter cupboard! Don't be intimidated by the process, simply follow my step by step directions.

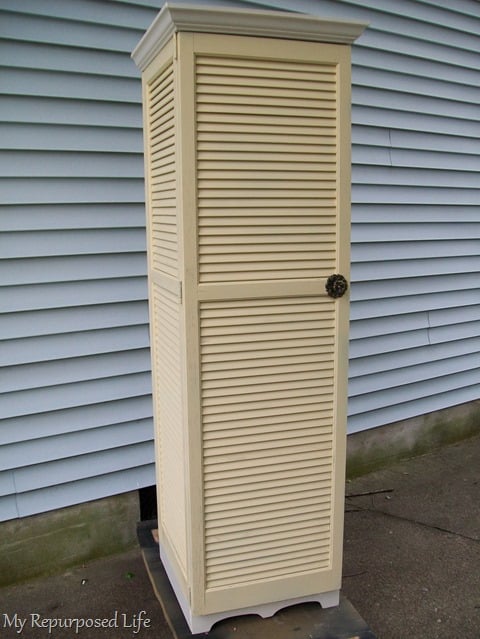
    Tall Yellow Shutter Cupboard

    my-repurposed-life-cabinet-made-from-shutters

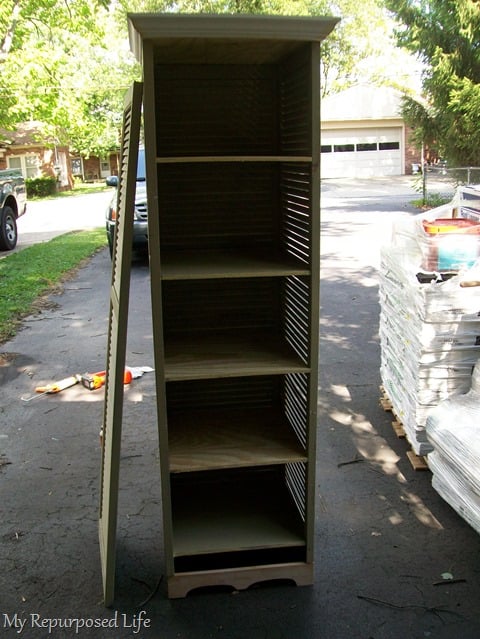
    I made the shutter bookcase for Jan a couple of months ago. She had 4 more shutters and she asked me to build her a shutter cupboard.

    Designing and Building a Shutter Cupboard

    designing a shutter cupboard

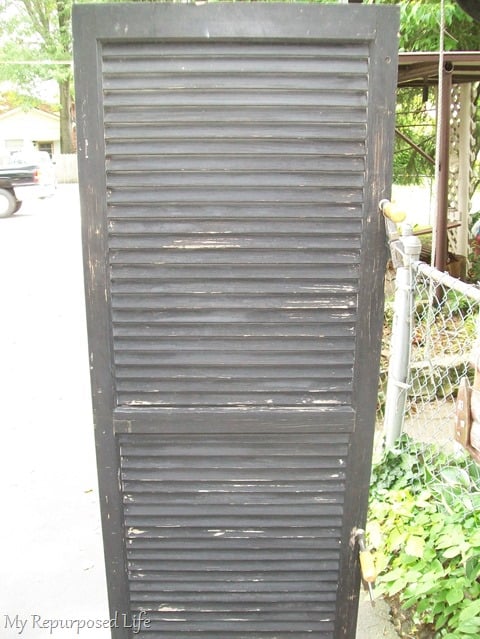
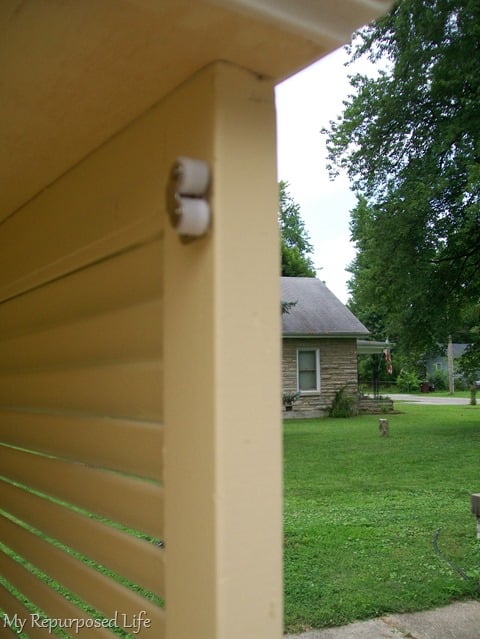
    These shutters are taller than I am.

    building a shutter cupboard

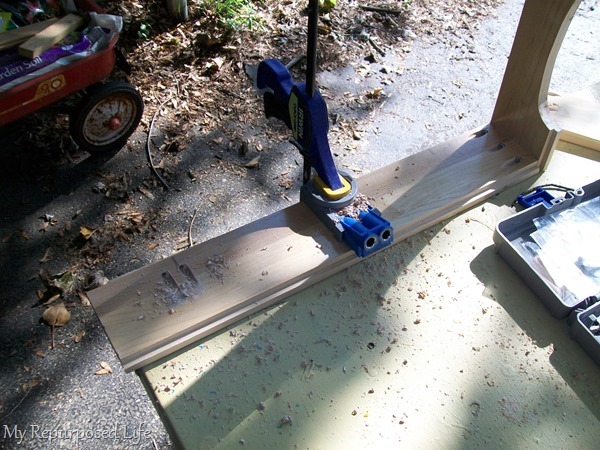
    I had to cut them off because two were shorter than the other two. Once I got them to match, I used my Kreg Jig Jr. to make pocket holes to join three of them together.

    How To Add Shelves

    how to make a shutter cupboard

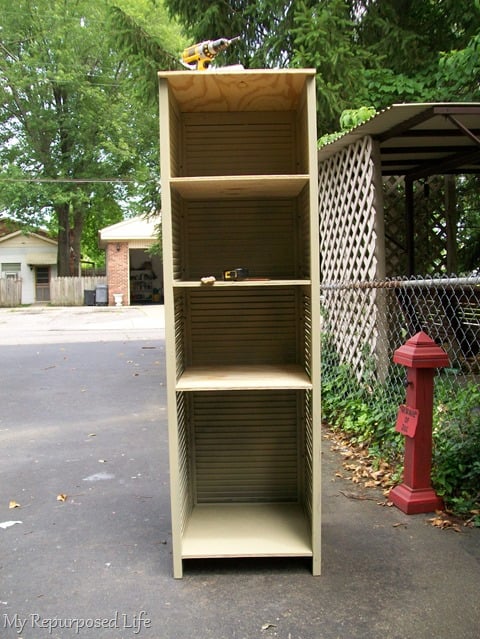
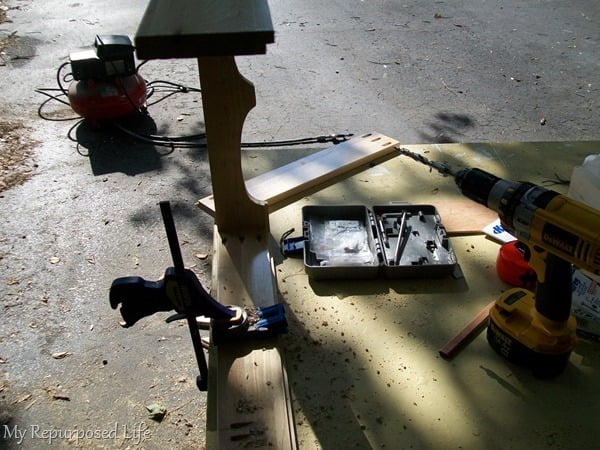
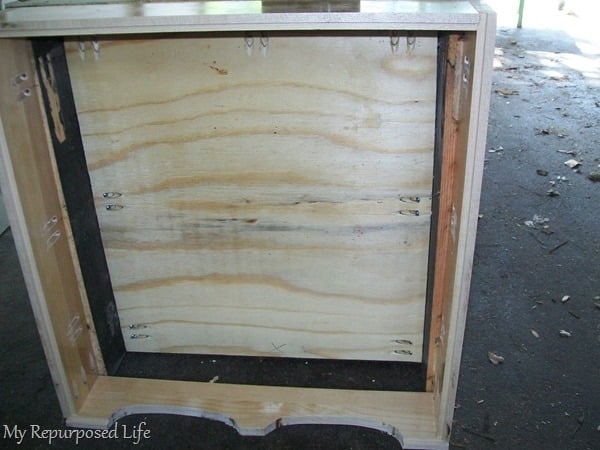
    I didn’t have any wood to use as shelves, so I purchased a piece of plywood at Home Depot. I cut the shelves to size. I attached the bottom shelf and the top of the cupboard first.

    adding shelf to cabinet

    Then I got busy installing the other shelves. I cut some scrap wood to use as spacers so that the shelves would be uniform in height. The middle shelf would be the one that would keep the unit squared and sturdy. Because the shutters have the middle piece I was able to use pocket holes all the way around 3 sides.

    Shop My Amazon Storefront to See my Favorite Tools and Products

    scrap wood to space shelves

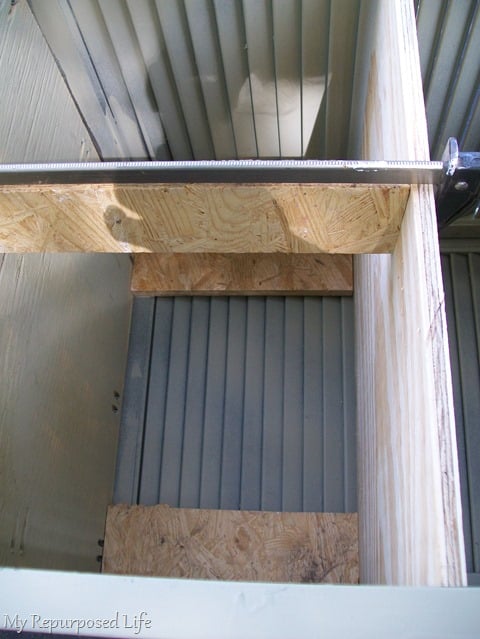
    The other shelves, I could only attach with pocket holes in the front and the back. However the pocket holes made with the Kreg Jig make very tight joints.

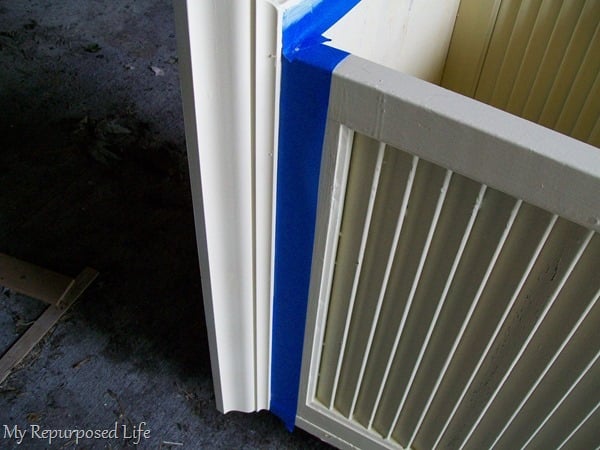
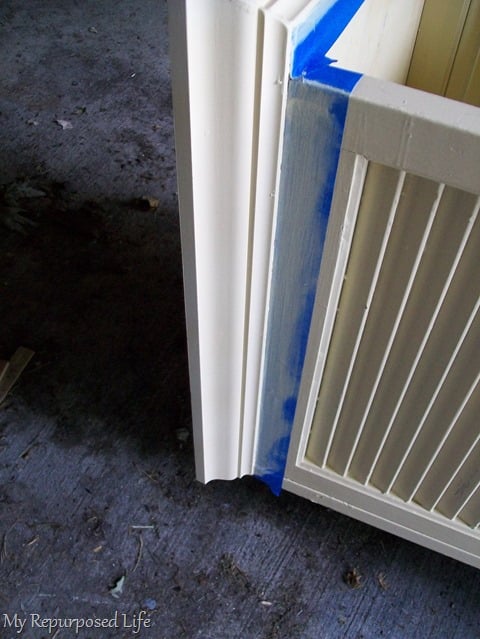
    Adding Decorative Base

    making trim for shutter cupboard

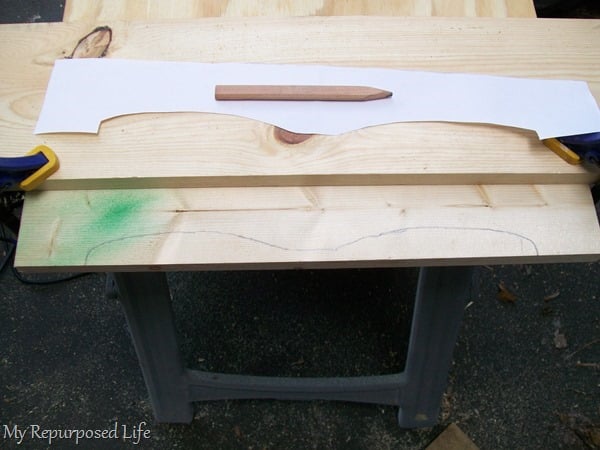
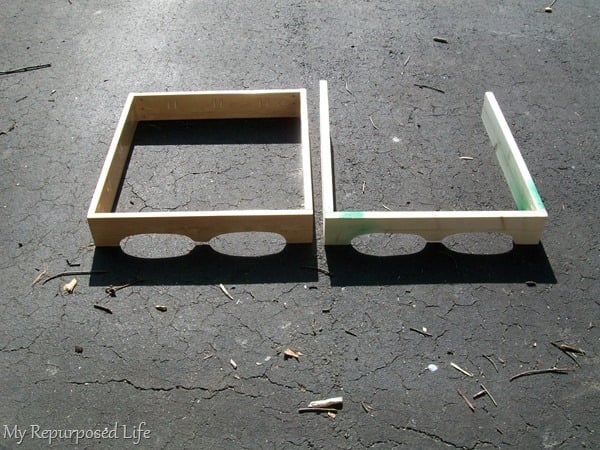
    I wanted to raise the cupboard off the floor with a decorative “skirt”. I folded a piece of paper in half so that the left and right sides would match. With the paper folded in half I cut out some curves. I traced the curves onto a piece of 1x4 and cut it out with my jigsaw.

    cut decorative piece for shutter cupboard

    While I was looking for a board to use as the back, I realized the 1x4  was just too wonky. The boards I decided to use were reclaimed drawer parts.

    using a kreg jig

    I used my Kreg Jig to make more pocket holes and joined the three new pieces together. (they were a little larger than a 1x4 so I had to rip them on my table saw to get them down to size)

    adding a base to shutter cupboard
    new base

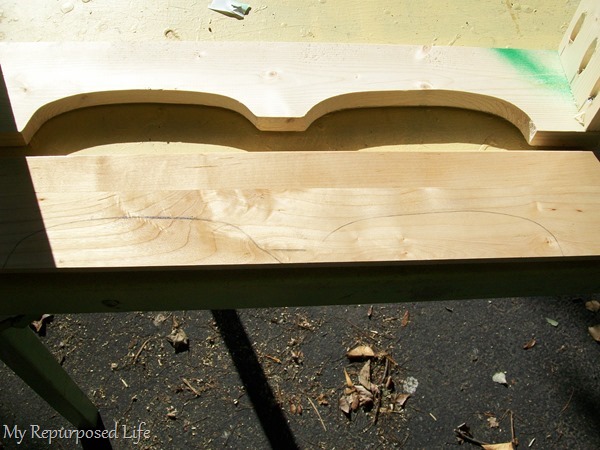
    On the left, the new piece.

    crooked boards

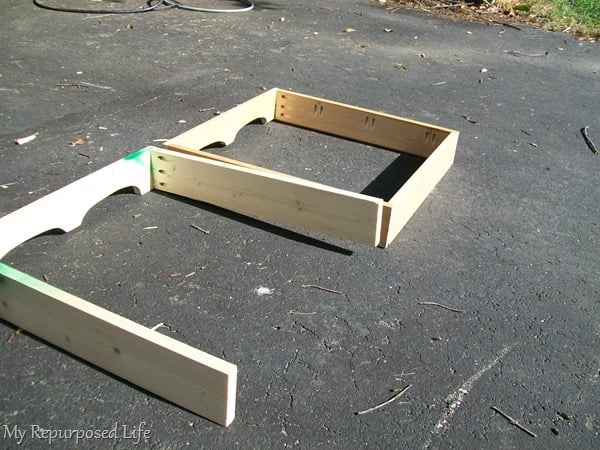
    See how caddywampus the first one was? yeah, not working! Seriously, it's worth the extra time and effort to do things right.

    How To Attach The Base

    attach the base to the shutter cupboard

    More great pocket holes and pocket hole screws  to attach it to the cupboard!

    Time For Paint

    paint the cupboard with primer

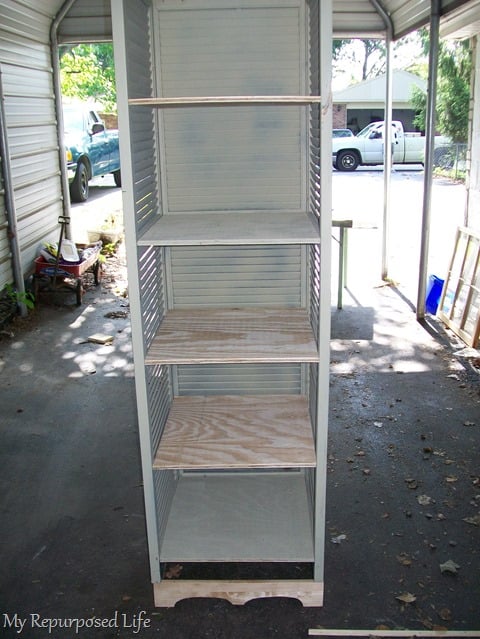
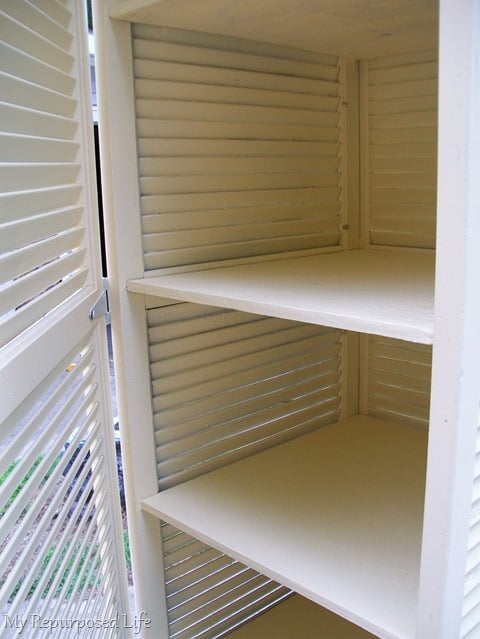
    I primered the cupboard one day while I had my sprayer fired up. Then I added some more shelves.

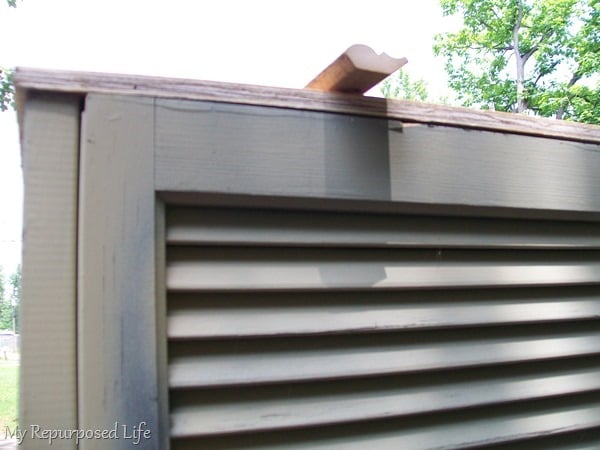
    Add Trim to the Top of Shutter Cupboard

    add trim with gorilla wood glue

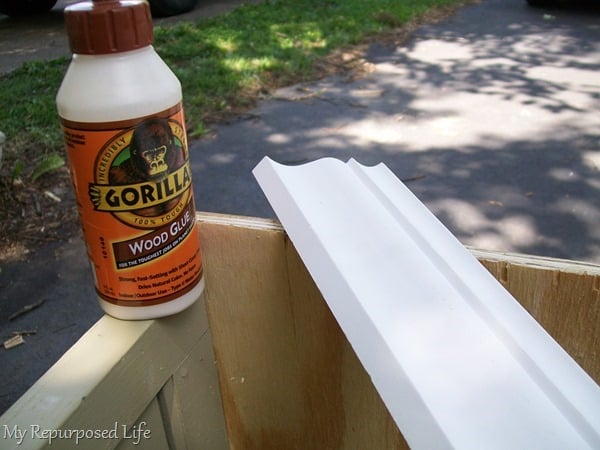
    I cut the crown molding and used Gorilla Wood Glue and my nailer to attach it.

    tall shutter cupboard

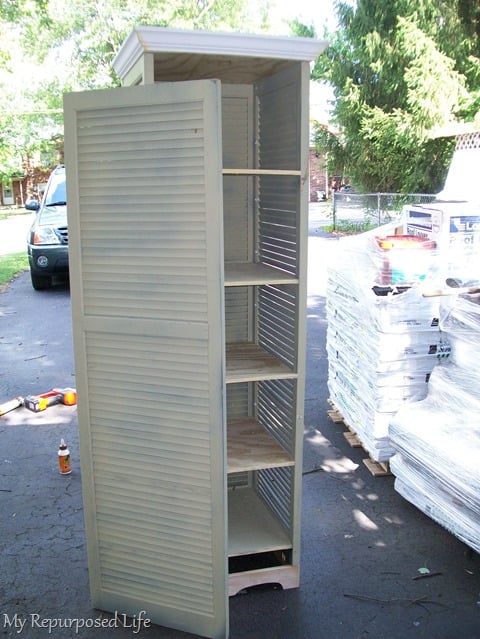
    This picture dates itself. See the shingles?

    painting tall shutter cupboard

    Painting with Painter's Tape

    using painters tape for painting trim

    Jan decided she wanted this cupboard to be two-toned. The cupboard was an “oops” that Jamie gave me a couple of years ago. The top and bottom trim are Martha’s Heavy Cream. I taped it off to get a clean crisp line.

    tips for using painters tape on projects

    Handy Tip from Gail: After applying your tape, make a swipe with the color (in this case yellow) that you have already painted. Then IF there should be any bleed, it will be the color that is already painted. After that little swipe dries, then paint the other color (heavy cream)  Remove your tape while your paint is still damp.

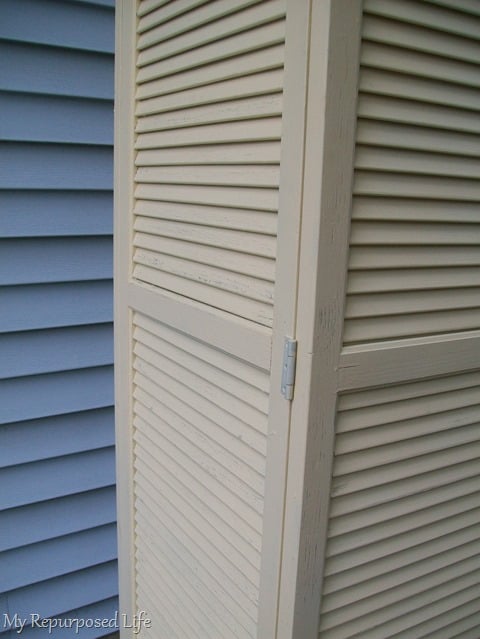
    A Look at the Hinges & Hardware

    adding hinges

    I had three hinges in my stash that worked great for the cupboard door.

    attaching the door catch

    The cupboard is not 100% square, so the door shifts a little when it is closed. I installed a “catch” that helps align the door when it is closed. shhhh don’t tell Jan, okay?

    distressed dry brushed paint

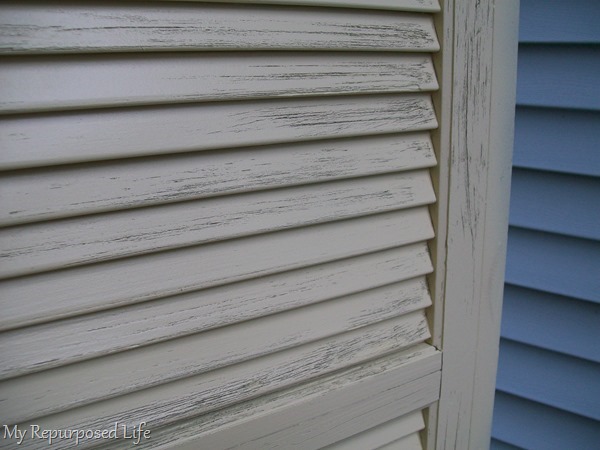
    Because the shutters were old and weathered, the paint (even though I did use primer) would not cover smoothly. However, I LOVE, LOVE, LOVE this look! I think it is a perfect look.

    knob

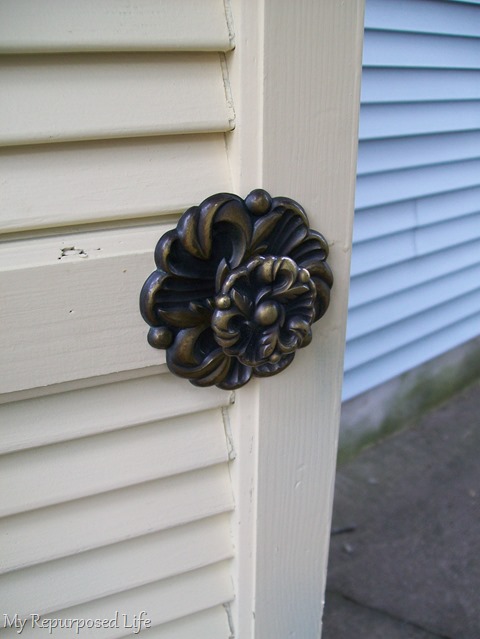
    This is the knob that is currently in place. Jan is probably going to want me to change it out. Hey! It’s a woman’s right to change her mind, right?

    painted the hinges

    I gave a little coat of paint to the hinges.

    Pretty Yellow Shutter Cupboard

    tall yellow shutter cupboard

    Do you like the two toned look? How about the knob? Jan is thinking it needs a simple wooden knob instead. Please let her know what you think in a comment below.

    gail

    Pin
    Share
    Tweet

    Related Content:

    • IKEA Billy bookcase update with paint and reclaimed wood
      IKEA Billy bookcase update with paint and reclaimed wood
    • How to Use a Kreg Jig Pocket Hole System
      How to Use a Kreg Jig Pocket Hole System
    • Reclaimed Armoire Door Book Shelf
      Reclaimed Armoire Door Book Shelf
    • Repurposed Drawers Bookcase
      Repurposed Drawers Bookcase
    • DIY Tall Window Cabinet
      DIY Tall Window Cabinet
    • Shutters Repurposed into Bookshelf
      Shutters Repurposed into Bookshelf

    Reader Interactions

    Comments

      See comments Cancel reply

      Your email address will not be published. Required fields are marked *

      This site uses Akismet to reduce spam. Learn how your comment data is processed.

    1. Shirley

      October 26, 2022 at 3:34 pm

      Love this, it is the perfect thing for our bathroom storage needs. We moved to an older home with high ceilings and last year we found some tall shutter to fill our a corner in our bathroom. Thanks for the great idea!!!

      Reply
      • Gail Wilson

        October 26, 2022 at 8:56 pm

        Awesome! It sound like you have the perfect plan. I love tall ceilings. 🙂 (and old homes)

        gail

    2. Danielle

      October 26, 2022 at 11:26 am

      I love the knob, especially if the cabinet is to be in a bedroom or living room. For a pantry, maybe a simple wood one would be more in tune with the space?

      Reply
      • Gail Wilson

        October 26, 2022 at 6:59 pm

        Good point Danielle!!! thank you!

        gail

    3. Janette

      October 26, 2022 at 4:50 am

      I love this you are so clever, I think Jan is correct, a nice wood knob would suit it better, just my opinion.xx

      Reply
      • Gail Wilson

        October 26, 2022 at 10:53 am

        Yes, I agree with both of you. This is such a great idea, however it's a very old project. But, I decided it was worth sharing again. I sure hope Jan still has this after all these years. 🙂

        gail

    4. Patti

      September 20, 2016 at 12:31 pm

      I love cabinet. Knob? Not so much. It definitely needs a knob that is not so daunting. Great job on cabinet, hubby. Wish my husband was handy. That would be me.

      Reply
    5. woodshoppegirl

      October 10, 2015 at 5:23 pm

      Hi! WOW! Love that cupboard so much...as soon as I saw it I started eyeing my family room for a place to put my "future" shutter cupboard! Hahaha! I mean, there's probably about 20 projects ahead of this one, but I already have the four shutters that I scored for free thanks to Craigslist, they were supposed to be for a headboard project for my brother, but he and his new bride changed their minds, so now the shutters are MINE to do as I please! Not sure about the two-tone paint, to me, it makes the trim look like it's separate from the shutters, if you paint it all the same color and distress it, it would look like it belongs on a Pottery Barn catalog...but I would definitely keep that knob, it's gorgeous, and gives the whole piece an antiquated look. I have to learn how to do those pocket holes of yours, I'm new to wood shop, but thank you so much for sharing this with us!!

      Reply
      • gail@myrepurposedlife.com

        October 11, 2015 at 8:53 pm

        Thanks so much for your comment! How wonderful that you have the perfect shutters for this project. Yes, you need to do pocket holes. It makes building so much easier AND very sturdy. 🙂

        gail

    6. Kim

      September 11, 2015 at 5:20 am

      Great idea with the shutters, it turned out great.
      Not a fan of the two tone at all. I probably would have gone with a distressed white.

      Reply
    7. Amy Lassere

      January 25, 2015 at 10:30 pm

      Wow, Love it, u are very talented. I have a shutter cabinet as shutter for just the doors. I LOVE DISTRESSED. I think its awesome, but my colors are different. Great job. Knob is cool, or a glass knob. God bless,
      Amy
      http://www.amyscountrycandles.com

      Reply
    8. Anonymous

      February 06, 2013 at 2:21 pm

      happen so that a friend of mine has a set of red barn color shutter she not using i might have to stop by and asked for them.....awesome projocet & great idea ...

      Reply
      • Gail Wilson

        February 06, 2013 at 5:43 pm

        thanks! happy you found some inspiration from my project!
        gail

    9. yankeehomesteader

      October 20, 2012 at 3:32 pm

      This is awesome! Thanks for the tutorial.

      Reply
    10. Then and Again Furnishings

      August 24, 2011 at 2:42 am

      Thank you for your inspiring cabinet idea. I recently built one from some old shutters I rescued from an old farm in Northern Michigan. I love the color choices on yours. I went with black to help cover some of the imperfections that were a little too "shabby", but would have liked to see it in buttery yellow. I built an ottoman today out of an old cast iron base from a wood stove. You can check it out on my blog at http://thenandagainfurnishings.blogspot.com
      Maybe I can return the favor of inspiration.

      Reply
    11. Carolyn

      July 11, 2011 at 4:53 am

      The cupboard looks fantastic. You did a lovely job in putting it together. Love the outcome.

      Reply
    12. MCoffeeSnob

      June 30, 2011 at 7:12 pm

      LUV the design...the colors aren't for me, but I like the weathered finish!

      Question - is there a reason there were three shutters vs. two shutters and a back? No problem with it at all, just curious.

      I REALLY enjoy your work and your blog. Definitely appreciate the How-to. you make it look easy and I KNOW it's not-great work!!

      <3
      ~m

      Reply
    13. Pamela @ Seeds of Nutrition

      June 30, 2011 at 6:18 pm

      Love this....what a great way to use shutters. The knob is pretty...just doesn't look quite right. A smaller knob would better and I agree with Jen. A glass angular shaped knob.

      Reply
    14. Jen

      June 30, 2011 at 4:13 am

      Oh wow, this is fantastic! I think I would use one of those antique looking glass angular knobs. I think I may need to start looking for some old shutters for a cabinet for myself! I'd love for you to come check out my blog sometime, http://www.icantstopcrafting.blogspot.com

      Reply
    15. HomeDefined.com

      June 29, 2011 at 8:28 pm

      I think it is cute... I'd love it more if the white color was used on the "frame" around the louvers and an aged "white wash" was on the knob.. more antiqued.

      You never fail to surprise me with your idea! I've been keeping an eye out for wooden shutters since I've found you 😉

      Debra
      http://homedefined.com

      Reply
    16. Meg

      June 29, 2011 at 6:00 pm

      Wow! I bow down to your carpentry skills! That cupboard is so cute. I love shutters and this is such a new way to use them! The 2 toned look is super cute and I love that knob! It makes the cupboard feel fancy. I like that.
      I'd love for you to join my giveaway for 2 canvas pillows going on now! http://www.alittleknickknack.com. Happy 4th!

      Reply
    17. Stephanie

      June 29, 2011 at 4:15 pm

      The knob is perfect! Knobs are jewelry and this just makes the cupboard. You sure are a pro at making those shutters into fun projects! Love the two tone colors.

      Reply
    18. Meari

      June 29, 2011 at 3:20 pm

      I like the knob, but I don't think it quite goes with the cupboard. I think Jan's idea of a wood knob would look great.

      Reply
    19. Full Circle Creations

      June 29, 2011 at 2:56 pm

      Love the color and the added details on the base. Great job! My vote is for a handle instead of a knob.

      Reply
    20. Sujomi

      June 29, 2011 at 2:54 pm

      Great piece, but even greater is the fact that you used the word "caddywampus" - I use it all the time and always get strange looks from anyone outside of the family whem I say it.

      Reply
    21. Anita @ GoingALittleCoastal

      June 29, 2011 at 3:52 am

      I love it! It looks great in yellow 🙂 I agree with you, the way the paint took makes it look even better. You might try painting the handle in the MS cream color. Jan might like it better. I like the idea of a handle too.

      Reply
    22. Suzanne@Meridian Road

      June 29, 2011 at 3:02 am

      I LOVE it! I LOVE the two tone paint! That crackle finish is perfect, too. I love happy accidents like that! You did a great job, Gail!

      I think a plain wooden knob would look cute, or a handle. I like the one on it, too. I think it just depends on whose house it goes in. 🙂

      Reply
    23. Jester

      June 28, 2011 at 7:56 pm

      WOW WOW AND WOW!!!!!!!!!!!

      Reply
    24. Mimi@blueroofcabin

      June 28, 2011 at 7:01 pm

      Gail I love it! Turned out great love the detail on the base. Love the crown on top, you did an inspiring job, again!

      Reply
    25. Terri

      June 28, 2011 at 4:01 pm

      Great idea making it two toned...it is adorable. You never cease to amaze!

      Reply
    26. Toqua's Crafts

      June 28, 2011 at 2:46 pm

      I like the knob that is on the cupboard now... but I also like the handle that Anne above suggested as well! I think a simple wooded knob would not be seen (it would blend in). If having it not seen is Jan's goal then do that. I would like to know where it is that Jan is going to use this cupboard. (Just curious). As always Gail, you did an awesome job on the tutorial and the cupboard!

      Reply
    27. Paige (Final Clothes-Out)

      June 28, 2011 at 1:37 pm

      I like the knob! It gives the piece some girly detail.

      Reply
    28. Deborah March

      June 28, 2011 at 1:27 pm

      Once again...pickin' my jaw up off the floor...your skill and ingenuity know no bounds...what a FABULOUS piece!! Love love LOVE the two toned look!

      Reply
    29. It's Just Me

      June 28, 2011 at 1:26 pm

      Gail, to say that I LOVE this would be an understatement. I SO wish I lived close to you so I could learn your mad skills.
      ~ Deanna

      Reply
    30. Korrie@RedHenHome

      June 28, 2011 at 1:25 pm

      The cupboard is fabulous! Somehow I missed that it was going to have a door...I love that. And I vote for the metal knob! It's perfect.

      Reply
    31. Jess

      June 28, 2011 at 1:24 pm

      i love the knob you put on it! 🙂 it looks great.

      Reply
    32. Anne

      June 28, 2011 at 1:23 pm

      I think the handle you have now draws your eye to it, rather than the cupboard. It is almost too ornate for the beautiful simplicity of the cupboard. I would switch it out for a simple knob in either of the two colors you used for the paint.(I personally would use the accent color---I just love it!)

      Reply
    33. Kathy@ Gone North

      June 28, 2011 at 12:52 pm

      Very, very nicely done... I am just in awe that you can do stuff like that... You continue to amaze..
      I would go with a handle if I was living with it... but that ofcourse means you would have to fill the hole & drill some new.. : )
      Again... Great Job!!!

      Reply
    34. Anne

      June 28, 2011 at 12:31 pm

      Really great job! I'd prefer a handle over a knob. Something wrought iron & chunky - like this: http://www.google.com/products/catalog?q=cabinet+handles&oe=utf-8&cid=16378056282821325588&ei=Y8kJTsvZBJOQMZCalMQI&sa=title&ved=0CAwQ8wI

      Cheers!

      Reply
    35. Lesley Litrento

      June 28, 2011 at 12:06 pm

      It turned out wonderful. I love the two toned thing....as you know, I recommended it!! 😉 I would have maybe liked to have seen a less settle difference in color. The knob. I would change it to something else depending on the room the cupboard was being placed. The finishing touch of the bottom and top trims are really super duper.

      Reply
    36. Mrs BC

      June 28, 2011 at 11:11 am

      What a lovely peice of furniture, you are so clever! Very inspirational..
      I love the knob, but not so much the 2 tone paint - but then, I'm not the one who gets to live with it so what do I know? 🙂
      Thanks for sharing
      xx

      Reply
    37. Cassie @ Primitive & Proper

      June 28, 2011 at 11:00 am

      it turned out so cute! i love the color.... if it were for myself, i am not a fan of the two toned look, but everyone has their own take on that, so it just depends on jan! i think a wooden knob painted the same color would be cute and cottagey, but hte knob it has is more feminine, so again, depends on what she is going for with it. a glass knob would also be pretty!

      Reply
    38. Cassie @ Primitive & Proper

      June 28, 2011 at 11:00 am

      it turned out so cute! i love the color.... if it were for myself, i am not a fan of the two toned look, but everyone has their own take on that, so it just depends on jan! i think a wooden knob painted the same color would be cute and cottagey, but hte knob it has is more feminine, so again, depends on what she is going for with it. a glass knob would also be pretty!

      Reply
    39. Cassie @ Primitive & Proper

      June 28, 2011 at 10:59 am

      it turned out so cute! i love the color.... if it were for myself, i am not a fan of the two toned look, but everyone has their own take on that, so it just depends on jan! i think a wooden knob painted the same color would be cute and cottagey, but hte knob it has is more feminine, so again, depends on what she is going for with it. a glass knob would also be pretty!

      Reply
    40. Cassie @ Primitive & Proper

      June 28, 2011 at 10:59 am

      it turned out so cute! i love the color.... if it were for myself, i am not a fan of the two toned look, but everyone has their own take on that, so it just depends on jan! i think a wooden knob painted the same color would be cute and cottagey, but hte knob it has is more feminine, so again, depends on what she is going for with it. a glass knob would also be pretty!

      Reply
    41. A Pretty Pastime

      June 28, 2011 at 10:54 am

      Very clever! I like the idea of handle, too.

      Great job Gail!

      Reply
    42. Sharon @ Elizabeth & Co.

      June 28, 2011 at 10:34 am

      Gosh, that is sooo cute!

      Reply
    43. Sharon @ Elizabeth & Co.

      June 28, 2011 at 10:34 am

      Gosh, that is sooo cute!

      Reply
    44. Rose @ Confessions of a Curbshopaholic

      June 28, 2011 at 9:45 am

      I like the paint job a lot. and the decorative bottom is a great touch. On the knob subject, I think I would opt for handle rather than a knob.
      Another great piece, Jan sure is a lucky lady!

      Reply

    Primary Sidebar

    Hi, there! I’m Gail Wilson, the author and mastermind behind My Repurposed Life. I’m obsessed with finding potential in unexpected places and believe that with a little hard work and imagination, any old thing can be made useful again—myself included! I hope you’ll enjoy the journey and pick up a few tools along the way… literally!

    More about me →

    Join Our Mailing List

    ​

      Click the topics you're interested in below:

      Subscribing above means you agree to our Privacy Policy​

      Footer

      ↑ back to top

      SEEN ON

      Might I Suggest

      • Start Here
      • Furniture Makeovers

      Newsletter

      • Sign Up! for emails and updates

      About

      • Gail's Favorites on Amazon
      • About

      As an Amazon Associate I earn from qualifying purchases.

      Copyright © 2023 My Repurposed Life · Privacy Policy · Disclosure