Luggage Rack Side Table using a Cabinet Door
As an Amazon Associate, I earn from qualifying purchases.
I have the perfect project for this month’s Thrift Store Decor project! A luggage rack side table. I have had this luggage rack in the guest room for years. I thought it was time for the luggage rack to have a makeover, and while I’m at it, why not reinvent the luggage rack as a table? The makeover on the luggage rack is so incredibly easy, but there are steps to follow.

As I said, the luggage rack has been here for years. It is used when my daughter Jamie and her husband Andy visit from time to time. I can’t remember where I got it or how much I paid for it.
Clean Thrift Store Items
The first step to almost any thrift store project should be to thoroughly clean your project piece. You should not paint over dirt, dust grease and grime.
*This post may contain affiliate links which won’t change your price but will share some commission. Read More Here.*
Prepare project for painting

To prepare my luggage rack project for painting I had to remove the webbing. I used a screwdriver and pliers.
Remove hardware

To make this project easier to paint I opted to remove the hardware (screws). Separating the legs would make this job go smoother.
Sand rough areas

There were a few rough areas where I removed the staples and thumbtacks. Those places needed to be sanded.
Use a paintbrush to dust grooves

Using a cheap chip brush to dust the grooves of the luggage rack seemed like a no-brainer.
Apply paint to luggage rack

I used a clean paintbrush to apply the Heirloom Traditions Heritage paint in Cobblestone.
Allow paint to dry

I rested the legs of the luggage rack up against the workbench to allow the paint to dry. I ended up doing three very quick and light coats of the gray paint.
Reassemble the luggage rack

While I was working on all the other components I threw these webbing pieces into the washer. I really like the pattern and color so I decided to keep them. I used my stapler to secure the straps.
not shown: I reassembled the luggage rack by putting the two screws and washers back in place.
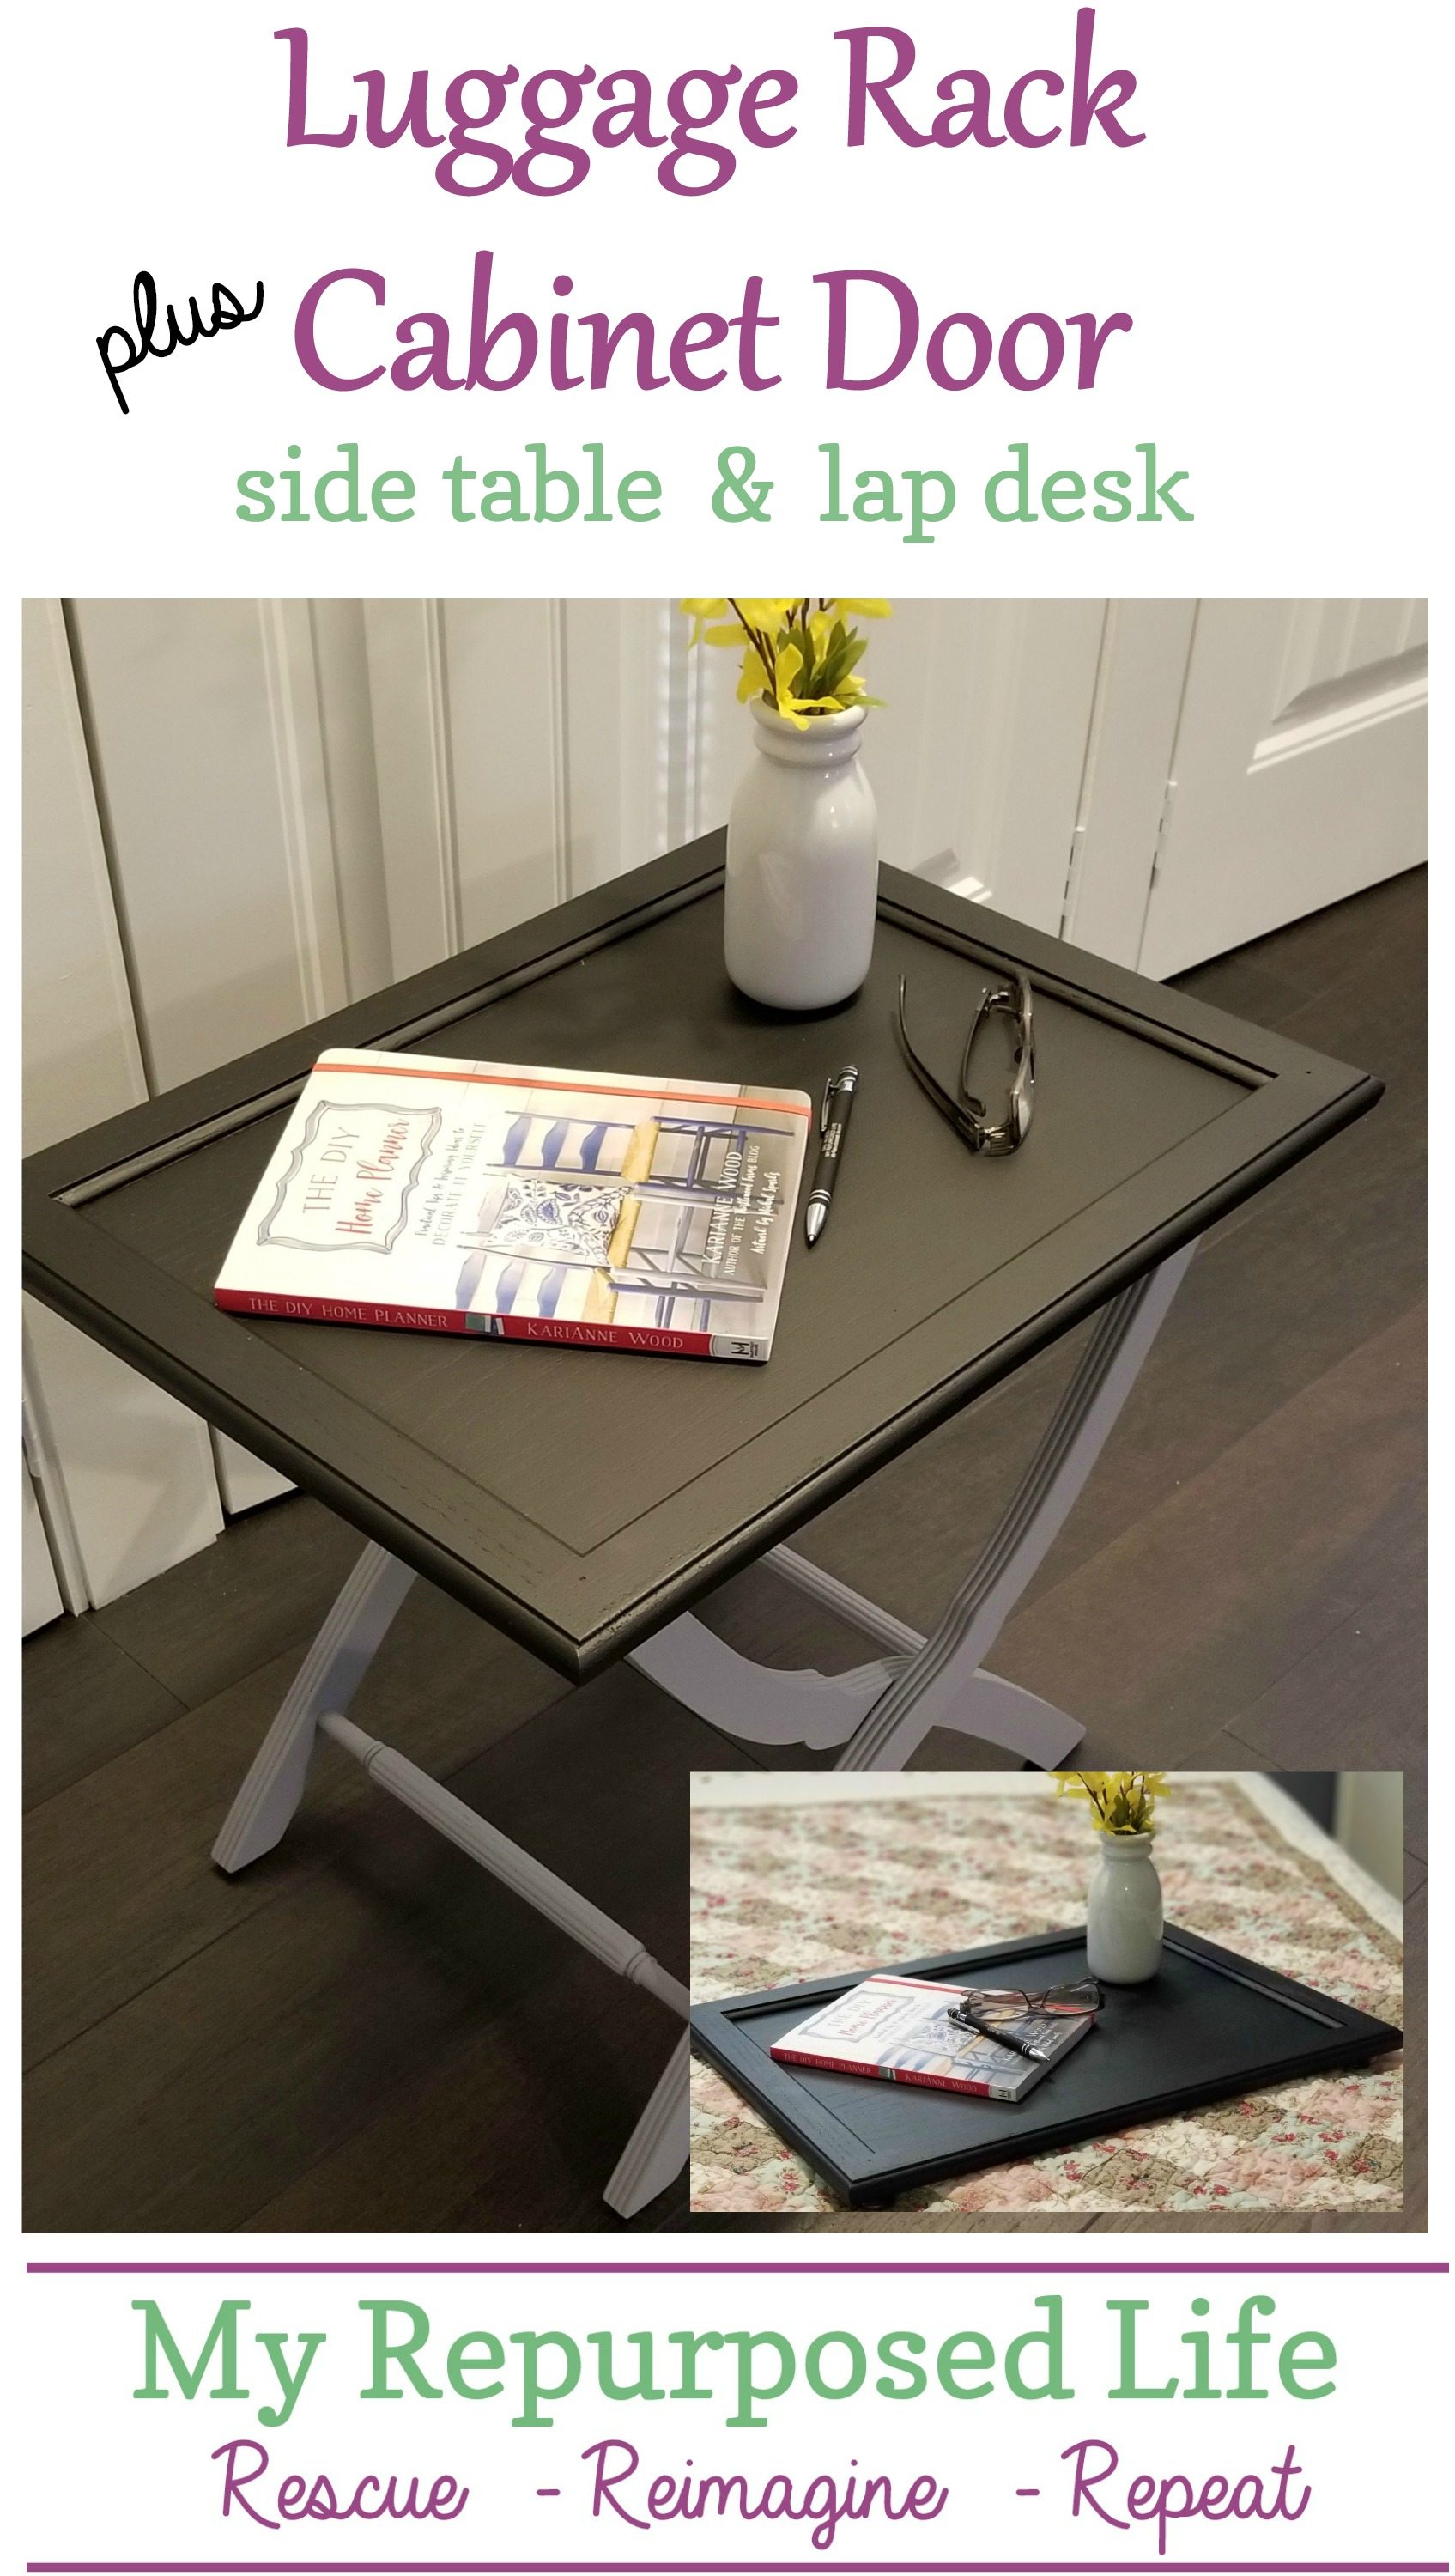
How to make a table top for your luggage rack using a cabinet door

Clean the cabinet door of grease and grime. Then paint both sides.I used Iron Gate from Heirloom Traditions to paint the front of the large cabinet door. The bottom side was painted the same color as the luggage rack.
Old hardware knobs make great feet for trays

While all the paint was drying I looked for an option to add feed to the cabinet door to make it a tray or table top.

I opted for these guys. I happen to have exactly FOUR of them. I’ve used knobs as feet before, drilling through the cabinet door. But I didn’t want to do that this time.

I placed the screw into the vice and used a hack saw to cut off the head.
Attach vintage cabinet knobs for tray feet

Using painter’s tape on the drill bit helps as a guide to keep you from drilling through the door.

Typically screwing the knob onto the threads would allow you to then turn the screw and secure it into the cabinet door. However these knobs seemed to be endless and the screw went deep into the knob and only slightly into the wood. I used needle nose pliers to twist the screw. That got to be a pain, so I searched that bucket for a more shallow knob in order to spin the screw into the wood. Then I removed the shallow knob and replaced it with this knob. Something that seemed to be so easy, suddenly became very frustrating. It happens!
Luggage rack with fresh paint makeover

Isn’t paint amazing? I love the new color of the luggage rack!!
Luggage rack side table 
The feet on the cabinet door tray help to support the weight by resting at the edge of the luggage rack top pieces.
Cabinet door used for a table top, lap desk or breakfast tray
The table top tray is easily removed for use as a lap desk or breakfast tray.
Related Content from Reinvented Delaware, Easy DIY Luggage Rack makeover

I think adding the cabinet door tray table top takes the plain luggage rack up a notch, don’t you agree? Doesn’t everyone need a luggage rack side table?
I hope you enjoyed this project, because I have lots of friends that want to show you how they reinvent thrift store items into great projects.
Thrift Store Decor Projects You Will Love

Fridge Magnets Petticoat Junktion
Peony and Grapevine Wreath Our Southern Home
Desk Lamp Makeover Domestically Speaking
Luggage Rack Side Table My Repurposed Life
World Map Makeover My Uncommon Slice of Suburbia
Message Board Refresh Restyle
Key Hook Cabinet Makeover Sadie Seasongoods
Repurposed Thrift Store Tray House of Hawthornes
Do you love doing thrift store makeovers? What’s your favorite item you can never pass up at a thrift store?
gail
awwwww. The link for the key hook cabinet makeover does not work for me. ;( It goes to her site – but I can’t find the cabinet project.
I’m so sorry, but the project/post has been deleted from that blog. I searched and searched for it, then reached out to Sadie Seasongoods and she confirmed the project is no longer on her site. I’m sorry for the inconvenience.
gail
What a lovely project! Love that vintage webbing!!! I got lost with why you took off the screw head. Finally figured it out…Perhaps the next project you should insert the screw first THEN remove the screw head? I’m also curious…don’t most cabinet knobs have screws with them already? Well, new ones, I suppose. I always save the screws that go with knobs I thrift. It’s HARD to find screws that fit found knobs………Nearly a half day project looking through my screws….And just about as long when I take the knob to the hardware store to find screws that fit. Altogether, I love this project. I’ll be keeping my eyes open for stands that I can use. 😀
Bonnie,
Thanks for stopping by to check out this project. 🙂
I needed the screws to be thread on both ends. One end to go into the knob, the other end to go into the cabinet door without anything showing on the opposite side of the door (tray). I hope that makes sense.
The knobs I have are reclaimed from various places over the years. I have all sizes of knobs and screws and rarely are the the same. 😉
gail
I love how the webbing went so well with the new gray and how you can still use it as a luggage rack. It would be a great table to take outside in good weather, easy to carry as it is lightweight. I’d be tempted to paint that tray or another with chalkboard paint to leave a message on it! I liked Susan’s idea to use one in her RV; anything that can be folded when not in use is a good thing!
What a great idea! I have an old luggage rack. You always spark my imagination!
Thanks for stopping by Christy! I love these challenges that really force me to think outside the box for an easy makeover.
gail
Great project! I just saw a bunch of those old luggage racks at my local thrift store. A hotel must have donated them when they renovated. I’m going to run back and see if they have any left!
Great idea! Going to make one for the RV. It will be perfect!
Love the paint color you used on the luggage rack! Great transformation! Great tip on using knobs for feet too.
That’s a great idea! I had a camping stool with no fabric. I could have used this idea. I sold the camping stool for peanuts!!
Thanks Kathy!
Oh my gosh, I NEVER get rid of anything. LOL
What a fantastic makeover!!!
love the color you chose and that you reused the webbing! ♥️
Thanks Nova. I was worried that people may not like the webbing, but I actually love it. 🙂 After washing it, I loved it even more.
This turned out so nicely. Love the grey paint, it’s perfect. Another use for this is next to a sewing machine. I have a folding table with a plywood top that I covered with batting and fabric stapled to it. It sits between my 2 sewing tables. I just turn and iron my seams or fabric. Sounds lazy until you work on a quilt with a bunch of seams. I also have a small cutting mat and rotary cutter on it for little cuts.
That’s a great idea Jennie! Being creative is all about being productive, right?
gail
The new paint really brings out the beautiful colors of the webbing.
I’m so happy you like the webbing. Originally I was going to do something else, but after washing it-I just had to reuse it.
gail