• Skip to primary navigation
  • Skip to main content
  • Skip to primary sidebar
  • Start Here
  • Shop Favorites
  • About
    • Welcome To My Repurposed Life Home of Repurposed Furniture
    • More About Gail
    • Disclosure
    • Privacy Information
  • Gallery
    • Repurposed Furniture
  • Repurposed Items
    • Building Supplies
    • Miscellaneous Household Items
    • Picture Frame/Chalk Board
  • DIY
    • Home Reno
    • outdoor living
    • Painting
    • Shop Talk
    • Tips for Around the House
    • Build It
      • Furniture
      • Home Decor
      • Storage
    • Crafts
      • Dollar Store
      • Easy
      • Holidays Seasonal
  • Furniture
    • Chair
    • Desk
    • Dresser/Chest
    • Headboard | Bed Parts | Cribs
    • Kids Furniture
    • Table
    • Kids Furniture
My Repurposed Life® Rescue Re-imagine Repeat
menu icon
go to homepage
subscribe
search icon
Homepage link
  • About
  • Start Here
  • Project Index
  • Furniture
  • Subscribe
    • Email
    • Facebook
    • Instagram
    • Pinterest
    • RSS
    • Twitter
  • ×

    Home » DIY » Build It » Modern Shelf (glass)

    Modern Shelf (glass)

    Published by Gail | Published April 6, 2011 | Updated April 9, 2019
    As an Amazon Associate I earn from qualifying purchases.

    Pin
    Share
    Tweet

    Cathy and I curbed some glass shelves a couple of years ago. They have been hanging around in my garage ever since. I saw a project in a new publication called, My Home My Style. (updated to add--the publication is no longer in circulation, but you can check out their website.

    *this post contains affiliate links, read more here*


    The glass was shipped in plywood pieces.


    This is what I found upon opening that plywood box. Two very heavy duty tempered glass shelves.

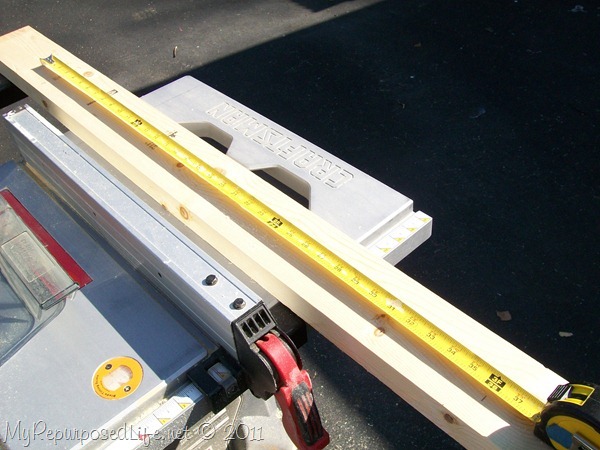
    Rip 2 x 6 on table saw

    ripping lumber
    Because this shelf is modern, the boards needed to be squared off. I removed some of each side of a board (2x6?)  I really can’t remember. Do you see that green paint? .51 cents at Home Depot.


    Looking at the picture of the shelf in the magazine, there was a little extra space at the top and bottom of the “support” piece.

    100_9751
    I needed a square board to place on top of the support piece. I was going to go with a 4x4 but it was too large. My table saw will not rip such a large board, so I went with plan b.

    Cut and glue two 2 x 4's


    I ripped a couple of 2x4’s and glued them together with Gorilla Wood Glue as though they were one board.

    Clamp 2 x 4's


    I clamped them using quick clamps and allowed them to set.


    If you look closely you will see that I have a scrap piece of wood between my board and the clamp. This wood is soft. If I had tightened the clamp on my board, it would leave a dent.


    I used some more Gorilla Wood Glue to attach the “new” square boards to the support piece.

    Add support boards


    This is the support piece with three “square” boards glued in place.


    Soap screws for easy application

    soap a screwAfter the glue set up, I turned the piece over and screwed some screws through the support piece into the “squared” boards. TIP-soap your screws for ease. You won’t hear that dreaded SQUEEK!!!!!


    Paint modern shelf black

    Can you see that the “squared” boards resemble 4x4’s? Hindsight 20/20 I would have used 4x4’s and then made the support piece wide enough that the 4x4’s would have worked. I spray painted it with my el cheapo primer.


    I painted it black with some oops paint.

    Insert glass shelves


    Now you can see how it all came together. Very modern floating shelves hanging on a privacy fence for staging.

    wood and glass shelf
    The gap between the boards was a little difficult to pull off. The gap had to be just wide enough for the piece of glass to slide in.

    black wood glass shelf

    I think it looks pretty neat hanging on the fence.


    I put some little candle holders on the shelf to help the shelf “show up”.


    These glass shelves are very thick and very heavy. I have attached two “D" rings on the back for hanging. However I think I will have to make a slight change. I have them centered from side to side, 24 inches apart. Because the “D” rings are centered, the piece sort of goes wibble wabble while being hung on the fence.

    Cost? zero! Although there was quite a bit of work involved since I really didn’t know what I was doing. There were plans in the magazine, but they didn’t fit the materials I had. You know I’m a use what I have kinda girl!

    Do you like it? or is it too modern to suit you? I highly recommend this magazine. I subscribed to it as soon as I saw it. There are no advertisements and I read it cover to cover. That is something I rarely EVER do.

    gail


    I used a large piece of free glass to make a top for this pallet sofa table.

    Pin
    Share
    Tweet

    Reader Interactions

    Comments

      See comments Cancel reply

      Your email address will not be published. Required fields are marked *

      This site uses Akismet to reduce spam. Learn how your comment data is processed.

    1. Michelle M

      October 08, 2021 at 12:38 am

      Thanks for sharing your project. We just picked up some free glass shelves so I was looking for ideas. This looks great!

      Reply
    2. your dad

      November 18, 2016 at 8:32 pm

      soooooooooooooooooooo uugggglllyyyyyyyyyyyyyyyyy.belive me................................

      Reply
      • Gail Wilson

        November 19, 2016 at 10:10 am

        seriously, you have to say something so negative, why not just click away and move on?

        I hope you have a wonderful day, and that someone's smile will warm your heart and give you a good feeling.

        gail

      • Jenn

        December 08, 2016 at 11:16 am

        To commenter - your dad: Your ignorance is ugly. And you misspelled believe. If you didn't care for the shelf, fine, everyone is entitled to their own opinion. However, there was no need to criticize someone's creation; you should've just gone on about your day or better yet - go make something you do like, then post it for others to admire - or criticize, if they don't find it to their liking. Gail - kudos to you for using your time creating and inspiring others to take whatever they have in life and make it into something pleasing and useful. Maybe for Christmas that negative commenter will get a slice of happiness to fill up their empty, negative life. God bless you and your family this holiday season!

      • Gail Wilson

        December 08, 2016 at 11:23 am

        Jenn,

        I could have deleted the negative comment, but chose to leave it because everyone is entitled to their opinion. I appreciate your sweet comment, and it makes me so happy that you enjoy the projects I work hard to create. May God bless you and your family as well, wishing you a very Merry Christmas!

        gail

    3. Pati Sievert

      September 15, 2013 at 10:14 pm

      Nice job. Kinda hard to see it with an add over 2/3 of the screen that will not go away. (Purolator)

      Reply
    4. Stephanie

      April 08, 2011 at 3:51 pm

      You did a wonderful job on this! I love it. Your little tips on making things is so informative. The soap tip? I am going to have to pass that one on to my husband, I bet he doesn't know about that.

      Reply
    5. Lindy

      April 07, 2011 at 3:37 pm

      THAT is too cool!!!

      Reply
    6. Elisabeth

      April 07, 2011 at 11:54 am

      I think your shelves are very attractive.

      Thanks for the link to the magazine. It looks like a good one so I signed up for a free copy to look it over.

      Elisabeth

      Reply
    7. Cassie @ Primitive & Proper

      April 07, 2011 at 12:27 am

      i love it! i like the unique style and nice clean lines.

      Reply
    8. Cassie @ Primitive & Proper

      April 07, 2011 at 12:27 am

      i love it! i like the unique style and nice clean lines.

      Reply
    9. Toqua's Crafts

      April 06, 2011 at 9:12 pm

      I do like, very much!
      Kudos!

      Reply
    10. Nikki ~ Let's Craft!!

      April 06, 2011 at 9:00 pm

      Stop by my blog: http://bestpartofbelieveis.blogspot.com/
      I awarded you the stylish blogger award 🙂

      ~ Nikki

      Reply
    11. Sylvia

      April 06, 2011 at 8:28 pm

      Great job! You always impress me with what you can do with what you have hanging around your house. I love your blog b/c you are real... very talented and make your home fabulous on a real budget.

      Reply
    12. tale of many cities

      April 06, 2011 at 5:57 pm

      ooh girl! that's one fab DIY!

      Reply
    13. Two Dollars

      April 06, 2011 at 4:52 pm

      Oh and for the wibble wobble, can you add another layer of thin wood to the back, so that the D hangers become recessed?
      -Stefanie

      Reply
    14. Two Dollars

      April 06, 2011 at 4:51 pm

      Funny I JUST picked up some glass off of freecycle yesterday! I can't do anything like this yet, but hopefully one day. I'm deciding what to do with the pieces (3) they are that smoky glass off of the old entertainment centers/ coffee tables. One of them has metal brackets on the corners. I had a plan in mind when I got them, but since they look different than I expected I'm mulling 🙂

      Good job.

      -Stefanie
      2ndChanceCreations.etsy.com

      Reply
    15. Suzanne@Meridian Road

      April 06, 2011 at 3:09 pm

      The shelves look great, Gail! They'll be fun to accessorize, too.

      Thanks for the tip about the new magazine. I love that there are no ads!

      Reply
    16. Full Circle Creations

      April 06, 2011 at 2:23 pm

      I like it! You do such a great job explaining how you make things. I think I'd like it with wood shelves. Great job!
      Holly

      Reply
    17. Proper Prim

      April 06, 2011 at 1:58 pm

      Great shelf Gail... good job. I think if I was hanging that I would screw it directly to the wall.

      Hugs, Deb

      Reply
    18. Debilou ~ Mississippi Mama

      April 06, 2011 at 1:41 pm

      oh great,, i went back and read the comments where you said it may have been wood,, should've read that first..lol

      Reply
    19. Debilou ~ Mississippi Mama

      April 06, 2011 at 1:41 pm

      great job,, i really couldnt tell where you were going with it and since I dont really have a set style or know what my style is,, I love it. Wonder if this same basic idea could be used for wood shelves instead of glass??

      Reply
    20. Anita @ GoingALittleCoastal

      April 06, 2011 at 12:52 pm

      I like it! I'm always impressed that you just work with what you have. I can see it with a more rustic look too if it was lightly stained and roughed up a bit. Maybe even using 2 supports for a longer piece of glass. Lots of variations with this. Also agree with Rose about the hanger 🙂

      Reply
    21. allenaim photography and design

      April 06, 2011 at 11:36 am

      You are a beast! (in the BEST way possible!)

      Reply
    22. Coleen's Corner

      April 06, 2011 at 11:20 am

      Yes - I like it too!

      Reply
    23. Granny

      April 06, 2011 at 10:40 am

      It looks great and I'm sure you would have no problem selling it. I think Rose is right with the suggestion of the keyhole hangers on the back.

      Reply
    24. Rose @ Confessions of a Curbshopaholic

      April 06, 2011 at 10:12 am

      I like it too! Not my style, but I like how it looks. Not sure about the d rings, do you mean you attached them at the top and bottom? Maybe it would sit better with a couple drilled out keyholes to hang it from? I can see that it must be pretty heavy!

      Reply
    25. Shawna

      April 06, 2011 at 7:13 am

      Oh I definitely like it!! It looks professionally made, great job!!!

      Reply

    Primary Sidebar

    Hi, there! I’m Gail Wilson, the author and mastermind behind My Repurposed Life. I’m obsessed with finding potential in unexpected places and believe that with a little hard work and imagination, any old thing can be made useful again—myself included! I hope you’ll enjoy the journey and pick up a few tools along the way… literally!

    More about me →

    Join Our Mailing List

    ​

      Click the topics you're interested in below:

      Subscribing above means you agree to our Privacy Policy​

      Footer

      ↑ back to top

      SEEN ON

      Might I Suggest

      • Start Here
      • Furniture Makeovers

      Newsletter

      • Sign Up! for emails and updates

      About

      • Gail's Favorites on Amazon
      • About

      As an Amazon Associate I earn from qualifying purchases.

      Copyright © 2023 My Repurposed Life · Privacy Policy · Disclosure