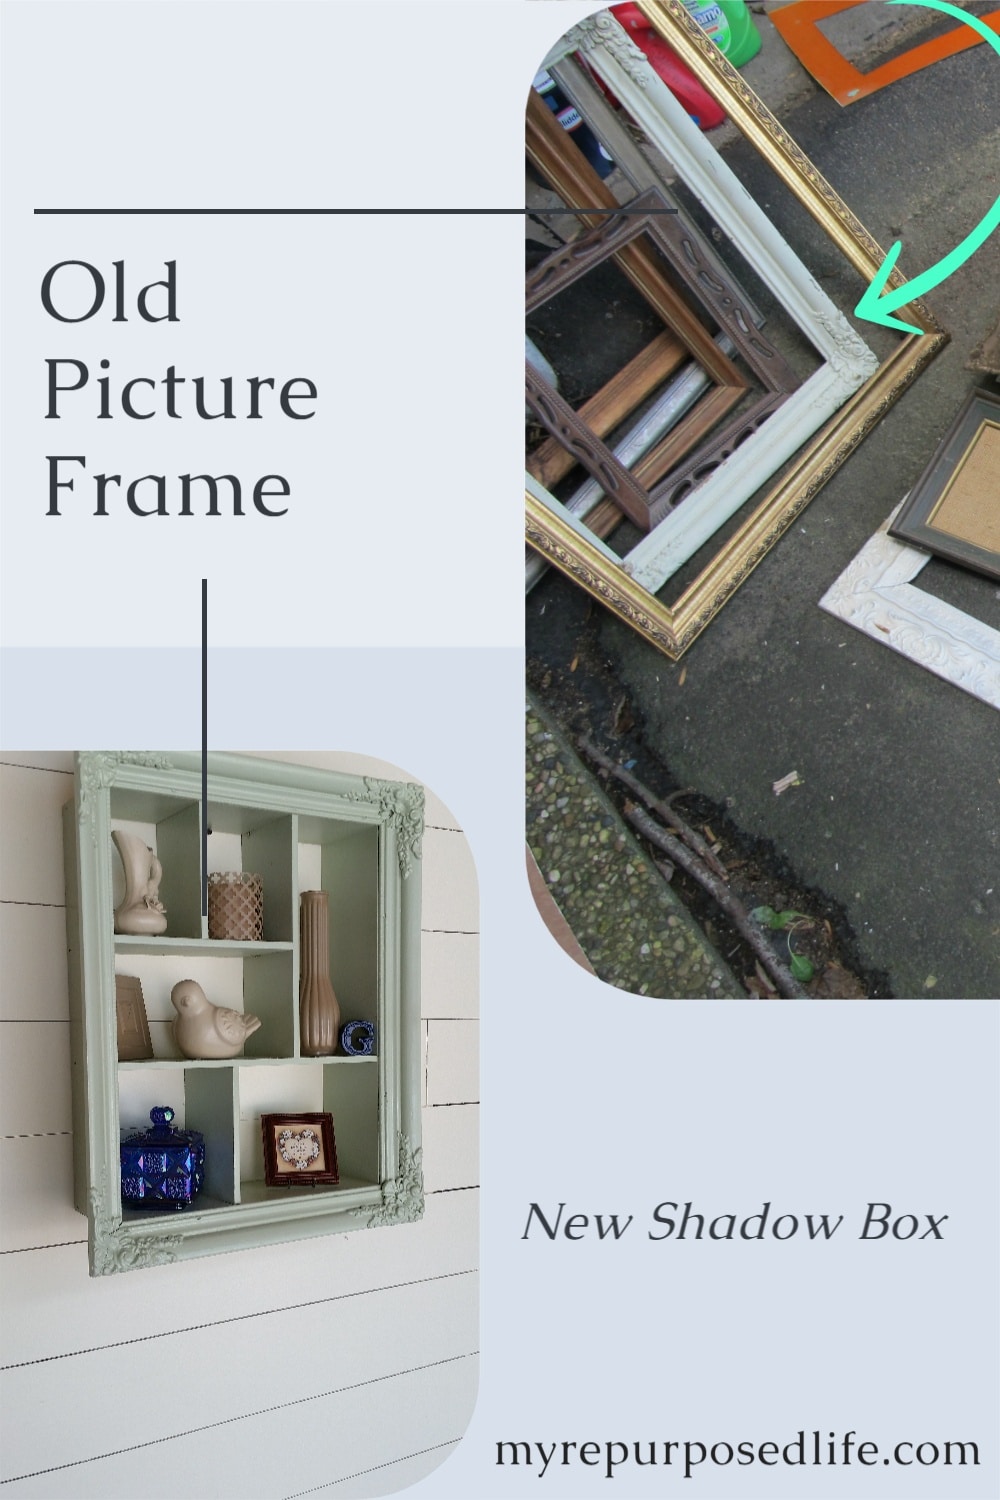
Picture Frame Shadow Box
As an Amazon Associate, I earn from qualifying purchases.
Repurposing is all about seeing hidden potential in the everyday, and this Picture Frame Shadow Box project does exactly that. By combining an ornate thrifted frame, reclaimed drawer wood, a splash of spray paint, and a few simple building tools, you’ll transform odds and ends into a stylish, multi-directional shelf that fits any room. Whether you’re after rustic charm, farmhouse flair, or a bold pop of color, this DIY lets you personalize every detail, no expensive materials required.


Thrift Store Picture Frames
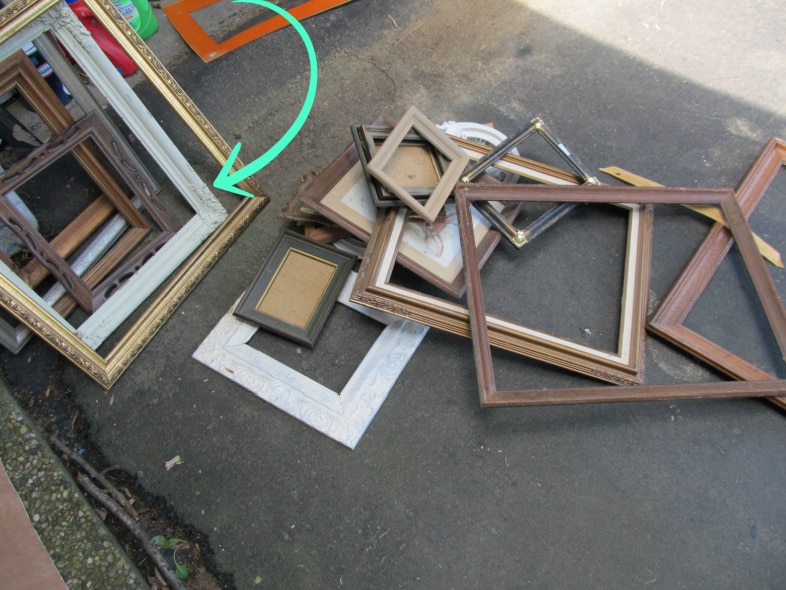
Let’s begin at the beginning. ![]() I am a hoarder and lover of frames. I even have a frame “dept” in my garage where I store my extra frames. The repurposed picture frame shadow box project I’m sharing uses the frame the green arrow points at.
I am a hoarder and lover of frames. I even have a frame “dept” in my garage where I store my extra frames. The repurposed picture frame shadow box project I’m sharing uses the frame the green arrow points at.
This Picture Frame Shadow Box was featured in Country Sampler Farmhouse Magazine!

Designer Challenge: Old Frames, New Uses!
I sold this shelf years ago. Can you imagine the owner or her friend looking through this magazine and seeing the shelf inside?
Paint Sprayer Marathon of Old Frames
A couple of years ago, I had a primer painting party where I painted a whole bunch of frames at once. The frame in question is shown with the black arrow. So, I’ve had it for a while, and it’s been waiting for the perfect repurpose.
The problem was finding some sturdy wood for the box and dividers, but my typical 1x’s would be too thick.
Repurposed Drawer Parts
My solution? I’m using the wood from these thrift store drawers. You can see it’s thicker than underlayment (too thin) but thinner than 1x (too thick).

Handy Tip From Gail-Dismantle drawers to harvest wood for future projects!
Dismantle Dresser Drawers | Harvest the Wood
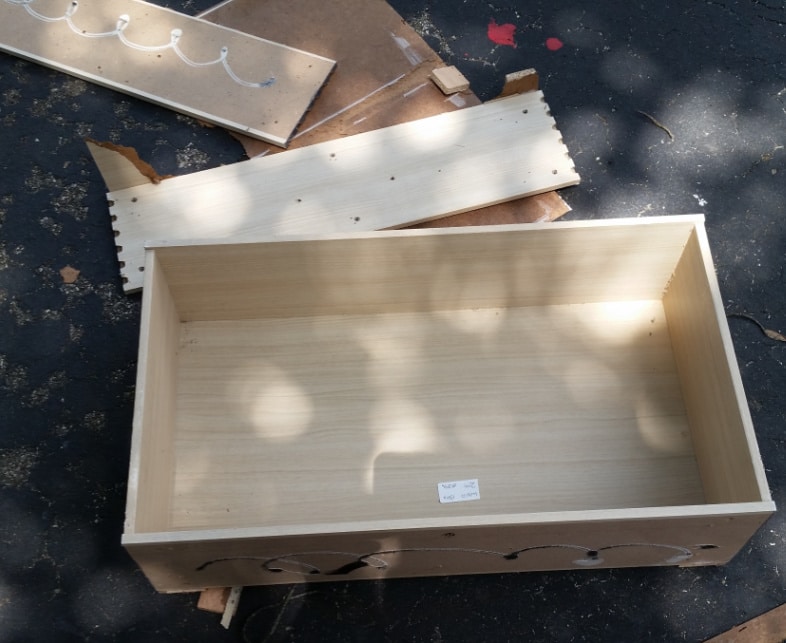
I dismantled the drawers with a rubber mallet and used mostly the longer rear boards for the shadow box’s frame. The front board had some holes and glue residue on it.
Related Content: Repurposing Wood From Old Furniture
How to Build a Picture Frame Shadow Box
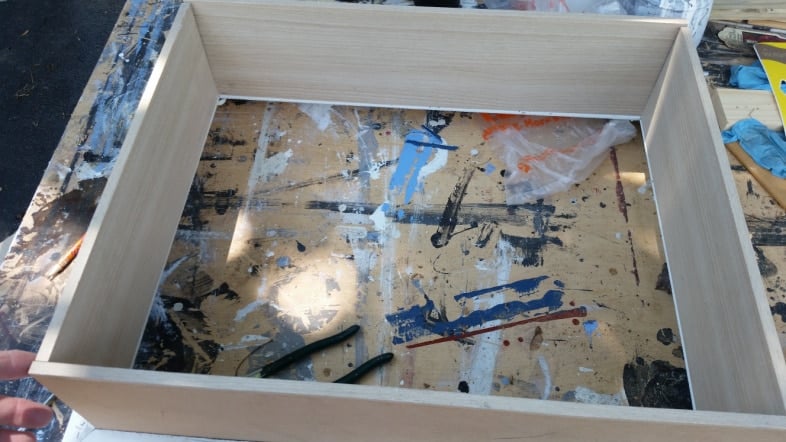
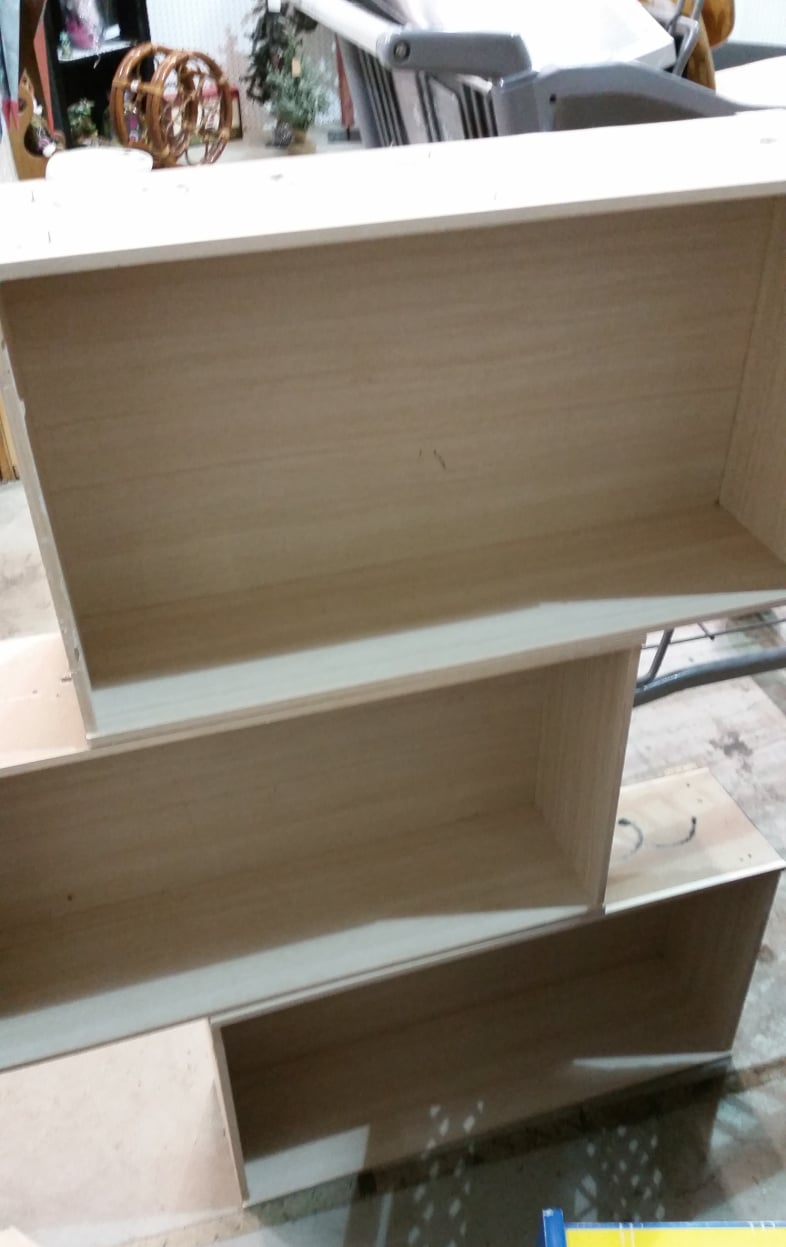
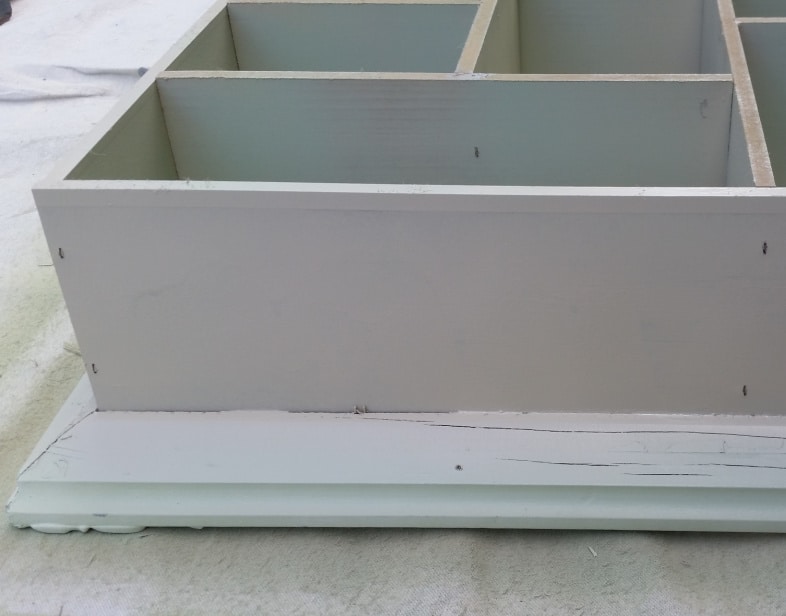
I cut my repurposed drawer boards to size to fit them inside the picture frame.
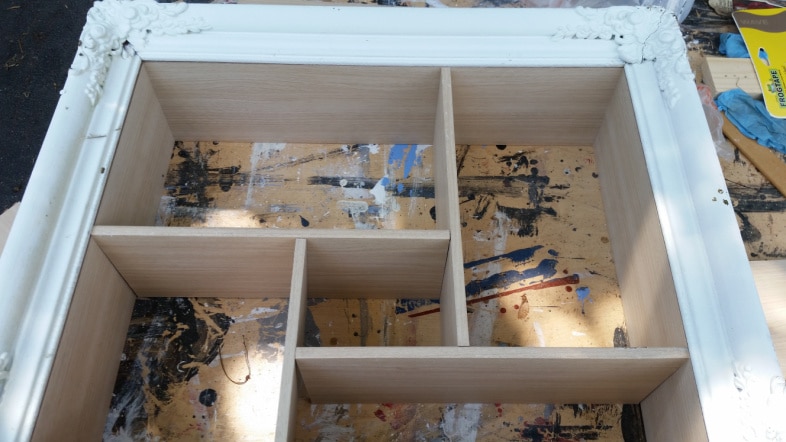
This is a dry fit while I figure out the configuration of the shadow box dividers.
Visit the My Repurposed Life Amazon Store to shop my favorite items.
Use Clamps and Wood Glue

It was a bit tricky to get all of the dividers in place. I used Gorilla Wood Glue, a speed square, and my Ryobi nail gun.
Of course, a clamp is handy for holding the pieces in place while you nail.
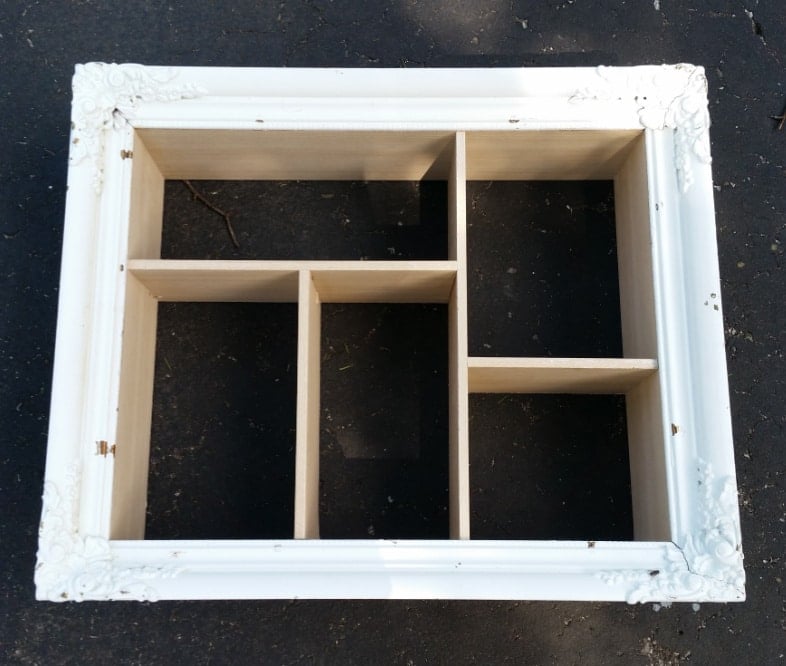
This is the final design of my picture frame shadow box.
Spray Paint Picture Frame Shadow Box
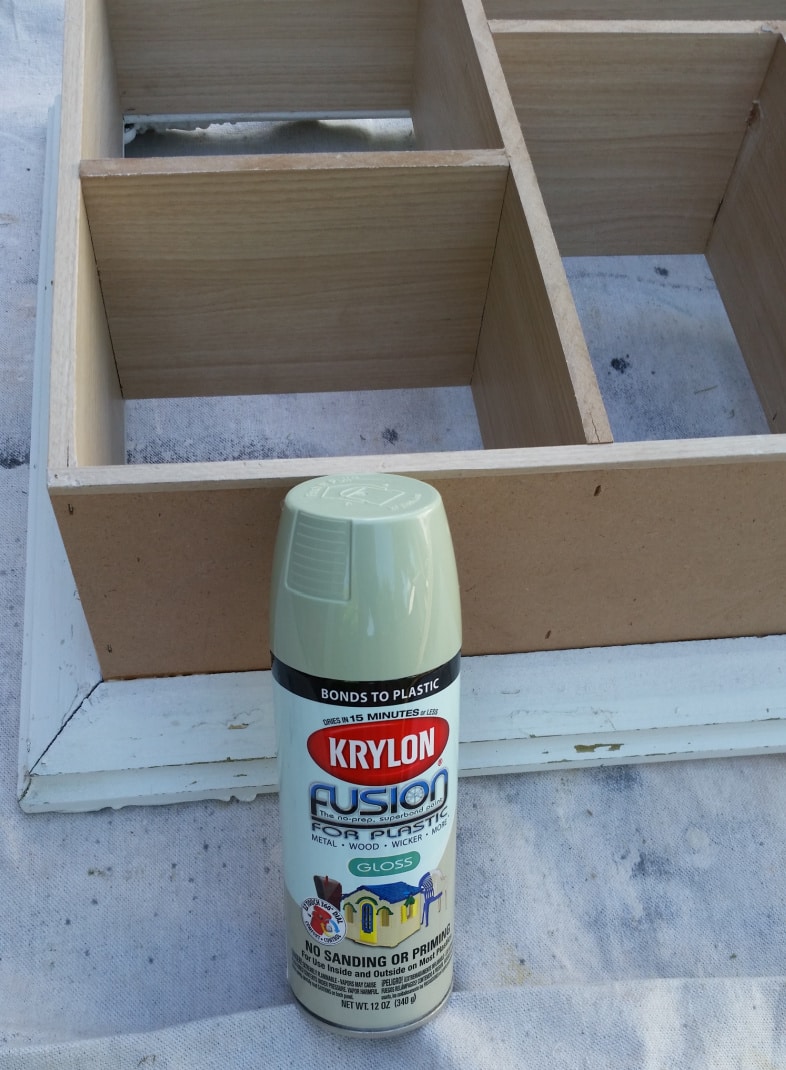
I used Honeydew spray paint; it’s the prettiest green! In this photo, you can see where I shot brad nails with my nail gun.
The Fusion paint didn’t want to adhere to this cheap MDF wood, so I used the Almond MAXX as a primer. As you can see, the Honeydew worked great on the frame.
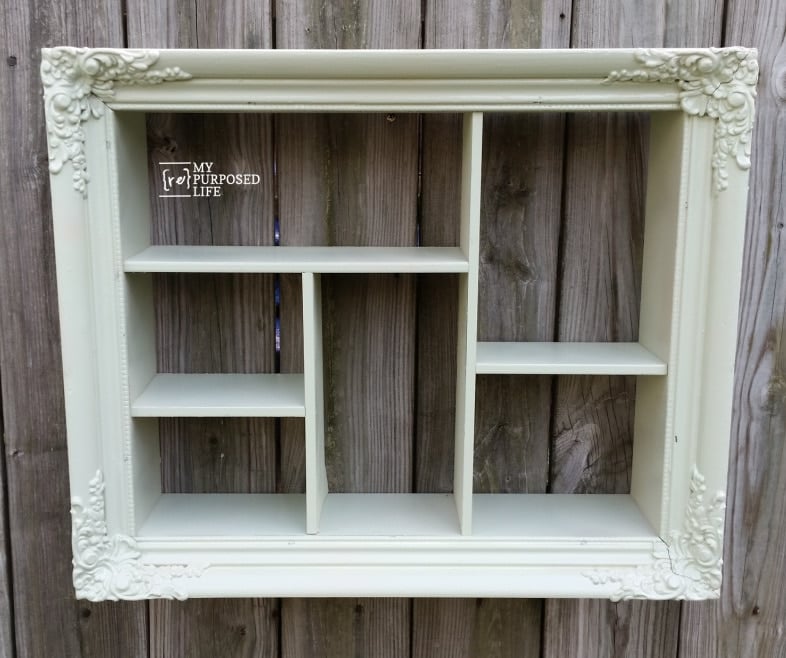
After a quick coat of the Almond, the Honeydew looked great on the cheap MDF dresser drawer wood.
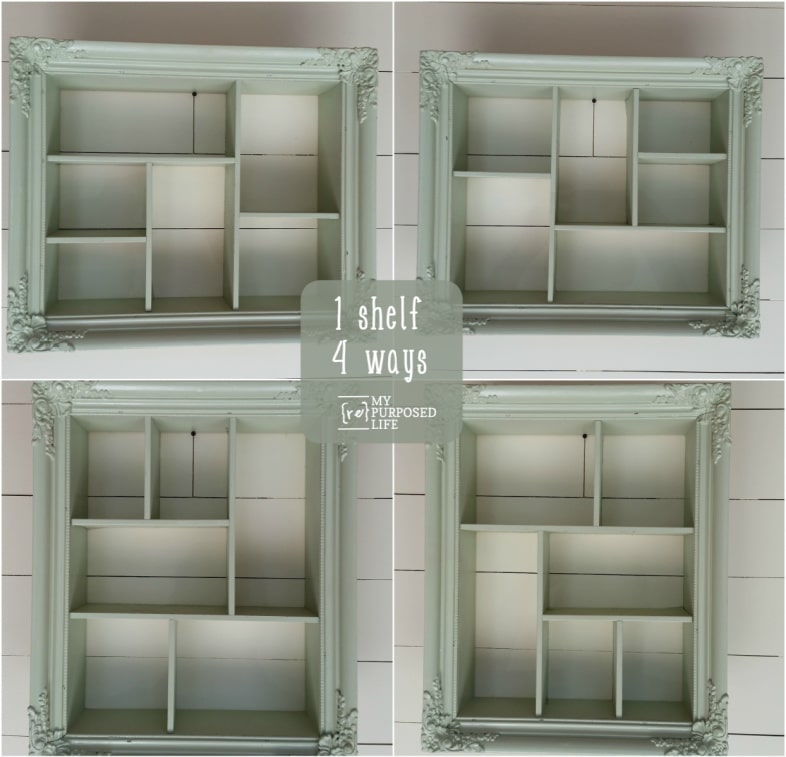
Do you love this shelf’s versatility as much as I do? Depending on the items you want to display, it can be hung four different ways.
Please Save & Share on Pinterest!
Updating Thrift Store Items With Spray Paint
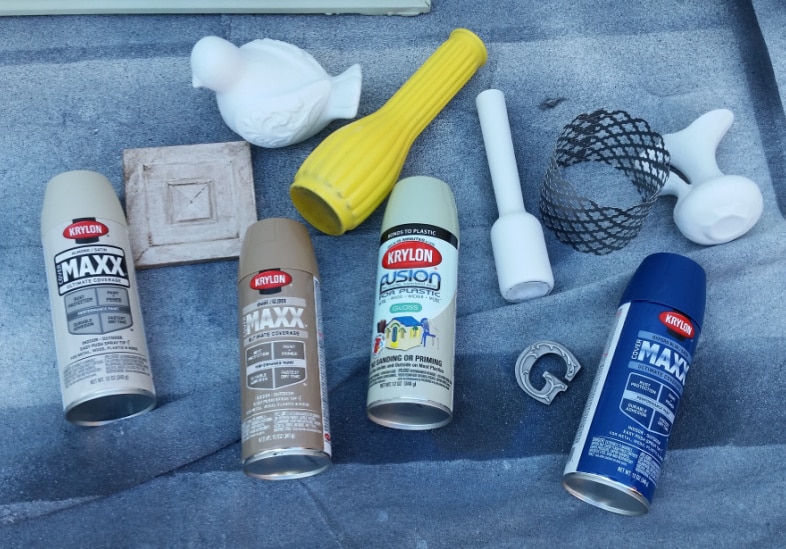
These are the thrift store items I gathered to spray paint. Some had already been used (and painted) by me. That’s the great thing about painting—it’s so easy to change up your décor!
Homeright Spray Shelter
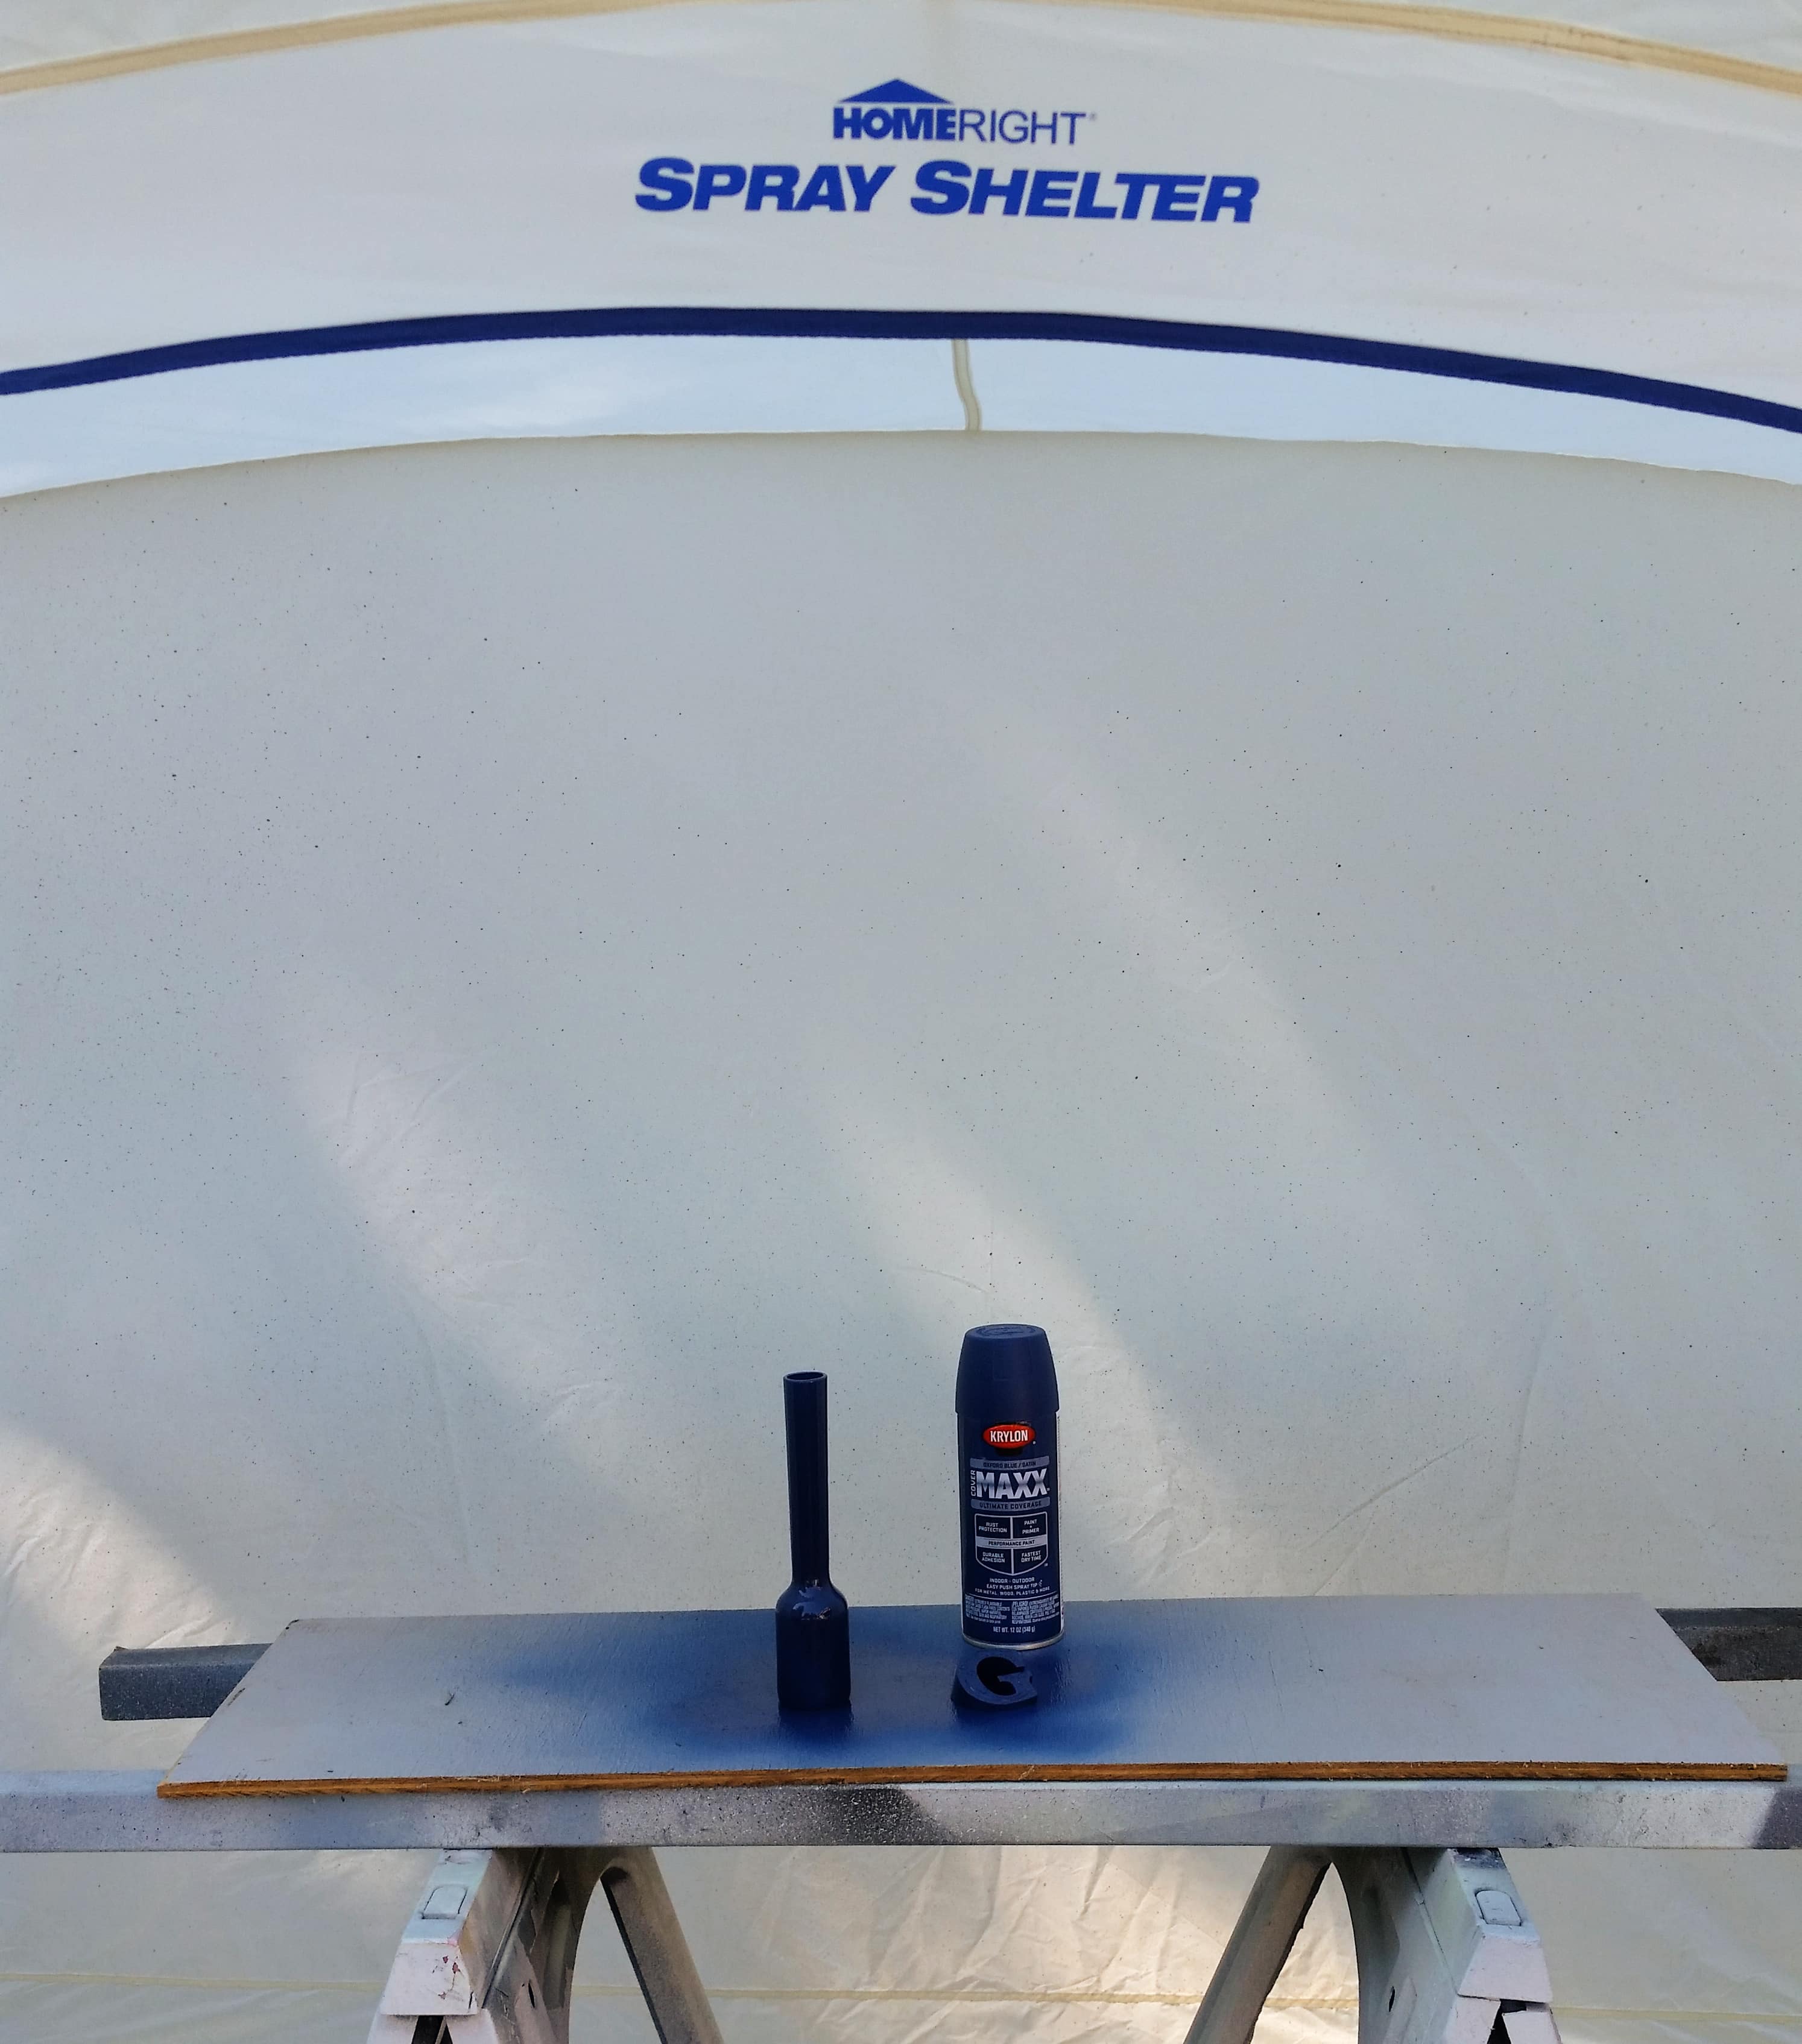
The small white vase got an Oxford Blue finish. I spray-painted it in my Homeright spray shelter on scrap plywood. I picked up the board and moved it aside to do another color.

The vase, candle koozie, and little architectural piece were spray painted with Khaki.
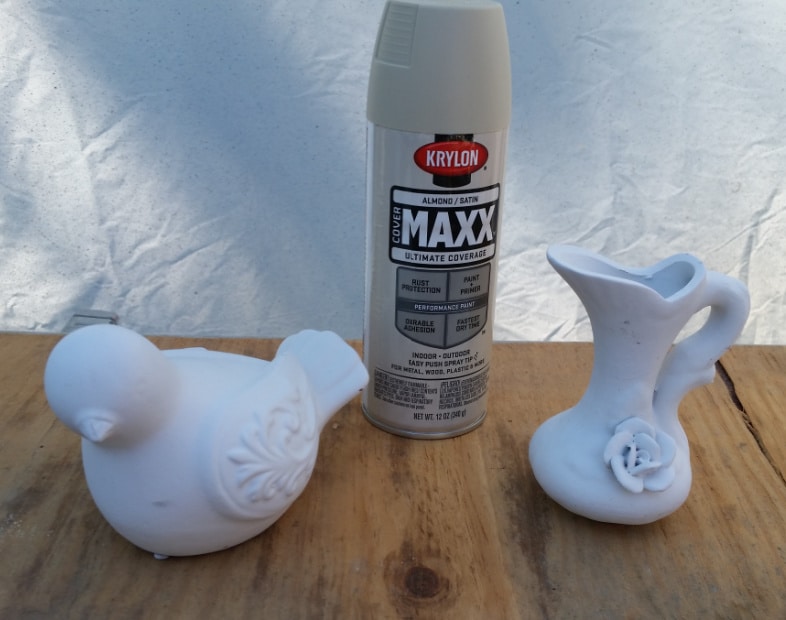
This bird and vase were painted with Almond. I liked both of these items in the white chalky paint, but I loved them even more after I painted them with this Almond color.

My “G” also got some Oxford Blue. Isn’t it fun to see the shadow left behind when spray painting?
Pretty Green Shadow Box
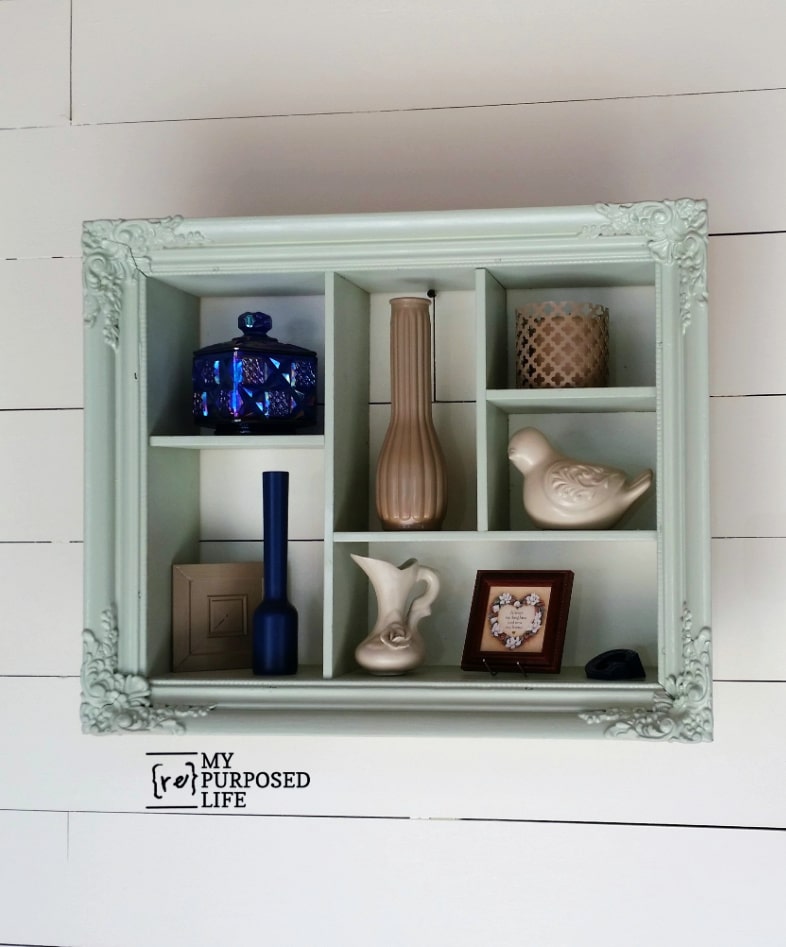
Ah, my shelf makes me smile! I thought I loved the Oxford Blue the best, but I really love the bird and vase in Almond.
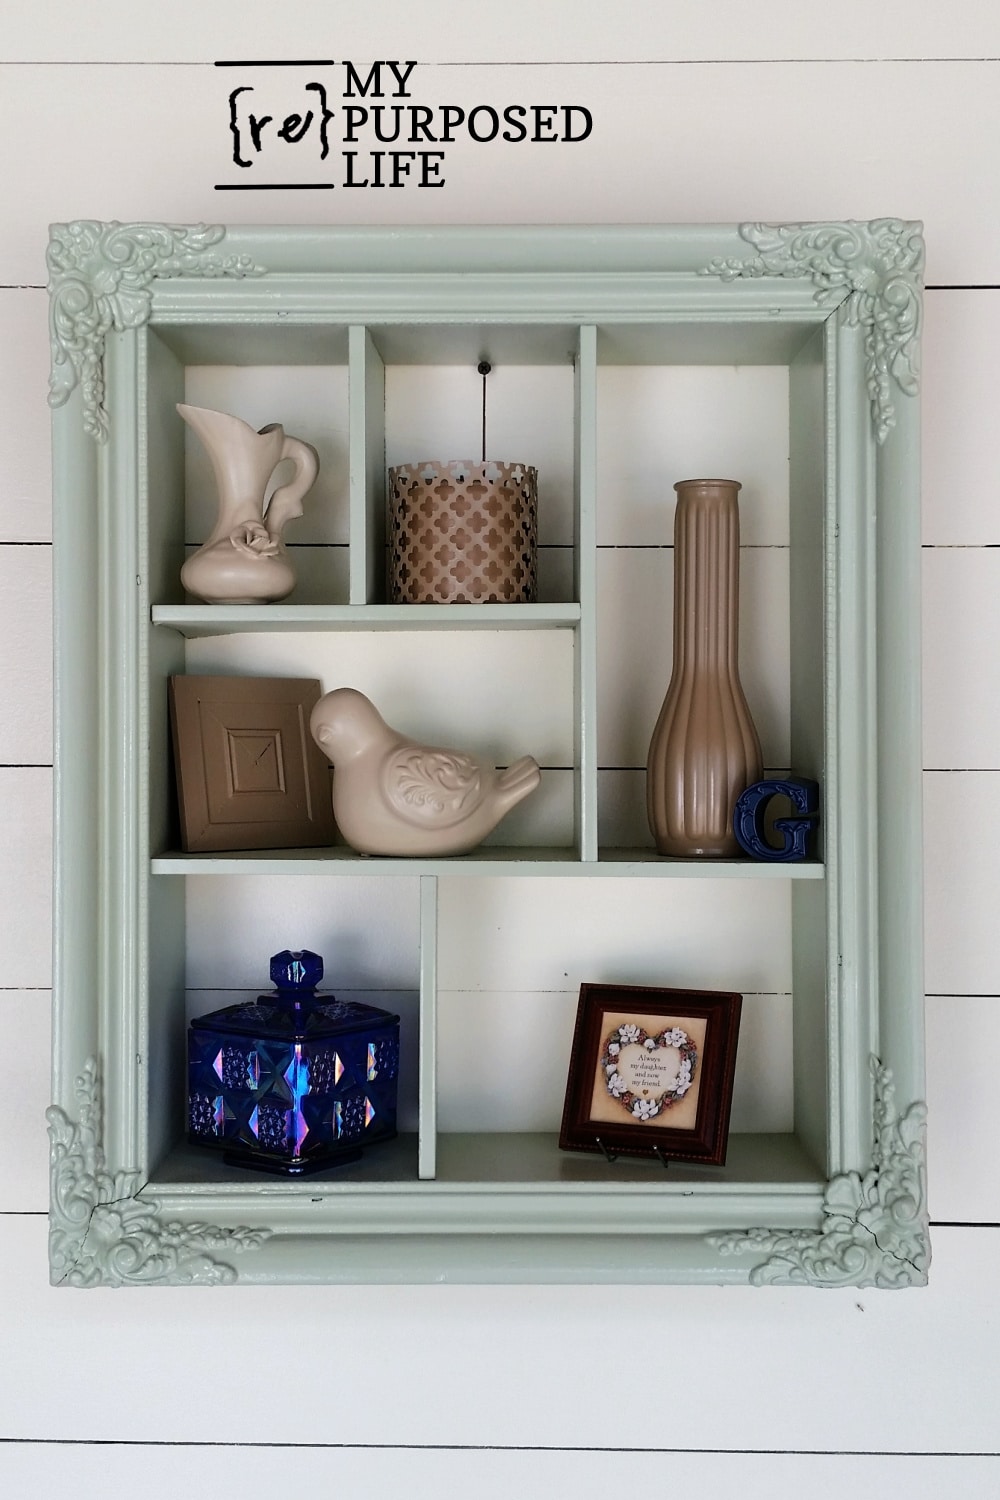
Here, it is styled vertically instead of horizontally.

I chose not to put a back on this piece to let the wall color show through. It would be easy to put a back on it or even decoupage some fabric on the back. There are many ways to customize a project like this, especially if you’re using spray paint to quickly (and easily) change up your items to suit your mood or the season. ![]() It’s paint!
It’s paint!
See an easy tutorial in my post Small Black Shadow Box, or Simple Rustic Shadow Box.
There is something satisfying about giving forgotten objects a second life. This shadow box demonstrates that a bit of creativity and patience can yield a project that feels fresh and personal. From the color you choose to the way you style each section, you make it your own. Once it is finished and ready to hang, the shadow box will serve as both storage and decoration while sharing your story.
Soooo — about my shelf …… what would you do differently?
gail
Related Content: Picture Frame Ideas For Home Decor and More
sharing here:
Thank you
Kathryn,
You’re welcome! Thanks for stopping by!
gail
Really Nice!
In your third picture, you have a couple of frames, I would love to buy from you if you are interested.
Charlie,
Unfortunately all of those frames have been re-homed already.
Thanks for stopping by and taking the time to leave a comment.
gail
So inspiring !! I love your shadow box 🙂
Thanks for the detailed instructions. Sooo helpful for us who don’t use tons of tools. (Power saws can be intimidating )
I had saved the old divided light windows from my last home, and had a handy man make ‘boxes’ for them with adjustable shelves. I so love them in my craft room with all the colorful craft materials peeking thru.
So, I know I’d love a shadow box ! Thanks for the inspiration.
p
Thank you so much, I love how this project turned out. I think your project must be beautiful, and having it from your former home, that’s soooo sweet.
gail
It’s really cute and the color is great.
Lizzy,
Thanks!!! I truly love how this project turned out. I appreciate your comment.
gail
I actually remember a shadow box my mother had when I was a child. I loved it so much and I was going to make one to try to replicate hers. In my travels of thrifting, I was telling this gentleman that I was picking something up from about my idea. He said oh hold on I think I might still have one. He went in his garage and then down to his shed and came back back with not only a shadow box, but the exact one that my mother had. I absolutely couldn’t believe it. I paid a little more than I wanted to for it considering it was in pretty bad shape but I knew I could restore it and make it what I wanted. I haven’t finished it yet because of other commitments but soon, very soon!
I love yours immensely! Not my color t all but it’s just gorgeous otherwise!
P.S. I forgot to ask…what width is the wood in the center for the cubbies?
Shirley,
The cubbies are all random sizes, I’m sorry I don’t have the exact measurements.
Your story brought tears to my eyes. How wonderful that you found that treasure. I’m really, really happy for you!!
gail
The only thing I might add is a dry brush of a chalky white paint on the corner embellishments, and along some of the edges to give a bit of a distressed look.
Or, perhaps a gold buff wax.
Beautiful frame, excellent idea. Love the paint that can be used on so many different surfaces.
Thanks! This shadow box picture frame has now found a new home. I did end up sanding the designs back a big to make them stand out before I sold it. I appreciate you stopping by and taking the time to leave a comment.
gail
Thank you for your comment, I love your ideas. Spray paint projects can be sooo quick and easy.
Thanks for stopping by and taking the time to leave a comment.
gail
I like it. It gives me an idea for what I can do with my father’s purple heart and a picture of him getting it.
Ohhh Brette… I’m so happy that you are inspired by my picture frame shadow box project. What a wonderful way to honor your father.
gail
hi…love the idea of using the dismantled old drawers for the shelves…i have a question.. did you use your nail gun for attaching ALL the shelves. im just wondering how you managed to fit the gun at the proper angle on the last shelf that you insert. what the sequence that you put the shelves in?…or did you did the shelves first, then place them inside the outside sides, then place the frame on top..thxs michele
Michele,
As I mentioned above . . . it was a little tricky getting all of the dividers in place. I used Gorilla Wood glue, a speed square and my Ryobi nail gun.
I nailed where I could, carefully planning my strategy, and used Gorilla Wood Glue for extra help where I couldn’t get the nail gun positioned. If you make one, just take it one step at a time, and work with your shelves until you have to look you love. I always start by making the outer “box” first, then make my shelves to “suit” me. 🙂
Thanks for stopping by!
I love, love, love this!!! I have a big frame that could be perfect for this! Can I ask how you attached it to the wall? Did you add some kind of hardware?
Stacey,
Thank you for your kind comment!
So far, I have only hung this on the wall for a photo op, resting it on a screw. Using two screws would be a very easy option. I typically use “d” rings for all of my hanging projects.
Have fun making your own. Please email me a picture, or share on Facebook! I’d love to see how yours turns out.
gail
Thinking about doing this for Christmas gifts. Putting a backboard with pics of family showing out. Then could put small objects in the shelves with nephews etc peeking out over them.