I made this coat rack wall shelf last month to give Jamie for her birthday. I couldn’t blog about it until I actually gave it to her. 🙂 Her birthday was Saturday (May 29th). So, here ya go!
DIY Coat Rack Wall Shelf


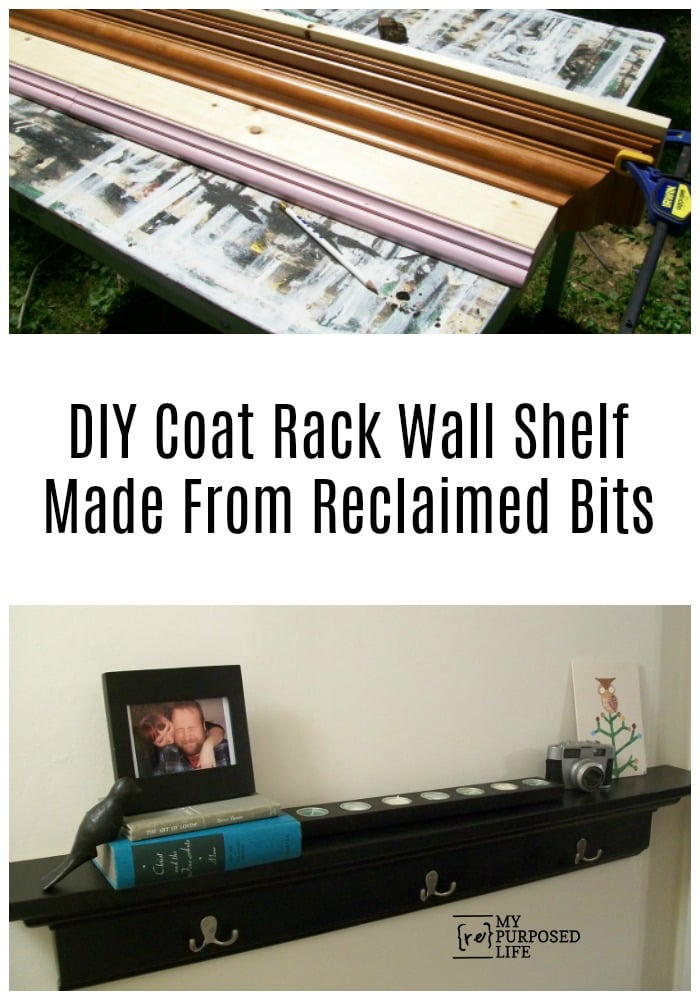
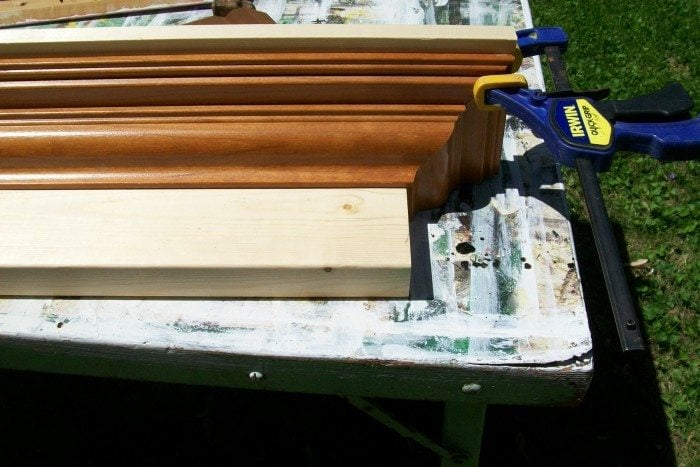
I actually bought some new material for this shelf. I needed a 2x6 and a 1x6. This is a “dry fit” to make sure everything is going to work out. I actually messed up on the first 1x6. I underestimated the length needed due to the crown molding.
Design Coat Rack Wall Shelf
.
I got a deal on this crown molding. I bought it at the peddler’s mall for $3.00.
Using Quick Clamps

I love these quick clamps. They are great for a project like this because they squeeze shut and they have soft edges, that don’t mar the wood. You can see here the 1x is a little too long, I’ll have to trim that up.
Reclaimed Wood Trim for Shelf

This small pink molding was a gift from a friend’s husband. He was trying to give me everything in his basement! I said yes to this molding, some larger molding and a very large mirror. Thanks Ed!

Now that I’ve trimmed it up, it’s looking pretty good!

From the end, maybe you can see how it’s shaping up.
Construct Coat Rack With Nail Gun

I used my nail gun to fasten it.
Line up Trim Carefully

There’s still a slight overhang on the edge. Oh well, Jamie would never know if I weren’t blogging about it.
Joining Two Pieces of Crown Molding

The small pink trim were all short pieces, therefore I had to piece it together.
Use Spackling Instead of Wood Putty

I used some spackling and then sanded it down real well.
 Another thing Jamie would never know about if I weren’t telling the world.
Time for Paint-Primer

Time for some oops Kilz. Do you remember I bought it for $5.00 at Home Depot a couple of months ago? I really like the color of it.

When I’m painting something like this laying on it’s back, I try to raise it up so that the paint doesn’t make a seal and stick to the table.

Several Coats of Spray Paint

I decided to spray paint it black instead of painting it with a brush.

I gave it many light coats of black.

Coat Rack Wall Shelf - Add Hooks

I bought five of these hooks on clearance at Meijer. I wasn’t sure how many Jamie wanted. This is where I just laid them on there to see how pretty they looked!
Black Coat Rack Wall Shelf

I took this shelf to Jamie when I went to help her with her deck. I had hoped to screw it directly to the wall (studs) and then place the hooks over those screws. However when I got there, Jamie reminded me that this was a spot we had patched drywall. It used to be a doorway to her living room. The previous owners had put up faux brick paneling in the living room, but had sort of made a “shelf” in this doorway area in the hallway. Long story short, there were no studs.

We bought keyhole hangers and mollys. Jamie played around with staging it a couple of different ways.

Jamie’s friend Dawn painted the owl, isn’t it cute?

Jamie decided she only wanted 3 hooks.


This is artwork that Jamie had hanging in this hallway prior to the shelf.

With no natural light nearby, it was hard to get a good picture.

I am really pleased with how all my mismatched pieces came together to make a really nice shelf! I inscribed the back so that Jamie will always remember when I gave her this shelf.
gail
This project was featured at:

Gail Wilson is the author and mastermind behind My Repurposed Life. She is obsessed with finding potential in unexpected places and believes that with a little hard work and imagination, any old thing can be made useful again, including herself!
Gail reinvented herself during a midlife crisis and has found purpose again. She hopes you will find new ideas for old things and pick up a few tools along the way.
Janet
Wow! You did an amazing job making this shelf! I never would have imagined it started out as some pieces of scrap wood. Thanks for the link. 🙂
Brandi
I love this shelf, you did a great job!
Inspire Me Heather
I know this post is older but I like it anyways - great looking shelf and fantastic tutorial! I linked it to my shelves post today too, well done!
Kristy Evans Photography
I love it! Crown molding makes my brain hurt too! Yay for you for figuring it out!
La Maison Reid
That is really neat. I'm gonna have to make one for the beach house. Love, love love what you did. You're a great friend! Wanna be my friend? 🙂
Nancy
Funky Junk Interiors
What a great piece! Looks pretty slick in black. And thanks for showing how all those components went together. You sure know how to pick your moldings!
Donna
Suzanne
That's a great looking shelf!
I wish we had a peddler's mall~it sounds like an awesome place,
Anne - Fiona and Twig
Better than PB as far as I'm concerned! 🙂
~mel
Great job on the shelf! I too like to refurbish ~ make new from old ~ or repurpose something. Thanks for sharing your projects!!
Prior
The shelf is awesome! Lezlee
Corn in my Coffee-Pot
Love the shelf for your daughter. When my birthday rolls around maybe I'll get something snazzy...made out of fantastic scraps! lol...
great repurposing; always great ideas at your spot!
Melanie Beth
Wow it came out looking great! I have been looking for something like this for my front room but even really cheap versions are so expensive! I love the way you pieced together things you had on hand, now I just need to go and see what I have lying around...
Suzanne
So pretty. I love it. I'm always amazed at how you take a piece of this and that and make something fabulous!
Candace
Great work! I love how you pieced it all together with your Peddler finds, it looks fantastic! Jaime is lucky to have you. By the way, the deck was incredible and the tables....oh my! 🙂
Proper Prim
Gail you aced that shelf... looks absolutely amazing. I can tell you it is built way better than anyone you could buy out there. I am a shelf addict.
I am sure Jamie will cherish that one for a very long time.
Hugs, Deb
Linda
What a great project, Gail! Just hopped over from Corn in my Coffee Pot~ I LOVE your blog and am looking forward to reading more~ I'm a new follower!
Amanda
You did a fantastic job on this! And I have to tell you, you've inspired me to look beyond the "throw-aways" and transform them into beauties -- I did a Pottery Barn inspired light for today's post -- so THANK YOU for your inspiration! 🙂
★All Thingz Related★
The shelf turned out great! Love it! We used to love going into Peddler's Mall when we lived in Louisville! You could always walk out of there with something! One of the many things I miss about Louisville. 🙂
{Rebekah}
junkermidge
The shelf is gorgeous! You did an amazing job. And it's great that you clearly show how it came together -- including what you think are oops. I bet Jamie is proud to show it off.
Midge
Pressed Petals
LOVE it! thanks for the inspiration!
Stella
Wonderful how you pieced all of the different pieces of wood together and came up with that great shelf. However, I am liking the table you were working on.
Denise
Look out Pottery Barn... your shelf is better than one of theirs of course because you made it with your own hands!
Granny J
The shelf is beautiful and it will mean more to Jamie than any shelf you could have purchased. You did a fantastic job of marrying all those wood pieces together.
I'm off to check out the remodeling guy now.
Rose
That came out really great! I never heard of the remodeling guy. Have to save that link.
Crown molding is such a pain to measure and cut, I really hate it. Makes my brain hurt! Love how all the scraps came together to make such a pretty piece!