• Skip to primary navigation
  • Skip to main content
  • Skip to primary sidebar
  • Start Here
  • Shop Favorites
  • About
    • Welcome To My Repurposed Life Home of Repurposed Furniture
    • More About Gail
    • Disclosure
    • Privacy Information
  • Gallery
    • Repurposed Furniture
  • Repurposed Items
    • Building Supplies
    • Miscellaneous Household Items
    • Picture Frame/Chalk Board
  • DIY
    • Home Reno
    • outdoor living
    • Painting
    • Shop Talk
    • Tips for Around the House
    • Build It
      • Furniture
      • Home Decor
      • Storage
    • Crafts
      • Dollar Store
      • Easy
      • Holidays Seasonal
  • Furniture
    • Chair
    • Desk
    • Dresser/Chest
    • Headboard | Bed Parts | Cribs
    • Kids Furniture
    • Table
    • Kids Furniture
My Repurposed Life® Rescue Re-imagine Repeat
menu icon
go to homepage
subscribe
search icon
Homepage link
  • About
  • Start Here
  • Project Index
  • Furniture
  • Subscribe
    • Email
    • Facebook
    • Instagram
    • Pinterest
    • RSS
    • Twitter
  • ×

    Home » Repurposed Furniture » Under the Bed Storage

    Under the Bed Storage

    Published by Gail | Published August 22, 2014 | Updated April 9, 2019
    As an Amazon Associate I earn from qualifying purchases.

    Pin
    Share
    Tweet

    A while back I picked up 4 drawers for free, and to be honest, I can't remember where I got them. 🙂  Over the past few months when I would see them I would envision different ideas of how I could use them, but nothing really "clicked".

    Being a busy mom, I decided that they could finally help me out by becoming some much needed under the bed storage for my youngest boy. Aaaaand it didn't hurt to get them off of my back porch that is SLOWLY making progress,  I wanted it to be done two months ago, and it. is. not. done. I did say I was a busy mom...right?! Anyway...

    Under the bed storage, repurposing drawers


    I love how they turned out! Let me show you a before of the drawers.

    old drawers

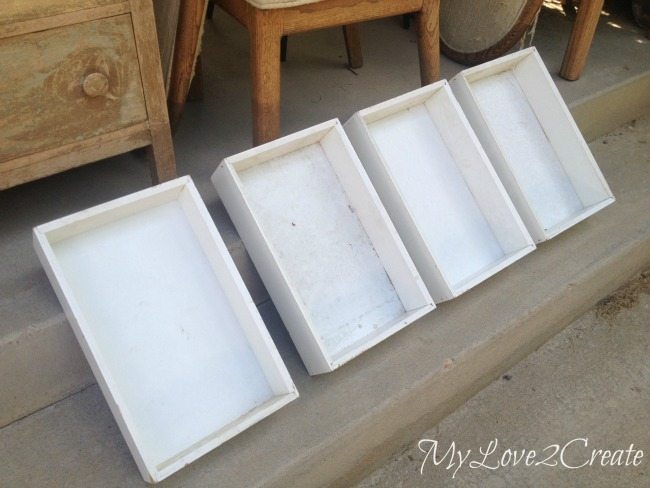
    I am not sure what they were used for because they had no "fronts" and no pulls. But they were in great condition and good sized, just a little dusty.

    marking scrap plywood for a bottom to the drarwers

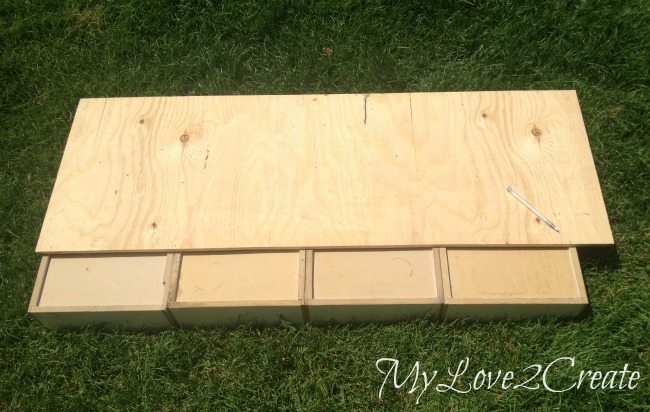
    The idea to turn drawers into under the bed storage is not new by any means, I have seen several different versions...and here is mine. I started by laying out the drawers in a row and marking on a scrap piece of plywood where to cut to make a bottom. Then I trimmed off the end with my circular saw. Luckily  I only had to trim one side. The depth was almost perfect already, just a little bit short, but good enough!

    Spray painting insides of drawers

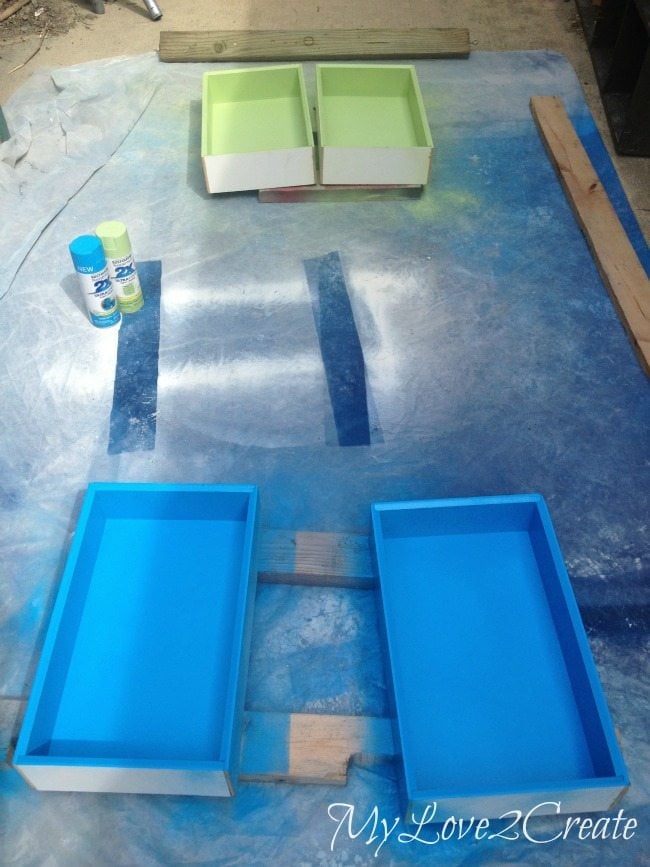
    Instead of building first I opted to spray paint the inside of the drawers. I had these two left over cans from my Old Chairs into New Bench and Old drawers into Porch Planters (wow...I come up with some really original titles, lol!)  Both projects were first seen here on My Repurposed Life, Here and Here.

    I thought these colors were perfect for my boy's room, plus they match his bedspread, sa-weet!

    Glueing and nailing drawers together

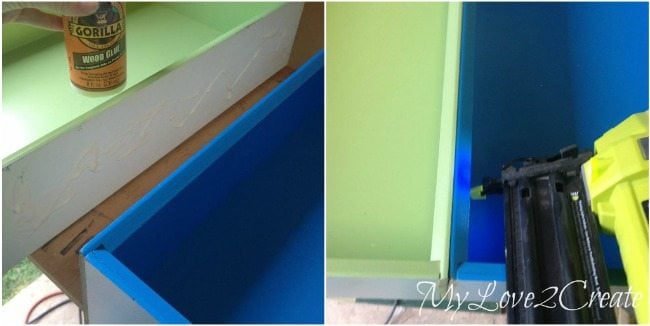
    After the paint dried, I glued and nailed all four drawers together, making them into one piece.

    attaching plywood to bottom of drawers

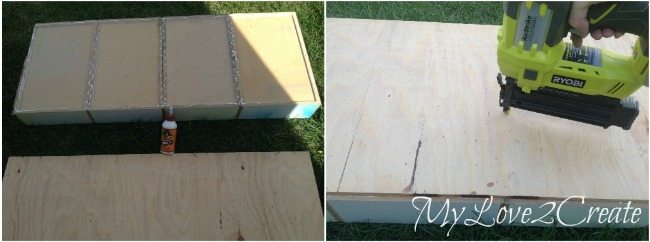
    Then I flipped them over and glued and nailed on the plywood bottom to make them really sturdy. You could add screws as well.

    Adding casters to bottom of under the bed storage

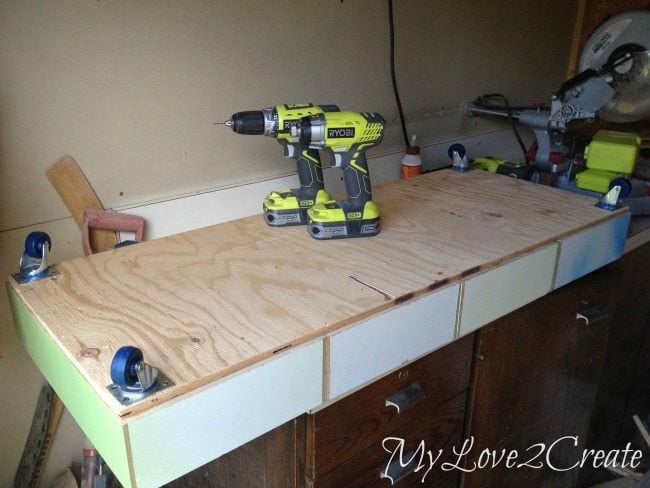
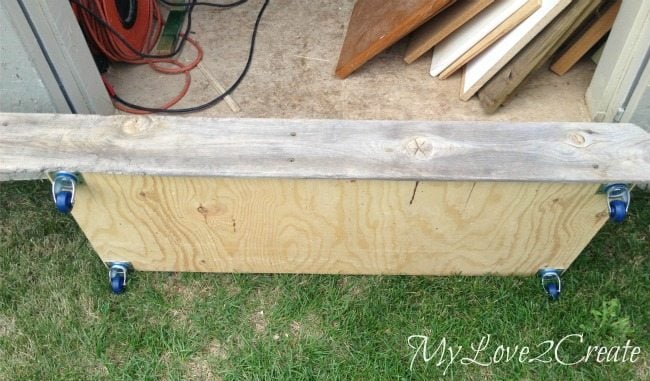
    The most important part was adding the casters so my little guy can easily pull out the drawer storage. I picked these up on sale for a dollar each at Harbor Freight back in March when I was helping my sister do her Closet/Laundry Room Makeover. You can't beat 4 dollars! I pre-drilled and screwed them on.

    fitting old fence wood for front piece

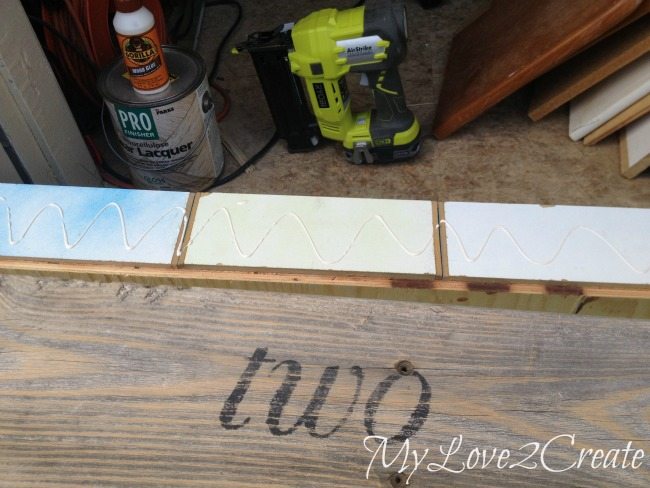
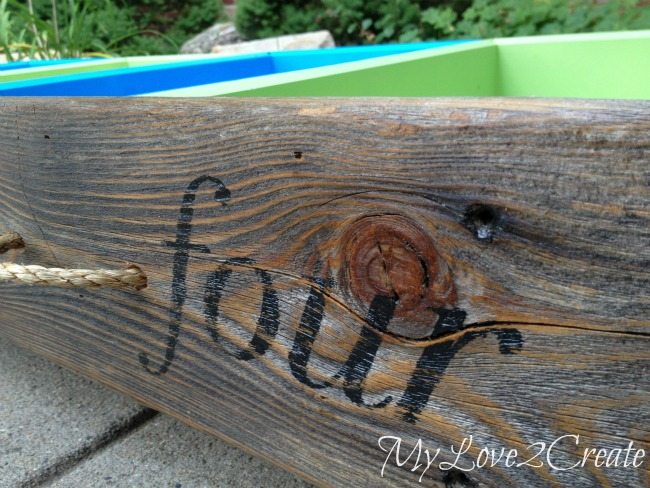
    For a front piece I debated for a while and finally decided to use this great old fence board. It was the last one from when I made my Long Tapered Crate, and it was perfectly imperfect, awww the rustic goodness of reclaimed wood.

    I set it on the drawers, marked the ends and cut it to fit.

    contact paper to stencil on words

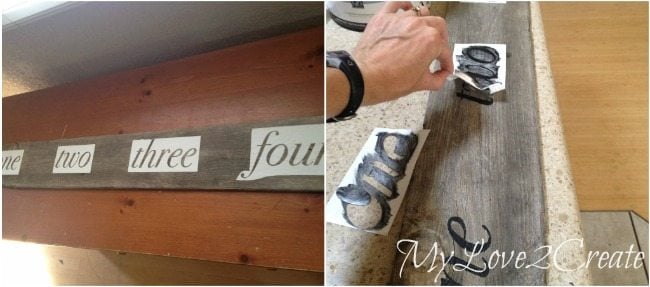
    Since my little guy is starting Kindergarten this year I thought it would be fun to add some "number words" I cut them on contact paper to make stencils and then painted them black.

    Attaching front to under the bed storage drarwers

    After a little distressing the front was ready to be attached to the drawers! Again wood glue and nails did the trick.

    drilling holes for rope handles

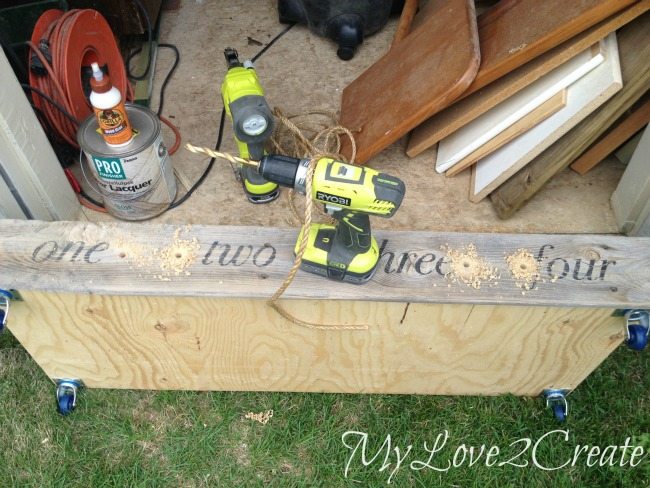
    To keep with the rustic front I went with simple rope handles and drilled holes for those. You can also see the Laquer in the photo. I added a few coats to the fence wood to darken it up and protect it.

    Close up of old fence wood front to under the bed storage

    Mmmmm, makes is super pretty!

    inside view of knots for rope handles

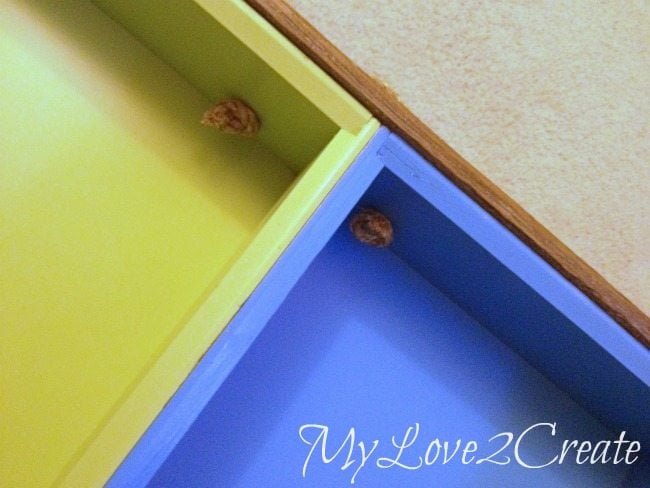
    Here is an inside shot of how I just knotted the ropes, quick and easy!

    How to touch up with spray paint

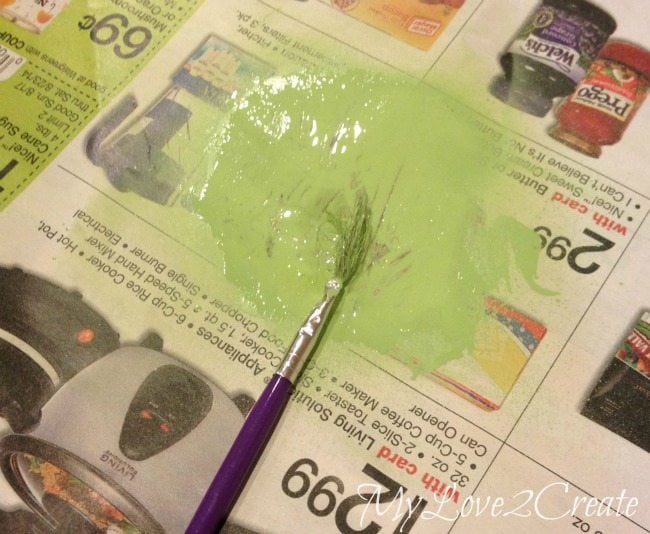
    I did want to mention that I had a little bit of touch up to do, because I was building right after I painted. The best way I have found to touch up with spray paint is to spray a spot really close into some newspaper and use a cheap brush to quickly paint over the spots. You have to work quick because spray paint dries so fast, but it was SO much easier to touch up the nail holes, rather than tape off and spray paint all the drawers alternating colors...

    under the bed storage, made from old drawers

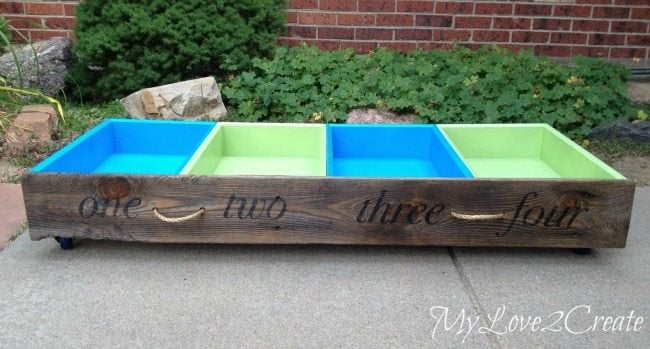
    I think these drawers were meant to be stuck together...

    Under the bed storage, repurposing drawers

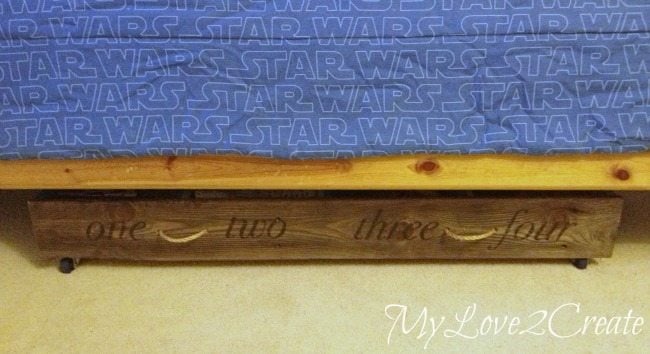
    And under the bed storage never looked so good!

    Under the bed storage pulled out

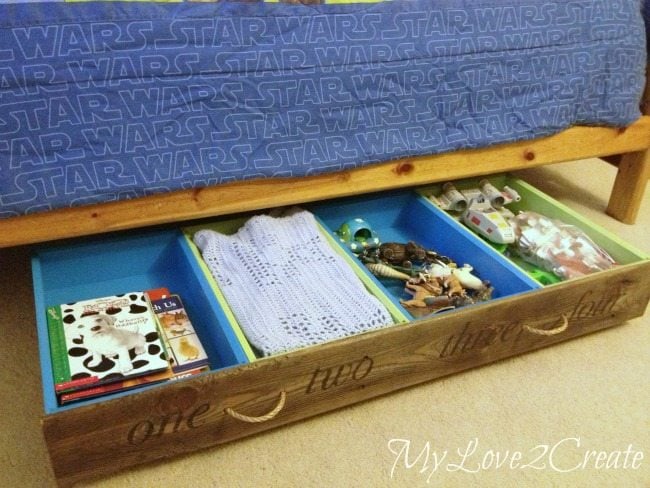
    Truth be told I think it is just fun for my little guy to pull it out and push it back in, he could care less about being organized...but I am sure loving it!

    Under the bed storage, repurposing drawers

    Too bad I only found four drawers, I could use some more of these. Of course it would be easy to make from scratch too, but repurposing is so much better!

    Have you ever made under the bed storage out of drawers?

    Hugs,

    Mindi

    see more of Mindi's posts on MRL below:
    [categorythumbnaillist 274]

    Pin
    Share
    Tweet

    Related Content:

    • Chest of Drawers Repurposed into an Entertainment Center
      Chest of Drawers Repurposed into an Entertainment Center
    • Storage Bench Made From A Dresser
      Storage Bench Made From A Dresser
    • How To: Turn a desk into a tall chest | Before and After Photos
      How To: Turn a desk into a tall chest | Before and After…
    • Pet Projects - DIY ideas for your furbabies
      Pet Projects - DIY ideas for your furbabies
    • 25 Repurposed Drawer Ideas
      25 Repurposed Drawer Ideas
    • Antique Chest Of Drawers Easy Makeover
      Antique Chest Of Drawers Easy Makeover

    About Mindi

    Mindi is a wife, mother, runner, dancer, and a lover of all things fun and DIY.

    A few years ago she discovered blogs and fell in love with the idea that she could do things she had always dreamed of doing. Like build furniture from pallets, and make cool projects for her home.... Mindi was inspired by other bloggers that empowered her to create.

    Mindi decided to give back and possibly reach someone out there that has a desire to create like herself. She believes we all have that desire in some form or another, and we all DO create in our own way, every day. Whether it be crafty or not, even creating happiness in others is a gift that many share.

    Mindi loves to learn and use that knowledge to make beautiful and useful things for her home.

    Reader Interactions

    Comments

      See comments Cancel reply

      Your email address will not be published. Required fields are marked *

      This site uses Akismet to reduce spam. Learn how your comment data is processed.

    1. Jennie

      October 19, 2017 at 11:41 am

      Well, putting a trundle bed under the day bed in the grand baby’s room is out. We have toys everywhere. Certainly I don’t spoil him.

      Reply
      • Gail Wilson

        October 19, 2017 at 7:34 pm

        Spoiling is what it's all about Jennie! 🙂

    2. Debbie

      September 26, 2016 at 7:08 pm

      I've been following you for a few years now and always love your work. Starting on a few projects with reclaimed wood, I am wondering - do you have a method to share on cleaning the wood before hand? Some people mention they "sanitize" it first to get rid of bugs - maybe having lived on a farm previously made me surprised to hear that and now I can't get it out of my head!
      I would appreciate your feed back so much!

      Reply
      • Gail Wilson

        September 26, 2016 at 8:05 pm

        Debbie,

        I use a lot of reclaimed fencing and I don't sanitize or clean it. I use a hand brush to "dust" off the dirt, but that's it. I basically use fence for signs (indoors) but the pieces I've built, like potting benches and such are for outdoors.

        I want to make sure I don't lose any of the patina. 🙂

        gail

      • Debbie

        September 27, 2016 at 7:02 pm

        I'm so happy to hear that! I've been wasting Hours looking on how to "de sanitize" these boards when I hadn't even thought about it before! So finally I decided to just ask the queen herself. ???? Thanks so much for taking the time to respond!

    3. girlfromwva

      July 22, 2015 at 12:58 pm

      great idea! love the board on the front and the rope handles!

      Reply
    4. Mary

      August 24, 2014 at 10:52 pm

      Such a thoughtful repurpose! Hopefully, it will be a joy to your son to put things away. Great storage idea, Mindi.

      Reply
    5. Catherine

      August 24, 2014 at 12:02 pm

      WoW--really nice job!
      Especially like the numbering and that font you chose!
      Catherine

      Reply
    6. Patricia

      August 24, 2014 at 1:15 am

      So great!
      Love how you repurposed all of it.
      i have some drawers in my barn...if I did this project, I'd for sure have to clean out from under the bed...if i did that, well, i'd have to get new stuff to store in it...
      just so many possibilities!
      Patricia

      Reply
    7. Terri

      August 23, 2014 at 8:10 am

      Such a great idea...who couldn't always use more storage!

      Reply
    8. Shirley

      August 23, 2014 at 4:15 am

      Love it! You can turn anything in to something. I love your blog and thanks for sharing.

      Reply
    9. Julie @ follow your heart woodworking

      August 22, 2014 at 2:32 pm

      Love the idea, Mindi. And the colours are great!

      Reply
    10. darrielle tennenbaum

      August 22, 2014 at 9:52 am

      you are a genius! Love this idea!

      Reply
    11. gail@myrepurposedlife.com

      August 22, 2014 at 9:27 am

      I think connecting the four drawers together to give one separated large drawer is pure genius! 🙂

      great project Mindi!

      gail

      Reply
      • gail@myrepurposedlife.com

        August 25, 2014 at 4:04 pm

        this is a test comment. 🙂 please ignore.

    12. Bliss

      August 22, 2014 at 9:08 am

      And there is a bonus to having all the drawers pull out at the same time, they won't be all wonky every time they get pushed back in. Now they will always line up.

      Reply
    13. Susan

      August 22, 2014 at 6:47 am

      This is a great idea Mindi and I love the colors on the inside with the rustic wood where it shows under the bed! <3

      Reply
    14. Denyse @ Glitter, Glue & Paint

      August 22, 2014 at 5:57 am

      Oh for the love of storage, Mindi! I absolutely love this functional storage idea. It would be perfect for summer/winter clothes storage.

      Have a super weekend!
      xoxo
      Denyse

      Reply

    Primary Sidebar

    Hi, there! I’m Gail Wilson, the author and mastermind behind My Repurposed Life. I’m obsessed with finding potential in unexpected places and believe that with a little hard work and imagination, any old thing can be made useful again—myself included! I hope you’ll enjoy the journey and pick up a few tools along the way… literally!

    More about me →

    Join Our Mailing List

    ​

      Click the topics you're interested in below:

      Subscribing above means you agree to our Privacy Policy​

      Footer

      ↑ back to top

      SEEN ON

      Might I Suggest

      • Start Here
      • Furniture Makeovers

      Newsletter

      • Sign Up! for emails and updates

      About

      • Gail's Favorites on Amazon
      • About

      As an Amazon Associate I earn from qualifying purchases.

      Copyright © 2023 My Repurposed Life · Privacy Policy · Disclosure