Update on Jenny Lind Bench
As an Amazon Associate, I earn from qualifying purchases.
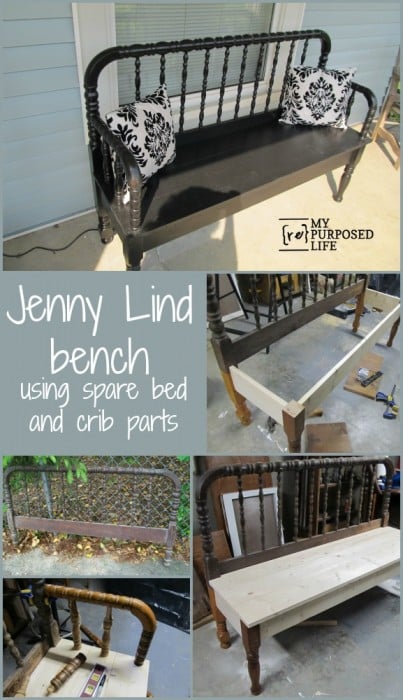
 If you’ve stopped by this week, you know I took all of these bits and pieces and made this jenny lind bench


I proceeded to use more bits and pieces in order to add arm rests.
 I used paint and primer in one and painted it black. The plan was to paint it black to get all the bits and pieces to be the same color, then paint it turquoise and distress it to reveal some black.
") I started on the seat, but decided to do a dry brush technique instead.
I started on the seat, but decided to do a dry brush technique instead.
") I got a little too much turquoise on it . . .
I got a little too much turquoise on it . . .
 . . . . so I went back over it with some more black.
 I did not sand this, it is all dry brushing. Then I talk to a good friend Stephanie, and she encourages me to do a Damask stencil on the seat. She convinces me that I should do that.
 When I got my stencil out, I decided that I should do it on the seat “as is” to see if I like it. Hey! It’s only paint, right? I can always paint over it if I don’t like it.
 I did a very light coat because I wanted it to be sort of “barely there”.

 I ended up liking it.

 I will not be keeping this bench. It will be for sale, which makes it difficult to decide. Because, I am so indecisive, I posted a picture on Facebook. It was a very popular post and I got lots of advice from all of my wonderful friends.
The tally was this
- Wouldn’t change a thing/Love it 18
- Paint the seat black with stencil (ranging from white to cream to turquoise) 13
- Paint bench teal and distress 2
- Black stencil 3
- Whitewash with Blue over Black 1
- Use a Greek Key Stencil instead of the Damask 1
- Black and White with accents on the spindles 1

So, I left it alone, covered it with a sheet and started on another bench made from two old chairs. 
If you would like to see the tutorial of the bench, check out my post Jenny Lind Bed Bench, if you want to see how I added the arms, check out my post Jenny Lind Bed Bench Pt 2
It’s D.O.N.E.
") There are a couple of places that need a touch-up, but after that it is done.
There are a couple of places that need a touch-up, but after that it is done.
 I decided to go with Damask pillows instead of a Damask stencil.

gail
love it well done !!!!!!!!!!!
Thanks Wayne! This was a very fun project.
gail
I just discovered you and I am COMPLETELY in love with this project! I will be scouring thrift stores for the bed!!!!
Thank so much for sharing. I lived that you shared that you used dowels to connect the arms.i looked at several different videos. And you gave me that AH HA Moment. I forgot I could do something like that. Such a great idea. Thanks again. So wonderful.
Awesome! I’m so happy you got something useful from my tutorial. I love those AH HA moments!!!
gail
I LOVE this bench. It’s amazing how you came up with it. This frankenstein of a bench turned out to be a beautiful piece. It doesn’t look at all like it was pieced together. Awesome!
Great job!
I have an old Jenny Lind hanging out in my garage, I’ve thought about making it a bench, but I’m just not sure. I like the distressed turquoise 🙂
Very cute bench. Now I have to pull out my old bed and get to work!
I really love how this bench turned out with the stenciling and color choices! this is the best I’ve ever seen a Jenny Lind baby bed ever look!
Totally caught me by surprise…I did not see that coming. Love how it turned out, not used to seeing you go so distressed. Love the turquoise/black combo! Great job as always!