Amazing Waterfall Chest of Drawers Makeover
As an Amazon Associate, I earn from qualifying purchases.


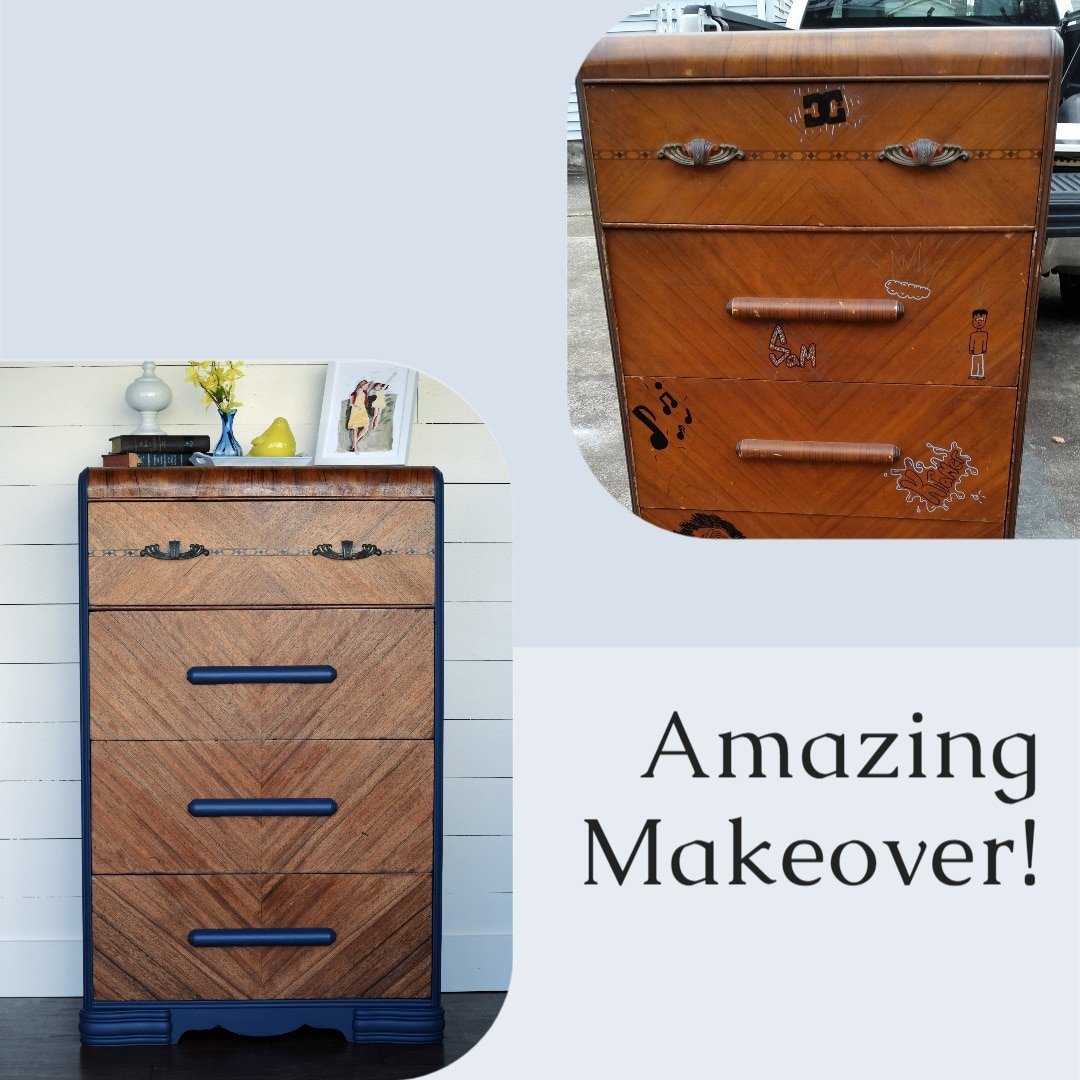
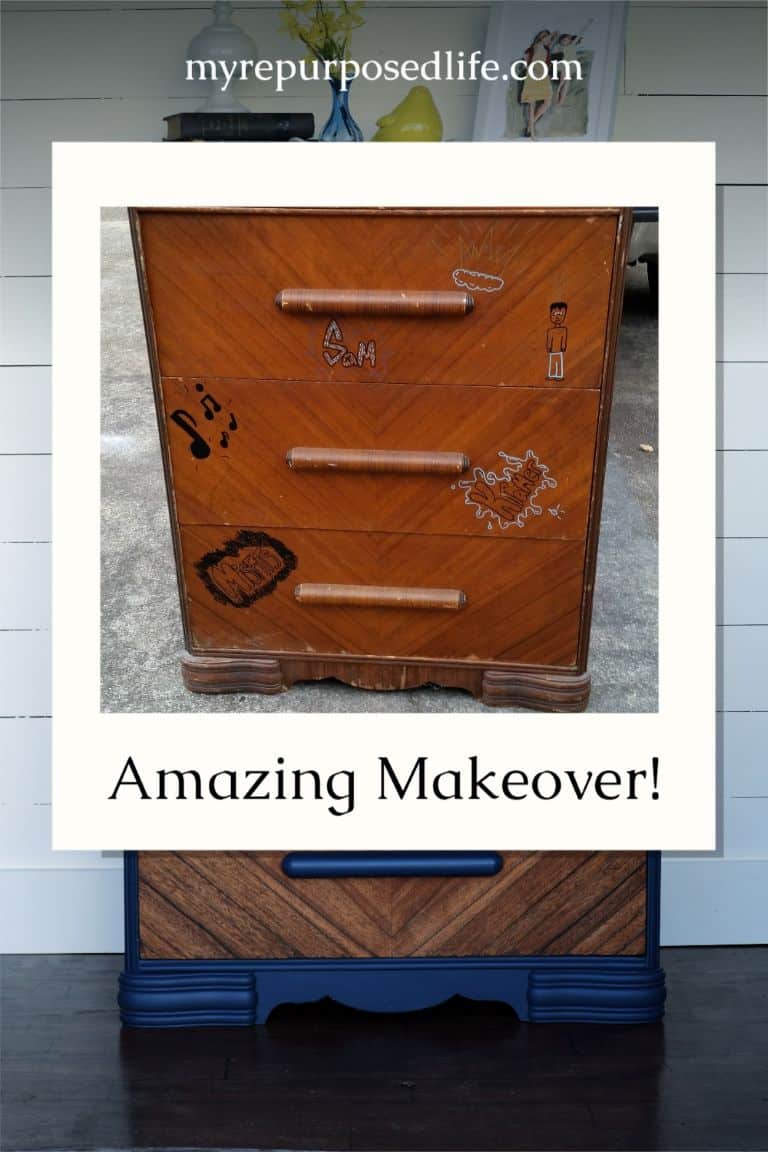
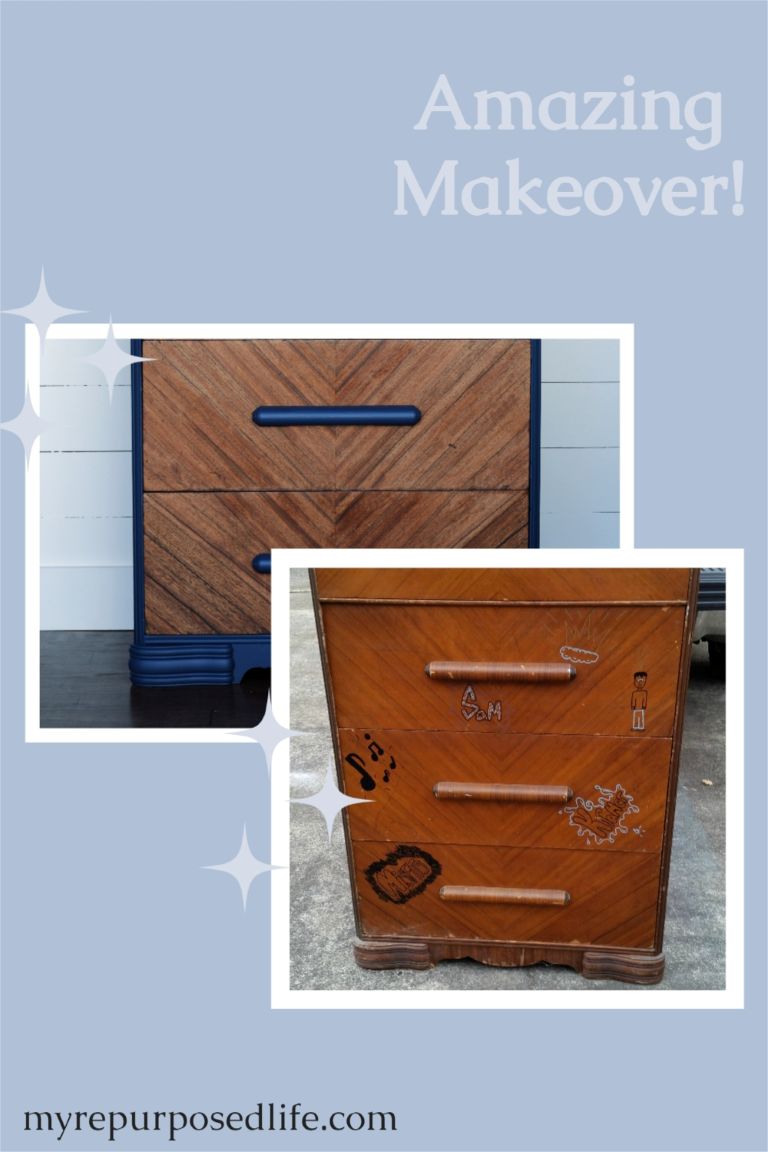
I’m excited to show you this fantastic waterfall chest of drawers (dresser) makeover! It was a free find right here in my neighborhood. This sad dresser was headed to the trash. This project was one of the quickest turnarounds I’ve done in a long time- only FOUR days!
Vintage Waterfall Chest of Drawers

This poor gal was headed to the dumpster, and I got it just in time. I didn’t want to paint it, but I didn’t know if I could remove all the “beautiful” artwork. Besides the graffiti, the dresser was in pretty good shape, with a few veneer issues. Even the drawers work really well.

It’s Furniture Fixer Upper Tour Day! Be sure to visit my friends’ projects at the bottom of this post.
How to Remove Graffiti From Furniture
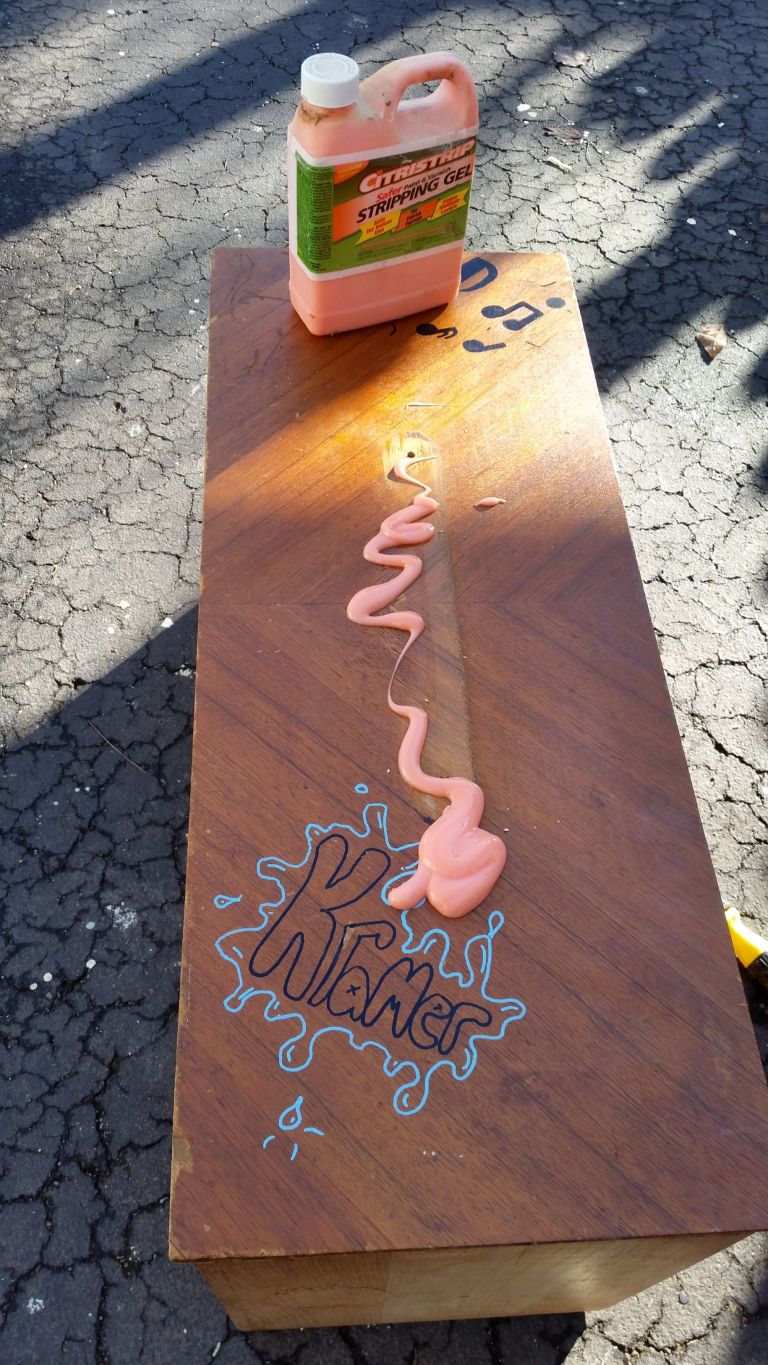
I don’t usually like stripping furniture, but I thought this might be a relatively easy job since there weren’t a lot of details on the drawers. I used Citristrip and a cheap chip brush to spread it around.
Visit the My Repurposed Life Amazon Store to shop my favorite items.
How to Strip a Waterfall Chest of Drawers

I paid extra attention to the portions of the drawer that had been drawn on with Sharpie markers.
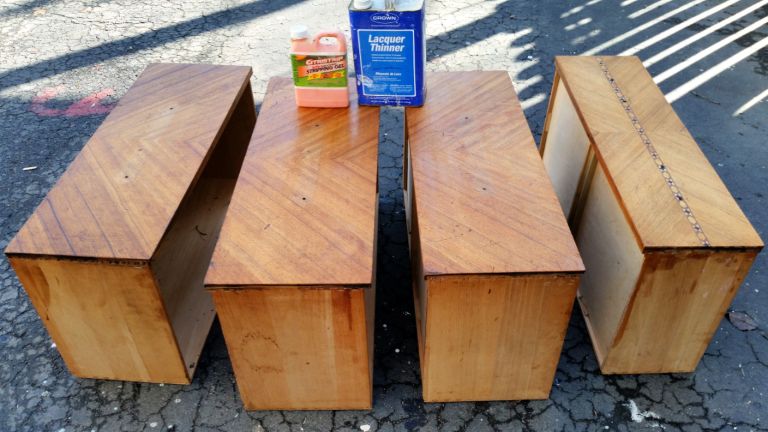
This is how the drawers looked after a coat of Citristrip, which was then wiped off with Lacquer Thinner.
Sanding vs Stripping
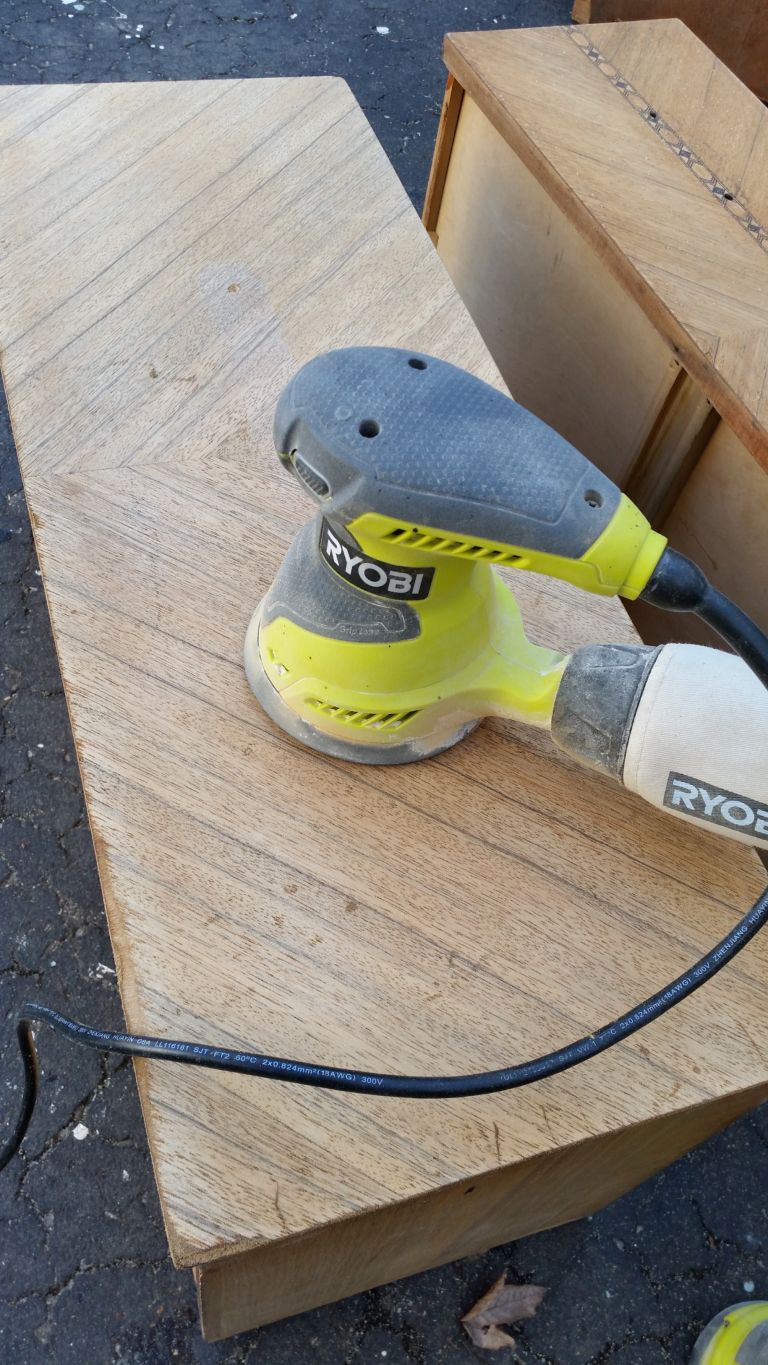
But that really wasn’t good enough. I had to sand each of the drawers, I probably should have left the Citristrip on longer, or done another application. Sometimes, I get impatient. Can you relate to me?

I used 60, 150, then 220 grit sandpaper. Buying these multipacks of sandpaper is much more economical if you do a lot of DIY projects.
Paint Sprayer for Furniture
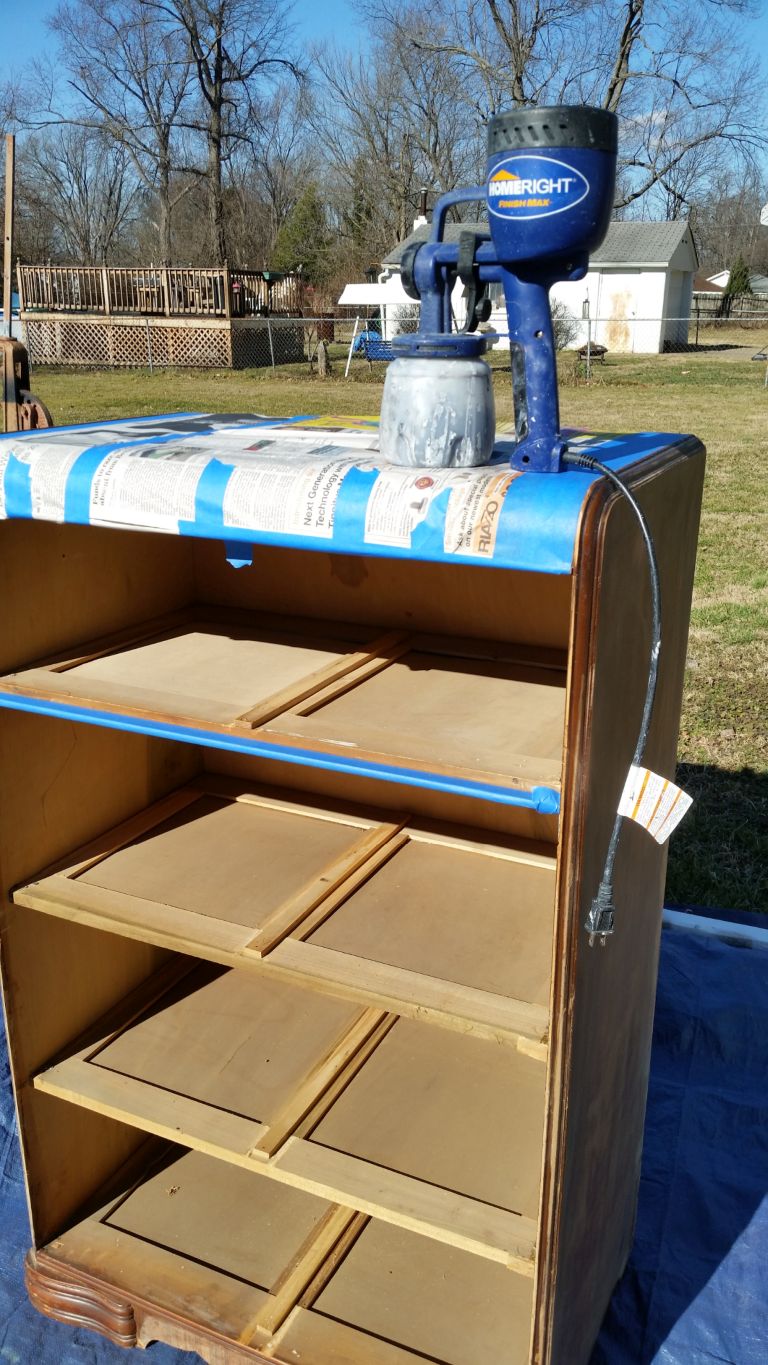
I used newspaper and painter’s tape to cover the top of the waterfall chest of drawers so I could use my Homeright Finish Max to paint the sides and the bottom front. I used the same blue oops paint that I used on my hall table.
This is after two very light coats of the diy chalky paint primer – latex mixed with Plaster of Paris. The next day, I did one more chalky paint primer light coat.
I will wax this project because this oops paint is a satin sheen.
Related Content: Navy Blue Furniture Projects
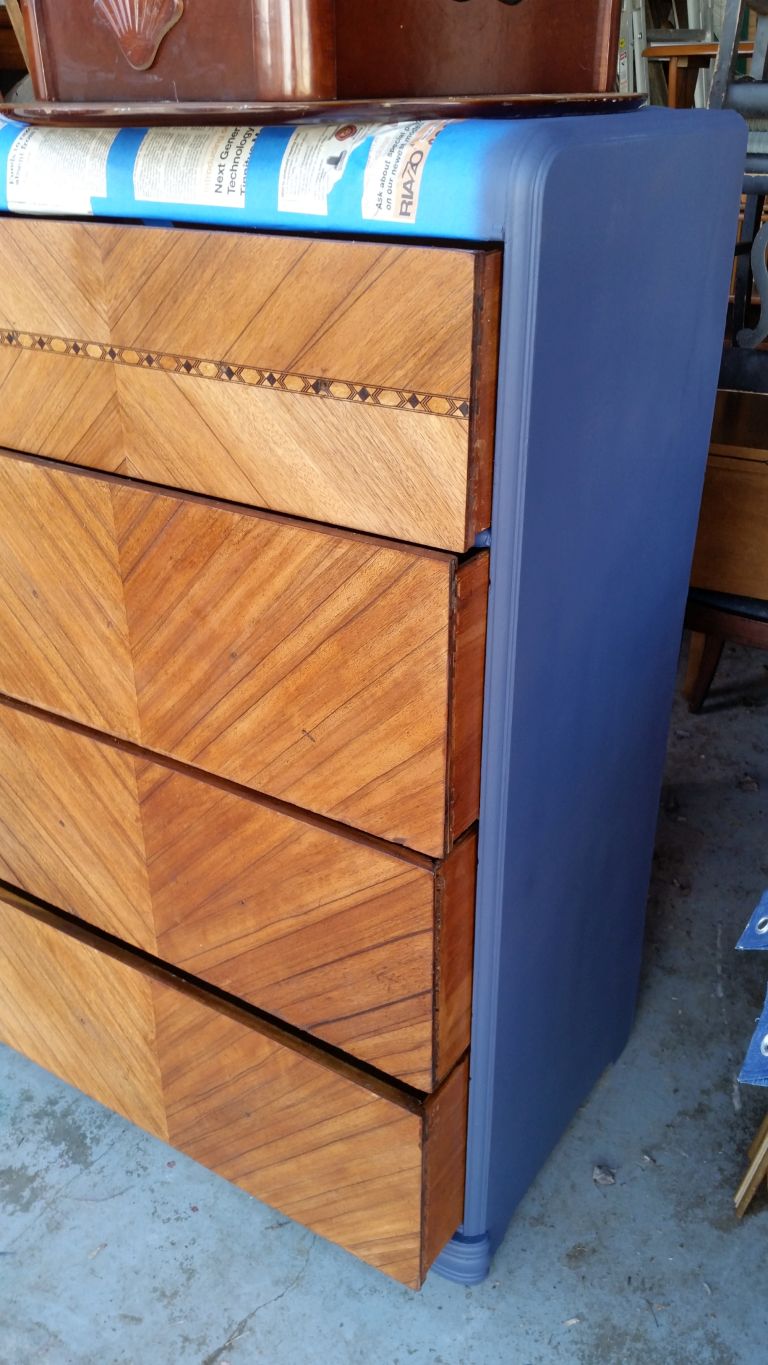
Stain Waterfall Chest of Drawers Top
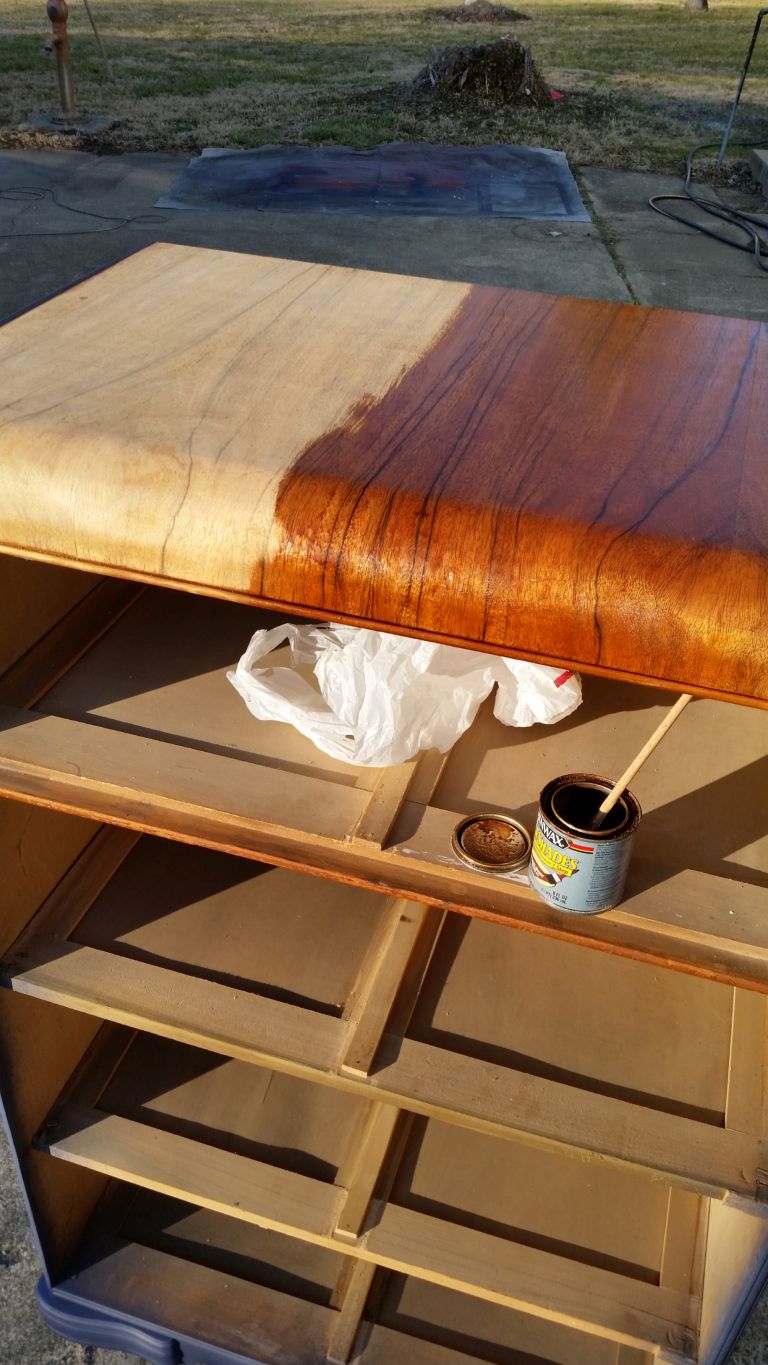
I used some Minwax PolyShades in Dark Walnut to stain the drawers and the top of this waterfall chest of drawers. I applied the stain with a small chip brush.
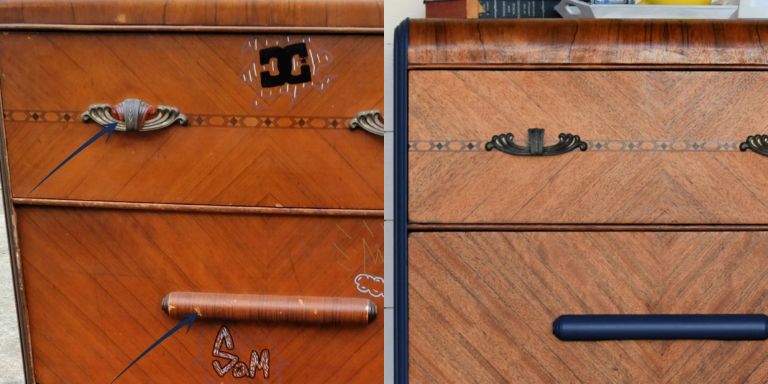
See the BLUE arrows? I had to make some changes to the dresser’s hardware. The metal hardware had some tortoiseshell (?) inserts. One of them was broken, and I didn’t think it looked good with the blue paint, so I removed them.
The long wooden drawer pulls were covered with paper. I applied stripper to them without even considering that fact. You can see the BLUE arrow pointing to where some of the paper had been scuffed off.
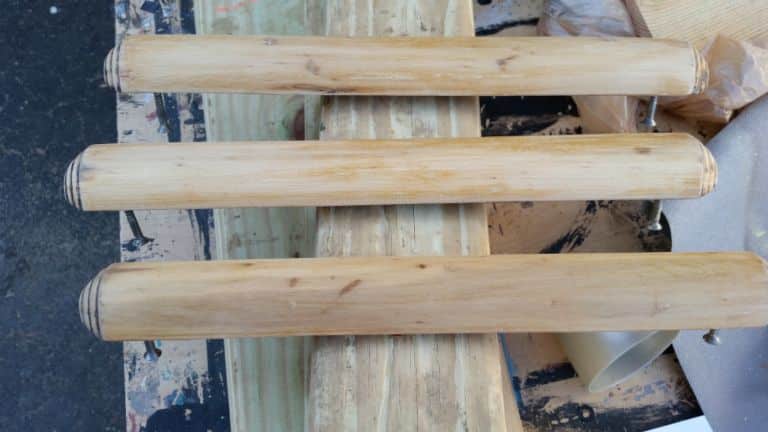
This is how the wooden pulls looked after they were stripped and sanded. I painted them with a few light coats of the chalky paint primer.
Use Packing Paper For Sanding

I sanded them in between coats with brown craft paper, the kind that comes in my packages from Amazon. Occasionally, the DIY Chalky Paint Primer leaves a rough residue.
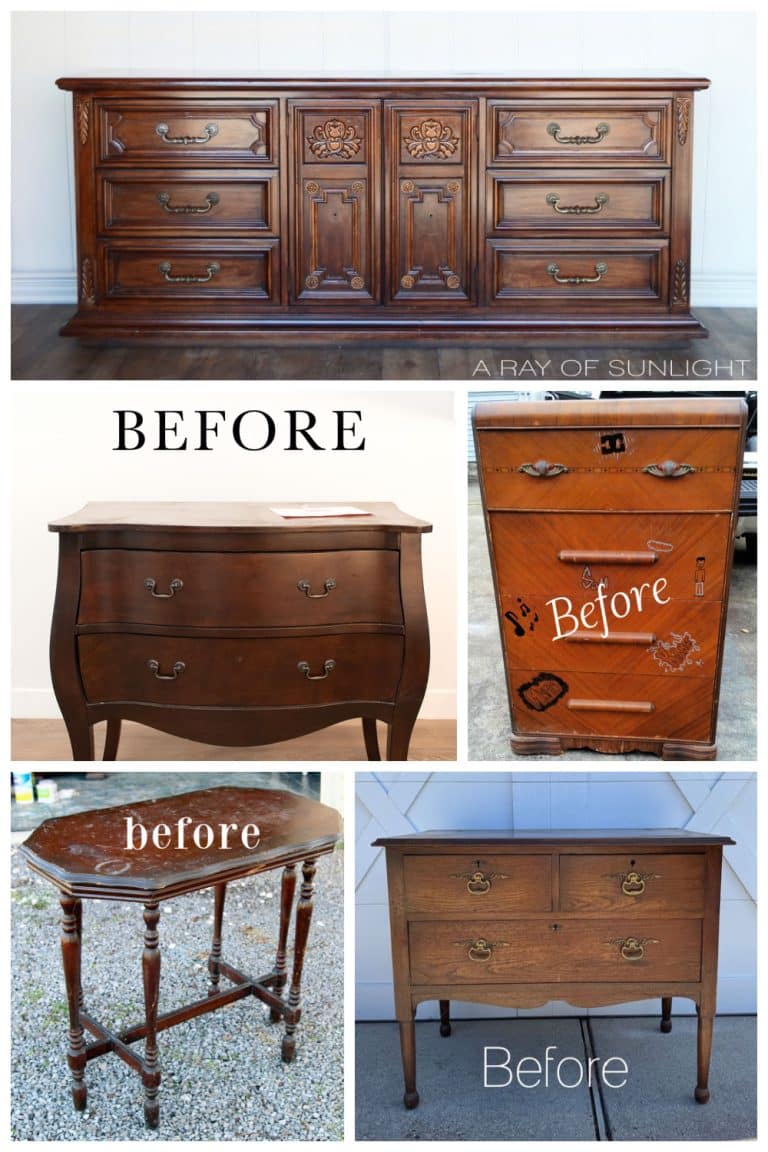
Did you know? This furniture was named “Waterfall” due to its distinctive rounded drops at the edges of all horizontal surfaces, thought to resemble a flowing waterfall. Pieces in this style were usually finished with a blond veneer, though a small percentage were finished in a darker walnut finish.
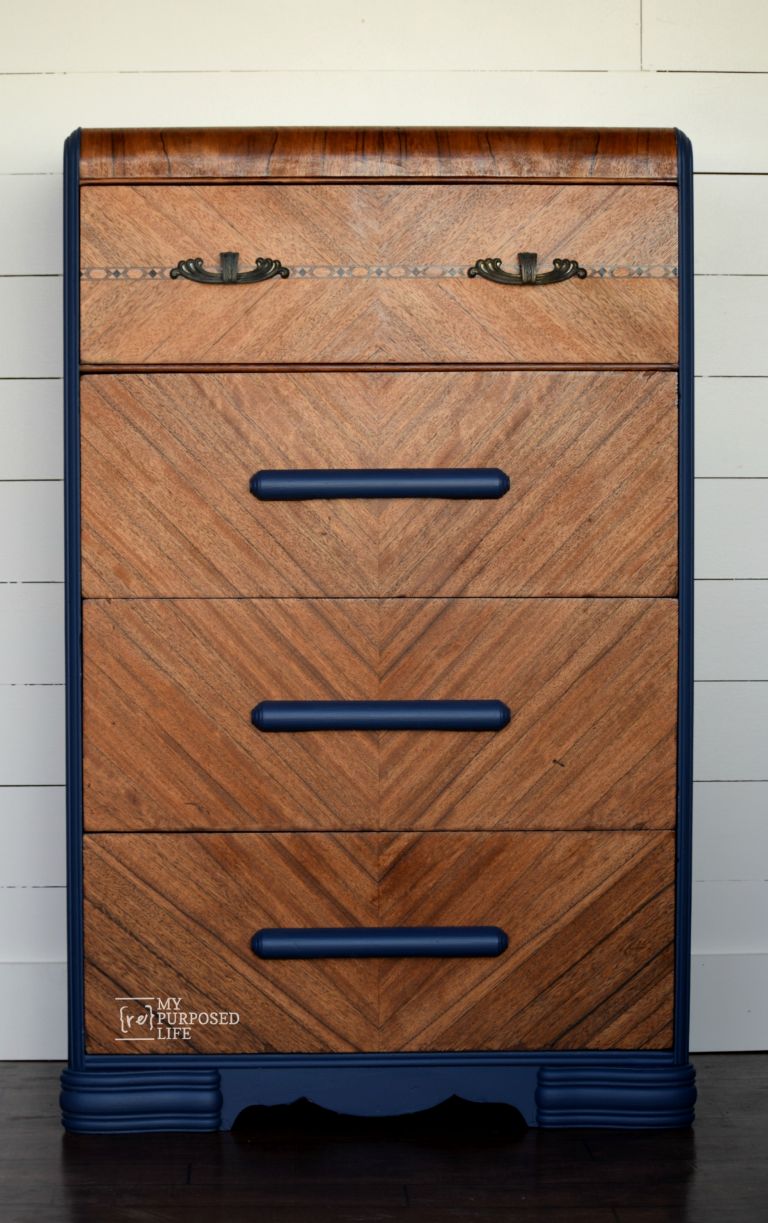
At first, I thought I wouldn’t like the blue wooden drawer pulls, but they are growing on me.
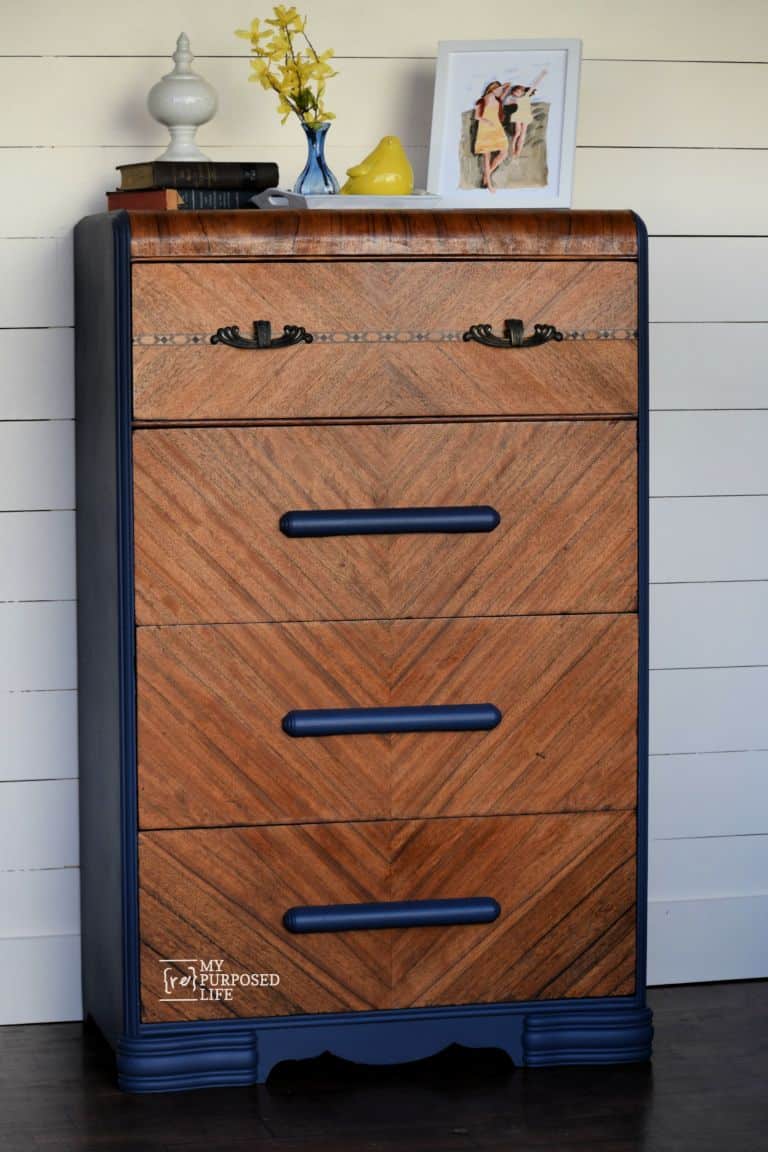
The white finial and the yellow bird were Christmas presents from Jamie and Andy. This picture is a good shot of the side of the dresser (which, in real life, I refer to as a chest of drawers).
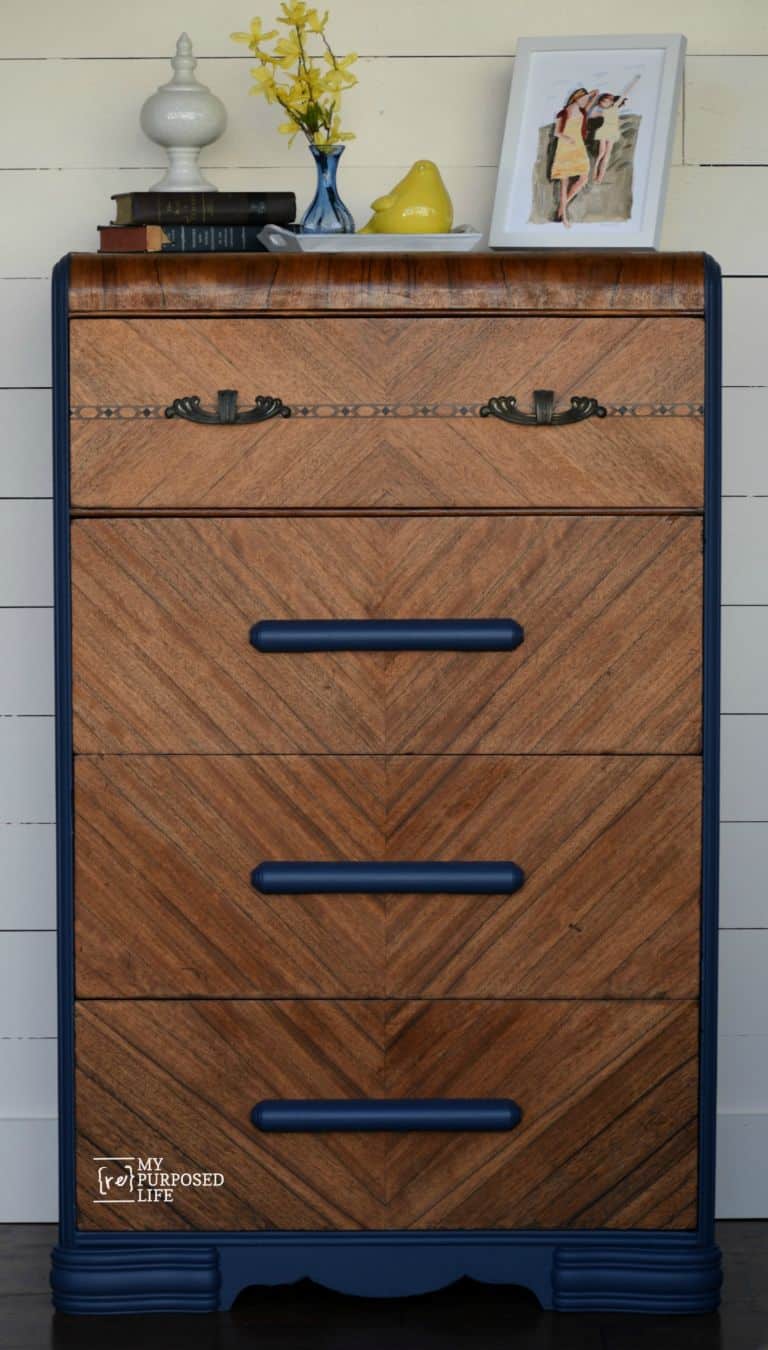
The old gal still has some issues, but she looks a LOT better than she did. Do you agree?
Would you have saved it from the dumpster and dragged it home?
This is another Vintage Piece I saved from a fate worse than death!
Let’s see what the rest of the team has been working on:
- DIY Sideboard Buffet
- How to Blackwash Over Existing Furniture Finish
- The Amazing Waterfall Dresser Makeover (you are here)
- Small Table Makeover With Chock Paint
- Estate Sale Dresser With Transfer
Furniture Fixer Upper Tour Projects
If you love seeing old furniture get a second chance, be sure to visit more Furniture Fixer Upper Tour makeovers. Each project starts with good bones and ends with a fresh new story.
See more Furniture Fixer Upper makeovers here
You will find everything from small side tables to large statement pieces, all transformed by talented DIY bloggers who believe in saving furniture rather than replacing it.
This turned out great! I have a similar piece that is a cedar chest with the waterfall & veneer. I want to refinish similar to this by sanding the main parts & paintwash or stain and paint the feet & trim in black. I have never sanded the waterfall, cedar or veneer before, any tips? Also wondering what cedar looks like sanded? Will it be a color I can paintwash? Thank you
Tina,
I lightly sanded the drawers on this piece. My suggestion is to use a fine grade sandpaper, and a light touch. If you get stuck, reach out to me and I’ll try to help.
gail
Hi Gail,
The tortoise shell is called Bakelite, or polyoxybenzylmethylenglycolanhydride … 😉. It is quite an historic phenomenon.
Great work! I love waterfall furniture and Bakelite 😎
Gail – I have 2 waterfall dressers that I want to repurpose. How did you save the detail strip on the front? I have detail on the front and I am afraid if I sand it down lightly it will remove the detail? Any suggestions??
Since I used the Citristrip first, I didn’t have to sand very much. It’s sort of an inlay, so you would have to sand heavy to damage it.
So, I recommend using Citristrip first!
gail
Stumbled upon your entry here as I am looking up ways to refinish my own waterfall set. Just picked up two new pieces, and they are in varying degrees of wear. This was a great source of info for refinishing it and not just slapping some paint on there! Thank you!
What a wonderful save. I’m amazed that you got al of the “artwork” off. Painting the sides and staining the front really highlight the beautiful waterfall patten of the wood.
I have a waterfall dresser that is almost the twin of yours. On mine, the top drawer looks like burled wood and the bottom 3 are V-d like yours. When you stripped the drawers you mentioned you should have done a second coat of the stripper. Would this have meant less sanding? My hands and arms don’t like sanding any more and without the control I would be concerned that I would go through the veneer.
I like the hardware on your top drawer. It’s too bad that they (whoever “they” are) didn’t put them all the way down the front. If you hadn’t painted the wooden handles would you have stained them the same colour as the drawers? The hardware on my dresser is the most bizarre looking hardware I have ever seen. They’re round (3″ across), made of a kind of orangy plastic, tortoiseshell-y looking material and in the centre is a brushed brass-ish circle (2″ across) with concentric circle grooves. Really not that fond of them other than the fact they are odd. With my luck I’d throw them away and find out later they were worth a lot of money. Need to do some research first. I bought this off Kijiji at a great price. The lady said it was her great grandmother’s. No one took a sharpie to mine but the sides are covered in stickers and the spongy bits from the backs of hooks. Not pretty!
How many coats of stain did you put on? And when you poly how many coats will you do? This will be first stripping project in over 40 years so I’m a little rusty.
Thanks as always for a great post! I am in constant amazement of your imagination for looking at a piece of furniture and seeing what it could look like.
Cathy
I should have done a second coat of stripper, or at least left the first coat on longer. It left too much goo behind. I think it would mean less sanding.
The wood handles were very strange wood. It almost seemed like they wouldn’t even “take” the stain.
They all have the tortoise shell plastic pieces, I’m not a fan.
I only put one coat of stain on everything. I will probably do two coats of poly (probably semi-gloss)
Stripping products have changed a lot over the years. Nothing works like it did 40 years ago. 🙁
good luck Cathy and have fun! Keep me posted!
gail
Absolutely I would have dragged that piece home and saved it from the dumpster. You did a great job transforming it, Gail, and someone will be lucky to have a well made, solid piece of furniture in their home. Now lets just hope it doesn’t have sharpies in it! 😀 Take care, Cynthia
I was worried you were going to destroy the wonderful woodwork with paint as I was reading, but very relieved to see you brought its beauty back. The painted sides and handles show off the wood quite nicely. Great work.