Wooden Desk Plaque (custom logo design)
As an Amazon Associate, I earn from qualifying purchases.
I don’t have a desk, but even so, I decided I must have a wooden desk plaque with my logo on it after I saw the cool gift Kim Six made for Wendi at H2O Bungalow! Kim is so clever and creative—I love knocking off her projects. ![]() I’ll show you my inspiration from Kim at the bottom of this post because you will definitely want to go check out her projects.
I’ll show you my inspiration from Kim at the bottom of this post because you will definitely want to go check out her projects.
![]()
You will want to make your own DIY wooden custom logo desk plaque after I show you how easy it is!

I printed my logo using my home printer. Each printer software is different, but here’s what mine looks like when I choose to print an image.I open the file where the image is, right click on it and choose PRINT.
 From this menu I choose 4×6, and opt for 2 copies.
![]() Even though this image looks like it’s on a full size paper . . . it’s actually a half sheet, with one image still to be used. I checked to make sure which size board I would use, and ended up using a scrap piece of 2×4 from my stash.
Even though this image looks like it’s on a full size paper . . . it’s actually a half sheet, with one image still to be used. I checked to make sure which size board I would use, and ended up using a scrap piece of 2×4 from my stash.
 If you look closely, you will see that I have my blade set to 15° to put a slight angle on the “bottom” of my plaque. I left the 2×4 it’s original length to make is safer to send through the table saw. I’ll cut the length to size after this step is complete.
 This was a trial and error for me, as I have never done this type of project before. This was after one pass through the saw.
 This is how the angled 2×4 rested after one pass. It’s okay, but not exactly what I was going for.
 I left the blade at 15°, but raised it slightly and ended up sending the 2×4 through again.
 In the end, the blade was about 3/8” high.
 This is after the final pass through the table saw. I still haven’t cut to length because it will be easier to sand having room to hold onto it.
 Wow! What a difference a little sanding makes!
 I only sanded the end I’m using.
 See how pretty the sanded piece is? I cut it right at 6” on the compound miter saw.
 See how nicely it leans back? See why I left it long to send it through the table saw and sander?
*this post contains Amazon affiliate links*
 I marked the paper to the exact size of the block of wood.
 This paper cutter has been around for probably 20 years! I’ve changed the blade a few times, but it’s always ready when I need to get a nice straight line. I only made one small mark and lined it up with the blade to cut it at the right place.
 I spread the decoupage medium using a cheap chip brush on the front of the wooden block.
![]() After laying the printed logo onto the block I used the bottle as a brayer to get out bubbles and such.
After laying the printed logo onto the block I used the bottle as a brayer to get out bubbles and such.
 Next step—apply a topcoat of the decoupage medium over the top of the paper.
 THIS is the tip I got from Kim! Place a paper towel gently on top of the topcoat of decoupage medium.
 When you lift off the paper towel, the brush strokes magically disappear and you have a textured looking surface. A good friend of mine does this when she decorates cakes. Genius!
 Some of the paper needed a little trim, so I used an emery board to clean it up after the decoupage medium was totally dry.
![]() I love it! This was a very fun and easy project to make, and just as Kim did, they would be perfect gifts for that someone special. You could get lots of these out of one 2×4.
I love it! This was a very fun and easy project to make, and just as Kim did, they would be perfect gifts for that someone special. You could get lots of these out of one 2×4.
![]() There are so many ways you could make one of these decoupaged desk plaques—painted, stained, etc. I chose to leave mine natural and seal it with a coat of decoupage medium.
There are so many ways you could make one of these decoupaged desk plaques—painted, stained, etc. I chose to leave mine natural and seal it with a coat of decoupage medium.
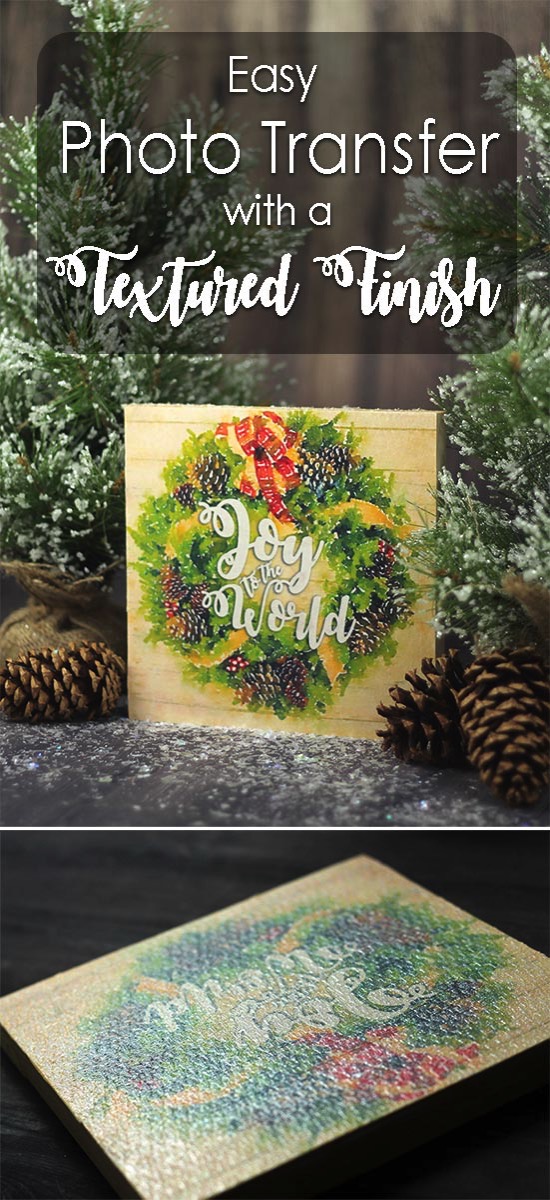 Kim has some wonderful Christmas designs you can download. Go visit The Kim Six Fix to see how she inspired me to make my own project!
This is so cute! I can’t wait to get home to see my plaque! This is such an amazing project, Kim is crazy creative and you my friend are the queen of power tools! Love how you angled the wood block with your table saw
Thanks so much Wendi! 🙂 I was wondering if you were home yet. YES! our friend Kim is crazy creative, how does she do all that she does?
I miss working in the shop… I’m anxious to do something very soon.
gail
WOW! that is wonderful. and i love how you always credit others for their work and provide a link to their project!
Thanks Nova! I love to be inspired by my friends, and always like to give them that credit. 🙂 Kim’s Christmas prints are too darn cute!
gail