• Skip to primary navigation
  • Skip to main content
  • Skip to primary sidebar
  • Start Here
  • Shop Favorites
  • About
    • Welcome To My Repurposed Life Home of Repurposed Furniture
    • More About Gail
    • Disclosure
    • Privacy Information
  • Gallery
    • Repurposed Furniture
  • Repurposed Items
    • Building Supplies
    • Miscellaneous Household Items
    • Picture Frame/Chalk Board
  • DIY
    • Home Reno
    • outdoor living
    • Painting
    • Shop Talk
    • Tips for Around the House
    • Build It
      • Furniture
      • Home Decor
      • Storage
    • Crafts
      • Dollar Store
      • Easy
      • Holidays Seasonal
  • Furniture
    • Chair
    • Desk
    • Dresser/Chest
    • Headboard | Bed Parts | Cribs
    • Kids Furniture
    • Table
    • Kids Furniture
My Repurposed Life® Rescue Re-imagine Repeat
menu icon
go to homepage
subscribe
search icon
Homepage link
  • About
  • Start Here
  • Project Index
  • Furniture
  • Subscribe
    • Email
    • Facebook
    • Instagram
    • Pinterest
    • RSS
    • Twitter
  • ×

    Home » Furniture Makeover » Antique School Desk Makeover

    Antique School Desk Makeover

    Published by Gail | Published May 3, 2016 | Updated January 3, 2022
    As an Amazon Associate I earn from qualifying purchases.

    Pin
    Share
    Tweet
    Some projects can be more challenging than others, as is the case with this antique school desk makeover. Dealing with rust that has been painted is tough. #MyRepurposedLife #repurposed #antique #schooldesk #makeover via @repurposedlife

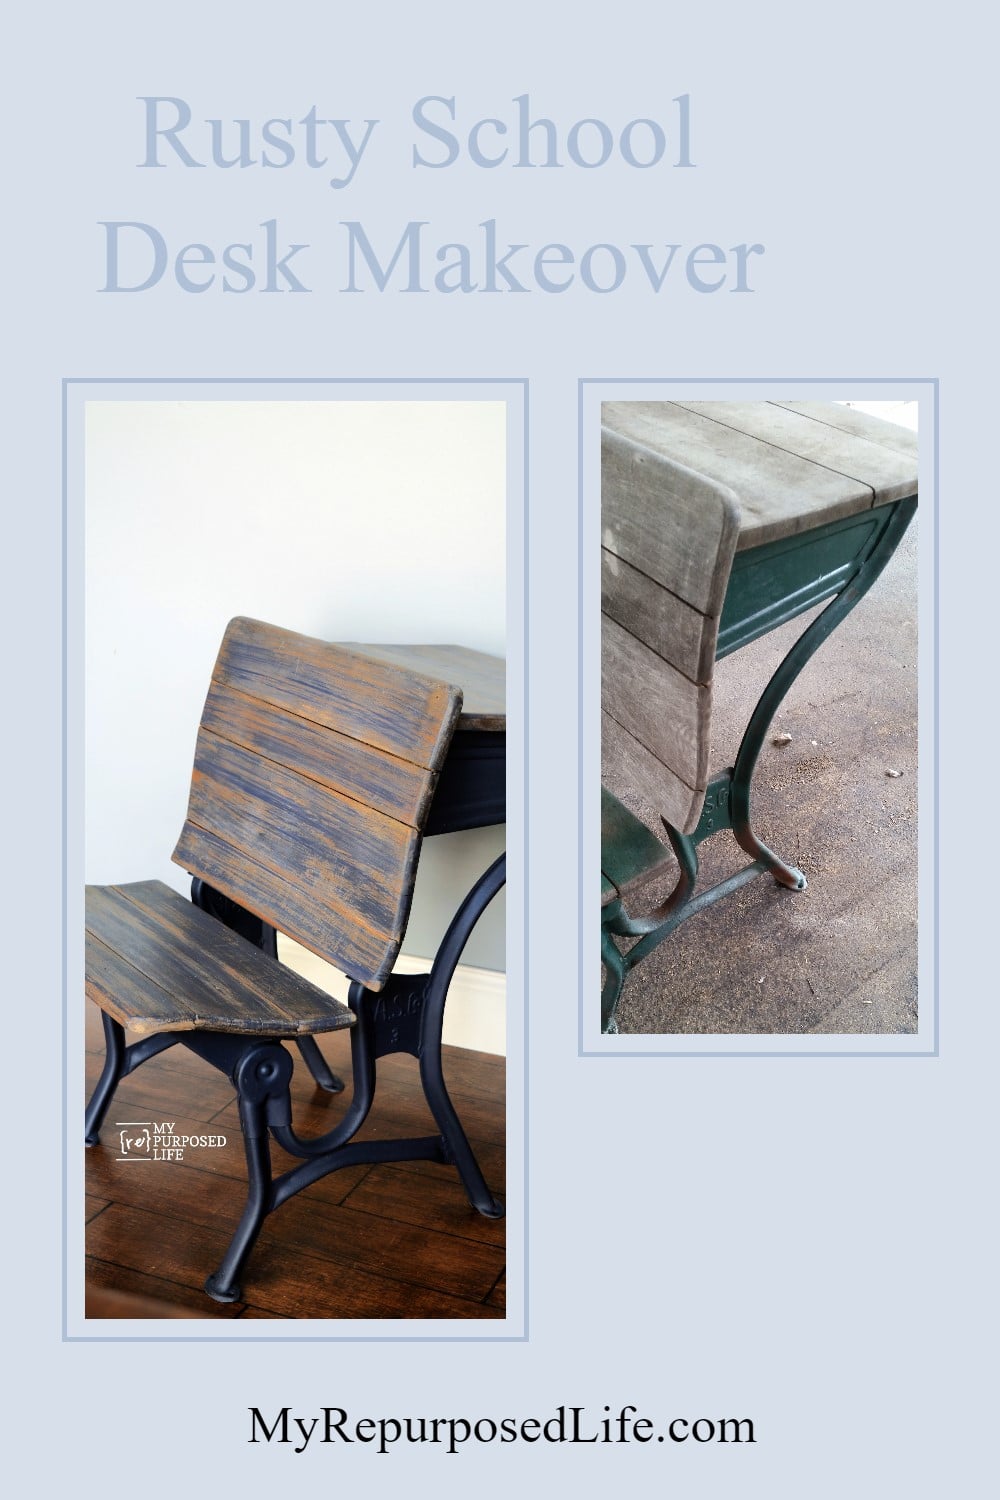
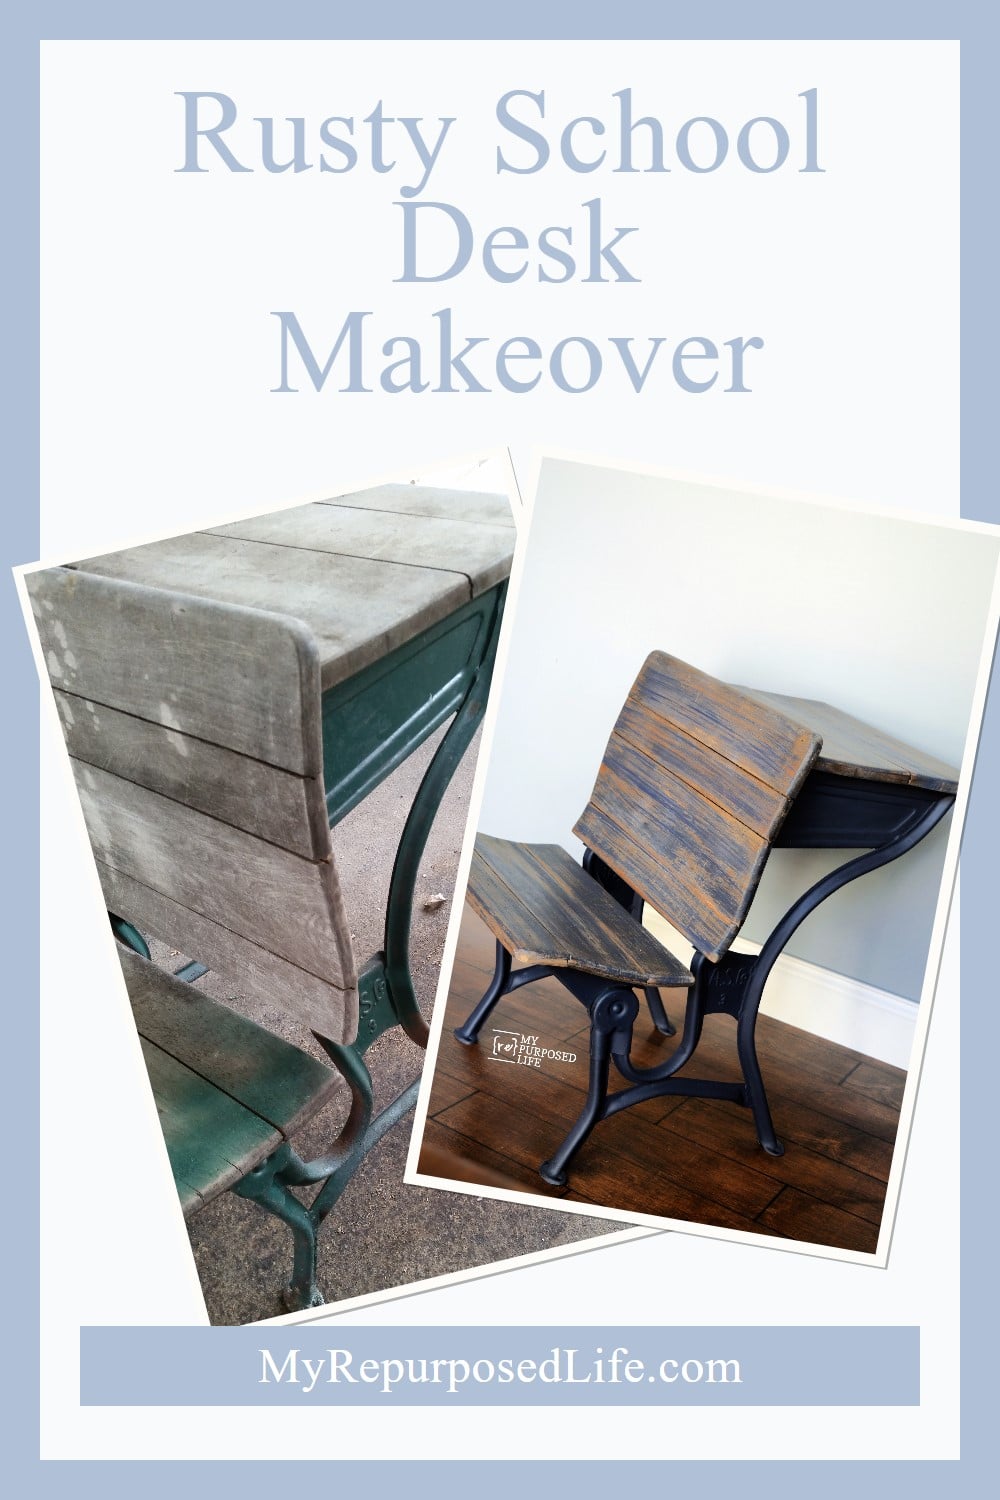
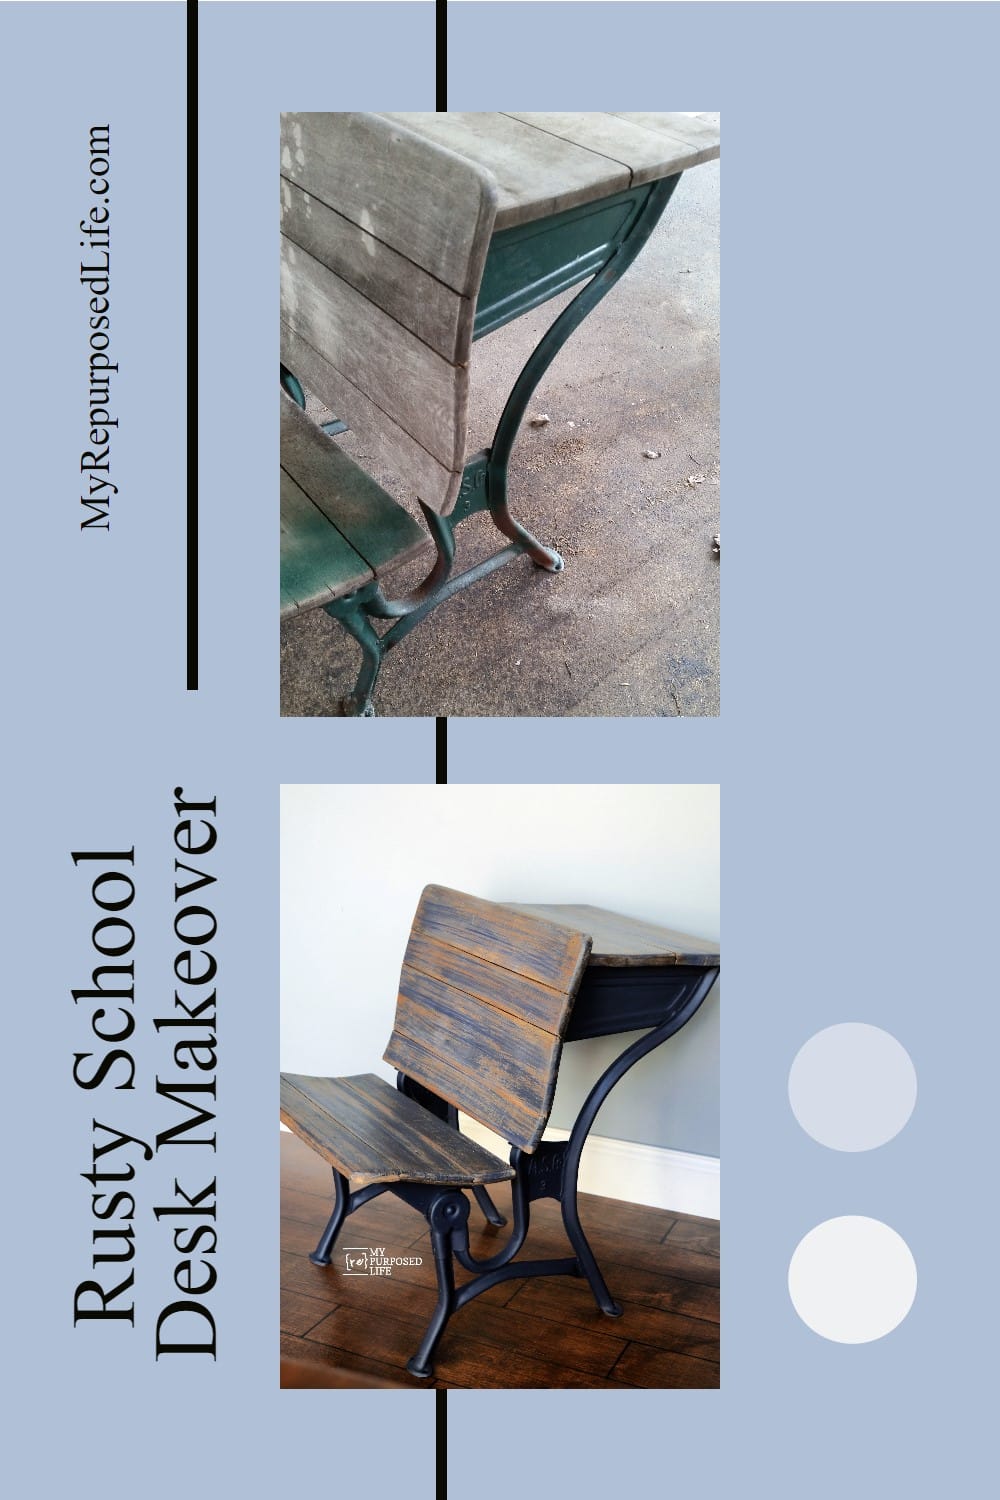
    Deciding whether or not to purchase this antique school desk was difficult, but working on it was totally more work than I bargained for!

    Antique School Desk

    old desk at Vendors Village

    When I posted THIS PICTURE on the facebook page, I got 75 comments about whether or not I should buy it. The price was right, but it was in such BAD shape!

    Wooden School Desk

    antique school desk

    This is after I brought it home and got ready to disassemble it and begin working on it. I may not have purchased it if I had any idea how much elbow grease it was going to need.

    antique school desk needs work

    This poor antique desk had been left out in the elements and needed a lot of work. Do you think the wood is oak?

    Because I don’t work a lot with metals, I really had no idea what I was in for.

    How to deal with rusty metal

    dealing with rusty metal

    I started attacking the metal frame of the school desk with a wire brush, that was pretty much pointless. What I quickly realized was this “someone had painted over existing rust”. I borrowed a wire wheel from Rodney and sort of made a dent in the rust and paint, but I would need to remove the paint so I could get to the rust.

    I bought this Krud Kutter Rust Remover on Amazon and applied it with a cheap chip brush. It worked on some of the areas, but the paint still needed to go so I could get access to the rust.

    citristrip

    I used some aerosol Citristrip to get rid of the top layer of paint. This is where I almost gave up. Had I realized that there was so much rust UNDER the paint, it would have allowed me to work in the proper steps and get to the root of the problem more easily.

    Spray Paint Primer

    spray paint primer

    After a lot of stripping of paint, treating the rust with the amazing Krud Kutter, using the wire wheel and even some sandpaper, I was FINALLY ready for some spray paint primer.

    How To: Dry brush technique

    antique school desk wood

    I mixed up some diy chalky paint primer with some plaster of paris in my oops paint. Since I really didn’t want to try to “restore” this wood to a like new condition. I wanted to preserve it’s used and abused nature to show how rough it’s life had been.

    It seemed like a dry brush technique on the wood was a great option.

    waxing antique school deskI used some Heirloom Traditions clear wax on the wooden pieces (and the metal pieces after they were painted)

    finish max sprays metal

    After using the black primer on the metal portions of the antique school desk, I’m ready to give it some color.

    finish max chalky paint primer

    I mixed up more chalky paint primer to use in my Homeright Finish Max to give the metal a pretty blue color.

    putting antique school desk back togetherAfter allowing the blue paint to cure on the metal, and fighting to get all of the wooden pieces back on the frame, the boards seemed a little loose, so I used some Gorilla Wood Glue on this handy Rockler Silicone Glue Brush to apply glue in between the boards. I clamped the sections and let them set up overnight.

    NOTE:  I’d love to give you tips on taking apart a school desk and putting it back together, but for me it was just “try this” then “try that”. I originally read this post at Coffee Under The Umbrella, but my desk was a little different.

    My best advice is BE patient, and make sure you keep all of the wooden components together so you know which is the seat, back and desk top.

    Navy Blue Antique School Desk

    blue antique school desk makeover MyRepurposedLife.com

    I LOVE the navy blue on the frame of this antique school desk, don’t you? The diy chalky paint primer sealed with clear wax looks gorgeous! It even has that little storage area!

    navy blue antique school desk makeover MyRepurposedLife.com

    You may not be a fan of the paint technique on the wood components, but I really love how it keeps the integrity and charm of the original pieces.

    I didn’t capture a picture of the desk top, but you can still see the initials carved into the wood. Making sure you could still see that was important to me. I know… I’m such a sentimental sap!

    anitque school desk makeover MyRepurposedLife.com

    It is currently for sale in my booth at Vendors’ Village. I wonder if the vendor who sold it in their booth will recognize it? Click the link to see the rotted tree trunk succulent planter.

    What project has challenged you, and almost made you regret that you ever brought it home? Did it involve RUST?

    gail

    Print Friendly, PDF & Email
    Pin
    Share
    Tweet

    Related Content:

    • Repurposed Desk Project Ideas
      Repurposed Desk Project Ideas
    • How To: Turn a desk into a tall chest | Before and After Photos
      How To: Turn a desk into a tall chest | Before and After…
    • Wooden Rocking Chair Makeover | Curb Find
      Wooden Rocking Chair Makeover | Curb Find
    • antique cane chair makeover with upholstered seat
      antique cane chair makeover with upholstered seat
    • Dressing Table Repurposed Desk
      Dressing Table Repurposed Desk
    • Antique Chest Of Drawers Easy Makeover
      Antique Chest Of Drawers Easy Makeover

    Reader Interactions

    Comments

      See comments Cancel reply

      Your email address will not be published. Required fields are marked *

      This site uses Akismet to reduce spam. Learn how your comment data is processed.

    1. Jen

      October 22, 2020 at 1:49 pm

      I have three that have been sitting in my garage waiting to be transformed.
      You have inspired me!
      Beautiful job🤗
      Thank you
      Jen

      Reply
      • Gail Wilson

        October 23, 2020 at 11:39 am

        Jen,

        It was a lot of work, but I was so pleased with the outcome! Good luck working on your antique school desks!
        gail

    2. Ian Ross

      August 15, 2020 at 9:36 am

      Hi there, you've done a marvelous job on this desk! I have a friend who has just the cast iron ends and we can't work out how the timber attaches to the wavy castings. Would you be able to shed some light on this please?

      Reply
      • Gail Wilson

        August 15, 2020 at 5:14 pm

        Ian,

        The best I can recall is the pieces sort of slide in and lock in place. There seemed to only be a few places to actually secure the pieces with screws. I wish I could be of more help!

        gail

    3. Jennifer

      February 05, 2020 at 9:15 pm

      I love how your project turned out! I recently purchased an antique desk like yours, but I can’t get the seat to fold up. Is there some secret button I’m missing?!

      Reply
      • Gail Wilson

        February 06, 2020 at 2:36 pm

        Thank you Jennifer!

        If you look closely at the picture where I'm showing the spray paint, you will see that the seat is actually hinged on this antique school desk. Perhaps all of them are not?
        So, check your construction and see if that brace that holds the seat actually moves, or is it stationary?

        gail

    4. Rachel Cleary

      October 29, 2018 at 10:46 pm

      Hi there! It turned out great! i’m currently working on a similar project and i’m wondering if you could explain more about how you refinished the wood part? did you sand and prime? or stain or just paint it with black? any advice would be appreciated!

      Reply
      • Gail Wilson

        October 30, 2018 at 9:13 pm

        Rachel,

        I'm sure I probably lightly sanded the wood. But mostly did the dry brushing with the blue paint and added a little wax to seal it. The wood was really dried out and weathered.
        I hope that helps!

    5. MARTHAIA

      May 11, 2017 at 1:57 pm

      Awesome !!! Nice job....

      Reply
    6. Hannah

      December 04, 2016 at 11:50 pm

      It looks great! Can I ask, did you do a black dry brush on top of the existing wood color? Is that all you did as far as color on the wood? I've got a similar project waiting for me in my home, and I've never done a dry brush with anything other than white so far, so I'm a little wary about trying black. I haven't been able to find any pictures of black dry brushing online either, so you can understand my hesitation! But after seeing this post, it looks really nice and I might try!

      Reply
      • Gail Wilson

        December 05, 2016 at 4:23 pm

        Hannah,

        I used the same blue as I used on the base. I use the cheap chip brushes and only dip the very tips into the paint and hold the brush straight up to apply the paint. The wood looks different because I applied wax over the paint (and wood showing through).

        I hope that helps!

        gail

    7. mare williams

      May 12, 2016 at 12:54 am

      I Love how it came out - navy isn't a color I would have thought of for this, but I love the color after all!!! I can see how it was a REAL armbreaker, too - your patience and hard work paid off, Gail!!!

      Reply
      • gail@myrepurposedlife.com

        May 13, 2016 at 8:37 am

        I almost lost my patience with that paint over rust! I'll be sure to be more careful next time, or at least know what I'm in for!

        I love that navy color--I've used it on several other pieces.

        gail

    8. Dawn

      May 05, 2016 at 9:08 am

      Wow! That turned out incredible! I have always wanted a piece like this! But never found one that was in the right condition to restore, or it was way over priced. Love the dry brush on the wood! OK now I'm on the "hunt" to find one to do! May I ask what you gave for it? I just want to know what a reasonable price would be in the condition you found it. Thank you for re-inspiring me!

      Reply
      • gail@myrepurposedlife.com

        May 05, 2016 at 9:11 am

        Dawn,

        Great question, I should have mentioned it in the blog post. I only paid $10 for this desk. I have seen several others at the same place for over $40. I couldn't get it on my cart quick enough. It's one of the perks of going often.... new stuff is brought in daily.

        good luck with your hunt. Might I suggest putting your request on your facebook page so family and friends know what you're looking for?

        gail

      • Darlene

        April 28, 2018 at 8:33 am

        I found one for $5.. I was so happy

      • Gail Wilson

        April 28, 2018 at 8:48 am

        Wow! That's an awesome find Darlene! congrats!

        gail

    9. Linda Neely

      May 04, 2016 at 10:23 pm

      You did a wonderful job! Live it!

      Reply
    10. Carol Stratford

      May 04, 2016 at 8:01 pm

      It looks like it was more work than most people would have tackled but I love how it turned out! Great idea to work with the weathered wood rather than stain/paint, it adds to the antique appeal.

      Reply
    11. June @ Coffee Under the Umbrella

      May 04, 2016 at 1:34 pm

      Looks great!

      Reply
    12. Liz

      May 04, 2016 at 11:13 am

      It turned out beautiful Gail! I totally agree on so many pieces... if I knew how much work it'd end up being, I probably should have passed, but it's all about the love and vision I guess.

      I have an old school desk nearly identical to this one that was the 1st antique piece we bought as a married couple 36 years ago... my husband bought it for me for a surprise... it too had initials carved in the top, so we added ours: MM + LW awe... 😉

      Reply
      • gail@myrepurposedlife.com

        May 04, 2016 at 11:22 am

        ohhh, that is sooo sweet! I'm so sentimental. 🙂

        thanks for stopping by and taking the time to leave a comment.

        gail

    13. Mindi

      May 04, 2016 at 10:16 am

      Well all your hard work paid off Gail, it is sooo pretty! I probably would have given up on the metal part! I LOVE the dry brush technique over the wood, it really looks fabulous!

      Reply
    14. girlfromwva

      May 03, 2016 at 12:44 pm

      you did a wonderful job! love the way it looks and the choices you made on the metal & wood finishes!

      Reply
    15. Julia - Vintage with Laces

      May 03, 2016 at 9:17 am

      It turned out great, Gail! It's a very lovely piece and was worth the effort.

      Reply
    16. Shawna P

      May 03, 2016 at 8:37 am

      So far the project that has frustrated...er...challenged me most is this doggone drop leaf table. It was my great grandmother's and I think the paint on it is 50 years old or so and I cannot get it off!

      Reply
      • gail@myrepurposedlife.com

        May 03, 2016 at 8:58 am

        Oh my Shawna! That does sound very frustrating. I'm sure you're aware that it is probably lead based paint, so be careful! I would probably put on a respirator and a hazmat suit and start sanding. The good news is, it's a family piece, well worth your time and effort to restore it. right? 🙂

        gail

    17. cassie @ primitive & proper

      May 03, 2016 at 6:58 am

      what a difference! it looks so good and brand new except for looking like an antique, too. 😉

      Reply

    Primary Sidebar

    Hi, there! I’m Gail Wilson, the author and mastermind behind My Repurposed Life. I’m obsessed with finding potential in unexpected places and believe that with a little hard work and imagination, any old thing can be made useful again—myself included! I hope you’ll enjoy the journey and pick up a few tools along the way… literally!

    More about me →

    Join Our Mailing List

    ​

      Click the topics you're interested in below:

      Subscribing above means you agree to our Privacy Policy​

      Footer

      ↑ back to top

      SEEN ON

      Might I Suggest

      • Start Here
      • Furniture Makeovers

      Newsletter

      • Sign Up! for emails and updates

      About

      • Gail's Favorites on Amazon
      • About

      As an Amazon Associate I earn from qualifying purchases.

      Copyright © 2023 My Repurposed Life · Privacy Policy · Disclosure