Ballard Design inspired Drying Rack
As an Amazon Associate, I earn from qualifying purchases.
How to make a Ballard Design inspired Drying Rack out of crib parts.

This is theirs:
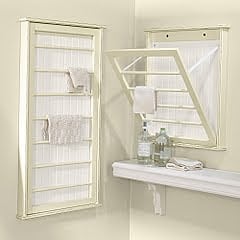 And here is mine:

 I started out with a simple box shape. (note to self, I need to stop taking pictures on this horrible table!)
 I got the perfect crib rail from Cathy. I have several crib rails, but they are spindles or rectangular shapes. I think those odd shapes may leave bumps in clothes dried on them. I cut the rail in half using my compound miter saw.
 I added a bead board back. Gluing and nailing it in place.

I went to Walmart to get some Rustoleum Heirloom white, and they don’t stock it at my store. I picked up Krylon Ivory (I think it was ivory) I used 2 cans for the box and the rails. I then decided to go to Meijer and get Rustoleum Heirloom White. I bought it in spray and a quart. In this picture you can see, the left side is the Rustoleum Heirloom White and the right side is the Krylon. The Rustoleum Heirloom White in this picture is brushed on from the quart can. I like really good coverage on this bead board. Doesn’t the Rustoleum Heirloom White look so much better than the Krylon Ivory? Rustoleum is the ONLY way to go!

 While looking for the Rutsoleum Heirloom White at Wally world, I found these magnets. See those little words Super Strong! Huge understatement! The cards of magnets hanging on the hook at the store were all stuck together! I had to peel them off their neighbors! When I opened the package, two of the magnets found each other, and I could hardly get them separated! I used two of the magnets along with two small washers.
The only fabric store I have near my house is Hancock. It’s not the best, but I can get some really good deals there. This spool of ribbon was 70% off.

It was rainy last week, so I had to work on this in the living room on a scrap piece of carpet. (to protect the drying rack and the hardwood floors) You know I am the repurpose queen, and I recycle anything I can. These hinges are off of some bifolding doors that I use for shutter projects.

I stapled the ribbon to this wooden “separator”. I then glued it with Liquid Nails to the inner top corner of the box. I used this “separator so that the rail (when shut) would be flush with the box.

By now, ya’ll know that I rarely use any of my projects in my own house. I would LOVE to have this, but I have absolutely NO place to put it. Sad, but true. So, I have it staged on a table. It is leaning slightly so that it won’t tip over. (it’s hard to not say “tump”, as I grew up saying it all the time)

Here, you can see that I stapled the ribbon to the rail so that it will extend out for drying. You can also see the separator.

I used E6000 to glue the washers and the magnets.


I believe that lightweight clothes would dry on this rack even with it closed. You’ll notice that my version has twice as many rungs as the small BD rack has.

This is with the rack closed. The ribbon just rests neatly behind the rail sides.

Side view, you can see that it is leaning so that it doesn’t tump (can’t help myself) over.

Side view closed. By the way, the magnets hold it shut very well, even with two thicknesses of the ribbon.

One last full sized view. I have been wanting to make one of these for so long. It just took a while to find the perfect crib rail. I still have half of it left! 🙂
gail
Check out my other repurposed crib projects here
Great drying rack! (my daughter could totally use that!) love how you took your inspiration and made yours even better!
Gail, you are amazing! I have a crib to do that with – I’ll hire you to make it for me! 🙂
I want one!!! You are a genius Gail… your version is excellent! I bet you have a great house with all these awesome things you make!
I haven’t made one myself, but I saw one in the Ballard catalogue and just loved it! But I couldn’t bring myself to spend that much on one. So my dad who is an awesome woodworker made me one for my birthday! Yours looks great!
This is EXACTLY the post I have been looking for !!!! So excited, I got my crib for $20 this morning and I am gonna be working on a project!! Thanks for the tutorial!! Beautiful!
Yay! So happy you found My Repurposed Life Paula! 🙂
have fun creating your own version!
gail
Great idea! I love this and you did such a great job Gail! (I wouldn’t have any place in my house for it either)
Susan
fantastic Idea can’t wait to make one myself Cheers Frances
What a fabulous IDEA & tutorial!! We’ve shared it with our readers!! http://consignmentmommies.com/BlogRetrieve.aspx?BlogID=419&PostID=199031
I loved this 🙂 I made one in lime green for our brightly colored mud room & I use it for swimming clothes & cloth diapers! Thank you for posting the how to! I can’t even imagine our laundry room without it!