Baroque Mirror Memo Board
As an Amazon Associate, I earn from qualifying purchases.
I bought this baroque mirror a couple of years ago. The price on it is $10, but I’m guessing I didn’t pay that much for it, especially since the mirror was missing. This is my contribution to our monthly Thrift Store Decor Team Tour. I was caught off guard this month and realized the night before going camping that it was due while I was gone. So, early on the morning I was leaving, I cleaned it up and gathered my supplies to complete the project while at the campground. In fact, as I write this post under the camper awning, I’m enjoying a nice breeze and beautiful Fall foliage!
Be sure to see what everyone else worked on before you leave. I think several ladies are doing a Fall project—not me. By the hair of my chinny chin chin, I went with quick and easy!
Baroque Mirror Makeover

Here it is in all it’s glory! What you can’t see, is how dirty and dusty it is!

Do you know how happy I am with the fasteners holding in the back? This would make my project go so smoothly!
*this post contains affiliate links, read more here*
How To Clean a Baroque Mirror Frame

How do you clean such an ornate frame? With Krud Kutter of course! Well, you could use lots of elbow grease, but remember I was in a time crunch for a departure to go camping!

When we buy items from the thrift store, we don’t really know their history. Perhaps it had been hanging near a kitchen where it endured greasy conditions, maybe there were heavy smokers in the home. In either case, you can’t paint over those issues. After spraying the Krud Kutter on and letting it sit for a minute or so, I rinsed it away with the hose. SO.MUCH.GRIME.
Are You an Impatient Crafter?

After using the leaf blower to clean off a small area of the driveway, I used a large fan to speed up the drying process so the Baroque Mirror would be ready to paint!
Spray Paint Baroque Frame

The last time I upcycled a mirror frame, I used my Homeright Finish Max. Because I just wanted to paint this frame black, I decided to go with Spray Paint. Maybe I should practice what I preach—you may notice I started with the front instead of the back. oops!

Even though, I’m an impatient crafter, I know when to not rush something. I did several light coats to make sure I got in all the nooks and crannies. I even held it to apply paint to the back of the frame.
Then, I went camping!
Turn an Ornate Baroque Frame into a Memo Board

Do you remember this fabric? I used it to line a vintage suitcase. Something about this Paris fabric just seemed fitting to use on the Baroque Mirror Frame.
There was enough for this project, with a little left over for one more small project someday. The supplies I took with me were cork board, fabric, and batting. The tools I used were a Hot Glue Gun and scissors.
Trim Cork Board to Size

Laying the backer board on the cork board, I traced the pattern.

After cutting the cork board with the scissors, I decided to trim just a little more in order for the backer board to have room for the fabric.
Cut Batting

I folded the batting over 4 times, laid the backer board down and trimmed right around it.
Arrange Fabric and Cut

First, I tried one end of the fabric, but didn’t love where the Eiffel Tower was falling. So, I worked from the other end, trying to save as much fabric as I could. After deciding this worked, I cut the fabric off near the top of the backer board, leaving enough to turn under.
Assemble the Layers for the Memo Board

This is my first project with my new battery operated glue gun, but NOT my last! This think is fabulous! And oh so handy crafting while camping!

In this photo, you can see how much room I left between the edge of the backer board and the cork board. The batting goes all the way to the edge. I didn’t secure the batting at all.
")
This is where I say, I’m a genius! When I build, I do a dry fit. Why not do it while crafting? Originally, I would have just placed the layers, and started hot gluing, but this my friends is where I give you very sage advice.
I carefully placed all the layers, and put the backer board into the back of the Baroque Mirror Frame! It was so easy to pull it snug without moving it out of place.
DUMB LUCK! I was not paying attention to which end was up. Luckily, I placed it the right way.

So, you can see that I secured all the clips in place with a small screwdriver. This was much better than willy nilly hot gluing it the other way.

Wow! That’s a lot of excess fabric. Let’s fix that!
Secure Fabric With Hot Glue

Working my way around the baroque frame, I apply hot glue to the very edge of the backer board.

Because HOT glue is HOT, I used the handle of the small screwdriver to press the fabric into the bead of glue.

Slowly, I worked my way around, trimming the excess fabric.

Yeah! That’s a LOT better, don’t you think?

Voila! This Baroque Mirror Frame Memo Board is so easy, you can even do it while you’re camping! Oops! Can you see where I accidentally cut my picnic table cloth when I was cutting the fabric?
Baroque Mirror Frame Paris Memo Board
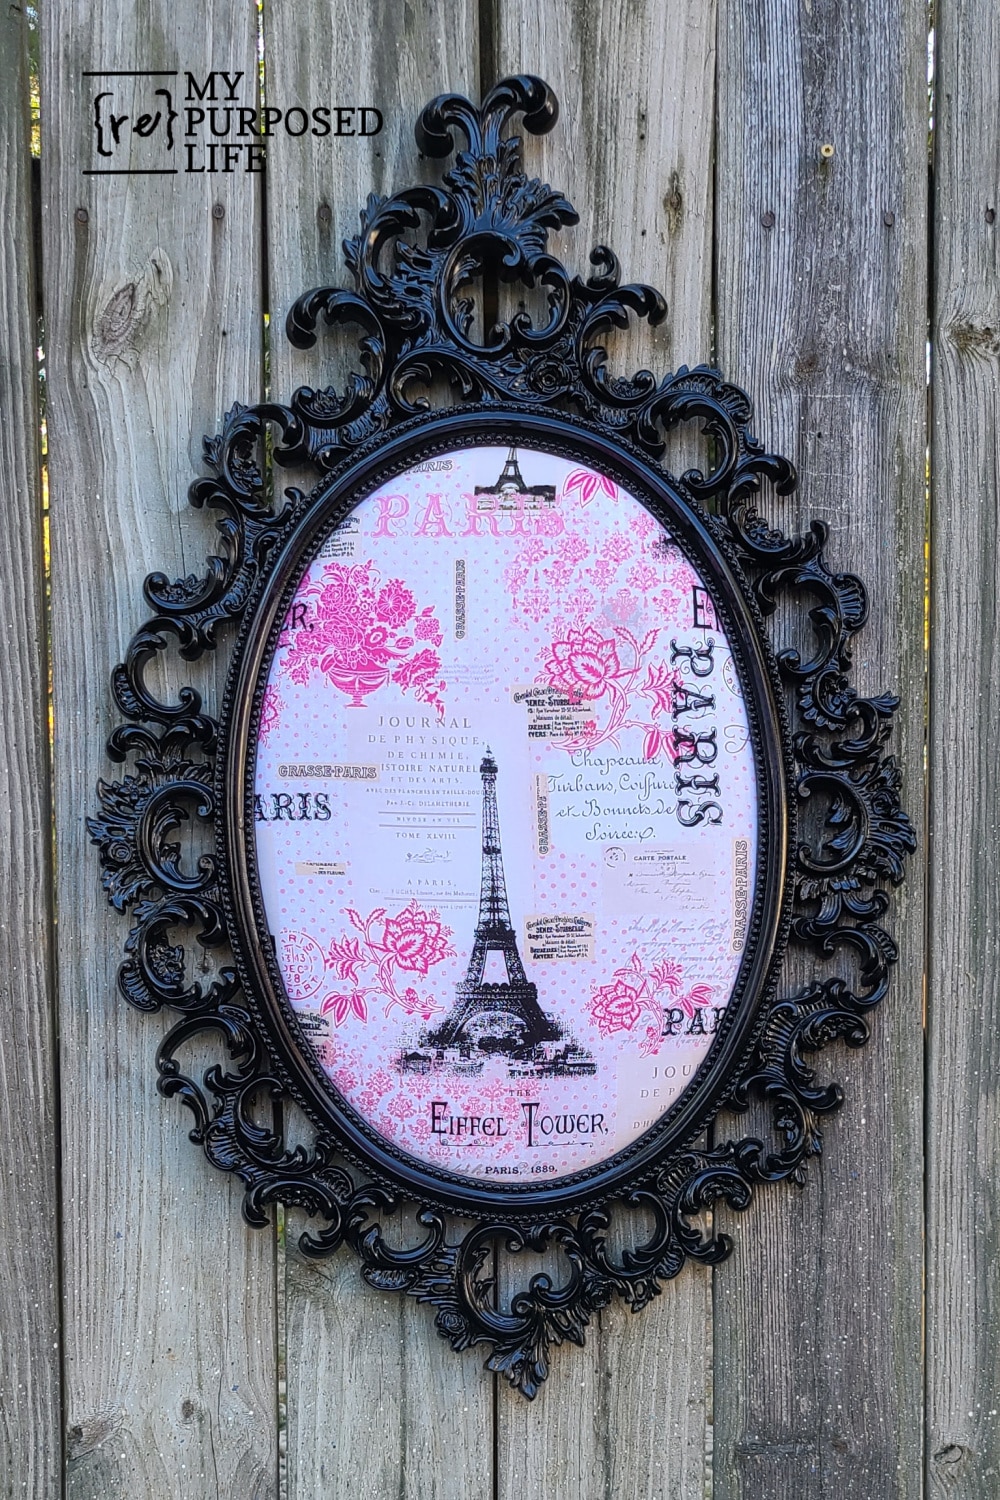
Looking at it, I’m wondering if I should add the pretty criss cross ribbon technique? So, I’ll put that question to you. Do you think I should add ribbon? What color would you suggest? If I update it, I will post it here when completed.
Now, go look at all the other awesome projects from the Thrift Store Decor Team….
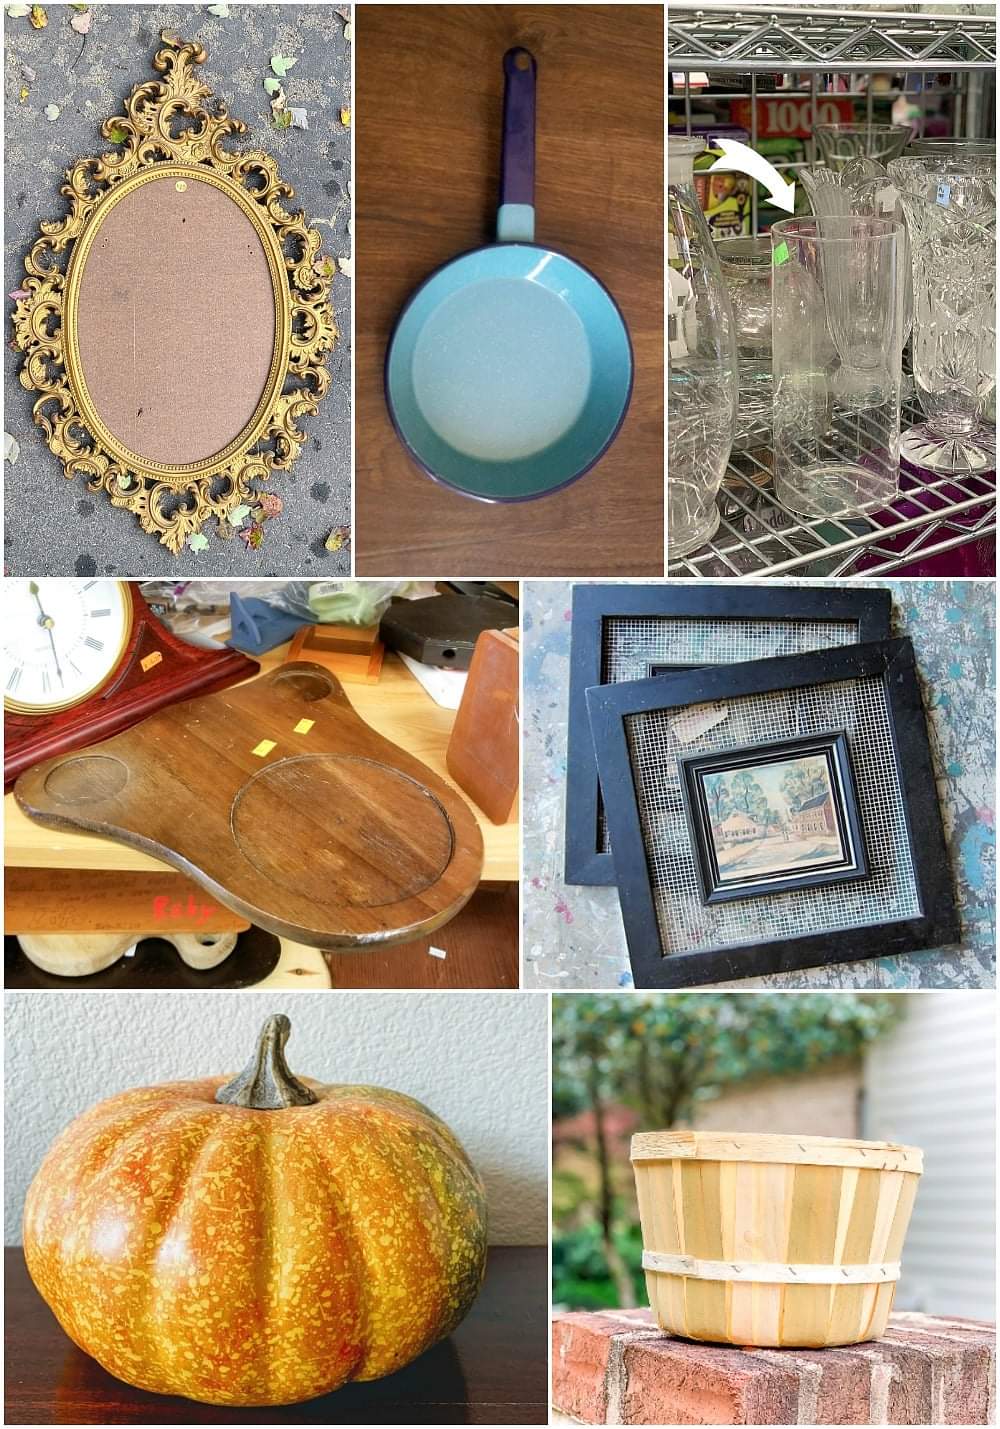
Frying Pan Sign from Domestically Speaking
Baroque Mirror Memo Board from My Repurposed Life
Paint Old Picture Frames from Petticoat Junktion
How to Paint a Basket from Our Southern Home
How To Make A Concrete Pumpkin from My Uncommon Slice of Suburbia
Halloween Ghost from a Wooden Cheese Board from Sadie Seasongoods
Rustic Birch Bark Vase from House
I really love this look! It would be perfect for a girl’s room no matter the age! Crud Cutter is the best ever. We use it all the time!
I love, love, love this!!! As I first began looking at your photos I thought PLEASE let her paint it and not leave it that gaudy gold! Thankfully I kept reading:) I would have probably done white as I love white but the black looks awesome and perfect with that Parisian fabric. I am torn about the crisscross ribbon. I think it would look great either way, but I think I would at least get some ribbon and lay it down to see how it looks to you. I made one of these (not nearly as cute) years ago using an old bulletin board I had and I have the ribbon and really like it. You, girl, are so super talented! And by the way, I am envious of the fact that you are out in nature in some cool air. It’s still hot as Hades here! Enjoy yourself. Another job well done:)
Thanks so much Cheri! I’m guessing I may leave the ribbon off…. maybe whoever buys it can add some if they like. 🙂
I have one last trip planned, and a another small craft project. Then it’s time to put the camper away for the winter.
I hope your weather cools off very soon.
gail
Great project! I agree–no ribbon–it would detract from the design. That cloth’s design is just perfect for that frame. Nice tutorial, too!
I appreciate your comment Kathy! Thanks for adding your input to the debate. It looks like I won’t be adding any ribbon. 🙂
gail
I love how this turned out, I’m a little jealous that you get to go camping right now 🙂
Kristin,
I can’t get enough camping. Crafting while camping is soooo much fun! I’ll probably be doing a lot more of it next year. One last trip planned before winter sets in….
gail
i really like how it turned out. i have several mirrors that are similarly shaped. i painted mine the oil rubbed bronze color but your black looks crisp. 😍
I love oil rubbed bronze!!! But the black does look great with this fabric. I think this is the third one I’ve painted…. the other two were navy and a red (I think). 😉
gail
I agree, it’s delightful as-is! Great re-do!
I love it the way it is, adding ribbon would take away from the beautiful Eiffel tower and the perfect placement of it.
Annette,
That makes a lot of sense about the print on the fabric. Thank you so much for joining in the conversation!
gail
Now that’s dedication…taking your project camping with you!! I love how it turned out but I don’t think you should add ribbon, I think it would be too busy since the fabric is detailed and the frame is detailed too.
Tania
Tania,
Thank you so much for your input about adding the ribbon. 🙂 Looks like most people are going to agree with you.
It’s fun to craft while camping… I get to be outdoors and be productive!
gail