Bench Made From a Door
As an Amazon Associate, I earn from qualifying purchases.
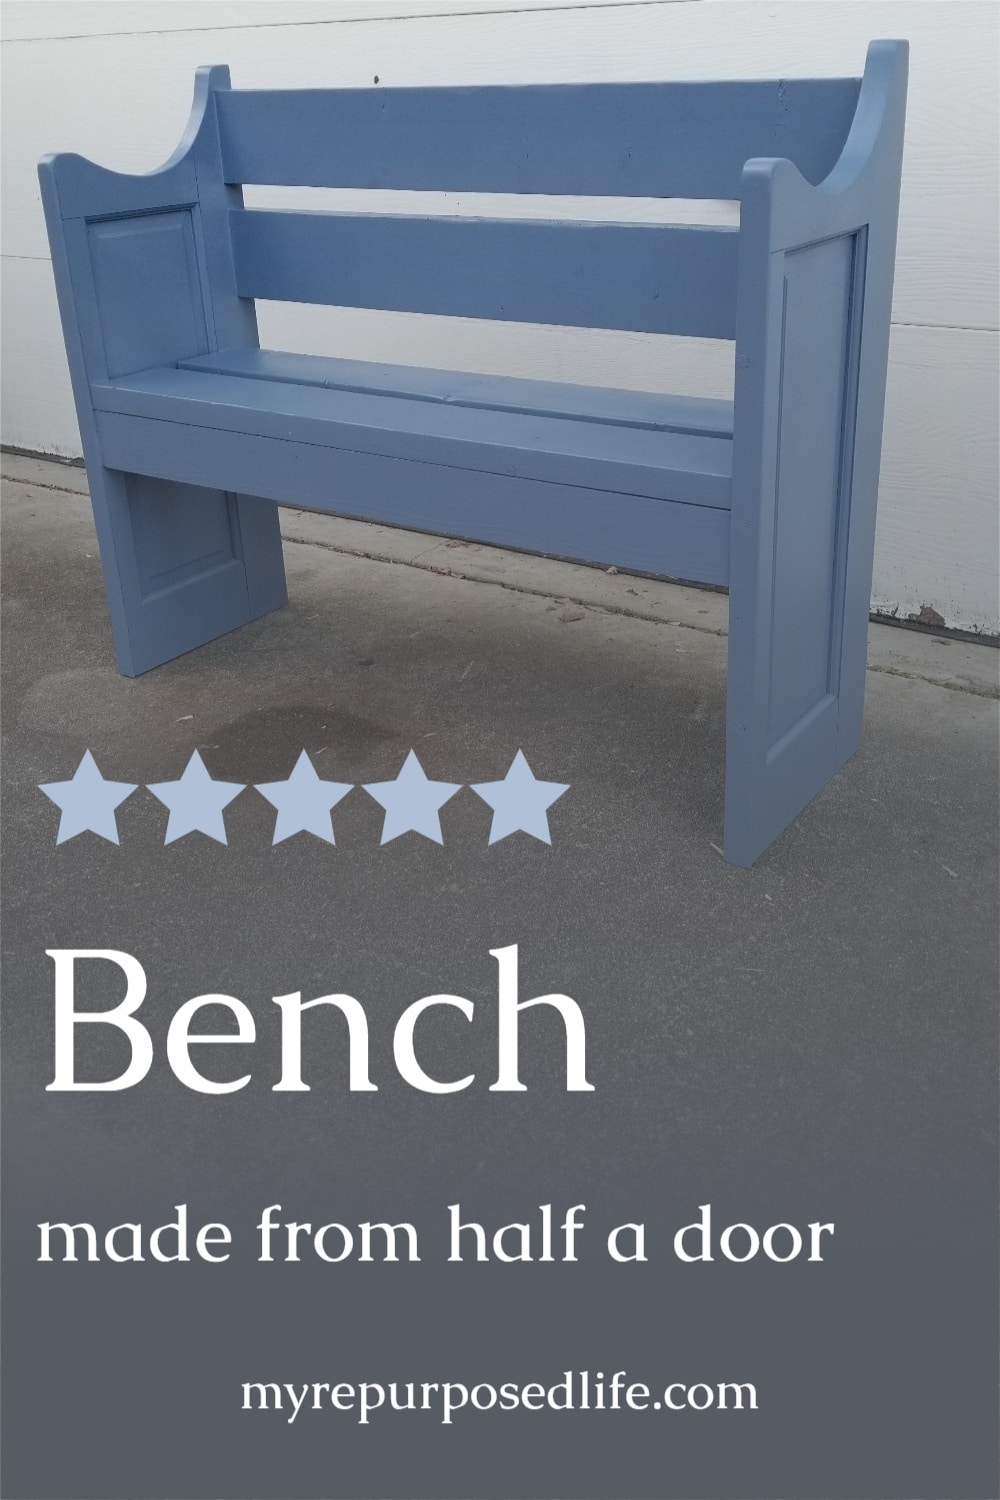
I’m sharing a small two person bench made from a door. Wouldn’t you agree that this unique door bench could be used in a mud room, entry way, or even on a porch? This is not a typical door bench because I only had half a door in my stash. Do you know the best thing about what I do? I get to design and change repurposed furniture projects along the way.
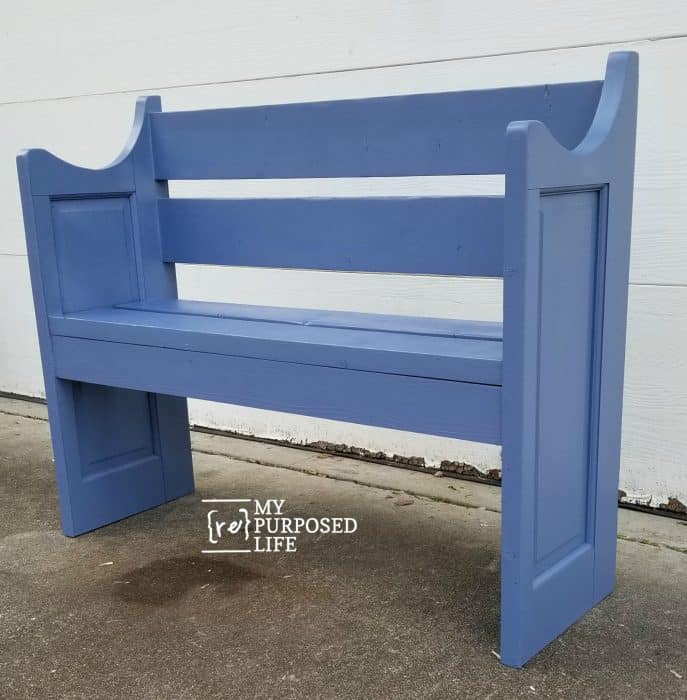
Does the door bench remind you of a small pew? It really did go through several design changes along the way. I’ll share my thought process on making the bench below.
Related Content: More Door Projects
Repurposed Door

Are you wondering why I have 1/2 a door in my stash? I have no idea. But on this day, I knew it would be turned into a small bench!
Rip Door on Table Saw

The first step was to rip the door to get two equal sides.
Small Circular Saw Cuts Door Panel

Next, I cut away the small panel with my circular saw.

Be sure to draw the lines so you can follow them with your circular saw. You will want to do this to both of the narrow door panels.
*this post contains affiliate links, read more here*

For safety sake, the door panel was clamped using irwin quick clamps.
Use Something Circular to Draw Pattern on Door Panel

Using a dollar store basket and part of and chandelier, I drew a pattern for cutting with my jigsaw.
Continue to Draw Pattern on Door Panel

After initially drawing the pattern, I decided to make it a little smaller.
A Jigsaw Cuts Door Panel Pattern for Bench

If you go slow, and let the jigsaw do the work, this is the end result.
Trace Pattern onto Second Door Panel

In order to get your two sides to match, use the first panel to make a pattern on the second side.
Clamp Two Door Panels Together

Clamp the two panels together and sand as ONE to get the profiles to match. I recommend, switching the two sides to make sure they match. Mine did not match completely, so I drew more lines using one panel as a guide to get them to match up.

I used this same technique when I made the narrow wall shelf corbels.
Maybe Time for Plan B

Leaning the door panels against the diy picket fence I’m not thrilled with the pattern.

You can see I took about three inches off the top of the door panel. But, little did I know that I would trim it yet again before the door bench was finished.
Reclaimed Lumber 2×6

Last Fall, my neighbor Rodney and I built a new carport for my truck. Because I never throw anything away, these 2×6’s were left over from that project. Using this reclaimed lumber really kept the price down on this door made into a bench!
I chose to make the bench seat and back 42”, knowing that would be wide enough to make this a nice love seat bench.
Steps to Assemble Bench Made From Door

I used my Kreg Jig to drill pocket hole screws on each end for the back. Pocket hole screws were used to attach all three of the 2×6’s that would make up the back.
A 2×4 scrap piece was used to make a cleat in order to attach the door bench seat. This was necessary because of the inset of the panel on the door.
The seat is approximately 19” from the ground.
But, I wasn’t loving it at this point.
Now We’re on to Plan C

My neighbor Rodney helped me off and on during the day with a few modifications and repairs. Initially he didn’t think I should cut any more off the height of the bench back. But after convincing him to sit on the bench to try it out, he agreed that it needed to have a little “taken off the top”. The 2×6 was removed, then he used the circular saw to trim the bench back a little.
Add Front Apron to Hide Seat Cleat

A 1×4 was cut to size to hide the cleat on either side. It was glued and tacked in place with my nail gun.
Note the rough front portion of the bench side piece.
How to Disguise Rough Wood

Because I tend to save all scraps and such, these thin “shims” were perfect for disguising the rough wood on the front of the bench. I used Gorilla Wood Glue and brad nails to hold the shims in place.

The left side has been fitted with the shim. It’s basically the rounded over edge that had been ripped off a 2×4. The shim was cut to length, fitted, then ripped on the table saw to fit the 1 3/8 inch door width. After gluing and nailing, the shim was sanded and rounded over to match the profile of the armrest on the door bench.
Drywall Mud Patches Screw and Nail Holes

Did you know I use drywall mud to patch my furniture projects? In this image, you can see how nice the shims repaired that particle board in the front.
Patch Doorknob Hole

Rodney made a nice plug to patch the hole that had been the original doorknob.
Patch & Sand Bench

Of course, I placed it in the sun to speed up the drying process of the drywall mud. A sanding sponge was used to smooth out all the patched areas.
DIY Chalky Paint Primer

As per my usual painting steps, I started with my DIY Chalky Paint Primer mixed with an oops blue. I recently told you how NOT to mix chalk paint, so this time I followed the proper steps.
Paint Underside of Repurposed Door Bench

Don’t forget to paint the under side of your repurposed furniture projects. There’s nothing more embarrassing than loading a piece into someone’s vehicle and seeing raw lumber and mismatched wood. Of course I used my Super Finish Max to make this a quick and easy paint project!
Related Content: Navy Blue Furniture Projects

This is after the first coat of the diy chalky paint primer made with Plaster of Paris.

This oops blue paint is a semi-gloss. After painting two light coats of the chalky paint, I did two more light coats of the semi-gloss paint. (not pictured)

So, I’m curious. Which bench is your favorite? The taller one with three boards for the back, or this version with one of the boards removed?

I have already taken it over to The Sugar Shack so the paint can cure. Don’t be surprised if I revisit this project and give this small bench made from a door my favorite Smoked Glaze treatment. For more details on that, see my article How To Glaze Painted Furniture.
I would love for you to save & share this on Pinterest! If I end up glazing this bench, I’ll let you know in an upcoming Weekly Update Email.
gail
See more Door Projects here
I actually liked the 3 board bench as it looked like a church pew. I could see it on a smaller front porch with some plants and a welcome sign on it.
I love your posts and often scrounge through them for new ideas. Thanks for your fun posts!
Thanks Kraig!
I liked it okay with three boards, but it was really top heavy as the seat wasn’t side enough due to the door being a little on the small side. If the door had been wider, therefore making the seat wider, I would have left the top board in place.
I appreciate that you scrounge through my posts for new ideas. That is why I do what I do!
gail
I think this is my favorite bench. I’m so glad you went to plan C. It was really looking like a church pew before. The blue is what I’ve started changing my colors over to on our patio. I look forward to an email with a fun project
awww, thank you Jennie! I always look forward to your comments! I can’t remember using this blue before, but the gallon was only about half full. 🙂
Take care,
gail