Chalkboard Key Rack | Wall Organizer
As an Amazon Associate, I earn from qualifying purchases.
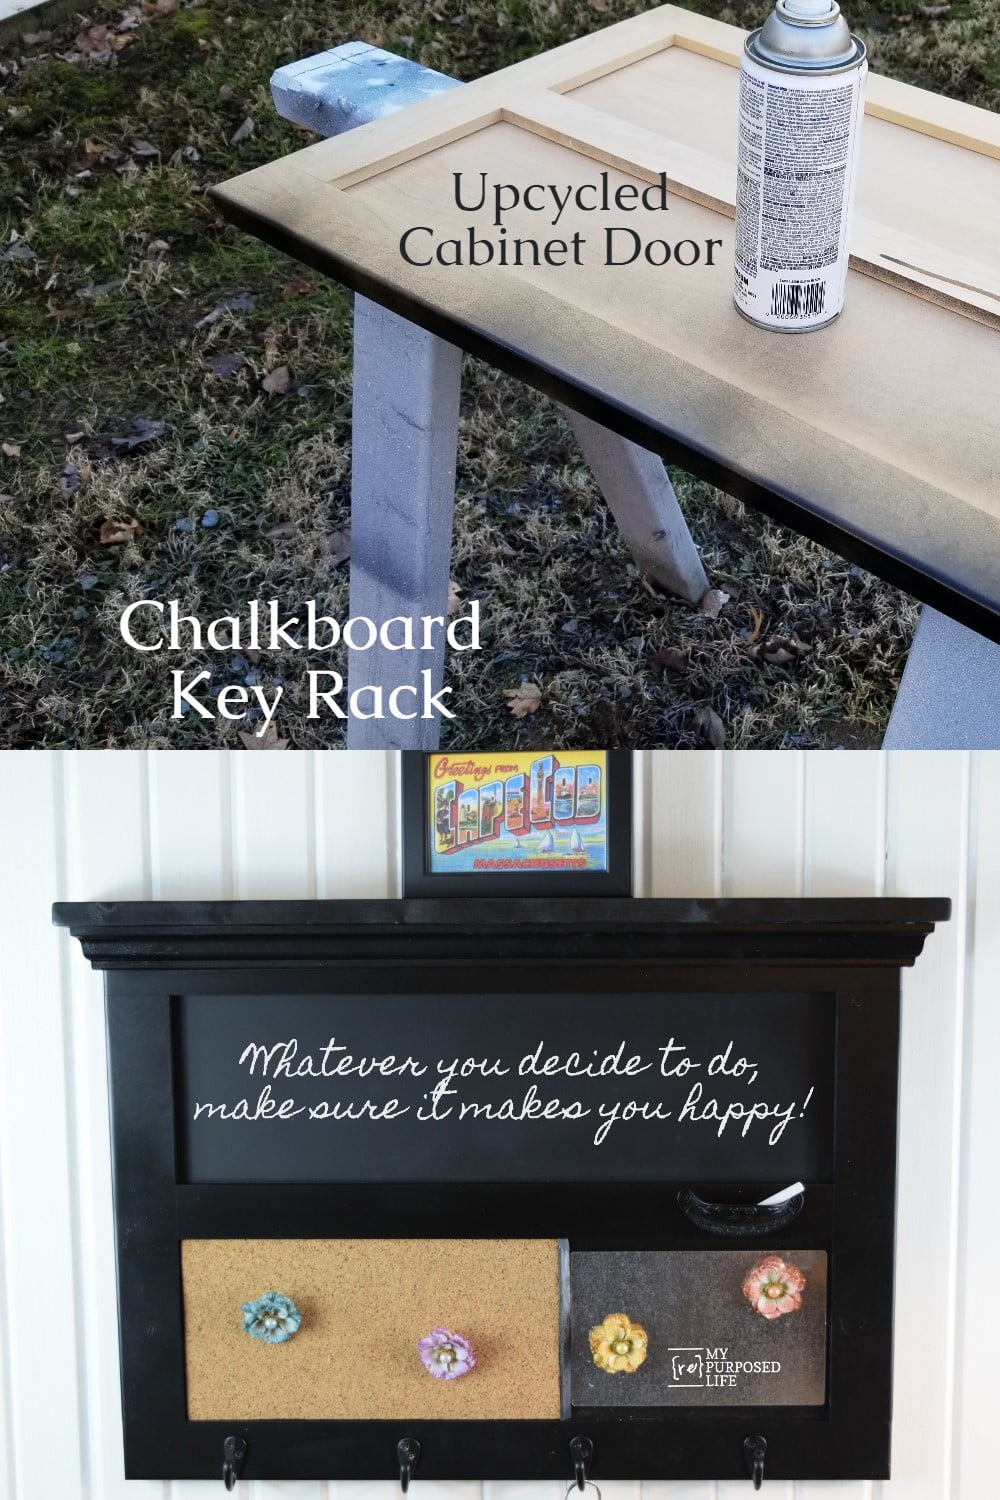
This chalkboard organizer for a busy home is made using a cabinet door, scrap wood and scrap molding.
I’ll be honest and tell you the trim (molding)on the chalkboard key rack is the most difficult part. You could actually skip that part, but it does make it look more finished in my opinion.

Spray paint Cabinet Door

I chose to spray paint this chalkboard key rack project to make it easy on myself.
Add trim molding (optional)

When one of the peddler’s malls was going out of business, I stocked up on this decorative molding. It’s small and perfect for the kind of cabinet door projects I make. I used it on this Coffee Station project.
I’m not an expert in mitering, but I will tell you that I cut the long piece first. Then I cut the two smaller pieces off of a long piece, doing the mitered cut first, then carefully making the straight cut. USE caution when cutting small pieces. Even though I was cutting it off a long piece, the short piece can fly up and around. Lower the blade slowly, stop the blade when the cut is complete. After the blade stops, raise the blade and your short piece should be resting on the miter saw.
*this post contains affiliate links, read more here*
Use wood glue on small wood trim pieces

I’m not kidding when I say I’m no expert. I used my nail gun on the large piece, then moved right around to the smaller pieces. The brad nails split the piece and I had to cut new pieces. After that happened twice, I chose to use Gorilla wood glue to hold the small wood pieces in place on the chalkboard key rack project.
Attach shelf board using brad nail gun

The top shelf board was cut and sanded before it was attached with my nail gun and Gorilla Wood Glue. I prefer to sand really well, smoothing how the hard edge of shelf boards. To do this, I use my orbital sander with 150, then 220 grit sandpaper.
Spray paint top shelf and trim

To make everything match, it was back to spray painting. I’m not a fan of how the spray paint allows the knots of the wood to show through. Since the top of this cabinet door will be the chalkboard portion of the key rack, I didn’t waste paint giving that section full coverage.
Chalkboard spray paint makes painting a chalkboard easy

I bought a six pack of chalkboard spray paint on Amazon. It was a great deal and I love using it for small projects like this chalkboard key rack.
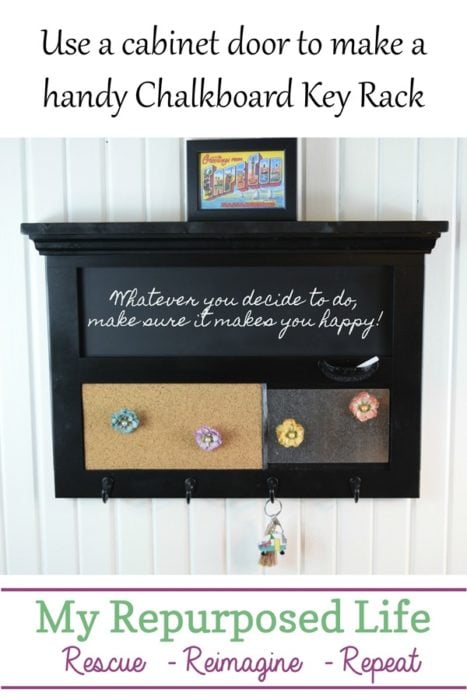
Add corkboard to the chalkboard key rack wall organizer

There are several options to adding a cork board. For this chalkboard wall organizer I used Contact brand cork board. I’m not even sure why I have this. It was too thin for this project. Because the cabinet door is hard wood, a push pin is nearly impossible to insert into the wood. I ended up using four layers of it.
How to add hooks for keys

Laying out the tape measure, I marked the small hooks so I could pre-drill the screw holes. Skipping this step is a big mistake. The small screws that come with these hooks are not meant for hardwoods.
The soap trick for screws

This is an old trick my Mom taught me and it rarely fails me! If you try a screw with and without the soap, you will see a big difference in how easy it is to drive the screw WITH the bar soap.
Don’t use a drill to drive these small screws

Be sure to use a screwdriver and not a drill to drive the small screws. Even using soap, and screwdriver AND a pre-drilled pilot hole, one of the heads broke off.
Glue on screw head with Gorilla Super Glue

I love this brush on Gorilla Super Glue for small tasks like this. I even used it a few weeks ago with a tea bag to mend a very painful broken fingernail. The small piece of sheet metal was secured using Gorilla Glue Spray Adhesive.
Cabinet door hardware jig

To add a bin pull for holding chalk, I used my Kreg cabinet hardware jig. Its the best foolproof way to line up the holes perfectly.
 Isn’t the bin pull so pretty? I got it from my friends at D. Lawless Hardware.
Wall organizer chalkboard key rack memo board

Generally, I would be showing this on my fence, but we’ve either had freezing temps or downpours of rain. This project had to be completed in the house.

This wall organizer has everything to keep a busy person in control. It offers a chalkboard, a corkboard, a magnetic board, and last but not least hooks for keys! Bonus! There’s even a small shelf on top!

Making the wall organizer chalkboard key rack didn’t take as much time as adding all of the extras that make it special. The building part is the best for me, adding all the hardware seemed to take forever. However, I did have fun making the matching pushpins and magnets out of some small flowers from my stash. ![]()
I think I’ve already found a new home for this chalkboard key rack! Where would YOU put it?
gail
Related Content
What did you use for the magnetic board? I can’t find that detail in your instructions.
Ohhh, good question Annette! It’s a small piece of metal I ordered online years ago. There was a time I walked around Home Depot with a magnet testing all kinds of options to see what would actually work. I found nothing.
Okay, after some investigative work, I remember ordering them from a flash site Pick Your Plum. They would have daily deals. It was 2014. I went to their site and couldn’t really find craft items currently.
I’m sorry I can’t be of more help.
gail
this is a really nice project. the embellishments make it more special.
How cute and useful! I love that you used a drawer pull for the chalk holder. The chalk board I made from a cabinet door gets so much use. I thought it would be something just cute in the kitchen. Wrong! Love the idea of the soap on screws. I use it all the time for screws, needles, pins and to mark sewing lines. I only use ivory because I find it doesn’t leave any oils on fabrics. Where are you putting your pieces now that the vendor store closed?
Jennie,
Thank you! This project took so much longer to finish due to all the embellishments. 🙂 The building is the fun part for me. lol I have two chalkboards in my kitchen and I often wonder how I spent my first 30 years in this house without them.
Where am I putting my pieces? A little here and there. Currently 3 of them are in my bedroom, which is a no-no. Cousin Terry wants to open a booth together, but if I have to give away my first $70 each month, I’d rather give my projects to family, friends and charities. So, I really don’t have an answer to your very good question.
gail