Child Bench made from Reclaimed Bed
As an Amazon Associate, I earn from qualifying purchases.
I’ve had this child bench done for a couple of months. It’s a fairly simple toddler sized bench made out of a reclaimed bed. It’s actually the foot board of a bed. Because the bed posts sit closer to the ground, it was perfect for using to make a small bench for a child. A grownup could also use the small wooden bench to display large dolls.

How to make a Child Bench
 You can see that the foot board is a full sized bed.
How to make a bench video
*this post contains affiliate links, read more here*
Cut bed apart to make back and sides
 To make a small child’s bench, the first step is to get the correct depth of the seat. A seat that is 10-12 inches is a good size for toddlers and small children. The key is to measure from the inside of the bed post. I measured and marked the foot board and used a small circular saw to separate the foot board into three pieces.
 A jigsaw would also work well for cutting the bed apart.
 Now that the full sized foot board is cut apart, it’s time to attach the back of the bed to each side.
Attach sides to back of child bench
 The width of the board was marked, and holes were pre-drilled. I love Gorilla Wood Glue for my repurposed furniture projects.
 Starting the wood screws in the pre-drilled holes will make attaching the side to the back easier.
 Here is a close-up of the toddler bench construction.
 I rested the toddler bench up against the diy picket fence to get a feel for what kind of legs to add on the back.
Attach back legs to small wooden bench
 Because I didn’t have any spare bed parts, I opted for 2×3 boards for the back legs. I used these boards for the Pallet Bar Table and had these small pieces left over. They were perfect for the petite wooden bench.
 To make sure everything was level, I used quick clamps to hold the 2×3’s to mark the proper placement. I wanted the seat to rest on top of the 2×3 back legs.
 The back legs were secured with wood screws and wood glue. Countersinking the screws makes a cleaner looking project-although I sort of changed things up down the line on this small wooden bench.
Add seat to small bench
 My daughter Jamie gave me this table leaf—it was nearly perfect for the seat on this small child’s bench. I needed to rip it slightly on the table saw and then cut it to length with the compound miter saw.

From the underneath side, you can see I made small cleats for the seat to rest upon.
 I cut two scrap pieces of thin plywood on the miter saw. . . .
 . . . to cover up each side of the small bench. There were too many screws and holes to patch.
 I used wood glue and my nail gun to attach the thin pieces of plywood.
 Filling a couple of brad nail holes is a lot better than trying to disguise all those screw holes. I did have to use quite a bit of putty to fill those bracket slots on the reclaimed bed posts.
 As I was looking at this small wooden bench, particularly the seat, I wasn’t happy with how it looked.
Patch and paint child bench
 But, I didn’t know what to do, so I got ready to paint the child bench. You can see I have patched all the holes and slots in the bed posts
 I did a lot of customizing on the paint. The pink I had was too bright, so I softened it with a little bit of white paint. Then I used plaster of paris to mix up my infamous DIY chalky paint primer. I used a mesh paint strainer to make sure there were no clumps in the paint before putting it in the Super Finish Max Extra paint cup. You can tell I love my cheap chip brushes, look how well worn it is!
 You may recall that I prefer to paint the underside of my projects first. To make things easier on my back I rested the wooden bench on my easy diy sawhorses.
 I’m still not wild about the color, or the front of the seat. But I love how easy this was to paint with my Homeright Paint Sprayer!
 It’s cute, but too PINK!
 ![]()
 I finally decided what to do about the front of the seat. It really needed some sort of distraction to seeing under the seat. I used a small piece of molding, painting it pink to match the wooden bench.
Glaze pink toddler bench

What is my answer to paint issues? My favorite Smoked Glaze technique! See more glazed projects here.
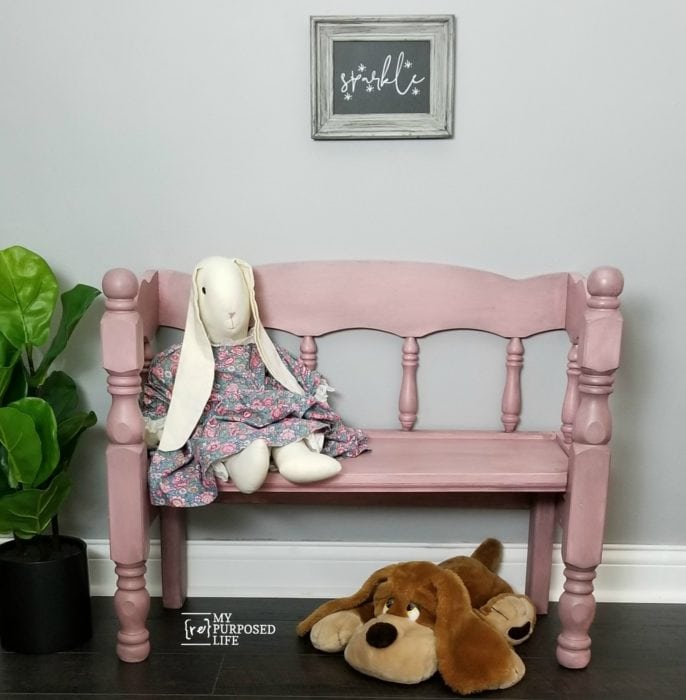 Finally, I’m calling the small wooden bench d.o.n.e. and I love it! Isn’t the bench perfect for a small child and her dolls? The chalkboard is a thrift store frame turned into a chalkboard with a transfer from The Junky Chalker shop. It took me all of 2 minutes to apply the chalk paste and clean up the screen print transfer. Read more about how much I love in my post Chalk Paste is the New Vinyl.

I would appreciate you pinning this to your favorite Pinterest board!
I think this small bench would also be perfect for a photographer’s prop when taking photographs of small children.
See more bench projects here, and more kid’s furniture projects here.
thanks for stopping by!
gail
YES Bonnie! You can use this method to make a larger version. In the early day, this is how I made all my benches before I had a Kreg Jig. I used a super long drill bit to drill through the bed posts.
Check out all the headboard benches here: https://www.myrepurposedlife.com/25-benches-headboards-more/ The older models are done without the jig.
gail
ps I’m here if you have any specific questions