Child’s bench made from a foot board
As an Amazon Associate, I earn from qualifying purchases.
How to make a child’s bench out of a foot board!
 A good friend of mine was making some changes in her bedroom. They had a squeaky bed, and decided to attach the headboard to the wall. Therefore she decided she didn’t need the foot board, and she called her good friend gail, cause she knew gail would take it off her hands! I did!
It was a petite foot board, but oh so cute!
") I actually started on this bench by myself. I should have waited for Cathy, cause I got confused and cut the sides too short. This was a queen foot board that I intended to be 12 inches in the seat. For it to be 12 inches in the seat, I should have measured from inside the post toward the middle 12 inches. I measured from the end of the foot board toward the middle (12 inches). That made the depth of the seat about 10 inches. I simply cut some off of each end, then swung those 2 pieces around to make the sides of the bench. You can see we also cut off some of the height of the posts. They stuck up way too high. We saved the balls to re-attach at the lower height. We used a 2×4 as a brace across the front, and a 1×3 to use as a cleat across the back. (for the seat slats to rest on.
I actually started on this bench by myself. I should have waited for Cathy, cause I got confused and cut the sides too short. This was a queen foot board that I intended to be 12 inches in the seat. For it to be 12 inches in the seat, I should have measured from inside the post toward the middle 12 inches. I measured from the end of the foot board toward the middle (12 inches). That made the depth of the seat about 10 inches. I simply cut some off of each end, then swung those 2 pieces around to make the sides of the bench. You can see we also cut off some of the height of the posts. They stuck up way too high. We saved the balls to re-attach at the lower height. We used a 2×4 as a brace across the front, and a 1×3 to use as a cleat across the back. (for the seat slats to rest on.
 Here you can see a closeup of the place where the side rails would have fit in the posts. There was a large metal piece there. When we removed it, there was this huge gap. We usually use wood putty to fill holes and such, but this was much too big for that.
 We used some leftover slats from a shutter, cut to size, and shoved in, they filled the space nicely. Then we were able to putty.
 We used some wood flooring for the seat slats. We used some very thin shutter slats as “spacers” to get an equal space on each slat. I cut the tongue and the groove off of every piece. Flooring has tongue and groove on the ends too, so I made sure that both ends were cut blunt. (removing the tongue or the groove)

You can see we re-attached the ball.

I used brush on primer.

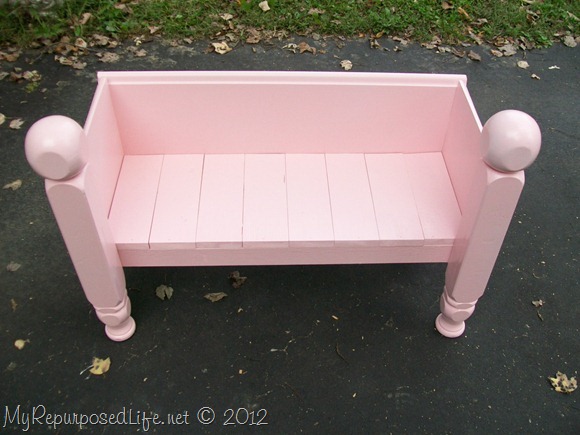
 From this angle the seat doesn’t look too bad. But…

 It was looking better to me now.
 I dressed it up with a small child’s quilt. (leftover from my teaching days)
 It matched really well. We took this to Glendale, and it sold pretty quickly. The lady who bought it walked right up and immediately said “I’ll take it”. She didn’t even think about it. Turns out that she is a photographer, and she bought it for taking portraits of children! Isn’t that cool!
See other fun bench project ideas here.
[url=http://minecraft-online-blog.com/]Minecraft Download[/url]
This is the cutest, sweetest bench ever! Just perfect!
I LOVE that! I never thought to do an alteration like that, but now I’m itching for it…
This comment has been removed by the author.
Oh this is soooo darn cute! I love it…thanks for sharing.
Jane @ Finding Fabulous
I love the way your bench turned out ! The color is perfect.
Love this!!! Now to hit the thrift store for a foot board!!!