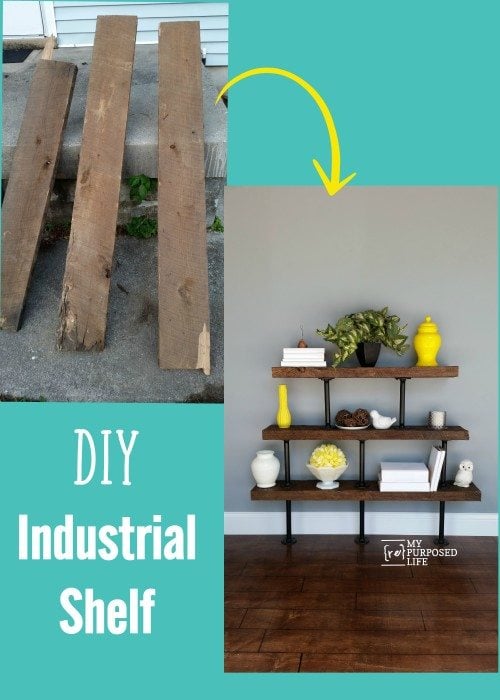
DIY Industrial Shelf
As an Amazon Associate, I earn from qualifying purchases.
I made a DIY industrial shelf! I hope you love it as much as I do!
When I was contacted by DIY Cartel about reviewing their 10” plumbing pipe table legs. I’ve always wanted to do a project with these plumbing pipes, but when I went to the store to buy them, I was so overwhelmed by all the mix and match choices that I ended up walking away. I requested two sets of the 10″ plumbing pipe table legs.

Clean plumbing pipes before building industrial shelf
 Because they are plumbing pipes, they are naturally a little greasy. I used a degreaser to clean them up. Then I waited too long to dry them, and encountered a little rust on the flanges. I recommend drying them right away.
Paint pipes for industrial furniture
 You can see the degreaser really did a number on the pipes. I used some rods to hold the pipes so I could spray paint them with some Kryon Dual. Initially I was going to leave the flanges their original color, but I decided to paint them black as well. I sprayed the flanges on a drop cloth.
Reclaimed lumber for diy industrial shelf
 I chose to use these humongous floor joists for this DIY industrial shelf project. When I was finished cutting off the bad parts, they ended up being 3 different lengths. That was okay with me, because that’s what I really had in mind for this project.
My neighbor told me these are yellow pine. All I know is they are the heaviest boards I’ve ever carried and cut. These are from back in the day when a 2x was really 2 inches thick!
I could cut the two smaller boards on the sliding compound miter saw by myself, but the longer one? That was so heavy I had to call in reinforcements. I know my limitations, and I was afraid that doing that task alone was too risky.
I washed the boards the day before and allowed them to dry thoroughly.
Bring out the beauty of wood with a poly sealer
 I used a scrap piece that I cut off to see how the wood was changed using Minwax Polycrylic. I liked the look, so I chose to use it on all the boards. The board standing up vertically is untreated, and the two laying horizontally have both gotten the poly treatment.
 I actually used a gloss on these boards and I love how they turned out. So much character in these very, very old boards!
Attach pipes to DIY industrial shelf
 After securing all of the pipes to two flanges, I got busy putting the pipes onto the underneath side of the bottom board. I used my adjustable combination square to make sure they were all spaced the same.
 I bought some of these lag screws at Home Depot, but actually didn’t have enough. When I went back, I bought 1 1/2 inch screws. They were .47 each. This project took a LOT of screws. By the way, I have a link at the bottom of this post where you can find them online a little cheaper.
 I drilled pilot holes for every lag screw, using a socket to secure them all. I screwed all of them in loosely before tightening them each down because my boards were slightly warped.
 After securing the bottom legs on the underneath side, I then started building UP by attaching the pipes and flanges to the top of the bottom shelf.
Heavy reclaimed lumber DIY industrial shelf
 You can see I have the lower two shelves completed. I was careful to make sure the OLD nail edge of each board all faced the same way. Some may like this side exposed, others may prefer that this side be up against the wall. It’s really a personal preference.
 You can see that I ended up using all 8 of the pipes on this one project.
Touch up Spray Paint
 To paint the screws, I used one of the flanges to trace a circle on a piece of cardboard. I then cut a small slit to allow the cardboard to fit over the pipe, and slide down to surround the flange. I used the same Krylon Dual spray paint to touch up all of the screw heads.
 Here ya go! One completed industrial shelf using 8 plumbing pipes and 16 flanges. SIXTEEN flanges, that is a total of SIXTY FOUR lag screws.
PLEASE NOTE: when these diy industrial shelves are rehomed, the new owner will need to secure them to the wall with some “L” brackets. I did not do that for the staging process.
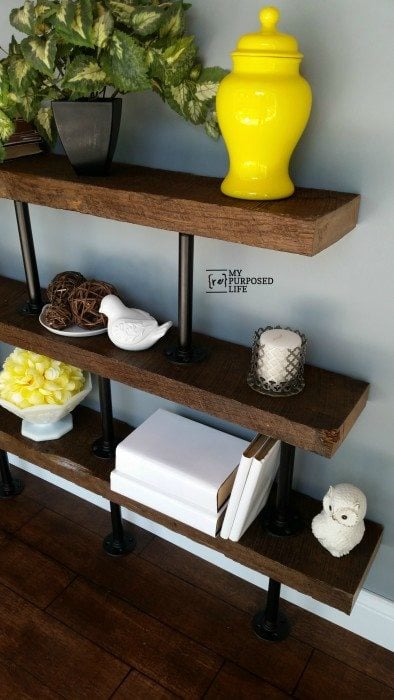
I love the new DIY industrial shelf made from reclaimed lumber!
 The edges of these boards sawed so much more smoothly than any of today’s lumber does. I wish there had been more boards to get. Most of them were eat up with rot.
 Do you love it? I’m not generally a big fan of industrial stuff, but I love this industrial shelving unit!
 A close-up of the wood and the flanges. This is the better side (edge) of the boards. The nail holes are currently butted up against the wall. The wood is far from perfect, which I think adds to the charm of this piece. Ohhh the stories these former floor joists could tell!
Info on lag screws

Now, here’s some information I found online after searching for cheaper lag screws for you. I couldn’t find any on Amazon (my first stop for online shopping) I found some reasonably priced lag screws at MSCdirect. They are sold by 100’s but even buying 100 from them is way cheaper than I paid. (even with postage) I contacted the company to ask about shipping. Their standard shipping (up to 17 pounds) is $11.60. I have not used these screws, and the length you buy would depend on what lumber you are using. These are 1.5” long. I just knew there had to be a better option than what I paid (.47 each)
You can order these plumbing pipes on Amazon.
See more reclaimed wood projects here
gail
disclaimer: although I received the pipes to review, I was not compensated for this project or blog post. All thoughts, opinions and projects are my own.
Hi Gail
I made a similar table about 3 years ago with repurposed lumber from a porch. It too, was very heavy. I used pipe and spray painted them black. Love your website!!
Thanks for stopping by Cindy and taking the time to leave a comment! Welcome to My Repurposed Life, happy to have you!
gail
I LOVE this industrial shelf. …L.O.V.E IT!!
we are looking for a house now and I am inspired to get back into crafting one we have a garage again!
I love this industrial shelf…..love the way you made the shelves different lengths and the way you placed the industrial pipe!!!!
Oh my Gosh! I missed this yesterday? These are amazing Gail! I love love LOVE them, of course I love rustic industrial! The way you placed them is just fun and different with the three lengths of boards, cool! I would say you nailed it and your staging too, man you are killing it all around! Pinned!
I’m kind of digging the whole industrial look these days. I keep hoping I’ll find an old cart to convert into a coffee table at a flea market but they are stupid expensive when I do see them! I’m thinking that these legs might just make a great workbench I can put on castors for my projects in the garage, I might just wither away waiting for the hubby to weld me a base with the new welder he just ‘had’ to have!
Very cool! These would be an especially huge hit with our younger customers. They are always asking for anything midcentury and industrial!