Dr. Seuss chair Cat in the Hat Decoupage
As an Amazon Associate, I earn from qualifying purchases.
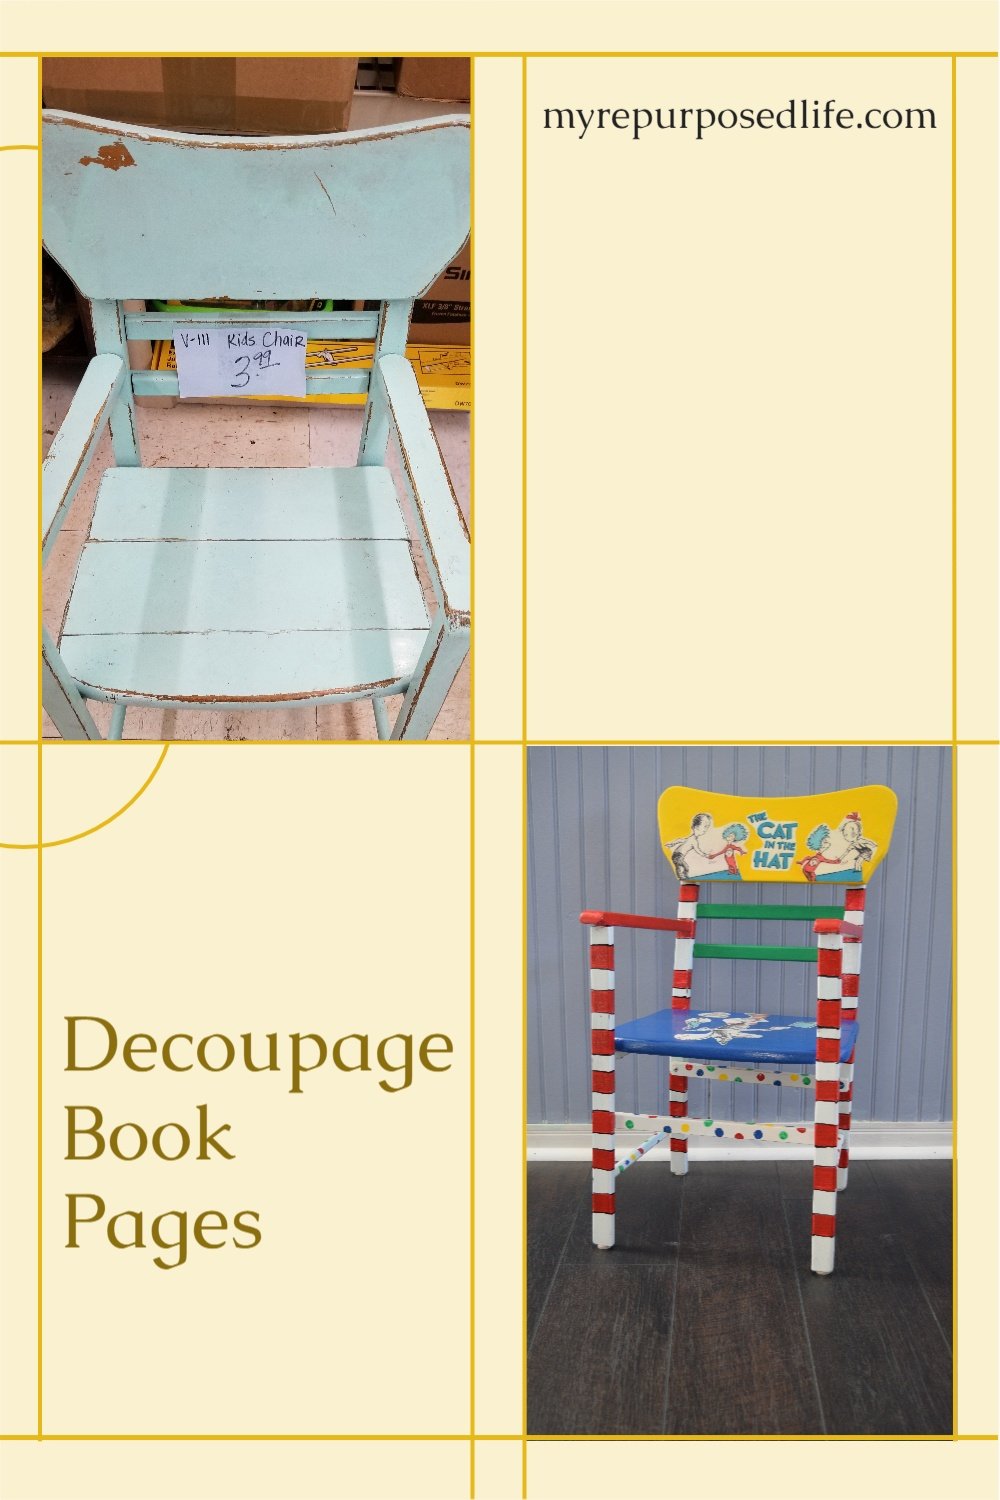
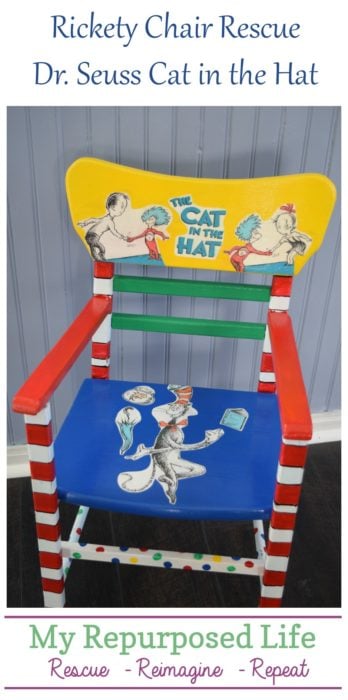
I’m sharing a Dr. Seuss Chair using decoupage book pages from a Cat in the Hat book.
I understand that opinions have changed about the author and books that I have read to my daughter and my pre-k classes from years gone by. However, this tutorial is helpful for any children’s favorite book.
First, I’ll explain how I worked on a wonky thrift store chair I bought, but if you have a sturdy chair, this is a really easy project. You’ll have an easier time than I did because I’m going to steer you in the right direction. I had a few hiccups along the way.

When I spotted this vintage kid’s chair at one of the local junk malls, I just couldn’t pass it up. I felt like it needed a little TLC at the very least. The price was right! But, this chair was very rickety. So, before I can decoupage book pages, I would have to make repairs. All of the joints needed to be tightened if it were going to hold anything more than a doll. I knew it would be perfect for my Dr. Seuss Decoupage!
How to fix a rickety kid’s chair

To begin, I took a LOT of pictures to make sure I got the chair reassembled correctly. There were very long staples in all of the dowels. After removing the staples, it was easier to remove the dowels with a rubber mallet. The tiny screwdriver was used to pry up the staples, then they were pulled out using the vice grips. By the way, the vice grips are one of my newest had tools and I don’t know why I waited so long to buy them.
I only did one side at a time, working quickly to get the chair reassembled before the gorilla wood glue started setting up.
Use Gorilla Wood Glue for all the joints

Turning the chair parts to allow the wood glue to stay in is key for this step.
Clamp rickety chair while glue sets up

A few of the dowels didn’t really want to seat into the holes, so I used bar clamps to keep everything snug until the glue set up. Because this chair seemed to be handmade, it was imperative that I got the sides put back on with the seat and back in place to make sure that it was “square” and everything lined back up.
At this point I took my time removing the two small braces in the back, gluing and screwing them back in place one at a time.
Use baby wipes to clean up excess glue as it oozes out

Here’s another view of the chair with the clamps. Baby wipes are very handy to keep in the shop, and really work well to wipe up the wood glue. The chair is almost ready for the decoupage book pages.
Adding extra braces

The rickety kids chair needed a couple of small braces if it were going to hold up to the abuse a child would surely give it. These small boards were found in my scrap pile, but they had sharp edges. The orbital sander quickly founded over the edges. See the difference between the two? The one in the lower portion of the image has been sanded.

Because this is a child’s chair, I used drywall screws and wood glue to attach the new small braces.

The rickety kid’s chair is much more sturdy now. You can see that it’s also been sanded a little. I needed to get the flaking paint knocked off. Use caution if you think your project furniture may contain lead based paint. You can pick up a lead test kit online or at the store. See how perfectly the Dr. Seuss Decoupage book pages will work on the back and the seat of this chair?
Paint the Dr. Seuss Chair Base Coat

The poor little thing still looks a little rough, but it’s so much more sturdy. It was late in the day, and nearly dark when I decided that it was my only opportunity to spray paint this little guy that wants to be a Dr. Seuss Decoupaged chair.
What color should I paint my Dr. Seuss Chair?
 The colors I used for the Dr. Seuss decoupage chair were Primary Red, True Blue, Kelly Green and Medium Yellow.

Already, the chair looks happier, don’t you think?
Best Craft Paintbrush

I’ve had this handy little craft paint brush for a while now, but had never used it. So, I brought it out for painting this Cat in the Hat chair and I LOVE it! I wish I could tell you how soft the bristles are, but they’re indescribable. I washed it in between colors and used it for all the painting.
Add fun details before doing decoupage book pages

I’m not the neatest craft painter. You can see I used paper towels, rags and cotton swabs to keep everything neat and tidy. Do you love the polka dots? Dr. Seuss books are so fun, I thought the polka dots were a must!
Polka Dots are fun for Cat in the Hat Chair

I knew just how to get those dots on the rungs of this Cat in the Hat Decoupage book pages chair! I love my Martha Stewart Pouncers. But, I had never used the small ones before.

To give a “hat” look to the red and white striped chair I added a small black detail to them using a paint pen. It’s not necessary to be perfect with this step. Have you see that Cat’s HAT?
Cat in the Hat Decoupage Book Pages

For the decoupaging I copied pages from a Dr. Seuss Cat in the Hat book and printed them on my home inkjet printer. This is the dry fit stage making sure the book pages fit okay.

Home printers vary, they are not all created equal. I got new printer last fall, and I’m not sure if it was the printer/ink or the paper I used. But, I had some bleeding with the pieces on the back of the chair. For the seat of the Cat in the Hat chair I was careful not to overwork the mod podge. However, because I was trying to keep the colors from running, I applied too much decoupage medium.
When I printed the pictures for Eli’s name letters, I didn’t have an issue with the colors running. Nor did I have an issue when I did the pretty blue dresser knobs. Both of those projects were done with home printing.
Bad Decoupage Job

I tried to sand away the thicker portions of the mod podge, but it didn’t work. Google to the rescue, yep I googled to see how to remove mod podge.
How To Remove Mod Podge

The consensus seemed to be to wet the project until the mod podge turned milky. For awhile I thought that the soapy water would thin out the thicker portions of the decoupage medium. It did not. After soaking off an on for about 20 minutes, I was able to peel most of the paper away, but the decoupage medium was still there.

So, this is what I was left with. I took the Cat in the Hat chair outside so I could sand it with the orbital sander.

This is after I finished sanding away the bad mod podge job.
Tip For Mod Podge Printer paper

While googling, I landed over at Amy’s Mod Podge Rocks page. She recommends spraying your printed paper with a spray sealer (front and back) before applying mod podge to cut down on the colors running. I really didn’t want to take any chances, so I used my spray sealer on both sides of the printed page as Amy suggested.

The Cat in the Hat chair seat got a fresh new coat of blue paint.
Dr. Seuss Decoupage Chair – Cat in the Hat

So much better! I didn’t think I needed to google how to decoupage, because I’ve successfully done many decoupage projects. What I forgot to mention is I used a different container of Mod Podge for the second round. I think the first one I used may have been old.
Not shown: after the deoupaged Cat in the Hat book pages dried, I used more Mod Podge to seal the entire chair. When I applied the printed book pages I used a foam brush. However, to do the sealing, I used that fabulous craft brush I used for the painting.

It’s not perfect, I love how the Dr. Seuss Cat in the Hat decoupage chair turned out!
Now, you know how to use your child’s favorite book pages to decoupage a chair!
gail
So cute and a great tribute to Dr Suess! Thanks for sharing how to correct the mod podge issue. Great makeover.
Love this! We bought a house in the neighborhood Dr Seuss grew up in-it’s being turned into a museum now. I’ve been collecting his books for years and need to redo a chair like this for a Dr Seuss book nook! My favorite is And to Think That I Saw It on Mulberry St which is an actual street in Springfield.
How Cool is that Melissa! I’ve never read that book before. Thanks for such an informative comment! I had no idea.
gail
Really captures the essence of Dr. Suess. Thanks for sharing the ModPodge tip, that goo can be so fickle.
I agree Audra, especially when it might be out of date.
Thanks for your sweet comment.
gail
My four year old grandson would squeal with delight if he saw this chair! Nice save of a rickety chair and adorable makeover! I’m going to remember both decoupage tips, especially the sealer one. Thanks 😊 Pinned
Thanks for stopping by Marie. I appreciate your sweet comment. Too bad you’re so far away….the chair needs a new home.
gail
Love your chair! My favorite Dr. Seuss book is Mr. Brown can Moo! Can you?
Ohhh, I remember reading that book to my class many times!
This is so cute, my favorite dr Seuss book is, Horton Hears A Who.
Thanks Jennie!
I’m not so familiar with this book. I know it, but I don’t think it was in my Dr. Seuss collection during my 19 years of teaching pre-k.
gail
My favorite is Horton’s hears a who. I love this chair, it’s so cute. I’ve use the spray clear coat on paper to hold the ink in place.
I’ve never had a problem with the ink running in my other projects. I think it was the ink in the new printer. I’ll have to remember this trick for future projects.
gail