• Skip to primary navigation
  • Skip to main content
  • Skip to primary sidebar
  • Start Here
  • Shop Favorites
  • About
    • Welcome To My Repurposed Life Home of Repurposed Furniture
    • More About Gail
    • Disclosure
    • Privacy Information
  • Gallery
    • Repurposed Furniture
  • Repurposed Items
    • Building Supplies
    • Miscellaneous Household Items
    • Picture Frame/Chalk Board
  • DIY
    • Home Reno
    • outdoor living
    • Painting
    • Shop Talk
    • Tips for Around the House
    • Build It
      • Furniture
      • Home Decor
      • Storage
    • Crafts
      • Dollar Store
      • Easy
      • Holidays Seasonal
  • Furniture
    • Chair
    • Desk
    • Dresser/Chest
    • Headboard | Bed Parts | Cribs
    • Kids Furniture
    • Table
    • Kids Furniture
My Repurposed Life® Rescue Re-imagine Repeat
menu icon
go to homepage
subscribe
search icon
Homepage link
  • About
  • Start Here
  • Project Index
  • Furniture
  • Subscribe
    • Email
    • Facebook
    • Instagram
    • Pinterest
    • RSS
    • Twitter
  • ×

    Home » Thrift Store Makeovers » Easy Beachy Frame Using Reclaimed Wood

    Easy Beachy Frame Using Reclaimed Wood

    Published by Gail | Published October 25, 2019 | Updated June 30, 2021
    As an Amazon Associate I earn from qualifying purchases.

    Pin
    Share
    Tweet
    Oh so pretty coastal beach frame artwork. This project can easily be done in an afternoon. Mostly, you'll just be waiting for paint to dry. Tips for attaching oak floor planks in the vintage picture frame. #MyRepurposedLife #beachy #coastal #decor #reclaimed #easy #project via @repurposedlife

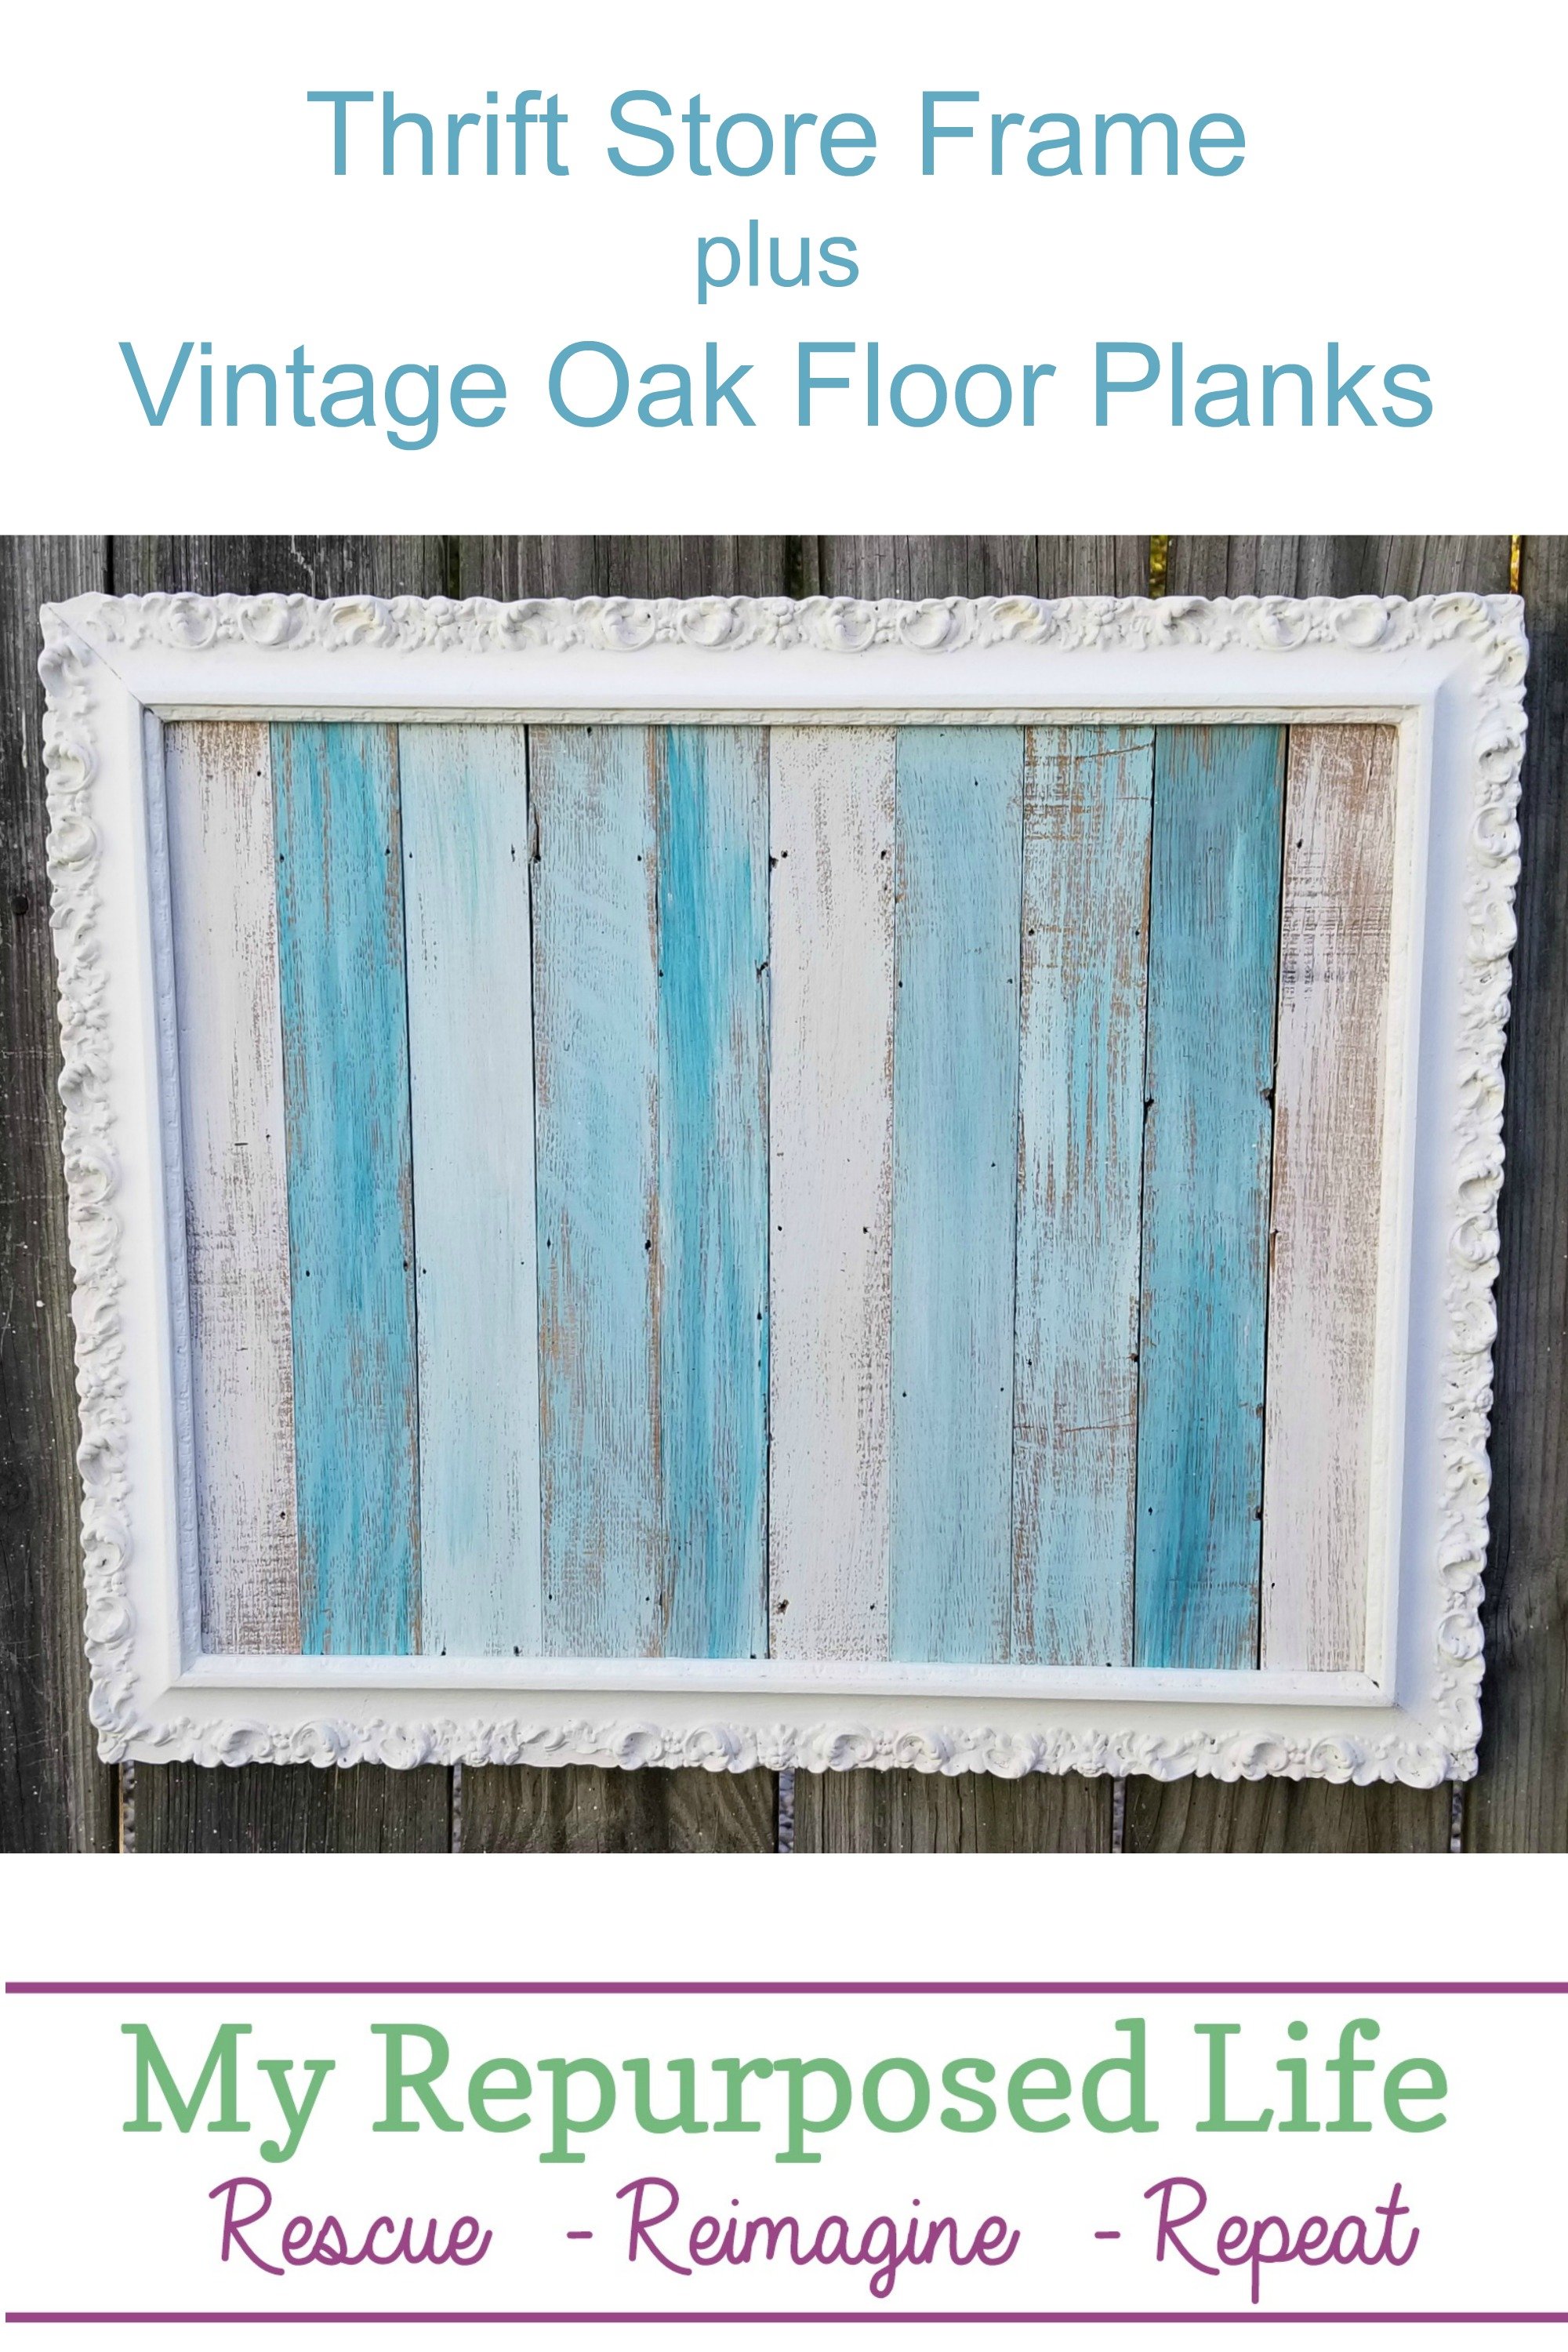
    This beachy frame made from reclaimed wood makes me smile every time I look at it. I was inspired by Brooke’s Reclaimed Wood Signs. I saved them on pinterest a couple of years ago.

    Easy Beachy Frame From Reclaimed Wood


    Repurposed Thrift Store Picture Frame

    I forgot to take a picture of the frame before I started painting it, but luckily I found it in my post Recent Finds Fall Edition (2014). When I dug it out of the garage, it was just the frame. The glass and portrait have been long gone. I got a great deal on it, and the booth number tells me it was from Joey’s booth.

    Reclaimed Wood Flooring

    This old oak flooring has been around for many years. This is the haul I got from a blog friend in 2014. I used it on this IKEA Tarva Hack Challenge years ago. Unfortunately, my stash is dwindling, but I had plenty to make this beachy frame.

    Add Floor Planks to Frame

    cut old oak plank flooring to fit frame

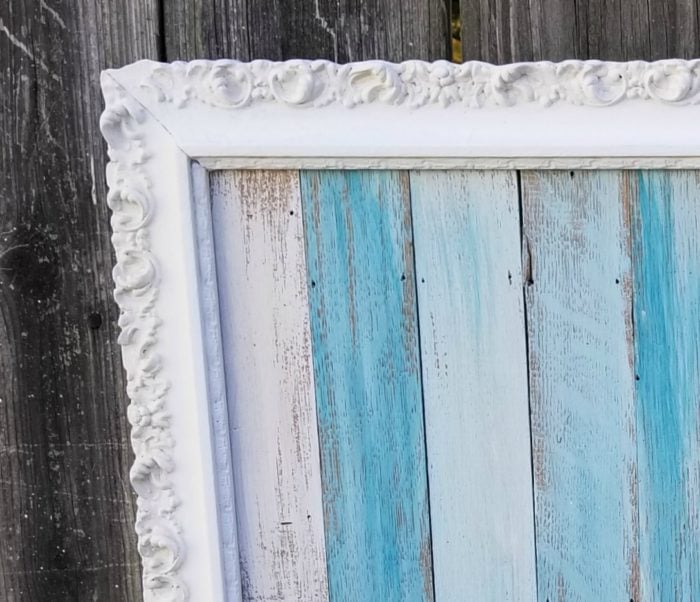
    Because I didn’t want to do a lot of sanding, and I was okay with the “rough” look, I used the back side of these old floor planks. I cut them to size on the miter saw. One board had to be ripped on the table saw in order to get the boards to fit the old picture frame.

    *this post contains affiliate links, read more here*

    Paint Thrift Store Frame

    paint vintage frame white

    The frame was difficult to paint. Soon, I was wishing I had used my Finish Max. Finally, I watered down the chalk paint to get it to cover all those ornate curly q’s.

    Sand & Paint Old Floor Planks for Beachy Frame

    lightly sand floor planks

    I did give a quick sanding to remove splinters, using my orbital sander and a 220 grit sandpaper.


    shades of blue paint

    I really liked the beachy shades of blue that Brooke used, so I went to my craft paint shelf and chose these two baskets of blue craft paints.


    shades of blue craft paint

    Four colors were chosen, but in the end I used 3 of the blues and a white. Two of the colors above are very similar.

    beachy frame shades of blue paint

    Of course I used one of my very loved cheap chip brushes. I started with the white boards, then progressed in order of lightest to brightest blue. The same brush was used for all of the boards without cleaning it in between. Seriously, don’t these colors make you smile?

    Fasten Floor Planks in Frame

    logan dual elite driver for framing

    Oh, how I love this Logan Dual Driver Elite for jobs like this. It’s a little pricey, but oh so worth it.

    Don’t Forget to Paint the Back

    paint back side of beachy frame with chalk paint

    I used the same chalk paint to do a quick coat on the back of the frame. Small things like this really make a huge difference when you’re selling your projects.

    Pretty Shades of Blue Beachy Frame

    beachy frame artwork MyRepurposedLife

    So, here’s my question to you. Brooke added wording to her sweet projects. I don’t have cut out words to add, but I could definitely Chalk or Stencil something on it. I’d love to hear what you think. I’ve already taken it to The Sugar Shack so the paint can cure fully. Not bad for a $2 picture frame, eh?


    gail

    See More Picture Frame Ideas Here

    Print Friendly, PDF & Email
    Pin
    Share
    Tweet

    Related Content:

    • DIY Rustic Fall Projects Including Thrift Store Ideas
      DIY Rustic Fall Projects Including Thrift Store Ideas
    • Thrift Store Shopping | Secrets and Tips
      Thrift Store Shopping | Secrets and Tips
    • Picture Frame Ideas for Home Decor and More
      Picture Frame Ideas for Home Decor and More
    • 25 Repurposed Drawer Ideas
      25 Repurposed Drawer Ideas
    • Repurposed Cabinet Door Project Ideas
      Repurposed Cabinet Door Project Ideas
    • Reclaimed wood projects | Fence | Pallets
      Reclaimed wood projects | Fence | Pallets

    Reader Interactions

    Comments

      See comments Cancel reply

      Your email address will not be published. Required fields are marked *

      This site uses Akismet to reduce spam. Learn how your comment data is processed.

    1. p

      October 30, 2019 at 1:58 pm

      Pretty shades of blue. Calming and cheery !!
      Very cute idea. 😉

      Reply
    2. Audra @ Renewed Projects

      October 26, 2019 at 10:31 pm

      It could even work well as a photo backdrop for smaller objects. Love the beachy looks!

      Reply
      • Gail Wilson

        October 27, 2019 at 10:36 pm

        That's an awesome idea Audra! Thanks for that suggestion.

        gail

    3. Mimsie Barnard

      October 25, 2019 at 11:40 pm

      How about a bit of sand at the bottom and sea shells . . . or sail boat either painted or toy or family vacation picture blown up and cut out as a boat or shell. Lots of potential for this one! Either 3-D (as in glued on) or painted on or some of both. Enjoy your website and look forward to ideas you share.

      Reply
      • Gail Wilson

        October 27, 2019 at 10:36 pm

        Thanks for all the great ideas Mimsie! I truly appreciate it.

        Happy you're enjoying My Repurposed Life, I do love what I do!

        gail

    4. girlfromwva

      October 25, 2019 at 10:00 am

      very pretty! you could definitely stencil on it !

      Reply
      • Gail Wilson

        October 25, 2019 at 9:37 pm

        yeah... I was thinking something for Christmas. I love blue Christmas decor! I still haven't decided yet.

        gail

    Primary Sidebar

    Hi, there! I’m Gail Wilson, the author and mastermind behind My Repurposed Life. I’m obsessed with finding potential in unexpected places and believe that with a little hard work and imagination, any old thing can be made useful again—myself included! I hope you’ll enjoy the journey and pick up a few tools along the way… literally!

    More about me →

    Join Our Mailing List

    ​

      Click the topics you're interested in below:

      Subscribing above means you agree to our Privacy Policy​

      Footer

      ↑ back to top

      SEEN ON

      Might I Suggest

      • Start Here
      • Furniture Makeovers

      Newsletter

      • Sign Up! for emails and updates

      About

      • Gail's Favorites on Amazon
      • About

      As an Amazon Associate I earn from qualifying purchases.

      Copyright © 2023 My Repurposed Life · Privacy Policy · Disclosure