• Skip to primary navigation
  • Skip to main content
  • Skip to primary sidebar
  • Start Here
  • Shop Favorites
  • About
    • Welcome To My Repurposed Life Home of Repurposed Furniture
    • More About Gail
    • Disclosure
    • Privacy Information
  • Gallery
    • Repurposed Furniture
  • Repurposed Items
    • Building Supplies
    • Miscellaneous Household Items
    • Picture Frame/Chalk Board
  • DIY
    • Home Reno
    • outdoor living
    • Painting
    • Shop Talk
    • Tips for Around the House
    • Build It
      • Furniture
      • Home Decor
      • Storage
    • Crafts
      • Dollar Store
      • Easy
      • Holidays Seasonal
  • Furniture
    • Chair
    • Desk
    • Dresser/Chest
    • Headboard | Bed Parts | Cribs
    • Kids Furniture
    • Table
    • Kids Furniture
My Repurposed Life® Rescue Re-imagine Repeat
menu icon
go to homepage
subscribe
search icon
Homepage link
  • About
  • Start Here
  • Project Index
  • Furniture
  • Subscribe
    • Email
    • Facebook
    • Instagram
    • Pinterest
    • RSS
    • Twitter
  • ×

    Home » DIY » Hardwood Floor Photo Prop

    Hardwood Floor Photo Prop

    Published by Gail | Published February 24, 2015 | Updated April 9, 2019
    As an Amazon Associate I earn from qualifying purchases.

    Pin
    Share
    Tweet

    My-Repurposed-Life-easy-diy-hardwood-floor-photo-prop


    I’ve been wanting to “up the game” in my furniture staging. Since I don’t haul my pieces inside to take pictures, I’ve been looking for some new options like a  faux hardwood floor photo prop. I saw a painted and stained floor on pinterest. However I didn’t really want to go to the trouble of painting my lines on the underlayment I purchased for under $12 at Home Depot.

    underlayment-plywoodUnderlayment is for subflooring, and it’s sold in a 4x8 sheet. Eight feet was a little longer than I needed so I cut it to size.


    how-to-faux-hardwood-floor
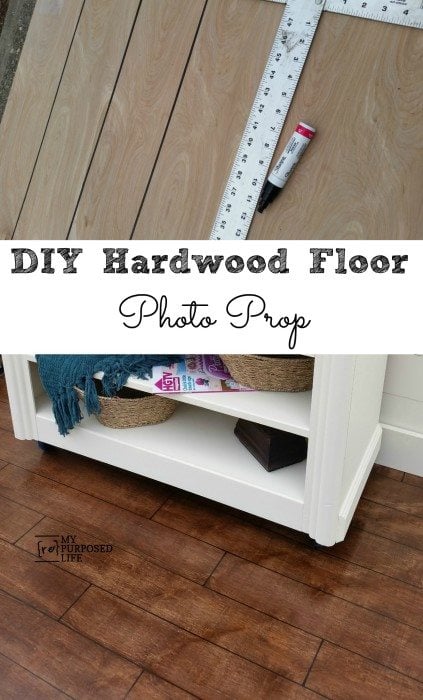
Instead of painting my lines on the underlayment, I used a Sharpie Oil Paint Bold Marker and Drywall T-Square to keep the lines straight.


    hardwood floor photo propAfter drawing the long lines east to west, I then drew the shorter lines north to south. The beauty about the Sharpie pen is it dried really quickly, and it was ready for stain in no time.


    faux-hardwood-floor-photo-prop-stainingI used some Minwax Hickory Gel Stain , applying it with an old paint brush and then wiping off the excess with a rag.


    minwax-hickory-gel-stainYou can see where I wiped off the gel stain I just applied.


    faux-hardwood-floor-photography-propAfter allowing the gel stain to dry, I applied some Minwax Semi Gloss Polycrylic with a foam applicator.


     Hardwood Floor Photo Prop

    MyRepurposedLife-photo-prop-faux-hardwood-floorVoila! here it is in use when I staged my dresser tv stand! I already had the stain and poly on hand, so the only thing I had to pay for was the underlayment and the Sharpie. So, I have a new faux hardwood floor photo prop for less than $20.

    This is of course great for staging furniture pieces, but it could also be helpful for budding photographers.


    gail

    Related Content:

    Stenciled Vinyl Wallpaper as a Laundry Room Rug

    Whitewashed Faux Hardwood Floor

    Pin
    Share
    Tweet

    Related Content:

    • Paint Tips
      Paint Tips
    • faux whitewashed floor photo backdrop
      faux whitewashed floor photo backdrop
    • How to Stain Vintage Hardwood Floors
      How to Stain Vintage Hardwood Floors
    • Night Stand Makeover
      Night Stand Makeover
    • Between The Studs Broom Closet
      Between The Studs Broom Closet
    • Photography Backdrops and Floors
      Photography Backdrops and Floors

    Reader Interactions

    Comments

      See comments Cancel reply

      Your email address will not be published. Required fields are marked *

      This site uses Akismet to reduce spam. Learn how your comment data is processed.

    1. Susan

      January 19, 2018 at 10:54 am

      Wowza! Gail, you made my year with this tutorial!! I’ve been wanting a much larger vinyl backdrop, but couldn’t find one. Now I can make my own. Yippee!

      Reply
      • Gail Wilson

        January 19, 2018 at 3:22 pm

        Awesome Susan! I'm so happy you found this tutorial for the faux floor backdrop.

        gail

    2. Sharon @ Elizabeth & Co.

      March 03, 2015 at 2:23 pm

      Happy to feature you at our party this morning. Thanks so much for sharing!

      Reply
    3. Denise on a whim

      March 03, 2015 at 10:00 am

      So clever! I really need to get making this for my photos! Thanks for the idea 🙂

      Reply
    4. Karen

      March 02, 2015 at 8:40 pm

      what a great idea! I need to get some backdrops so everyone doesn't see my paint splattered floor and unfinished projects around the stuff I make.

      Reply
    5. Sharon Mobley

      March 02, 2015 at 9:52 am

      WOW! This is amazing! Thank you for sharing

      Reply
    6. Sharon @ Elizabeth & Co.

      March 01, 2015 at 4:49 pm

      Oh you clever girl! That is a totally awesome (and thrifty) idea Gail! It looks like the real deal!

      Reply
    7. Rayana

      February 27, 2015 at 7:33 pm

      This is awesome!!! Just what I needed 🙂 Thank you for sharing.

      Reply
      • gail@myrepurposedlife.com

        February 27, 2015 at 10:45 pm

        Thanks for stopping by and taking the time to leave a comment. Happy to inspire you.

        gail

    8. Betsy

      February 26, 2015 at 5:46 pm

      Brilliant! It really does look so authentic.

      Reply
    9. Cynthia - Clockwork Interiors

      February 25, 2015 at 11:47 pm

      What a great idea, Gail!

      Reply
    10. Mindi

      February 25, 2015 at 1:05 am

      What?!! You made it?! Wow Gail this was totally genius! You are my HERO!! Pinned!

      Reply
    11. Patricia

      February 24, 2015 at 8:27 pm

      You know me... I'm a HUGE fan of faux wood floors! I totally give this TWO THUMBS UP! Great job Gail. Patricia

      Reply
    12. Debbie

      February 24, 2015 at 8:20 pm

      Amazing idea! I may have to create one! Love it!

      Reply
    13. Mary

      February 24, 2015 at 6:59 pm

      Hi Gail! Haven't dropped a comment in a while. You now have a Wonderful!! prop / idea. I love it. I could use that under my sewing machine table to keep strings off the carpet. Sewing strings/small pieces of fabric, etc on carpet is not a good mixture for tidiness.

      We have snow here in NC tonight.

      Mary

      Reply
    14. Julie @ follow your heart woodworking

      February 24, 2015 at 6:28 pm

      Great idea, and you could do something different on the back, so you have two looks.

      Reply
    15. Trish

      February 24, 2015 at 5:51 pm

      You have amazed me yet again!

      Reply
    16. terry hayes

      February 24, 2015 at 3:39 pm

      Beautiful as always! You are such an inspiration

      Reply
    17. Pam

      February 24, 2015 at 2:43 pm

      Oh Wow.....looks great, like a real floor.....Great job.

      Reply
    18. Tammy

      February 24, 2015 at 2:37 pm

      Your so clever...!!

      Reply
    19. Tracy@www.bluridgevintage.com

      February 24, 2015 at 12:47 pm

      WOW!!!! What an awesome idea and an fabulous back drop for a photo shoot. You have really kicked it up and I am sure that will be lots of people giving this a shot.

      Reply
    20. Catherine

      February 24, 2015 at 11:04 am

      I think I'm going to need to do this too! I don't have the energy to schlep things in and out of the house for pictures, my garage studio is where it all happens anyway.
      Such a great idea!
      Catherine

      Reply
    21. Kathleen

      February 24, 2015 at 10:26 am

      Genius! Seriously genius. Fantastic idea. Will have to do this when I get into more furniture painting.

      Reply
    22. Sylvia

      February 24, 2015 at 8:17 am

      Another great idea. I have been thinking about doing something similar to the subfloor in some of the rooms in our house. Instead of staining, I am thinking about painting the subfloor white and then drawing the lines to make it look like and old painted hardwood floor. Old carpet needs to go but, I'd like a cheap alternative to new flooring for a while. You have inspired me to think more about this.

      Reply
    23. Robin @ Redo It Yourself Inspirations

      February 24, 2015 at 7:02 am

      What a clever idea! It looks amazing, Gail!

      Reply

    Primary Sidebar

    Hi, there! I’m Gail Wilson, the author and mastermind behind My Repurposed Life. I’m obsessed with finding potential in unexpected places and believe that with a little hard work and imagination, any old thing can be made useful again—myself included! I hope you’ll enjoy the journey and pick up a few tools along the way… literally!

    More about me →

    Join Our Mailing List

    ​

      Click the topics you're interested in below:

      Subscribing above means you agree to our Privacy Policy​

      Footer

      ↑ back to top

      SEEN ON

      Might I Suggest

      • Start Here
      • Furniture Makeovers

      Newsletter

      • Sign Up! for emails and updates

      About

      • Gail's Favorites on Amazon
      • About

      As an Amazon Associate I earn from qualifying purchases.

      Copyright © 2023 My Repurposed Life · Privacy Policy · Disclosure