faux whitewashed floor photo backdrop
As an Amazon Associate, I earn from qualifying purchases.
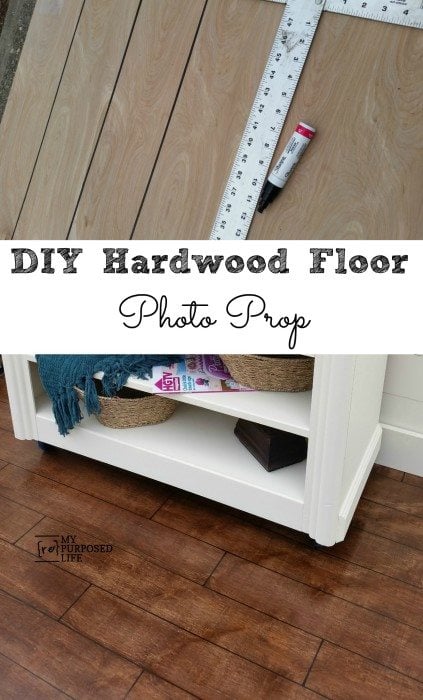
Have you ever done a whitewashed floor? Was it plank flooring? I have a fun tutorial today showing how to do a Faux whitewashed floor, but not just a painted floor, it’s a faux plank, whitewashed floor. Have I confused you?
Many months ago I made a portable wall that is dual sided for staging my projects. When I did that wall, I also did a faux hardwood floor photo prop.
*this post contains affiliate links for your convenience*

Supplies you will need to make a whitewashed floor
- 8×4 ft 1/4” plywood ($12)
- Minwax Wood Finish Stain Marker (I used Ebony)
- Screwdriver
- Cheap chip brush
- Latex gloves
- Rags
- Minwax Special Walnut
- Drywall T-square or long straight edge
- White Paint
- Polycrylic
I was fortunate enough to have everything on hand except the plywood. So this was a very inexpensive photo prop for me to make.
Steps for making a whitewashed floor to use as a photo backdrop

- Measure and mark your “planks”
- Using the drywall T-square, “score” your planks with a flat head screwdriver (this will give your floor a more realistic look)
- Stain your plywood using a very light coat of stain to bring out the wood grain. (You can sand it back a little if you get it too dark or heavy)
- Using the drywall T-square and the Minwax marker, make the lines to represent your planked flooring
How to whitewash

- Water down your white paint and apply to your liking

Optional-You can apply more Minwax marker if your lines aren’t defined enough.

- Apply a generous coat of Polycrylic to protect the surface of your new whitewashed floor photo prop. I used a chip brush to do this.
 I recently put a fresh coat of gray paint on the wall, you may have seen this vintage sewing cabinet in the post Vintage Sewing Cabinet Storage Cabinet.
 The secret to photo staging furniture for blog posts!
 And here’s the small vintage table I blogged about earlier in the month.
 This is what was happening behind the scenes of the photo shoot.
That is a faux chair rail clamped in place to hold a faux black curtain.
 I have since bought some curtain rod brackets and a pipe from Vendors’ Village in order to hang my curtain panels.
 ![]() These brackets simply slide onto the screws, so I can easily move them from the gray drywall side over to the white planked wall side.
These brackets simply slide onto the screws, so I can easily move them from the gray drywall side over to the white planked wall side.

Those of you who didn’t know I use a fake wall, fake floor and fake curtains, are you surprised? I don’t have the time and the energy to haul my pieces into the house for photo shoots.
I would love to hear how you solve these problems if you are a furniture flipper.
gail
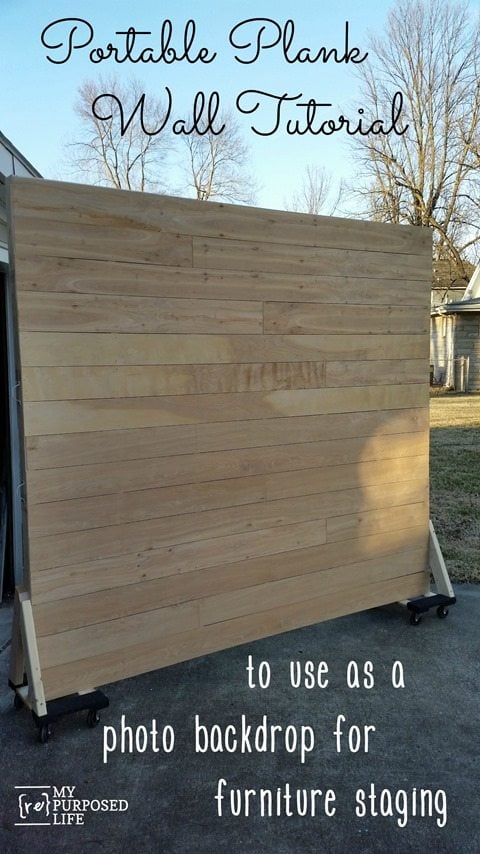
How to build a portable wall for photo staging
How to make a floor for a photo backdrop
For more great ideas, follow this site on Facebook and Pinterest.
gail
This is brilliant! Wow! I’ve thought of doing this but not to the extent that you perfected it! Loving both the wall and the floor! You’re so smart!
This dual wall and now two floors has really upped my staging game. But Mindi still takes her photos outside and her projects go viral anyway… go figure!
gail
This just made a cheaper way for me to fake my flooring until we can afford the real deal. Now I won’t have to look at my husband’s painted sub floors anymore. Thank you ever so much for this idea!
How awesome Mellisa! That is fabulous, wishing you lots of luck.
I’m happy you found my tutorial helpful. That’s why I do what I do!
gail
I love this post Gail! What a fantastic idea 🙂
Thank you Annie!
It’s really changed the way I stage my projects.
gail
dang I am not a blogger but I wonder if that floor could be used for real in the living room here? it would be cheap and easy to do the entire floor xx
Chris,
This is a link to one of my favorite all time diy floors from my friend Shannon.
http://quarryorchard.blogspot.com/2010/12/plywood-to-plank-flooring-tutorial.html
just something to think about….
gail
I haven’t solved this problem yet but, my husband and I have talked about doing the same kind of thing with some leftover wood flooring we have, if we have enough. We’ll come up with something I’m sure. Staging is definitely a piece of blogging I need to work on and I love seeing how you went about making yours! As always, thanks Gail!
Staging is such a struggle for me! I am not good with decor, OR photogrpahy! Talk about a double whammy! But I try to continue to learn and improve on both levels.
I made the wall 18 months ago, and I think it has really made a difference in my presentation on the blog. 🙂
gail