Laser Etched Cutting Boards
As an Amazon Associate, I earn from qualifying purchases.
Etched Cutting Boards using an Epilog Laser

I have another class and laser etched cutting boards project to share with you from my local Maker 13 maker space! I took a laser class, using the Epilog Laser (40 watts). The class seemed a little above me at first, but Bryan was very good at explaining the details, and allowed us to ask questions and repeat the steps while making several projects during the class.
One of the projects involved laser etching and cutting on cardboard. The file was already created with the mountains and a deer. We were able to manipulate the images a little and add text of our choice. In the image the laser is actually cutting out the cardboard into a smaller size.

Another project was etching on a piece of acrylic. You will notice the bed is different when you’re just etching (raster) vs cutting (vector). The bed on the laser machine is very easy to switch out. The etching was done on the reverse side of the acrylic so the front side would be smooth. Again, we could manipulate the images slightly, and add our own text. Because it was an image of fish I chose Nemo and Friends.

I guess this could be done for coasters and other applications—maybe some jewelry?

Each of the first two projects were done on the upper left corner—this project on a small wood slice was done using the option of “center engraving”. For this option, you manually choose the center of the object and set that as the “home” position, and the laser automatically starts there.

These are the three projects we did in the class.

After the class I went back to use the laser machine on my own. I did some experimenting with different substrates. I have a lot of these ceramic tiles left over from when I was doing Silhouette projects with vinyl. Bryan had said they probably wouldn’t etch properly because they would etch “white”. They did. But I had a plan.

To make the etching show, I tried painting the tiles with some craft paint. I was hoping that after the paint dried, I would be able to wipe the paint off the glossy surface of the tiles, and leave the etching with a bit of color to show up where the etching was done. It didn’t work, and I because I was so frustrated, I never took a picture of the white etching.
plan B

I have used a Sharpie on stamped metal to make lettering show up, so I thought why not try a Sharpie for this project. I covered the etching, let it dry, then wiped away the sharpie. Although I used a black sharpie, the color left behind was more of a silver or a gray.

In this image you will notice that the upper portion of the etching is slightly darker than the lower portion. When I first started the Epilog Laser, I had the settings set slower to give a “good” etching. At those settings, the tile would have taken about 40 minutes to finish. I stopped the project, and restarted with a faster setting. The laser redid the upper portion, and then continued on the rest of the tile. Therefore the upper portion was “cut” or “etched” twice. That is why it took the sharpie differently.
Laser Etched Cutting Boards Practice Projects

Another project I worked on was wood—a cheap thrift store cutting board. I paid $1 for this cutting board on a trip to Bowling Green. The program in which we work on these files is Corel. I don’t have the program, so I still have a little bit to learn about getting the image centered properly to the right size. I didn’t like the front side, so I tried again on the back.

This was another thrift store cutting board I worked on that first time on my own. It turned out better. I made this for my daughter Jamie, it’s from her favorite hymn.
Plywood Templates for Etched Cutting Boards

On my second trip to use the laser on my own, I worked on IKEA cutting boards. I made this template out of thin plywood for a test cut to make sure I would get the etching in the proper place. The plywood on the left was a little wonky which made the cutting board not etch exactly right.

Here you can see the cutting board is resting on the template. After each cut, all I had to do was remove the finished cutting board and center a new one on the template. This made making multiple cutting boards very simple.

I was struggling with remembering the cut settings on the Epilog Mini so I snapped a picture of it for reference.

I made 11 or 12 cutting boards in all. Some were duplicates. The template really made it easier to get all of the images in the proper place. These will be headed to Glendale in the Fall.

While at IKEA, I also bought some wooden spoons. I made templates for those as well. I was running out of time so I didn’t take any “in progress” shots. But you can get the idea of how it worked by looking at this template .

I etched a bunch of spoons for friends and family. A laser etched spoon is perfect to take to a pot luck. Not only will you get your spoon back, all the guests will know which dish to oooh and ahhh over. ![]() If you need an idea for identifying your dish, check out this project—a personalized etched baking dish.
If you need an idea for identifying your dish, check out this project—a personalized etched baking dish.
I would love for you to PIN IT!

. . . and this spoon.

The directions for the IKEA cutting boards recommends coating the boards with food safe mineral oil so I used the same stuff that I used on my diy cutting board. I’m thinking maybe the spoon should be oiled as well? Does anyone do that?

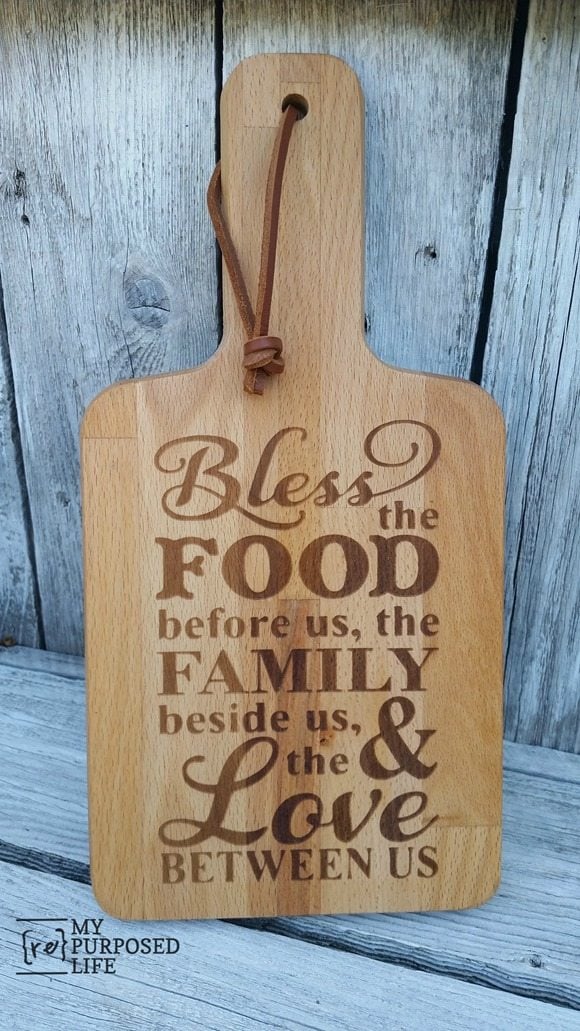
However, since I’ll be selling these cutting boards at my craft show, I opted for genuine leather cord string instead of a repurposed belt for hanging that I used for my cutting board.
I love how these etched cutting boards turned out. Someone asked me about actually using them, and I think they’d make great décor in the kitchen displaying the front side, and then the back of the boards could be used for cutting. It’s a win/win.
Other projects I’ve done at Maker 13 include a routed FAMILY sign done on a CNC machine, and a cheese board made in the wood shop. If you’re local to the Louisville or Southern Indiana area, I’ll be doing an event at Maker 13 in late August. More details to follow.
gail
Looking for a beginners training class. I love in Louisville ky area
Check out Maker 13 in Southern Indiana! Such nice people, so many things to do.
gail
Hi Gail:
Did you know that food safe mineral oil can be found in your grocery store? It cost about $1.50, located in the section that has meds for upset stomachs. I have used it for years on my black granite sink after cleaning it to make it shine.
And yes I oil all my wood kitchen accessories.
Yep, that’s where I got mine! 🙂
Ohhh, so you do oil your spoons too?
thanks!
Those are really nice. Bet they will sell fast at Glendale!
Wow! I love how your cutting boards turned out Gail. So fun for decor, and useful too.
The possibilities are endless. Looks like so much fun, and so pretty!
Gail ,
Beautifully done ! What a blessing to be able to take these classes . The possibilities must make must be mind boggling yet fun .
What a great skill you’ve learned! I love the cutting boards you created and also the etched spoon. These should sell quickly in your booth.