• Skip to primary navigation
  • Skip to main content
  • Skip to primary sidebar
  • Start Here
  • Shop Favorites
  • About
    • Welcome To My Repurposed Life Home of Repurposed Furniture
    • More About Gail
    • Disclosure
    • Privacy Information
  • Gallery
    • Repurposed Furniture
  • Repurposed Items
    • Building Supplies
    • Miscellaneous Household Items
    • Picture Frame/Chalk Board
  • DIY
    • Home Reno
    • outdoor living
    • Painting
    • Shop Talk
    • Tips for Around the House
    • Build It
      • Furniture
      • Home Decor
      • Storage
    • Crafts
      • Dollar Store
      • Easy
      • Holidays Seasonal
  • Furniture
    • Chair
    • Desk
    • Dresser/Chest
    • Headboard | Bed Parts | Cribs
    • Kids Furniture
    • Table
    • Kids Furniture
My Repurposed LifeĀ®
menu icon
go to homepage
subscribe
search icon
Homepage link
  • About
  • Start Here
  • Project Index
  • Furniture
  • Subscribe
    • Email
    • Facebook
    • Instagram
    • Pinterest
    • RSS
    • Twitter
  • Ɨ
    Home Ā» Repurposed Furniture Ā» French Inspired Piano Bench Makeover

    French Inspired Piano Bench Makeover

    Modified: Jun 2, 2022 by
    This post may contain affiliate links

    Pin
    Share
    Tweet

    Benches are one of my favorite things, besides crates, I LOVE crates too. This bench was sitting out with someone's garbage in the rain, until I spotted it while driving by....

    My family is finally getting past the shame and embarrassment phase of my trash digging, in fact this project was picked out of the trash by my oldest son, I didn't even have to get out of the car! Yep, I am training them right!
    French inspired piano bench


    Of course that was months ago, and the sad lonely discarded piano bench has been residing in my basement ever since. Let's get a better look at the before.
    Related Content: Easy Piano Bench Makeover
    Piano Bench Before
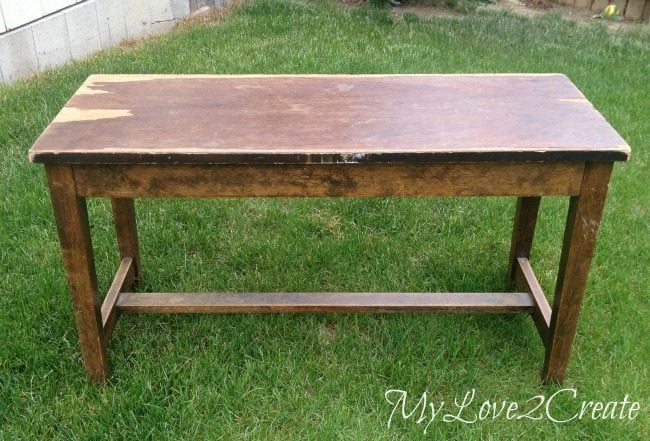
    It was structurally sound and the lid worked great, just had some top veneer issues.
    bad veneer on top
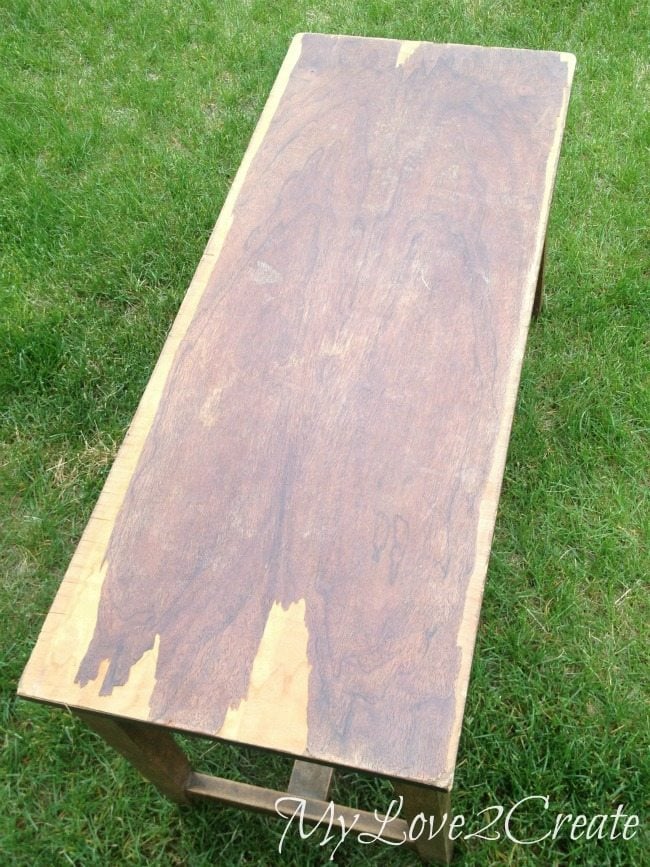
    Yea, not patching that mess up! I have read that good wood mostly resides under veneer, so I commenced in finding out.
    Removing bad veneer
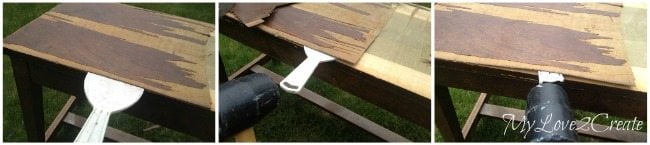
    I grabbed some tools, a spackle scraper, a mallet, and a crowbar, and set to work. The veneer was peeling pretty good on all the edges so I easily worked the plastic scraper under and then pounded with the mallet. I kept the scraper level with the bench and It really helped to pull up the veneer in big chunks.
    Removing bad veneer
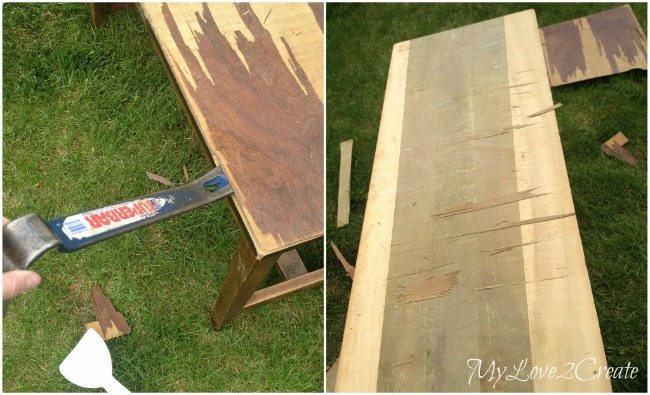
    I also used a crow bar to help lift it up too. About a 20 minutes later I was left with some stubborn spots that weren't budging.
    using a damp rag and iron to remover veneer
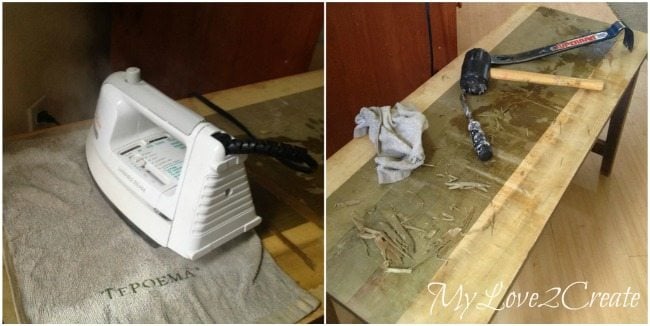
    With a little google search I found that heat and water help, so I grabbed an iron and a damp cloth. I sprayed water on all the left over spots of veneer and let it sit while the iron warmed up. Then I placed the damp cloth over the spots and ironed away. This also brought the glue up too, which was sticky. It  did help to loosen the veneer, but I still had to do some prying and scraping to get the rest, but it wasn't too bad.
    dry fitting scrap boards for bottom shelf
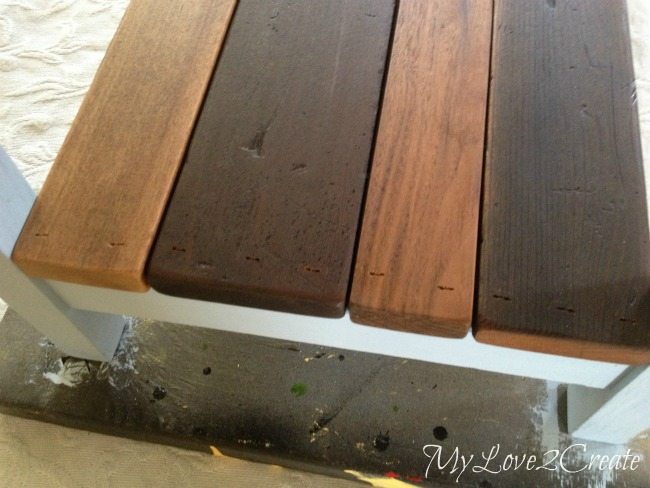
    Next, I sanded the top down with 60 grit, and then followed with 150 grit sandpaper until it was nice and smooth. I also decided to make a shelf for the bottom and so I grabbed some of my free scrap boards and found 4 that fit. I cut them to size and sanded them smooth.
    staining piano bench top and bottom shelf boards
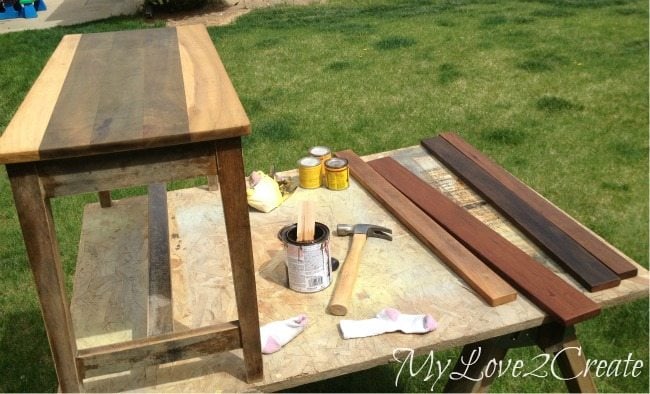
    Since all the wood was different, I thought it would be cool to keep the contrast and stain them all with natural stain. Here they are pre wood conditioned and stained natural. The top of the bench was super cool! I loved it and was planning on keeping it as is. But of course I had to mess with it, because the wood colors clashed a too much with the bottom shelf boards. Ugh! So I stained it with Rusteoluem's Kona and I was NOT happy with how it took away the stripe look....Oh well, to late now! I also took the largest bottom shelf board and used the same dark stain on it. I hate it when I mess with things too much...anyway it has a happy ending, thank goodness!
    painting bench legs
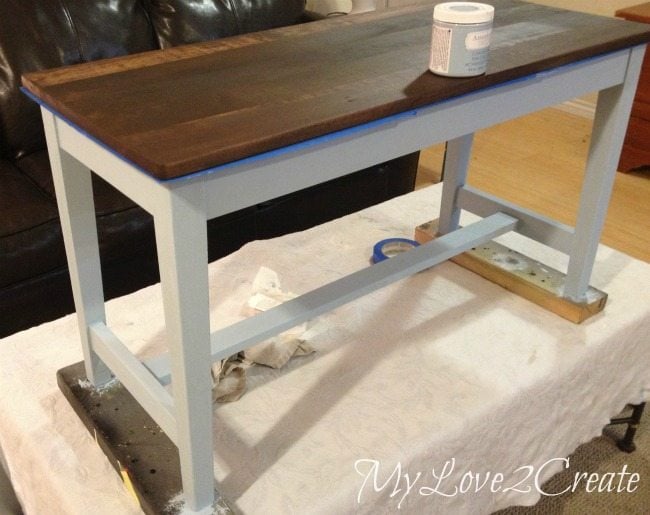
    I had a chance to attend SNAP, a blogging conference, a few weeks ago and received some awesome stuff to try out. The first being chalk paint. This was my first time using it. I did two coats of Americana Decor Serene Chalky Finish. It was super thick, but went on well.
    french themed stencils
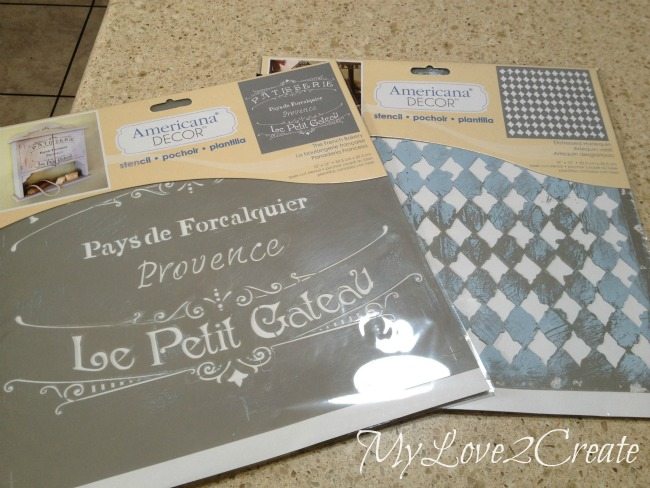
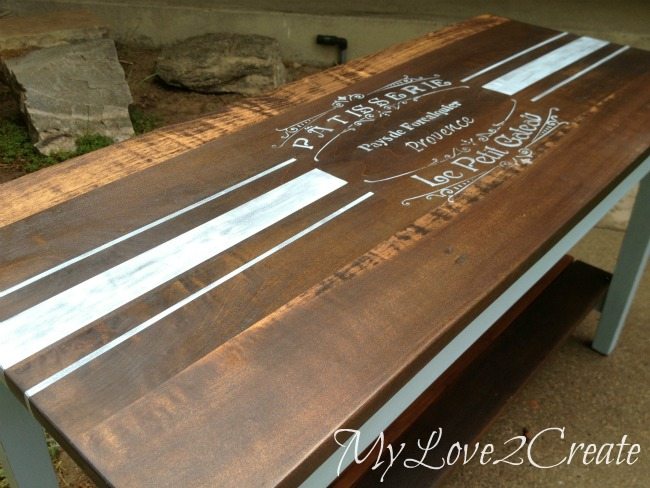
    I also wanted to try out these stencils I had gotten and I was so excited to have a french theme! You can buy these products at Home depot.
    painting stencil with chalk paint
    I thought it would be fun to have a pattern on the inside of the lid so I used this stencil to create it. I was impressed with the stencil quality (I am not sponsored I just am saying it like it is, in my own opinion) I used this brush and put a small amount of paint on it, rubbed most of it off in a circular motion on some newspaper, then used the same circular motion directly on the stencil with what was left on the brush. I had zero bleeding, which made me very happy!
    painting stencil with chalk paint
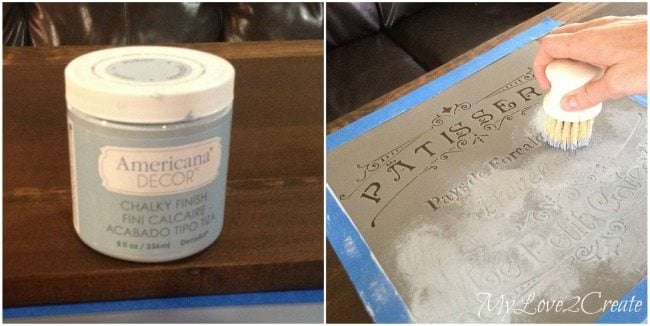
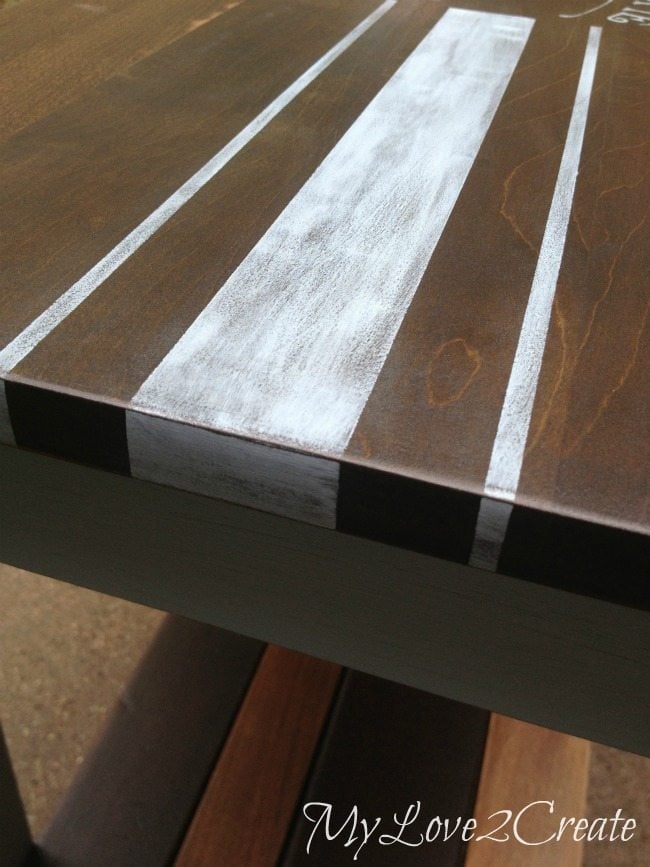
    For the next stencil I centered and taped it onto the top of the bench and used the same method to stencil the french design. Again no bleeding, which I was worried about on the stained wood top, phew! I think the most important thing to remember is to load and unload your brush, so you have very little paint left to stencil with. This 8 oz. jar of paint went really far, I only used half of it for the whole bench.
    painting grain sack stripes
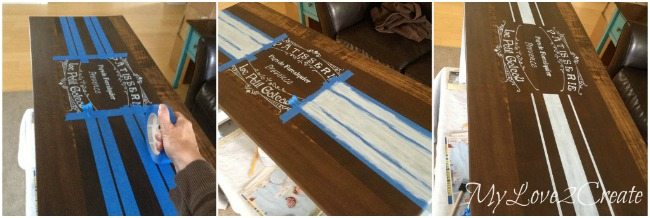
    In keeping with the french theme, I couldn't resist grain sack stripes, I LOVE THEM! After I measured and taped my lines, I firmly ran the tape roll over all the tape to seal it really well, this helps to get those crisp clean lines (a trick I learned from Mandi at Vintage Revivals). It really works guys, you can see another example in my How to Paint a Subfloor post.
    nailing on bottom shelf boards
    I glued and nailed the bottom shelf boards on, then sanded/distressed the painted areas, stenciled parts included. Since I have never worked with chalk paint and was worried I would take off too much paint I used 400 grit, but I am thinking a 200 would have been fine. I was going to use wax to seal it, but ended up using polyarylic.
    French inspired piano bench
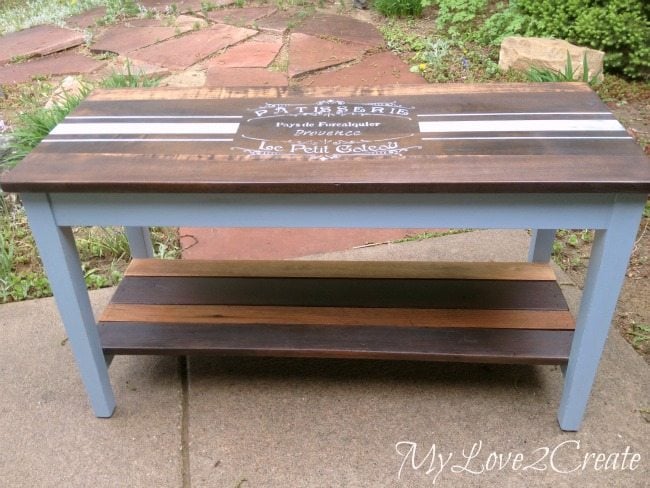
    And I was all done!! I am very happy with the final result, even if I did mess up with the top stain.
    Close up of grain sack stripes
    I really liked the chalk paint, I will have to use it more often. These stripes are so fun!
    French inspired piano bench
    It amazes me that they hide such fun wood under veneer, it has such character, why use veneer at all?
    French inspired piano bench inside stencil
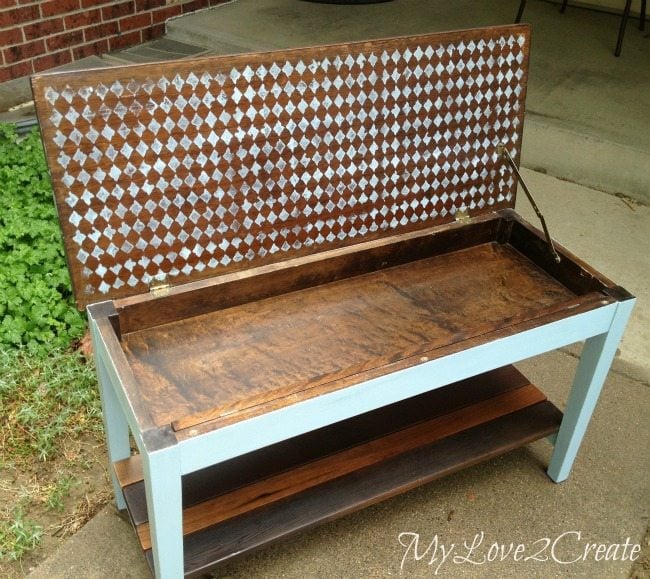
    The inside is a little busy, but hey it was fun for me to try out that stencil, I kinda like it too.
    French inspired piano bench

    I only had a few minutes when the sun came out that I could snap some pictures before it started raining again.

    French inspired piano bench
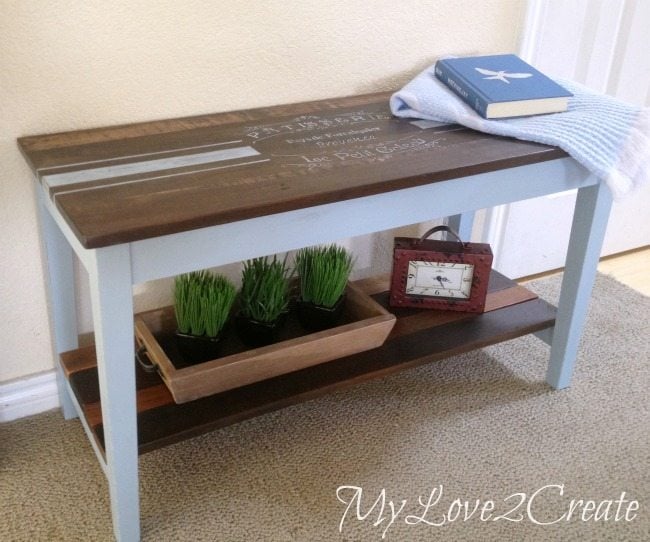
    Right now this bench is hanging out in my entryway, I am sure I will find a good home for it!
    If this was your bench where would you put it?
    Hugs,
    Mindi
    see more of Mindi's posts on MRL below:
    [categorythumbnaillist 274]
    Pin
    Share
    Tweet

    About Mindi

    Mindi is a wife, mother, runner, dancer, and a lover of all things fun and DIY.

    A few years ago she discovered blogs and fell in love with the idea that she could do things she had always dreamed of doing. Like build furniture from pallets, and make cool projects for her home.... Mindi was inspired by other bloggers that empowered her to create.

    Mindi decided to give back and possibly reach someone out there that has a desire to create like herself. She believes we all have that desire in some form or another, and we all DO create in our own way, every day. Whether it be crafty or not, even creating happiness in others is a gift that many share.

    Mindi loves to learn and use that knowledge to make beautiful and useful things for her home.

    Reader Interactions

    Comments

      See comments Cancel reply

      Your email address will not be published. Required fields are marked *

      This site uses Akismet to reduce spam. Learn how your comment data is processed.

    1. Bliss

      May 29, 2014 at 9:05 am

      Pinned it!

      Reply
    2. Patti

      May 19, 2014 at 8:46 am

      That chalk paint is HORRIBLE, juat putting it out there for those who havent tried it. I got the off white color and wanted to shabby chic a lingerie chest with it. Keep in mind ive been doing this about 5 years with a home made chalk paint recipe. It took 4 coats, and was still see through in spots. When it came time to distress, it just peeled off like latex on veneer. No priming? No sanding? Thats a lie. And is expensive! Almost $9 for a sample!

      Reply
      • Mindi

        May 19, 2014 at 10:22 am

        Thank you so much for the heads up Patti! I appreciate it, especially since this was my first time trying chalk paint, and I had nothing to compare it too. It is good for us to know, especially at that price. I got this as a free sample so I was unaware of the cost. I did not have problems with the coverage or the peeling when I distressed this piece, but it was a different color of paint so maybe that is the reason. Thanks again!

    3. Tracy

      May 17, 2014 at 8:35 am

      Awesome bench. I love what you did with it. I am also a lover and seeker of sad homeless furniture. I have worked with chalk paint and have found it to be nice to work with. I have completed several pieces using Annie Sloan chalk paint and the out come has been great. Annie Sloan is a bit expensive, however pending the size of your piece you can do several items.
      Again, I love this bench!!!

      Reply
    4. Romain

      May 13, 2014 at 3:38 am

      That's very cute ! I think you really have a passion for benches (and Forcalquier is a very nice small town ! )

      Reply
    5. Terri

      May 11, 2014 at 8:46 am

      This turned out so cute! Love this!

      Did you feel that the paint was as good as Annie Sloan chalk paint? I have not used it yet, but was very excited when I saw it at HD...I wasn't very excited about the price, however! I am helping my daughter paint some laminate furniture and was just wondering if I should give this a try!

      Reply
    6. Nancy @ Little Homestead in Boise

      May 10, 2014 at 6:07 pm

      Cute, I was thinking the same thing- in my hall, or a bedroom.... Surprised HD is selling stencils!!!

      Reply
    7. La Verne

      May 10, 2014 at 12:05 am

      Seriously loving the stencil, the lack of veneer and the wood choice on the bottom. Mindi, you just get better and better.

      Reply
    8. Laurel Stephens

      May 09, 2014 at 2:03 pm

      I just noticed the watermark on these beautiful photos are from My Love To Create and that Mindi is a contributor here on My Repurposed Life. What a great team!

      Reply
    9. Laurel Stephens

      May 09, 2014 at 1:49 pm

      I think this is the prettiest furniture you've created so far. I LOVE it! I'll be looking for stencils at Home Depot now!

      Reply
    10. Linda

      May 09, 2014 at 12:13 pm

      Btw, what kind of brush is that? And where do I find one? Thanks šŸ™‚

      Reply
      • Mindi

        May 09, 2014 at 1:51 pm

        Good question Linda! It is a Martha Stewart stippling brush, you can purchase them at walmart, homedepot, or any craft store. I used it because it is what I had on hand. A regular stencil brush would work great too, and they are cheaper. Good luck!

    11. Linda

      May 09, 2014 at 12:09 pm

      Love the bench! And thanks for the stenciling tips. I've never liked to stencil b/c I'm so bad at it but I think I'll give it another try!

      Reply
    12. shirley Reesor

      May 09, 2014 at 10:46 am

      I really like reading your post. You give great detail and inspiration. I am somewhat new to the re-purpose life. I enjoy giving new life to furniture. You have great ideas. I plan on using some of them. Keep up the Great work!

      Reply
    13. kim

      May 09, 2014 at 10:34 am

      That turned out great - I really like it.

      Reply
    14. Tanya

      May 09, 2014 at 10:22 am

      I love this and wish this bench was in my home! I am now on the hunt for my own piano bench to rescue šŸ™‚

      Reply
    15. Sharon @ Elizabeth & Co.

      May 09, 2014 at 9:17 am

      Oh how pretty! I love the stencil design and that rustic shelf is just perfect! And I have no idea why they choose to cover up good wood with that annoying veneer!

      Reply

    Primary Sidebar

    Hi, there! I’m Gail Wilson, the author and mastermind behind My Repurposed Life. I’m obsessed with finding potential in unexpected places and believe that with a little hard work and imagination, any old thing can be made useful again—myself included! I hope you’ll enjoy the journey and pick up a few tools along the way… literally!

    More about me →

    Footer

    ↑ back to top

    SEEN ON

    Might I Suggest

    • Start Here
    • Furniture Makeovers

    Newsletter

    • Sign Up! for emails and updates
    • Contact

    About

    • Gail's Favorites on Amazon
    • About

    As an Amazon Associate I earn from qualifying purchases.

    Copyright Ā© 2023 My Repurposed Life Ā· Privacy Policy Ā· Disclosure