Geometric Candle Holder made from Scrap Wood
As an Amazon Associate, I earn from qualifying purchases.
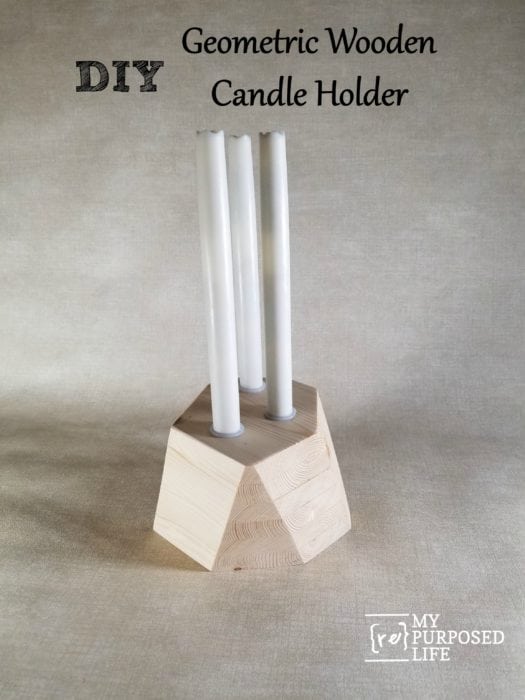
I thought this geometric candle holder would be an easy project. It really wasn’t all that hard, but it did take some patience. I think you will really like how this geometric candle holder turned out.
*this post contains affiliate links, read more here*
Use a stop block to get equal measurements

I used a 1×6 pine board, cutting it into squares. To keep all the lengths the same I clamped a scrap piece of wood to my compound miter saw . This is called a stop block. It’s really easy to do when you use a quick clamp.
Materials needed to make a wooden geometric candle holder

- Three foot 1×6 pine board
- Gorilla Wood Glue
- Glue brush
- Clamps
- Hand Saw (I used a flush cutting double edged saw)
- Sandpaper (I used an orbital sander)
- Drill
- Paddle bit
- Sealer or stain (I used wipe-on poly)
- Latex gloves
- Soft cloth
- Candles
Apply wood glue

Use an ample amount of the Gorilla wood glue to the first block of wood.
Silicone Glue Brush

A silicone glue brush makes quick work of spreading the wood glue from edge to edge on the block of wood. Continue with each block of wood. You can make your geometric candle holder as tall as you would like.
Clamp blocks of wood to make a geometric candle holder

When the wooden blocks are clamped, there will be some ooze. You don’t want to clamp your blocks so tight that all of the glue seeps out. I use baby wipes to remove beads of glue prior to it setting up.
Secure block of wood to work table

There’s not right or wrong way to design your geometric candle holder. After clamping the blocks of wood to my work table, I proceeded to use the flush cut saw to make my first cut. It’s best to start sawing with the blade straight up. Once you have a slot in the wood, angle your blade so that your cut will be on a slant.
Keep your flush cut saw blade on an angle

It wasn’t long before I learned to not cut this way. I was working harder, not smarter.

The hand saw will do the work for you if you keep it on an angle as opposed to cutting straight across the wooden blocks. I honestly didn’t think I was going to complete this project during the first angle cut.
Sand wooden geometric candle holder

As I said, you can cut/design your geometric candle holder however you want. I really had no idea of what I would do until I was finished. The hand saw leaves the block of wood in a really rough state. I used 150 grit sandpaper on the orbital sander on ALL sides to smooth out the wood.
Which way is up?

Here is the wooden candle holder sanded all smooth. Now it’s time to make a decision on which end is up. I prefer the pretty pattern of the end grain showing. Top and Bottom Left
Mark top of candle holder for drilling

X marks the spot! I randomly marked the spaces for three holes to hold taper candles.
Paddle bit holes for taper candles

The packaging said the candles were 1”. I first drilled a one inch hole using a paddle bit in a scrap piece of wood. It was a little too large, so I went with a 15/16 bit. You could also use a forstner bit. I only have one size and it is for tea light candles. You can see the log candle holder I made in my post How to Make a Tea Light Log Candle Holder.
Wipe-on poly seals wooden candle holder

Usually I prefer dark stain, but I just wanted to bring out the details of the wood with a clear sealer. Wipe-on poly was the easiest choice to finish off this geometric candle holder. Even though it’s water based and easy clean up, I like to use latex gloves.

 I’m so glad I stuck with this wooden candle project–even though at one point I really wanted to give up while sawing the angles. Just remember to let your saw do your work.
You can see my inspiration for this project from Orly Shani on Hallmark. I love all of her projects!
gail
Great project and teaching! Did you line the holes? It looks like rings around the bottom of the tapers.
Thank you Derry! I appreciate you comment!
I didn’t line the holes. Those are battery operated candles and they had various adapters to hold them in many sizes of candle holders.
gail
Gail! I love this project, it turned out so pretty! I love how simple it is, once you saw at the right angle 😉 yet it looks like it was difficult to make! Awesome job!
I really like the semetrical lines and overall look of the candle holder.Great job Gail👍
Thanks so much for loaning me the saws! I really did only use the handsaw. I’m glad I didn’t give up.
gail
i think it turned out wonderfully. love the pretty finish.
Thank you so much Nova! I appreciate you checking it out. 🙂
gail
I wonder how it would look with 3 or 4 different types of wood? A compound miter saw with a clamp would work well. Unless you had some aggression to work out through the flush cut hand saw. 😉
Jennie,
I think it would be oh so pretty with different species of wood! But using a handsaw I chose a soft wood. 😉
I didn’t feel comfortable doing this on the miter saw, and I wouldn’t want to recommend others to do so. I was hoping to showcase an easy project for those who don’t have a lot of tools.
Aggression? How did you know, were you hiding in the camper? lol
gail