DIY Egg Shaped Soap by Rook No. 17
As an Amazon Associate, I earn from qualifying purchases.
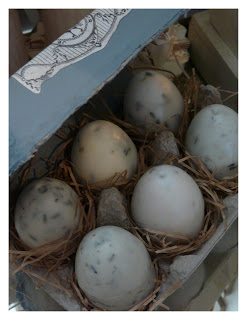
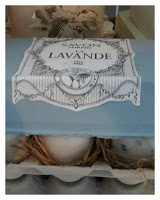
This afternoon we have a great DIY, soap! I have really enjoyed bringing ya’ll all of these different kinds of DIY projects. Jenn even found a way to repurpose some items for this project. Look at that staging, aren’t these eggs and their container just too cute!
Chances are, if you celebrated Easter this past week, you probably have a dozen or more of those colorful plastic eggs lying around. So, what to do with those empty plastic shells once the last jellybean has jumped and the last peep has popped into your mouth?
Hi, I’m Jenn, the crafty bird behind the creative living blog, Rook No. 17! I’m a cake sculptor by profession, but am on hiatus — taking the time to enjoy my two young daughters and satisfying my itch to be creative by sharing my original recipes and unique craft projects in my own vintage-avant garde style at Rook No. 17. I was so excited when Gail invited me to be a guest here at My Repurposed Life! I wanted to be sure to share a project that embraces the spirit of repurposing and had enough sophistication and chic to fit in here with all of Gail’s amazing work.
To that end, I came up with this simple little tutorial for making lovely egg-shaped soaps out of your leftover plastic Easter eggs. Even the packaging is made from recycled materials.
DIY — Egg Shaped Soaps from Plastic Easter Eggs
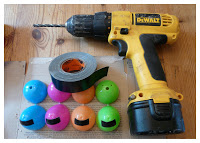
Materials
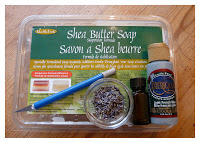
Pour & Mold Soap
(2 pounds will yield 1 dozen egg soaps)
Essential Oil for scent — optional
Cardboard Egg Carton
Acrylic craft paint & paint brush
Small funnel* (typically available at craft stores)
Drill with a 7/32 bit and a 11/32 bit
Piece of scrap wood
Plastic Easter Eggs
Gorilla Tape & scissors
Bamboo skewer
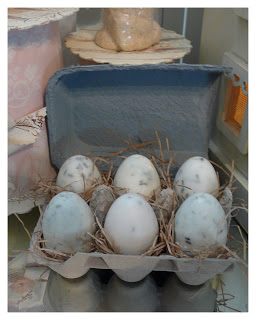
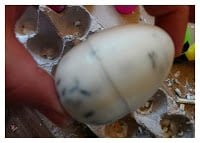
Note: For my eggs, I made LAVENDER soap by adding a few drops of lavender essential oil and a few teaspoons of real dried lavender to the melted soap. You can add any scent or color to the soap once it’s melted. If adding dried herbs, flowers or natural exfoliants, be sure to get a soap specially formulated for “suspension”, so the add-ins don’t sink to the bottom. For half of my “eggs” I ground the lavender in a spice mill to break it into finer pieces. When mixed in the melted soap, the milled lavender added a subtle green tone.
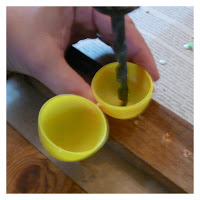
Step 1: Fit your drill with the smaller 7/32 bit. Drill a hole through the center of the bottom of the bottom-piece of the egg. Use a scrap piece of wood beneath the egg to protect your work surface.
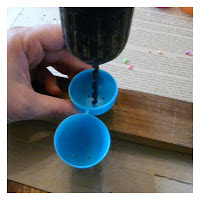
Step 2: Now enlarge the hole by redrilling with the larger bit.
Step 3: With your scissors, cut small pieces of Gorilla Tape and use them to cover the holes on the pointy-end of the egg. Use another small piece to help hold the two sides of the egg together. I learned the hard way that this step is necessary — the egg opened up and hot soap went everywhere!

Step 4: Chop the soap base into small pieces with a kitchen knife and melt according to manufacturers instructions. For mine, I microwaved a cup at a time, in a glass measuring cup, for 30 seconds, then at 10 second intervals until the soap was melted (this fills 2-3 eggs). Stir in any desired color, scent, or exfoliants.
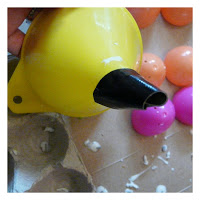 |
| *Try not to laugh at my doofishness — Somewhere amidst the leaning towers of craft bins in my art room, there lives a family of nesting funnels.Try as I might, I couldn’t find them and feared an ensuing avalanche if I continued. As a substitute, I used one of my kitchen funnels, and created a smaller tapered end with Gorilla Tape. By golly, I love Gorilla Tape! I wouldn’t recommend this method over a proper funnel, but in a pinch it’ll do. |
Step 5: Set the prepared plastic eggs in a carton or egg cups to stabilize, hole side up. Place funnel in the hole of one egg. Gently pour in melted soap. If funnel clogs, use the bamboo skewers to help move things along. When soap has reached the top, gently tap the bottom of the plastic egg on a hard surface (with a finger over the hole). This will help the soap settle and help release air bubbles. Top off with more soap. Repeat with remaining eggs.
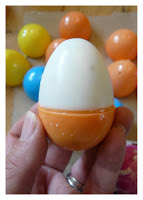
Step 6: Let eggs set for 30 minutes to an hour. Then, remove the piece of tape holding the two sides together, and open egg. You may need to give the egg a gentle squeeze. When the eggs come out, they may have a slight lip near the center. You can trim this away carefully with a craft knife. You can also use your fingers to buff out any imperfections. It will not adversely affect the sheen of the finished egg.
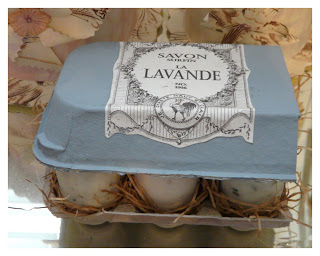
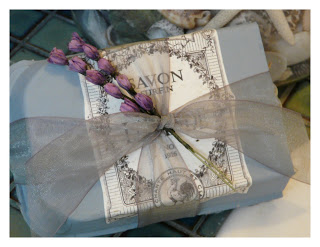
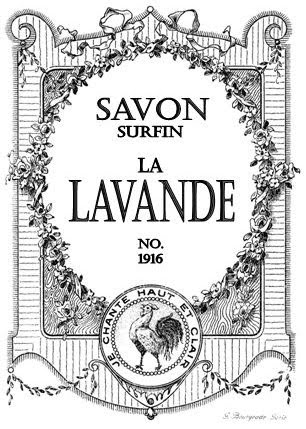
Step 7: Package — For my repurposed packaging, I cut a cardboard egg carton in half and painted the inside and outside of the lid with DecoArt Americana French Blue acrylic paint. When dry, I filled the carton with little bunches of paper shred and then placed the soap eggs inside. Lastly, I found a beautiful vintage label from The Graphics Fairy, made some modifications, printed it on handmade paper and glued it to the top of the carton.
Enjoy!

Thanks Jenn for a super post and a great tutorial. I love your pictures and staging! (we all know I’m in need of help in that department). Make sure you hop over to Jenn’s place to say hi! (after leaving her some love here first.)
gail
looking for more easy craft ideas?
3/16/25
Hi, super cute egg carton idea but didn’t see the video. Couldn’t find it. Will try but the funnel filling sounds hard. You have a pic of (maybe) one egg sitting in a nest or twine with tulle, how did you make the nest? Small grapevines?
Hi Lee,
This article is a guest post from a friend. I’m sorry I can’t answer your questions about the video or how she made the nest.
gail
Thanks for the tutorial! I love the egg soaps, I just started making a few different types, testing things out and what not. I can’t seem to get a rounded top on the top of the soap where I screwed a hole to pour into the plastic egg. Any suggestions?
Lauren,
This is not my tutorial, and I’ve never made any soaps. But I was wondering if maybe you could drill the hole in the bottom, so it may be less noticeable? Just a thought.
good luck,
gail
Brilliant egg soap hack! Pinned 🙂