• Skip to primary navigation
  • Skip to main content
  • Skip to primary sidebar
  • Start Here
  • Shop Favorites
  • About
    • Welcome To My Repurposed Life Home of Repurposed Furniture
    • More About Gail
    • Disclosure
    • Privacy Information
  • Gallery
    • Repurposed Furniture
  • Repurposed Items
    • Building Supplies
    • Miscellaneous Household Items
    • Picture Frame/Chalk Board
  • DIY
    • Home Reno
    • outdoor living
    • Painting
    • Shop Talk
    • Tips for Around the House
    • Build It
      • Furniture
      • Home Decor
      • Storage
    • Crafts
      • Dollar Store
      • Easy
      • Holidays Seasonal
  • Furniture
    • Chair
    • Desk
    • Dresser/Chest
    • Headboard | Bed Parts | Cribs
    • Kids Furniture
    • Table
    • Kids Furniture
My Repurposed Life® Rescue Re-imagine Repeat
menu icon
go to homepage
subscribe
search icon
Homepage link
  • About
  • Start Here
  • Project Index
  • Furniture
  • Subscribe
    • Email
    • Facebook
    • Instagram
    • Pinterest
    • RSS
    • Twitter
  • ×

    Home » Repurposed Furniture » Shutter Shelf from Follow Your Heart Woodworking

    Shutter Shelf from Follow Your Heart Woodworking

    Published by Gail | Published September 7, 2012 | Updated August 3, 2020
    As an Amazon Associate I earn from qualifying purchases.

    Pin
    Share
    Tweet
    This fun little shutter shelf project is a perfect weekend project. The color goes with anything, and the hooks are a great addition to any busy home. #MyRepurposedLife #followyourheartwoodworking #repurposed #diy #project #shutter #shelf #upcycle via @repurposedlife
    guest post banner 1

    Shutter Shelf

    repurposed shutter shelf


    I'm Julie from follow your heart woodworking and I am so pleased to be able to Guest Post at Gail's great blog My Repurposed Life. Gail is the queen of repurposing and she was the very first follower I had when I began blogging. I consider her to be a friend, even though we haven't (yet) met in person, so I am honored to be able to guest post here at her blog.

    Because I am a cabinetmaker I make all sorts of things from wood. Often I use pine or pallet wood and sometimes I repurpose found items. This project is a shutter which is turned into a backing for three small shelves.

    The Details

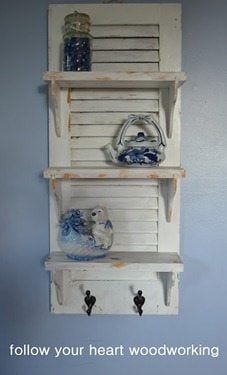
    I began with a shutter that I bought at a local re-use store. I'm using a 12" x 30" fixed shutter. By fixed I mean there is no mechanism to open and close the slats.

    This is how it looked before and then after I put a quick sloppy coat of white paint over the whole thing. I purposely allowed some of the stained wood to show through in parts. But first, I filled the old hinge and handle holes with spackle.

    Repurposed Shutter Shelf 1
    I decided on three shelves which I made out of ¾" thick pine, because that was what I had in stock. So, I cut them to 11 ½" long and 4"wide. Of course you could do anything you wish to fit your own shutter size.

    How to Add Shelves

    Each shelf will be held up with ¼" thick pine brackets. So I dadoed (cut a groove in) each shelf underneath where the bracket would go. I use a router with a ¼" wide straight bit, which will make the dado the exact thickness of my brackets.
    Repurposed Shutter Shelf 2

    First, I put the grooves in the shelf so that they would match up with the middle of each side of the shutter.

    Repurposed Shutter Shelf 3

    I planned the size of the brackets by making a template shape out of paper. This was done to see how the bracket would fit.

    Fitting the Brackets

    Repurposed Shutter Shelf 4

    The bracket would look something like this with a jog in the length of the back making it shorter than the full length of the bracket. This allows you to cut a slot in the shutter for the bracket to fit in.
    You don't have to be perfectly accurate in your shutter slot this way. The bracket goes into the shelf as well as the shutter, so when measuring, take this into account.
    Repurposed Shutter Shelf 5This length between the arrows is the length of each slot
    Repurposed Shutter Shelf 6
    Using this template, I cut six brackets from ¼" thick pine. Then I marked where my slots would go in the shutter to hold the brackets and cut them with my router. Again using the ¼" bit. (This photo shows the shutter upside down)
    Repurposed Shutter Shelf 7

    The back of each bracket then fits in the slot on the shutter and the top of each bracket fits in the groove in the bottom of the shelf. They are glued in place. There is no need for nails or screws since they are fitted into each other.

    Shutter Shelf Brackets Installed

    Repurposed Shutter Shelf 8

    Repurposed Shutter Shelf 9

    How to Paint Shutter Shelf

    After the glue dried I put a stain on the shelves to make them match the old colour of the shutter and then put some vaseline here and there. This doesn't allow the top coat of white paint to stick where the vaseline is. I put a coat of white paint over top, as I did with the shutter.
    Repurposed Shutter Shelf 10

    On the back I screwed in two triangle shaped hangers and on the front at the bottom I put two hooks.
    Repurposed Shutter shelf 11

    Repurposed Shutter Shelf 12
    I hope this gives some readers ideas to make their own shutter shelf. I welcome any questions about the making of this or any woodworking project.

    More Projects From Follow Your Heart Woodworking

    cupboard
    hutch
    shutter cupboard

    Please visit my blog follow your heart woodworking where you can see a cupboard with a shutter for a door, how to design and make a buffet hutch, how to make a barn board cupboard and many more projects.

    Thanks again, Gail, for the chance to guest post on your great blog!

    Thank you Julie for sharing this project with my friends! I have made a couple of these, and I think it’s time to make some more…I have the perfect chippy shutters (bifold door halves) in my stash! Of course mine won’t be with a dado. You’re so good at REAL woodworking!
    gail

     see other shutter and or bi-fold door ideas here
    Pin
    Share
    Tweet

    Related Content:

    • Shutter Mail Organizer
      Shutter Mail Organizer
    • Queen Anne Tables Cut in Half
      Queen Anne Tables Cut in Half
    • Repurposed Shutter Projects
      Repurposed Shutter Projects
    • Repurposed Table Shelf | Queen anne Legs
      Repurposed Table Shelf | Queen anne Legs
    • Take 2 Tuesday repurposed shutters
      Take 2 Tuesday repurposed shutters
    • Queen Anne Coffee Table | Three New Projects
      Queen Anne Coffee Table | Three New Projects

    Reader Interactions

    Comments

      See comments Cancel reply

      Your email address will not be published. Required fields are marked *

      This site uses Akismet to reduce spam. Learn how your comment data is processed.

    1. Linda

      July 07, 2016 at 1:36 am

      Well, Holy Moly!!! I don't know which project I want to do first!!! I just happen to have a collection of "Parts" i.e. old windows, shutters, cabinets, old frames, and so on and so on.....didn't know what I was going to do when I got the items....but boy am I pumped now!! You are genius!!! Thanks for the tutorial info and the supplies info !! now I am challenged to add my own "personal" touch!! LOVE IT ALL!!! Keep it coming!!

      Reply
      • gail@myrepurposedlife.com

        July 07, 2016 at 9:07 am

        I'm happy you love Julie's shutter project! I hope you stop by often to see new projects.

        gail

    2. Betty

      July 19, 2014 at 11:36 am

      do you sell these?

      Reply
      • gail@myrepurposedlife.com

        July 19, 2014 at 4:39 pm

        My friend Julie made this and she is no longer making them to sell.

        gail

    3. Pam

      May 02, 2014 at 3:02 pm

      LOL....I was on PINTEREST and I saw this shutter shelve, as I clicked on it I was thinking that looks like Gail's work!....look where clicking on the link took me! Love it...

      Reply
    4. Laurel Stephens

      September 15, 2012 at 1:11 am

      Julie's project is so great, I shared it on Friday Finds!

      Reply
    5. Corn in my Coffee-Pot

      September 10, 2012 at 4:02 am

      That turned out cute! I love this little shelf.
      I have three shutters...I've been waiting to do something with--this gives me inspiration!

      ...enjoyed seeing it, Pat

      Reply
    6. Laurel Stephens

      September 07, 2012 at 2:52 pm

      This is a fantastic tutorial! I have a bunch of old shutters and think I can tackle building one of these shelves because Gail inspired me to buy my own Dremel Trio awhile back. It has a router, and this will be my first router project! Yippee! Thank you, Julie, for a superbly written and illustrated tutorial. Your shutter shelves are awesome!

      Reply
    7. Donna OShaughnessy

      September 07, 2012 at 1:14 pm

      So very cute. Think I'll copy for some shelves in my little country store here on our farm. THANKS!

      Reply
    8. Korrie@RedHenHome

      September 07, 2012 at 1:01 pm

      LOVE this! I have an old shutter waiting in my garage....hmmmm...

      Reply
    9. Julie @ followyourheartwoodworking

      September 07, 2012 at 12:51 pm

      Thanks again, Gail, for inviting me to guest post.
      You don't need the dadoes for the shelf bracket, you could just screw it in from the back and top. I just prefer dadoes as they really lock the pieces together.

      Reply
    10. Susan @ homeroad.net

      September 07, 2012 at 10:00 am

      I love the shutter shelf Gail! Nice job from Follow Your Heart.... I could use one of these shelves!
      Susan

      Reply

    Primary Sidebar

    Hi, there! I’m Gail Wilson, the author and mastermind behind My Repurposed Life. I’m obsessed with finding potential in unexpected places and believe that with a little hard work and imagination, any old thing can be made useful again—myself included! I hope you’ll enjoy the journey and pick up a few tools along the way… literally!

    More about me →

    Join Our Mailing List

    ​

      Click the topics you're interested in below:

      Subscribing above means you agree to our Privacy Policy​

      Footer

      ↑ back to top

      SEEN ON

      Might I Suggest

      • Start Here
      • Furniture Makeovers

      Newsletter

      • Sign Up! for emails and updates

      About

      • Gail's Favorites on Amazon
      • About

      As an Amazon Associate I earn from qualifying purchases.

      Copyright © 2023 My Repurposed Life · Privacy Policy · Disclosure