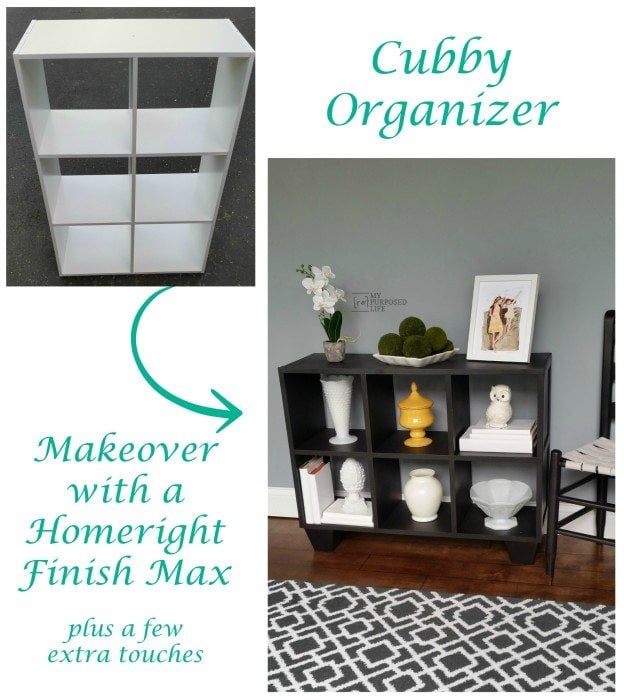
Homeright Cubby Organizer Challenge
As an Amazon Associate, I earn from qualifying purchases.
Homeright has issued another challenge to the Brand Ambassadors. Our mission, should we choose to accept it was to get our hands on a regular ole cubby and work our magic with a Finish Max and paint from Lowe’s.

Homeright sent me a gift card to purchase a Closet Maid cubby and paint. Off I went to pick up what I needed. 
 This is what we had to work with-a simple cubby organizer made out of mdf.
 While assembling the cubby, I chose to use Gorilla Wood Glue to strengthen all of the joints and dowels.
 Here is the simple cubby organizer all put together. At this point, I was still unsure exactly what I was going to do. I was hoping for some big LIGHT BULB moment, or at least a THOUGHT bubble over my head—nope, a big fat nothing. Were my creative juices drying up? Or was this the hardest challenge I ever took on? You may remember the IKEA challenge from Homeright.com last October. I actually won that with my dresser into a hutch. Furniture is definitely my strong point . . . but I moved forward.
 Thinking back on my challenge from last year, I decided to go the same route with this simple challenge. The plain cubby needed a little something.
 I added some smaller trim pieces to beef up the front of the cubby a little—to make the boards look a little more substantial. (I actually added these boards to the back of the cubby where the rougher mdf was showing, so the Gorilla wood glue would adhere better than to the shiny laminate of the front boards.) In addition to gluing, I used my brad nailer to secure the boards on the front and on the sides of the cubby.
 This is after I’ve added all the extra pieces to get a new look on the cubby organizer.
 I filled all the small holes with some spackling—as I was sanding that, I also gave the entire piece a light sanding to allow the paint to adhere easily.
 I set up my Homeright Spray Shelter, and rested the cubby on some sawhorses so I could paint the bottom of the unit first.
 After the bottom dried, I set the unit upright and continued painting all the way around. Using the Homeright Finish Max on this project made painting a breeze! Getting into all the little cubby holes was easy and as always the overspray was minimal. TIP set your project up higher, off the ground for better coverage and ease of painting.
 I was hand painting some other projects, so I used some leftover paint out of my Finish Max paint cup to do a couple of quick coats on these chunky feet I picked up over the Summer at a yard sale.
 I used some Gorilla wood glue to add the chunky feet to the Closet Maid Cubby organizer.
 TIP: use a brad nail gun to temporarily secure chunky feet on the cubby unit until the Gorilla wood glue sets up. Think of it as a way to clamp where you really can’t use a regular clamp. After the glue set up, I then secured the feet with two long screws on each foot.
 I love the flawless finish I get when I use my Homeright Finish Max, isn’t it beautiful?


I love how the feet raise it off the floor, don’t you?
see more great Finish Max projects here
gail

disclaimer: I’m happy to be a Homeright Brand Ambassador which allows me to share great projects and products with you. Homeright furnished me with all of the products for this project and I have been compensated for my time. All thoughts and opinions are my own.
I love the look with the legs! I would change the legs a bit and add baskets to conceal junk in the cubby.
I would enjoy doing a bar/wine storage piece that had some”old time Glam” inspired sparkle or bling to it! I’d Install a mirror to the back, add trim to beef her up, add a couple bottle storage areas, and then paint her a platnium color.
i think i would two tone it like black with white inside if not pretty or style up i think id change it to one color love it …..
i think i would two tone it like black with white inside if not pretty or style up i think id change it to one color love it