Home » Repurposed Furniture » Brown Paper Bag Technique

Brown Paper Bag Technique

As an Amazon Associate, I earn from qualifying purchases.

brown paper bag decoupage antique vanity

Pin it!

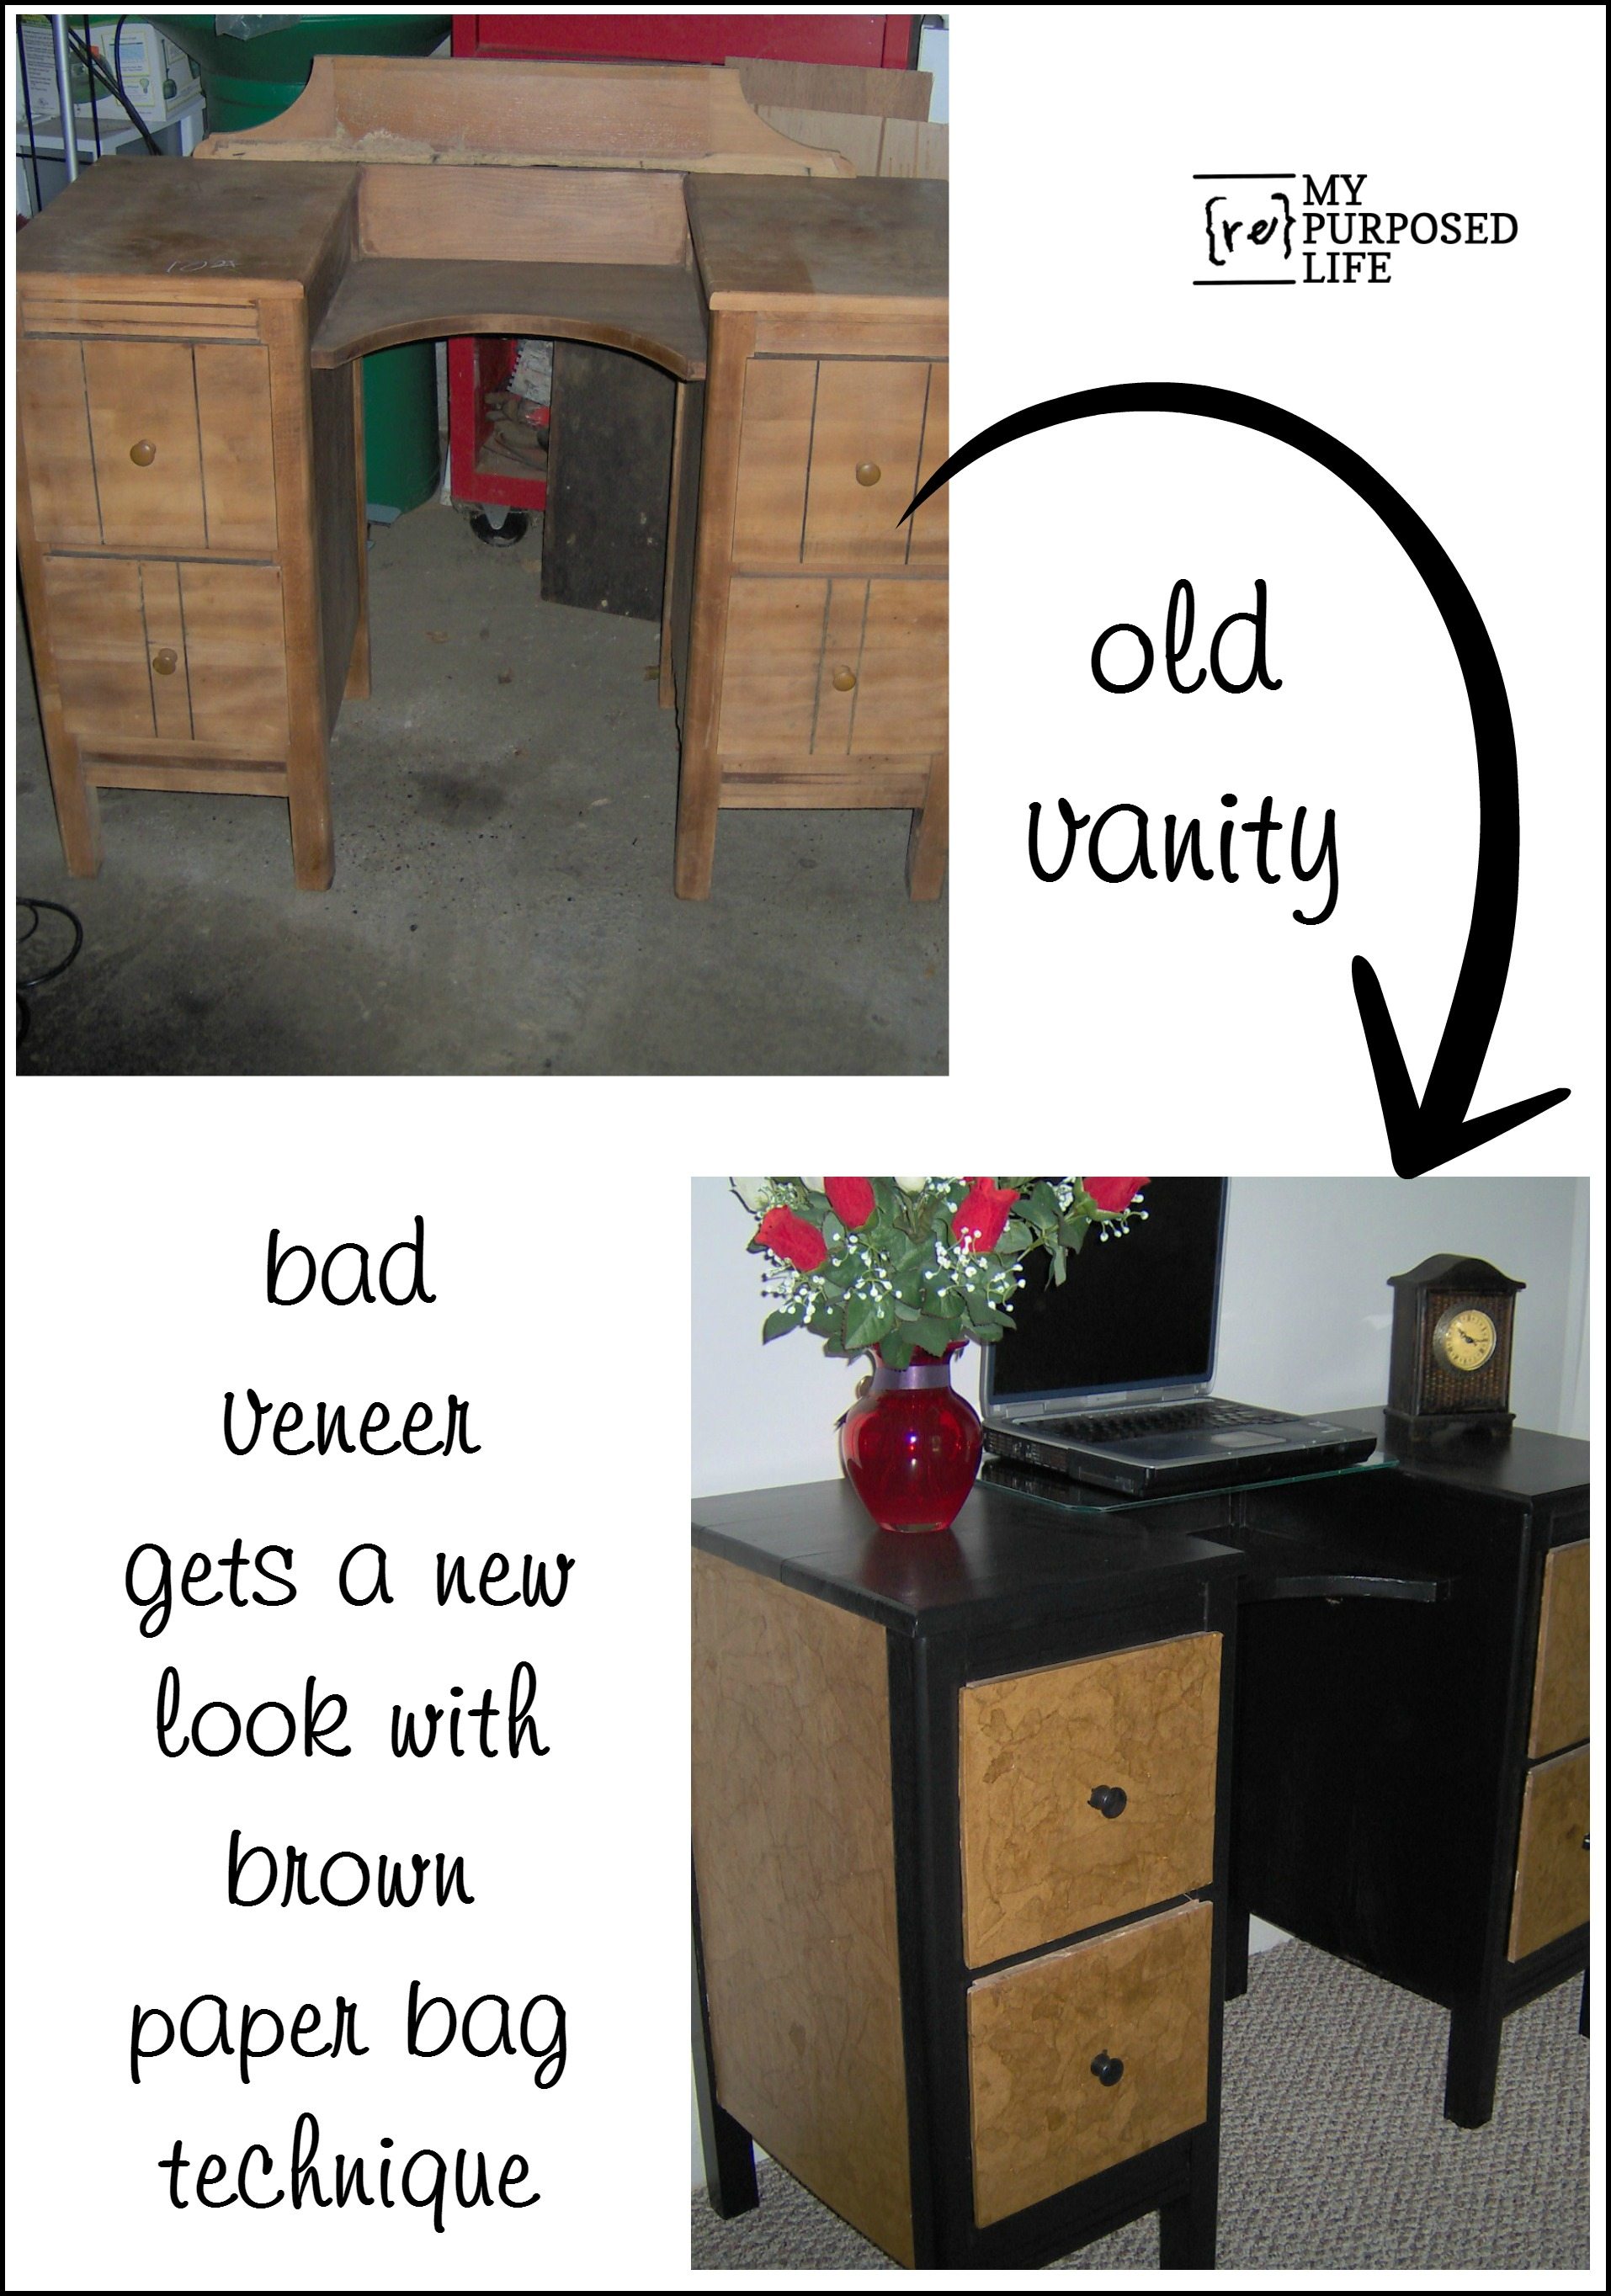
This is a great way to update or upcycle an old outdated or damaged dresser.
thrift store vanity

Check out this old vanity I picked up at one of our local Thrift stores. If you look closely you can see that it was marked $10.01. They have the strangest pricing system, like $3.03, $2.02, etc. Anyway, because of that cute little yellow X, I got it for 75% off! Yeppers! That’s right! A scant $2.50.

IM000173

Here you can see the front of it. It was nearly naked, not a lot of sanding or stripping to do on this little gem. What you can NOT see is that the veneer on all sides is in very poor condition.

IM000610

I decided to paint it an antique white with the hopes of it looking shabby chic….but mostly it just looked shabby.


IM000613

The weather turned a little cold, so I had to resort to working indoors in the kitchen. You are not a true t2t person if you have never painted and decoupaged a vanity in your kitchen. The brown sides and drawer fronts are done with the “brown paper bag technique”.

Insert short tutorial here:

MATERIALS NEEDED
brown paper bag (or craft paper)
Elmer’s white glue
some type of stain (I used old english for scratches)
polyurethane

Rip the paper into varying sizes. Crumple up the paper, straighten out slightly. Decoupage onto your piece of furniture.

After the Elmer’s glue dries, rub lightly with stain (this will highlight the high points)

seal with poly

IM000630

I decided I didn’t like the brown paper on the antique white, so I decided to mix up my own color of brown. NOPE, I liked the brown less than the antique white color.

IM000549IM000554

IM000555

Finally after several days of thinking about it, I decided to paint it black! It was a long process, but for $2.50, it was a great deal!

gail

29 Comments

  1. I love the look of the brown paper with the black and may incorporate that in the credenza redo that is in my future. One thing I would have done different on the vanity is I would have added a one piece top so that it would be more useful for a working desk. I would be concerned about the small piece of glass not being shifted by my cats or someone setting something on it and the original “shelf would still be there. Just my thoughts.

  2. I love the bit about painting in the kitchen. I can relate on so many levels. Super cool find & it is good to see your progress, even your decicion to change colors. It happens. It is so nice to see that others are interested in repurposing old furnishings and by the amount of comments you have we are not alone.

    Janeane
    http://www.designwithj9.wordpress.com

  3. I love this idea. I was wondering how I might like to redo my hutch and cabinet and now I know.. Going to do Black paint and brown bag technique. I think it will look amazing with my already black table and earth-tone accessories. I hope it turns out, keep positive thoughts… Thanks Gail.

    1. yay Judy! so happy you found My Repurposed Life! Thanks so much for taking the time to leave a comment.
      have fun, good luck!
      gail

  4. Wow! I have never done decoupage before and I have been thinking of trying it on some really old dressers I have. I could not figure out what to do but after looking at some of the pictures that you have posted I think I am going to try the brown bag technique. I hope mine will look even half as good as yours! Wish me luck!

  5. I’m glad I’m not the only one who sometimes has to paint pieces a couple of times before I get it right. The black definitely looks the best with the brown bag treatment.

  6. You got that for $2.50!!! Not fair! I want it! I LOVE the brown paper bag technique. I haven’t seen it before. It looks amazing against the black! Thanks for linking this up to somedaycrafts.blogspot.com for Whatever Goes Wednesday!

  7. I never find furniture bargains like that! It is beautiful in the black and brown and what a good idea to use for your laptop.

  8. Wow, $1.50 what a steal. I just love the brown paper bag technique. This was quite the transformation.

    Have a blessed weekend.

  9. I love that you let us watch your thought process. Black was definitely the way to go. Great technique on the drawers!

  10. Love how it turned out! Thanks for sharing the details on the brown paper bag technique & thanks for sharing it POPP.

  11. First off…I want to live where you live and shop where you shop because there is no way I am getting such a great deal on a desk around here. What a great transformation!! 🙂

  12. Gail this is so great! I wish we had great thrift stores here! So Jealous!! I love how it turned out! Rose’s adventures are hilarious! You guys make me smile!
    Happy Wednesday!
    :)Nicole

  13. Amazing, but, of course, I’ve come to expect nothing less from you Gail! Thanks for linking up and teaching me something. 🙂

  14. Yes!
    The black was the right color!
    I do the paper bag trick on all sots of things, but I use Mod Podge.
    They call me the Decoupage Queen around here!

  15. Hello Gail…

    My friend…welcome to Sunday Favorites! I’m just so pleased to have you join in with the fun of Sunday Favorites…so very nice to meet you, Gail!!!

    What a terrific post to share with us…I loved it! I’m so interested in refurbishing old furniture and must admit that I don’t know much about it! Thank you so much for including the tutorial on the “how to’s”! You know…I have seen so many great old pieces but the vaneering was so damaged…I didn’t know how a person would repair it! I think that your “paper bag” technique is fabulous!!! Ohhh…and it seems simple enough that…even I could do it! I just loved watching the transformation of this pretty desk/vanity…so very interesting! And…it turned out beautifully! I can see that you are a very creative and talented lady!!! Thank you so much for sharing this with us for Sunday Favorites, my friend! I hope that you’ll join in with us again!!!

    I hope that you’re having a super Sunday!
    Warmest wishes,
    Chari
    PS…Just wanted to let you know that I added your delightful blog to my list of blog follows…I look forward to getting to know you, my friend!!!

  16. Hi Gail!

    Loved this redo!

    I slowly scrolled down and as each picture popped up I was thinking, “humm…not loving it” and then finally the last picture…LOVE IT!

    Great job!

    Have a wonderful sunday!

  17. I love the black and the brown stained bag look….very neat indeed. Takes me back to my childhood when we use to take masking tape, tearing it in pieces, cover a jar and using brown shoe polish to make a small flower vase or something. Same type of idea. Near thought of doing it for a piece of furniture!
    Thanks…
    Pam

  18. Hi Gail! I love the way you use the brownpaper bags! I’ve seen it many times but often to much in one place…the way you do it really highlites the effect! Beautiful! You’ve inspired me and lit up that bulb in my head! I’ve had a retro pool table in our rec room for 25 years. It came from a bar and I’ve run out of ideas of how to refinish it. It’s impossible to sand…thought about crackle paint amoung many other ideas but now…paper bag it!!! The sides for sure and highlight it with black paint! I really can’t wait to start!! Thanks again! I’ll be back to your site for sure!
    Darcie

  19. Gail,
    That looks great! I love to see what some folks can do with what others have deemed beyond redemption. Keep it up!
    Rere

Leave a Reply

Your email address will not be published. Required fields are marked *

This site uses Akismet to reduce spam. Learn how your comment data is processed.