Jewelry Shelf with Knobs using Molding
As an Amazon Associate, I earn from qualifying purchases.

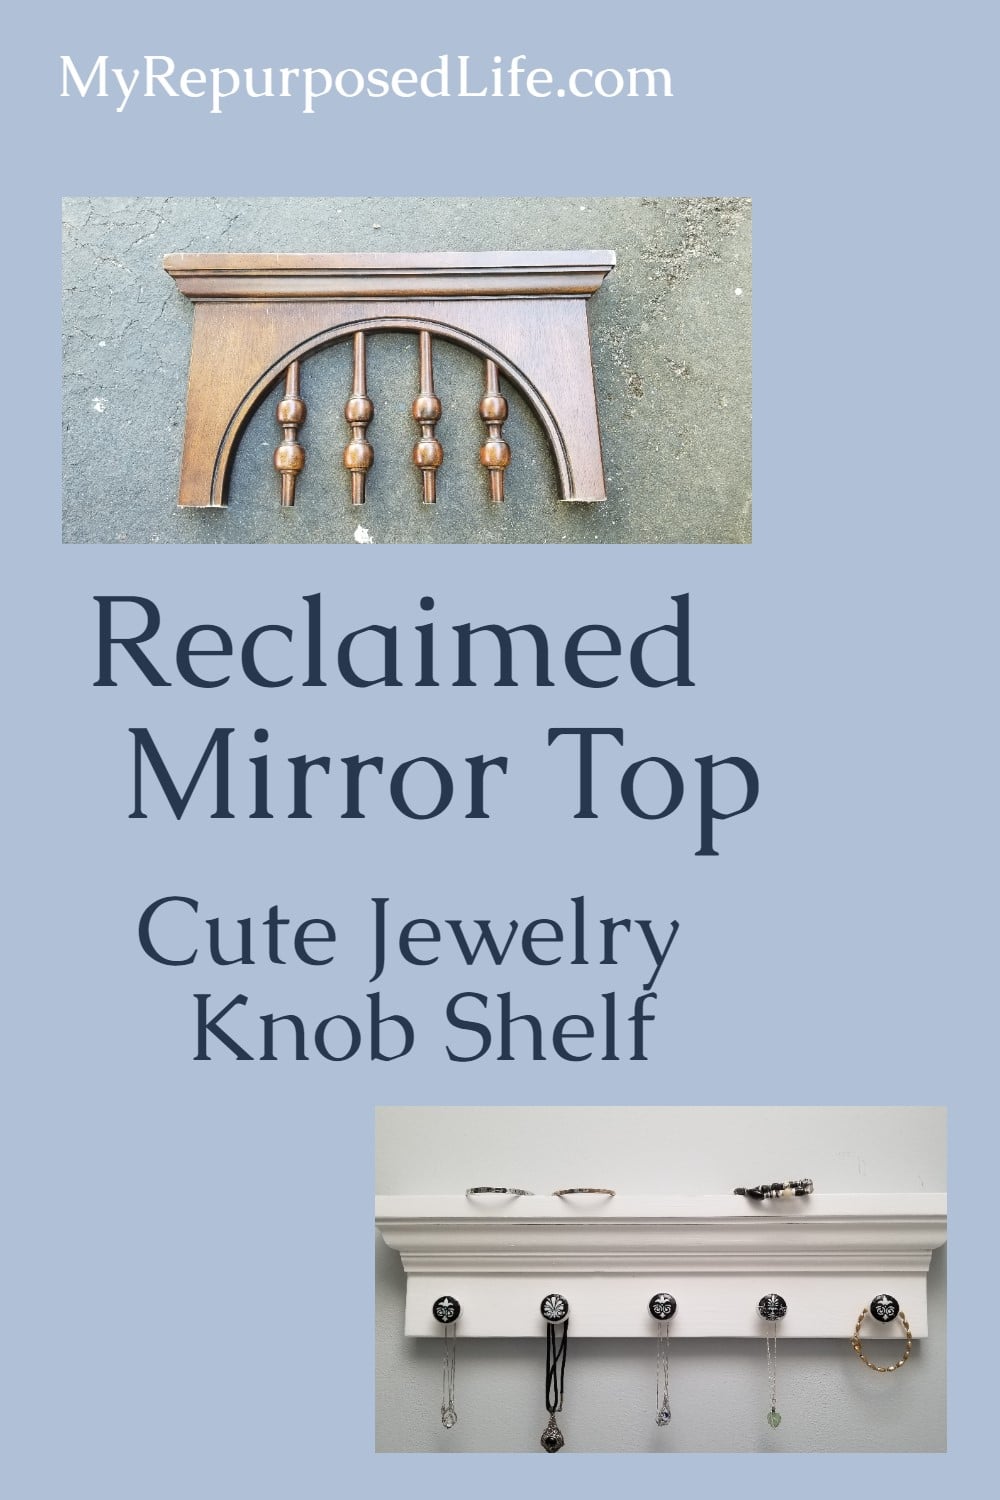
I love cutting up furniture. I made a scrap molding jewelry shelf with hooks from the top part of this Spindle Mirror Makeover. The piece was too cool to toss in the burn pile!

This is what was leftover from that mirror makeover. Can you see my vision?
Transform Mirror Top With Saw

Now, do you see it? After cutting the spindles off, I was left with that chunky piece of molding!
Add Scrap Wood for Jewelry Hooks

Adding a scrap piece of lumber to the bottom of the molding will allow me room to add hooks or knobs for hanging jewelry.
Pocket Hole Joinery

Of course, I used my Kreg Jig to add pocket holes to the scrap board. The board was marked while it was in the test fit stage. It’s fairly easy to get confused while drilling pocket holes. Because of knots and such, you will want to make sure that the pocket holes are drilled on the less favorable side of the board.

Can you tell I don’t really measure my holes? It’s not rocket science, and I’m okay with guesstimating. The board is secured to the molding using pocket hole screws.
Beef Up Jewelry Shelf With Trim

How do you like it so far?

What if I add a small piece of scrap trim?

Yes, I decided to add the small wood trim piece to the jewelry shelf board. Irwin quick clamps and gorilla wood glue secured the trim piece. I didn’t even use a nail gun.
I did use my orbital sander (seen above) to sand that scrap board and the molding (shelf) portions. That dust brush? It’s been around since day one. I highly recommend something like it for your shop!
Update Old Cabinet Knobs

These old cabinet knobs were chosen as the “hooks” for the jewelry shelf. They had brassy bases, so I used chalk paint and a small brush to make them black.

I bought some black and white designs off Etsy, a digital download. They came in several sizes. The first sheet I printed was too large for my knobs.
How to Decoupage Ceramic Knobs

Not shown: I held the little circle in my palm and placed the knob (with the decoupage already applied with my finger) onto the back side of the circle design. It’s difficult to take pictures of the process. I let that set up.
The process was a lot like this: Decoupage Knobs for Antique Dresser
Because the ink runs easily if you overwork the Mod Podge I added it to the bottom of a small paper cup. Attaching the screw seemed like the best way to dip the knob in the decoupage medium. Carefully dipping the decoupaged knob into the cup, I coated the knob with a nice top coat of the decoupage medium.
Adding Knobs To Jewelry Shelf

Also not shown, I painted the shelf white using the same paint I used on the former spindle mirror. Don’t you think that small piece of trim I added brings it all together now that it is painted?
I’m not the sharpest tool in the shed when it comes to math. I always struggle with how I want to space hooks on shelves. So, I used my trusty vintage yardstick from Piece Goods Shop. Do you remember that store?

Maybe you have a better way of figuring these things out. I like my hooks/knobs near each end, then evenly spread out. Does that make sense? I marked the spots and drilled the holes.

After the holes were drilled, I used a screwdriver to secure the knobs. However, the last knob, unbeknownst to me, had a screw broken off in it. Therefore, I had to do the whole decoupage process over.

The decoupage knobs look so great on the jewelry shelf.

What do you think? Do you love it as much as I do?
If so, I would love for you to share this on Pinterest! Thanks in advance!
One outdated mirror produced two beautiful projects. It doesn’t get any better than that!
gail
This is clever, will be a great project for my kids to try. Cool gift idea.
Thanks so much Shelly! I hope the project is a hit with the kids.
gail
Cute!
Very pretty and inspiring.
I love how you can take just a piece of something and create something beautiful! Such a great idea!
Thanks !! It’s my favorite thing to do, make something out of nothing!
gail
just awesome! thanks for all your how-to instructions.