Kitchen Island Table Top and More
As an Amazon Associate, I earn from qualifying purchases.
I shared a couple of weeks ago about how I painted the old kitchen island. Today I’m going to show you how I made the island table top.
This kitchen island was made out of a repurposed desk.

The kitchen island has served me well, but I felt it was time for a little makeover.
How to make an island table top
![rip 2 by 8 on tablesaw[3]](https://www.myrepurposedlife.com/wp-content/uploads/2018/04/rip-2-by-8-on-tablesaw3_thumb.jpg "rip 2 by 8 on tablesaw[3]")
I bought three 2×8 (8 ft) boards to make a new island table top. For the new top I wanted to get rid of the “crumb catchers”. To do this I needed to rip the edge off of each of the boards on the table saw to remove rounded edge.
Cut boards to size
![cut lumber compound miter saw[3]](https://www.myrepurposedlife.com/wp-content/uploads/2018/04/cut-lumber-compound-miter-saw3_thumb.jpg "cut lumber compound miter saw[3]")
After ripping the edges, I cut the boards to size using the compound miter saw.
Drill Pocket Holes
![kreg jig pocket holes build table top[3]](https://www.myrepurposedlife.com/wp-content/uploads/2018/04/kreg-jig-pocket-holes-build-table-top3_thumb.jpg "kreg jig pocket holes build table top[3]")
To connect the four boards together I drilled pocket holes with my Kreg Jig. Not shown: I always mark my pocket hole lines before I drill them. I have messed up and drilled wrong when I don’t mark them first.
Assemble island table top using pocket hole screws
![clamp table top and secure with pocket hole screws[3]](https://www.myrepurposedlife.com/wp-content/uploads/2018/04/clamp-table-top-and-secure-with-pocket-hole-screws3_thumb.jpg "clamp table top and secure with pocket hole screws[3]")
It’s best to use scrap pieces when clamping a table top so you don’t create divots in your wood when tightening the clamp. I secured the first board to the second board using pocket hole screws. I continued on with each board until all four boards were attached.
![kreg jig clamp[5]](https://www.myrepurposedlife.com/wp-content/uploads/2018/04/kreg-jig-clamp5_thumb.jpg "kreg jig clamp[5]")
Using a face clamp to hold the boards flush helps while securing the boards.
![new kitchen island table top[3]](https://www.myrepurposedlife.com/wp-content/uploads/2018/04/new-kitchen-island-table-top3_thumb.jpg "new kitchen island table top[3]")
I love it! I made this top wider and longer than the original kitchen island table top.
Sand table top
![sand table top orbital sander[3]](https://www.myrepurposedlife.com/wp-content/uploads/2018/04/sand-table-top-orbital-sander3_thumb.jpg "sand table top orbital sander[3]")
I sanded both sides of the table top with 150 grit and 220 grit sandpaper using my orbital sander. A dust brush is really handy to remove all the sawdust.
Stain table top
![ebony stain kitchen island table top[3]](https://www.myrepurposedlife.com/wp-content/uploads/2018/04/ebony-stain-kitchen-island-table-top3_thumb.jpg "ebony stain kitchen island table top[3]")
Wanting a darker finish on the new table top, I chose Minwax Ebony stain. I applied a light coat late in the day and let it dry overnight.
![testing second coat ebony stain[3]](https://www.myrepurposedlife.com/wp-content/uploads/2018/04/testing-second-coat-ebony-stain3_thumb.jpg "testing second coat ebony stain[3]")
I tested a second coat of the Ebony stain on the back of the table top to see if it was to my liking. It was!
![second coat ebony stain[3]](https://www.myrepurposedlife.com/wp-content/uploads/2018/04/second-coat-ebony-stain3_thumb.jpg "second coat ebony stain[3]")
I love that the black stain lets the wood grain show through. Black paint wouldn’t have the same look.
Seal island table top
![wipe on poly kitchen island table top[3]](https://www.myrepurposedlife.com/wp-content/uploads/2018/04/wipe-on-poly-kitchen-island-table-top3_thumb.jpg "wipe on poly kitchen island table top[3]")
Using Minwax wipe-on-poly is not only easy, but it gives a fabulous look to the wood.
Repurposed Window as Cabinet Door
![single pane window as a cabinet door[2]](https://www.myrepurposedlife.com/wp-content/uploads/2018/04/single-pane-window-as-a-cabinet-door2_thumb.jpg "single pane window as a cabinet door[2]")
Now that the table top is finished, it’s time to move onto making a door to cover the knee hole now that the curtain is no longer in use. I searched all the windows I have in storage to find one that was nearly the perfect size. It just needed a few minor adjustments. I removed all the metal parts including hardware. Then I ripped each of the sides (where the ropes were) off using the table saw. I also had to take a little off the bottom to make the window fit the opening.
Paint and Glaze Window (door)
![painting window to use as a door[2]](https://www.myrepurposedlife.com/wp-content/uploads/2018/04/painting-window-to-use-as-a-door2_thumb.jpg "painting window to use as a door[2]")
The white window needed a quick coat of black paint, then a red wash, and finally glazing.
![painting glazing corbels[2]](https://www.myrepurposedlife.com/wp-content/uploads/2018/04/painting-glazing-corbels2_thumb.jpg "painting glazing corbels[2]")
These corbels needed the same three steps in order to get them to match.
![install window as a door for kitchen island[3]](https://www.myrepurposedlife.com/wp-content/uploads/2018/04/install-window-as-a-door-for-kitchen-island3_thumb.jpg "install window as a door for kitchen island[3]")
While installing the hinges on the window/door I had to take it back to the table saw a couple of times to tweak it a little to make it fit. When I got it just right I attached the hinges, and replaced the screws that hold on the table top. I LOVE the new “door” on my kitchen island. This repurposed window is so much better than that old curtain!

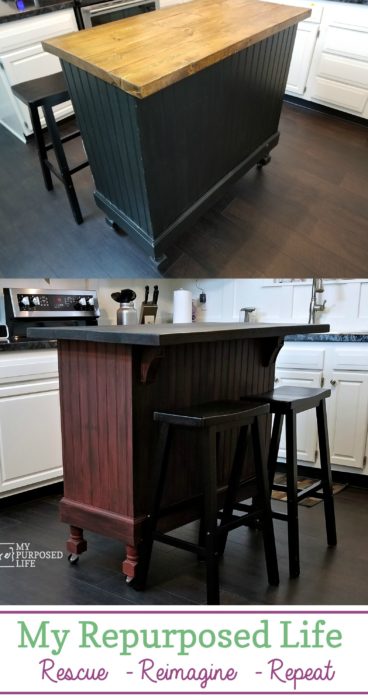
Here’s a quick look at how the island looked before I got started.

Here is the old kitchen island table top. You can see that crack between the boards is a place waiting for crumbs. The little dings are from accidental drilling while I make Etsy signs.

And here’s the beautiful after! You can see how I painted the updated kitchen island here. I love the new top. The color of the island? Not so much! I really wanted the kitchen island to match the repurposed desk t.v. stand. The kitchen island looks more of a maroon color.
Additionally, I will be changing out the knobs to match the handle for the new door. I haven’t chosen them yet. Oh, and some kind of towel bar or hooks for my tea towels. I had command hooks there before. With the longer overhang on each end I think that a small towel bar would be perfect.

Remember, this kitchen island is more like a craft station for me. It was made extra tall so it’s comfortable to stand at while doing crafts or wrapping presents! I’m really enjoying the new size of the island table top.
Still to do on the kitchen island:
- Knobs
- Handle
- Towel Bar
- Repaint (to match t.v. stand)
I hope to get to the finishing touches very soon!
Still to do in the kitchen:
- Build a new table and bench
- Replace counter tops
- Install a new sink
- New back splash
- Patch and paint over microwave
Hi Gail, I love the new kitchen island it looks very posh. Now with all due respect for the tv stand, and I understand the need for some cohesion in the room; I have to say it anyway, don’t change the color, I think it’s gorgeous. Maybe change the tv stand. Ah well obviously the choice is yours. Kudos on the design, I can’t wait to see the finishing touches. 🏆
Eileen,
To each his own, right? I appreciate your opinion and the fact that you feel comfortable sharing it here. 🙂
Stay tuned for more updates . . . someday soon. (I hope)
gail
Beautiful job and awesome tips too!! Thanks for your inspiration!
I love it. The privacy glass in the window is great. I’ve always wondered how people with glass front cabinets keep them neat enough. After 35 years of marriage my dishes and bowls don’t match, glasses are one of that are left through the years. Serving bowls are what I cooked in. Oh, and the new plastic kiddie cups, bowls for my grand toddler. Yea that would make me crazy, and people would say “oh…. what a unique kitchen”. 😊
how awesome! that looks like it will suit u and ur kitchen a bit better. the old top was pretty but this one is fabulous. i love the window door instead of the curtain.
Gail how many inches do you comfortably add for the over hang if you are using chairs? Thank You!
That’s a great question. I actually googled to see what people said before I made my new island top. There are so many variables. For me I had to go with what works for my kitchen (and the island) The island isn’t real deep, so I couldn’t make it top heavy on one side. In addition, there isn’t a lot of room in my kitchen for the extra width.
It also depends on who will be sitting at the “counter” on the “chairs” or “stools”. How long are their legs? Are they just catching a bite, or are they relaxing with coffee and the morning paper?
For me, I just wanted a place to rest my bum for a few minutes should I tire of standing for hours while wrapping presents or working on Etsy signs. I already had these stools, so luckily I didn’t need a lot of room to tuck them under the ledge.
this is what I found. . .
“Stools for raised 42-inch countertops are usually between 28 and 30 inches tall, giving a comfortable 12 to 14 inches of knee room. The recommended counter overhang also varies with the counter height, with experts suggesting 15 to 18 inches for the lower counter and 12 inches for a raised counter.”