Large Coat Rack Shelf
As an Amazon Associate, I earn from qualifying purchases.
I’m in love with this large coat rack shelf! I’m going to show you how to make one yourself.


Using Reclaimed Trim for Large Coat Rack Shelf
 Last week while I was looking for a quick and easy project that I could work on in the basement shop I saw this over sized crown molding I recently picked up at the Peddler’s Mall. I thought it would be perfect for a large coat rack shelf.
 I found two 1×10’s in my scrap pile.
 Checking to see if I like the crown molding I chose.
How to Construct Large Shelf
 I cut the crown molding ends on my miter saw.
Testing Dry Fit
 Here I’m doing a dry fit while holding everything together. I see that I can use pocket hole screws that will be totally covered up by the crown molding.
Pocket Holes
 I used my Kreg Jig Jr and my Ryobi Drill to make a few quick pocket holes.
Need more details on using a Kreg Jig? See my article How to use a Kreg Jig Pocket Hole System
 When I did this dry fit, I realized that I had made the shelf backwards, or upside down. This small piece of crown molding was being held in place, but when I tilted the shelf up, you can see that you could see a hole/gap. I know this might be confusing, but I just want to make sure you don’t make the same mistake.
In this picture the board on top is the shelf, the vertical board is the wall board.
Pocket Holes on Shelf Can Be Confusing
 What I didn’t “get” was that the top shelf, not the wall board needed to be the longer of the two. I’m not sure how I got that backwards in my poor little head. Luckily, all was well, I didn’t even have to remove the pocket hole screws, I just flipped the coat rack shelf around, and the crown molding would still cover up the screws.
 In this picture you can see I had to cut two new pieces (left) of crown molding off the end of the 8 ft. board I had been using. There is no way you should ever try to trim up such small pieces of molding with a miter saw. I always cut the angle on the very end of a long board, then do the straight cut to remove the small piece of molding.
Assemble Large Coat Rack Shelf
 I used Gorilla Wood Glue on the wall and ceiling edges of the crown molding in addition to staples with my Ryobi Airstrike.
 To help hold the small corner piece in place I used a scrap piece of 1x to brace it. The Gorilla wood glue took hold so quickly and secure, that I ended up not using any staples or nails in it. I didn’t want to take a chance on splitting it.
TIP: using painter’s tape will keep my crown molding from being glued to the scrap board should any glue ooze out.
DIY Chalk Paint
 I used some oops black paint and some plaster of paris to make some diy chalky paint primer.
The Pushpin Tip for Painting
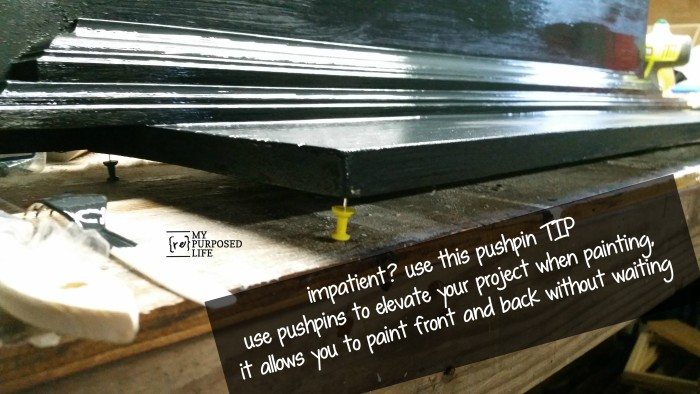 I knew I would not be leaving this black, but I like painting new lumber with a couple of coats of black undercoat so when I distress I’m not revealing the lumber color.
TIP: because I wanted to paint the entire piece, I used pushpins to hold it off the workbench.
 I did two coats of black chalk paint primer. At this point I started thinking about coat hooks and how they will look on the wall board.
Choose Coat Hooks
 I chose to use these hooks from D. Lawless hardware. Because they have the tall top portion, I knew I needed to keep them low on the board so they wouldn’t interfere with the crown molding when hanging items. However, I wasn’t really loving the look of the wall board.
 I went to my stash to find another piece I routinely buy at my local peddler’s mall. It fit perfectly along the bottom of the wall board.
 I cut the trim to size, and secured it with my Ryobi airstrike stapler and Gorilla Wood Glue. Then I gave it two coats of the black diy chalky paint primer.
Paint Top Coat
 I intended to paint this shelf white and distress it like I did the bunk bed coat rack, but instead I went with a light green that I used on this hall tree shelf.
 Because the green paint was so flat, it needed to be sealed. To seal it, I used miss mustard seed’s furniture wax.
Add Heavy Duty D Rings
 I used 2 d-rings on the back on 16” centers so the large coat rack shelf can be hung on studs.
 I brought it upstairs for these final stages….it’s warmer and not so boring—because I can watch t.v. while I work.
 ![]()
Tips for Installing Coat Hooks
 I lightly distressed the paint, and measure and space out the hooks.
TIP: use an emery board for distressing small areas or tight spaces.
 TIP: use felt pads to cover screw tips that are protruding through.
The felt pads will also cushion the wall board against the wall, as well as protect the wall from getting scratched by the screws that were barely too long.
Large Coat Rack Shelf
 Voila! it’s done! As always I staged it on my fence because I have no place to hang it on my wall and the lighting is awful indoors.
 The measurements of my shelf were determined by my scrap 1×10’s. The longest board (top shelf) is 43 3/4”. The other 1×10 (wall board) is 37 1/4”. The crown molding length is determined by your 1×10’s. The shorter end of the crown molding is 37 1/4, with the longer edge being 43 5/8 (coming just to the edge of the top shelf) The small end of the crown molding extends 3”.
The small trim on the bottom is also 37 1/4”
 You can see this shelf would work great as a bathroom towel rack shelf.
 It would work equally well for a mudroom shelf coat rack.
On Second Thought . . .
Okay, in keeping it real, I must tell you that I’m not totally loving this project. I was loving it until I wrote this blog post. The shelf looked great “in real life”, but after looking at all of these pictures, I can see something is amiss. I think perhaps it is the crown molding I used. After studying the pictures, I believe the length of the crown molding board should only come to the width of the wall board. Does that make sense? In my defense, I’m not sure that this crown molding would actually work that way. Do you see it? the wall board should extend over a few more inches.
Maybe the title of this post should be “how NOT to build a crown molding wall shelf”.
Oh well, it’s still very functional. ![]() And… it’s proof that I don’t always know what I’m doing, and maybe I should learn to draw out plans or something. heheheh
And… it’s proof that I don’t always know what I’m doing, and maybe I should learn to draw out plans or something. heheheh
Even so—hopefully your learned a few tips.
gail
Looks good to me! I love the color!
I see what your saying, as long as it works its good. You can’t be happy with everything you do. Take care have a happy warm week.
love and pinned!!
I agree with Julie, you are too hard on yourself! I like it, it is unique, and your miter cuts are perfect! I am impressed, mine never seem to fit exactly right… When I first saw the photos I thought, surely this was not the fail she was talking about! You staged it so perfectly and it would look beautiful in any home! Adding the bottom trim was a smart move it ties it to the crown moulding and makes it look complete. Great Job Gail, I think it was a win, not a fail!
I think it’s unusual, but that is part of the appeal!
I think this looks beautiful and well crafted. Aesthetically, if placed on a wall with nothing underneath, the board with the hooks should be a as wide as the shelf. However, this would be great as-is with a longer bench underneath. Then, the shorter board adds dimension and interest. I love it!
Quick question: is there a benefit to using chalk board paint as a primer as opposed to other kinds of primers?
Catherine,
Thanks for that great tip about the design of this shelf. I’m soooo not a decorator. 😉
I don’t use chalkboard paint, I mix my own chalk paint instead of buying the high priced quarts that are readily available online and in stores.
Adding Plaster of Paris to latex paint makes it very flat–perfect for use as a primer. The benefit is you can get the color you want. Say you wanted to paint a piece RED, mix a little diy chalk paint as a primer, do 2 quick light coats (it dries VERY fast) then use THAT same paint as your top coat. it’s a win/win
gail
You are too hard on yourself… it looks beautiful and looks like it’s been around for many years.
Love this coat rack shelf and the color you painted it!
I don’t think the shorter wall board takes away from this project at all, but I get where you’re coming from; I do lots of projects that I would change in hindsight after they’re done. Once again, you’ve made something that’s so versatile and useful. I love that pretty shade of green and the way the dark hooks complement the distressed black. I can never get my head around miter cuts at all. It’s hard!