Home » DIY » Build It » Large Rustic Clock

Large Rustic Clock

As an Amazon Associate, I earn from qualifying purchases.

You know the phrase “copying is the highest form of flattery”? Well it is true, and my Large Rustic Clock is proof.
My compliments go to the person who designed Pottery Barn’s Rustic Wood and Iron Clock, because I think it is awesome. In fact, I loved it so much that I decided to make my own, but on a much larger scale.
MyLove2Create, Large Rustic Clock


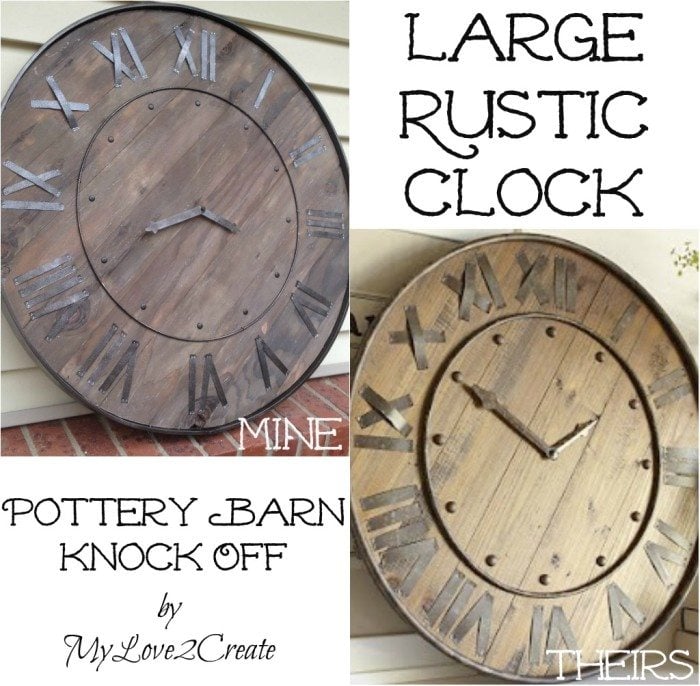
It is not exactly the same, but it totally filled my need for a large rustic industrial clock, and it works! My kids were pretty amazed that it actually tells time, funny. 🙂

MyLove2Create, Large Rustic Clock

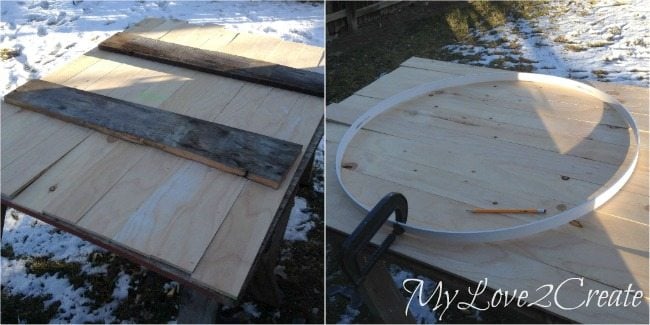
I started with some wood that I had gotten from the cull bin at Home Depot years ago. (mine doesn’t have a cull bin anymore, boo!) It was 1/2 inch plywood that I had ripped down into 3 1/2 inch strips. I used some of this plywood for my plank wall in my master closet makeover. I decided to just use scrap barn wood for the back and glued and nailed all the plywood together. I later went back and screwed the boards on.

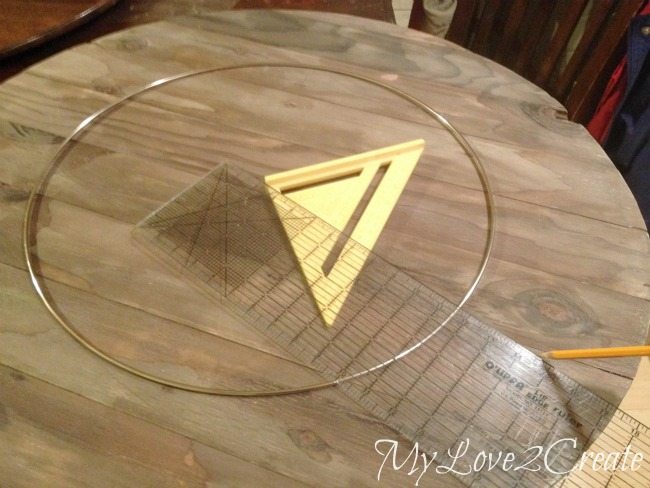
In the photo on the right I measured my circle. What is that I am measuring with you ask? It is PVC Lattice in white and it is 8 feet long just under 2 inches wide, and really bendy. Which is why it was perfect for my faux metal band. I didn’t cut it at all, which gives an idea of how big this clock is. Since it will be the outside of the clock, it made since to use it to trace my inner clock circle.

MyLove2Create, Large Rustic Clock

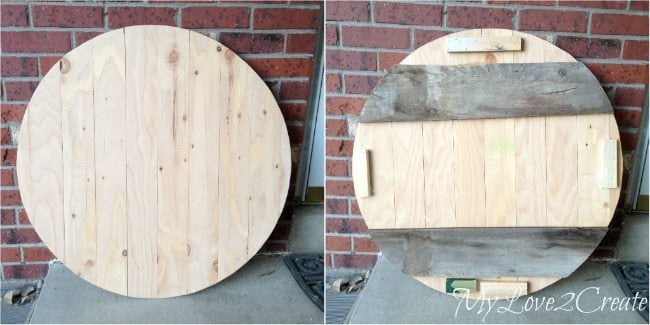
After cutting my circle with a jigsaw, sanding it, and adding a few more support boards, I was ready to make a clock!

MyLove2Create, Large Rustic Clock

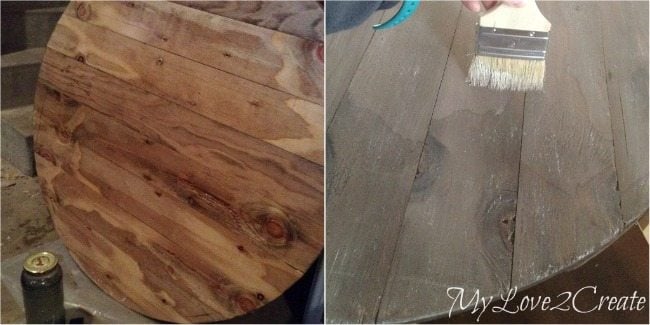
I used my “natural stain” which is 0000 steel wool and vinegar in a jar that has sat for at least a day or two. Then to give it a little more “old wood look” I dry brushed on some white paint very faintly.

MyLove2Create, Large Rustic Clock

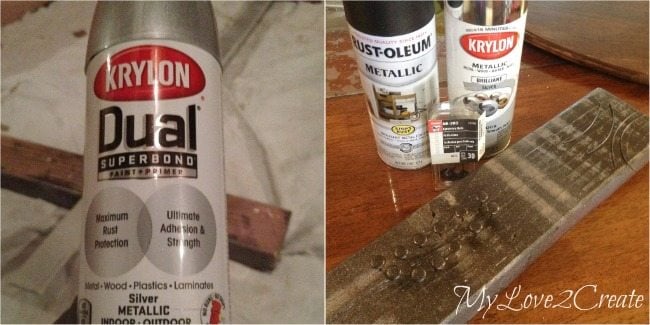
I set to work spray painting my “metal band” with Krylon dual superbond. I knew this would ensure I wouldn’t have any PVC lattice poking through my faux metal. Then I gave my lattice and carpet tacks a coat of oil rubbed bronze and then a light spritz of metallic silver. This was done from really far away it kind of gives it a hammered look but without the texture.

All this spray painting was done in 30 degree weather in my garage…I know, but it was sooo much faster to wait for the cold weather dry time rather than painting all these small pieces by hand. I kept my spray paint inside except when I was using it, and it worked like a charm.

MyLove2Create, Large Rustic Clock

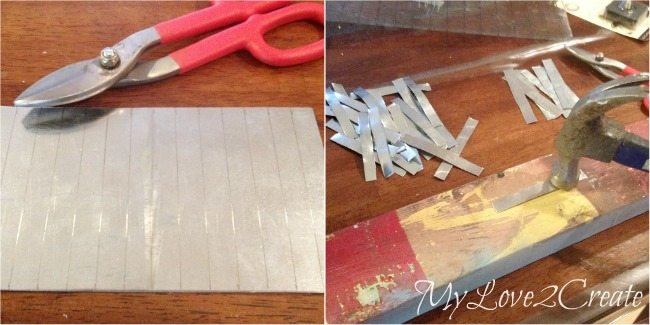
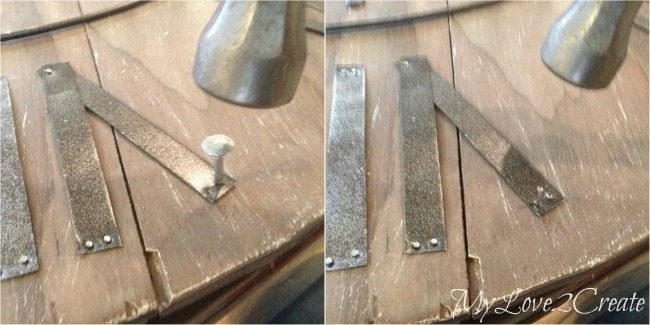
I happened to have some small scraps of sheet metal around from another project and used it to make my roman numeral numbers. I cut them in strips with tin snips, each strip was 1/2 inch wide by 4 inches tall. I used a hammer on a board to flatten them out. Then I used the same spray paint method as above.

MyLove2Create, Large Rustic Clock

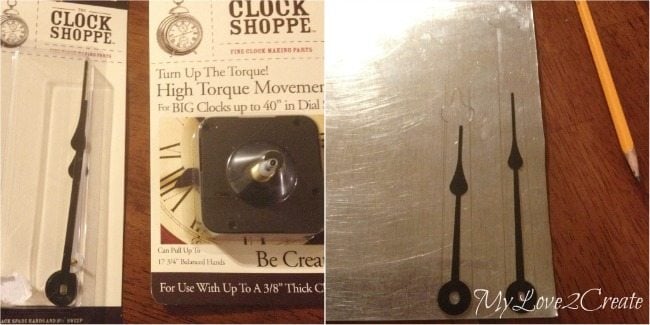
I did go to Hobby Lobby and purchase clock gear, and used a 40% off coupon. I also bought the big metal ring that is in the center of the clock at Hobby Lobby. The PVC lattice I got at Home Depot. Everything else I already had on hand so this clock was around $20 for me. Not bad for a Pottery Barn Knock Off!

In the photo on the right I am measuring the clock hands on the metal. I originally had them longer, which is how I wanted them, but my High Torque Movement wasn’t as “High Torque” as expected and I had to cut them down…

MyLove2Create, Large Rustic Clock

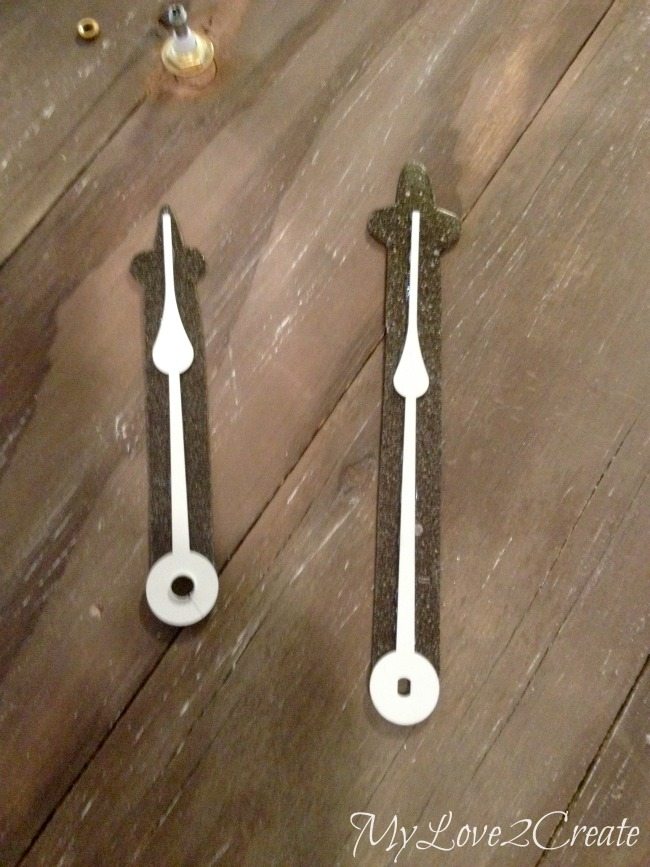
Here I am attaching them with hot glue to the original hands. Too bad I had to cut them, they looked way better longer. Oh well. Sorry for the blurry picture, when I get in project mode I forget to check if my photos are good.

MyLove2Create, Large Rustic Clock

I measured and marked the center, and also the placement for the metal ring. In the photo I am marking where the Roman Numerals need to go, by measuring every 30 degrees from the center. This is my least favorite part, because it needs to be pretty accurate, and that takes time, so I was happy to be done!

MyLove2Create, Large Rustic Clock

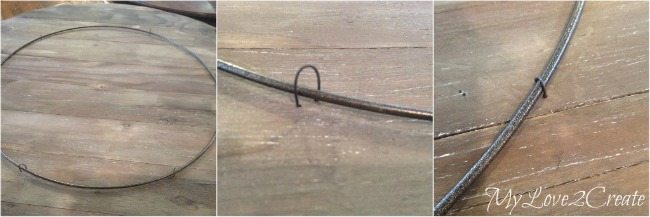
To attach my ring, I hammered in some nails to make holes and then added wire to hold it in place. I simply twisted the wires together in the back and it is nice and secure.

MyLove2Create, Large Rustic Clock

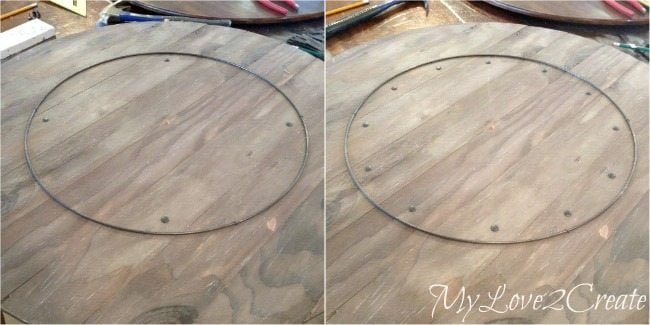
Then I added my carpet tacks for the hour markers.

MyLove2Create, Large Rustic Clock

I used a big nail to puncture the metal for my numerals and then used my smaller nails to hammer them onto the wood. This took a while, most went in easily, but the knots in the wood really gave me some trouble in several spots.

MyLove2Create, Large Rustic Clock

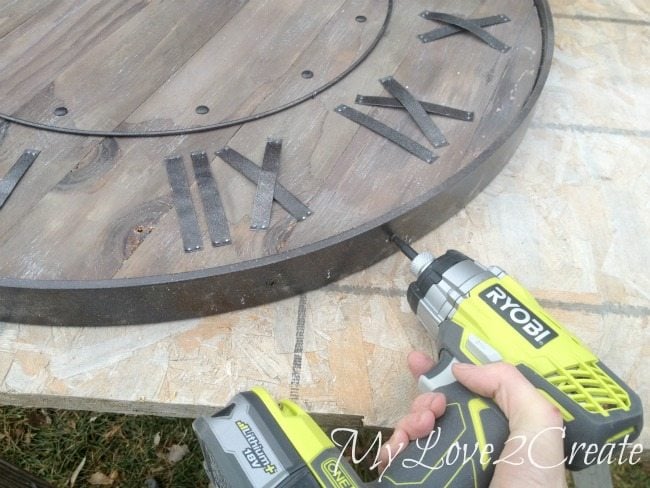
Last up was attaching my faux metal band. I used a nail gun to hold it in place and then used screws to secure it. I had to touch up where the nails went in, but that was easy. I filled them with wood filler, then just sprayed oil rubbed bronze onto some newspaper and quickly used a small paint brush to paint the holes.

MyLove2Create, Large Rustic Clock

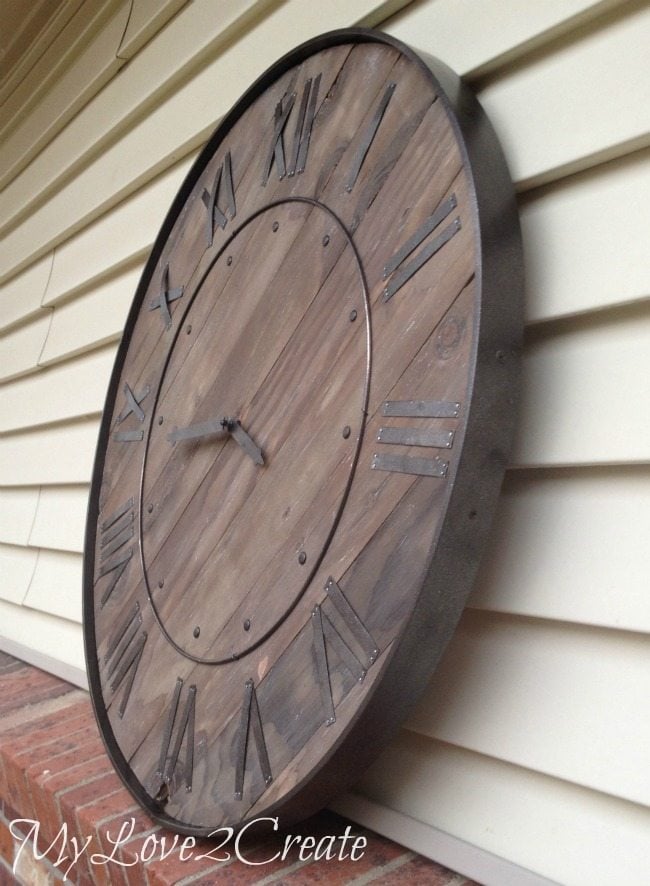
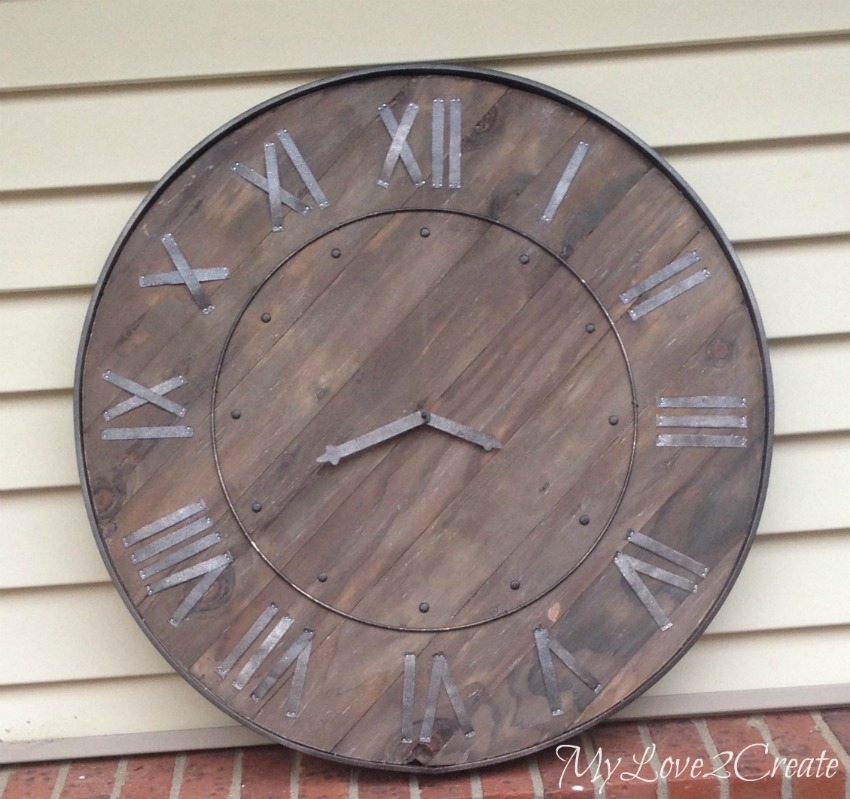
So does it look like a metal band to you?

MyLove2Create, Large Rustic Clock

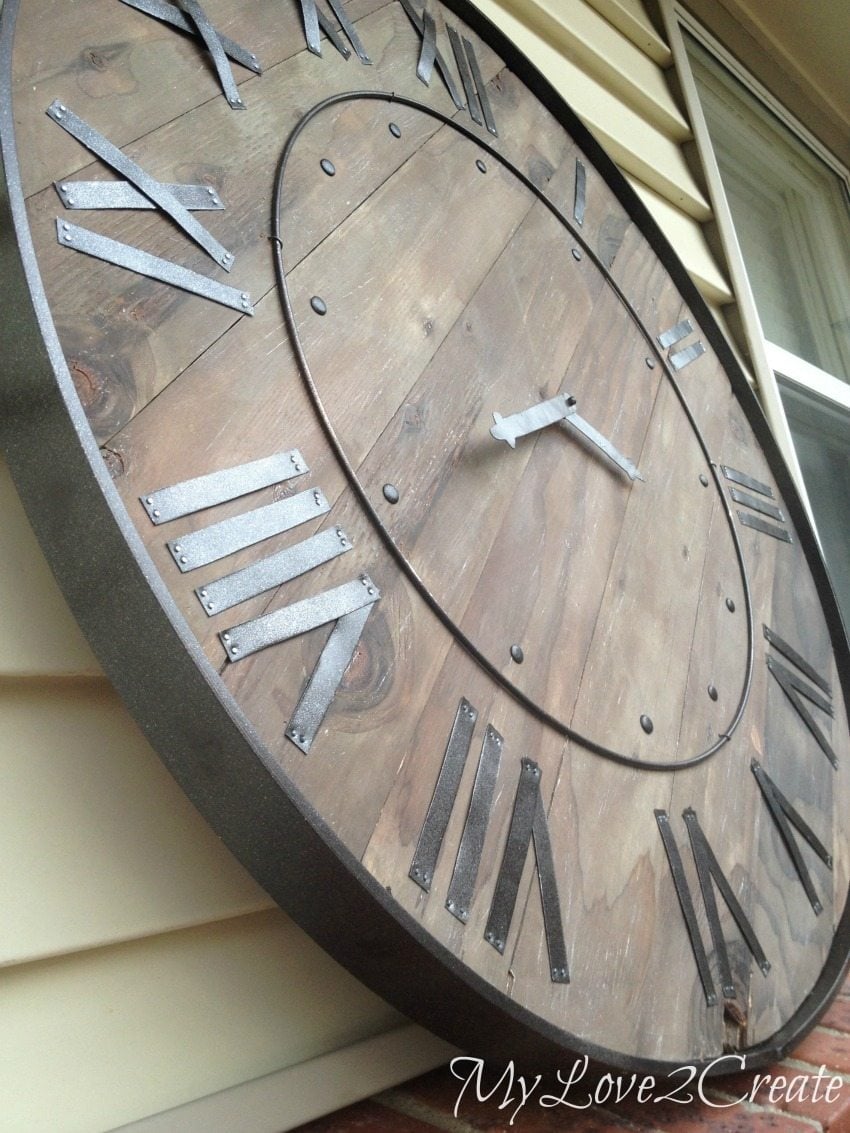
It is close enough for me! My husband said that he thought it was metal, which made me happy.

MyLove2Create, Large Rustic Clock

I have to be honest, this looks way better in person. Just sayin’.

MyLove2Create, Large Rustic Clock

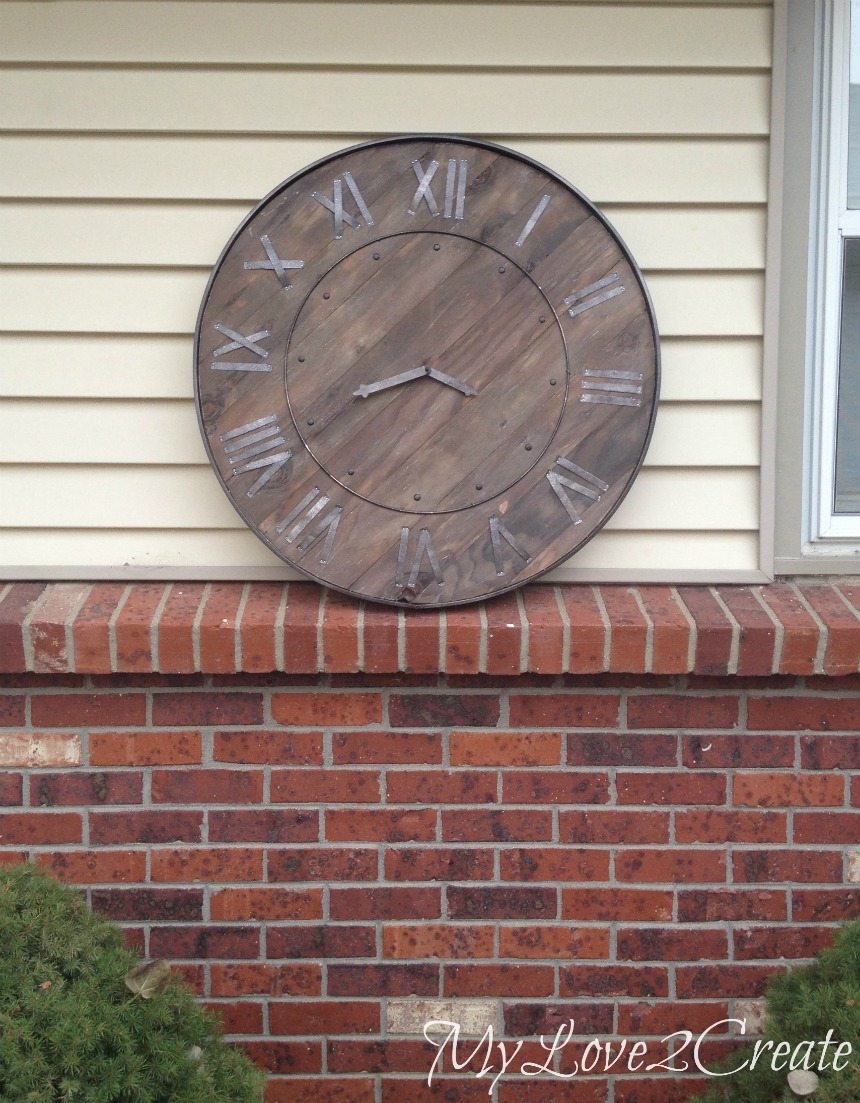
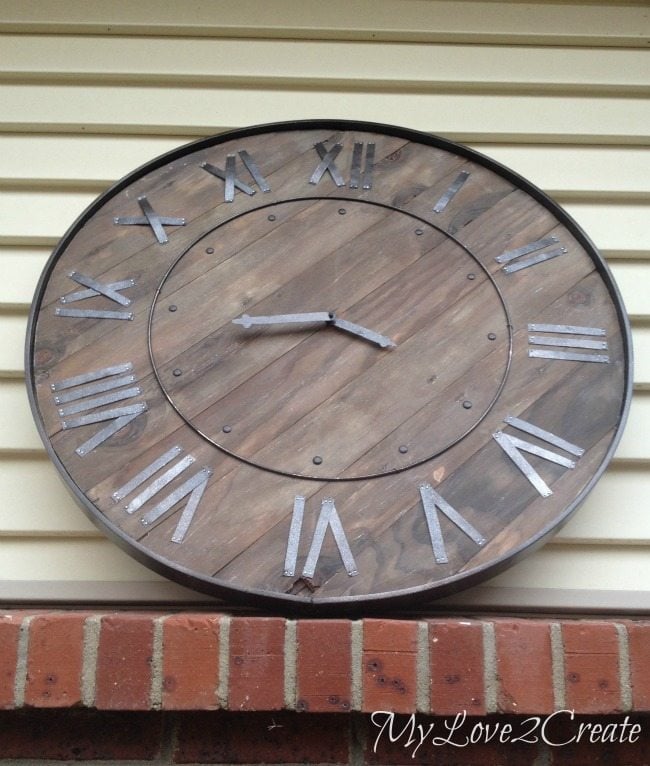
It looks so small staged on my house, but it is approx. 32 inches tall and wide.

MyLove2Create, Large Rustic Clock

I can’t wait to get it hung up on the wall! Eeek!

I love it, even if the hands are smaller than planned. 🙂  I guess I can’t get everything I want…

If you like knock off projects then come check out my Restoration Hardware Chalkboard and my Pottery Barn “It’s the Most Wonderful Time of the Year Sign”.

Happy Holidays!

Mindi

Sharing here:


see more of Mindi’s posts on MRL below:

[categorythumbnaillist 274]

60 Comments

  1. I’m just finding this amazing clock you’ve made – I’m not sure if you’ll see my post – How did you get the ends of the PVC to stick together? Thank you!

    1. The band is attached all the way around the outside of the “clock” with a nail gun and screws. So just tack each end close to the edge, voila! You have a faux metal band. I hope that helps!
      This was my friend Mindi’s project. She’s pretty brilliant, eh?
      gail

  2. My experience with pvc lattice is that it expands in the summer and shrinks in the winter. Now that your clock has seen the test of time has this been a problem?

  3. I went shopping today. Found the PVC board at Lowe’s with the doors. Had to ask to find it. Found the metal ring at Hobby Lobby by the wooden letters and other crafting things. Found a small piece of steel sheet metal at Lowe’s too. Steel is cheaper than aluminum. Found small nails and carpet racks at Lowe’s too. Went to our antique store that has salvaged wood for the wood base. Oh and the clock parts at hobby lobby. You might have to ask but everything is out there at Hobby Lobby and Lowe’s. Can’t wait to get started.

  4. HI – love your site!! Do you need different sized clock parts, depending on the actual size of the clock? Like one this big as compared to one that is, say, 1 foot across. I have tried googling the questions but am not getting good information! Thank you!

  5. Question about the spray painting, can you be more specific with what you did for the band versus all the other parts of the clock? Confused if the numerals are just silver or a mix.
    Thanks!

    1. Hi Nicole! Great question, I used oil rubbed bronze spray paint on both. For the band I completely covered it with the spray paint, for the numerals I sprayed from far away with the spray paint can, enough to almost cover them. I liked the speckled look it gives to see some of the silver…but that is just personal preference. I hope that helps!

    1. Stephanie,

      I think they’re called “wire nails”, you can probably find them near the picture hanging supplies at your local hardware store.

      gail

  6. Easier way to mark where the numbers go is to put the movement in and set it to 12 and the move the minute hand around an hour and mark the hour hand at 1, then move the minute hand and mark 2, and continue on for the remaining hours.

  7. I went to Lowes this evening and found the peice for the outside band. It was in with the interior resin moldings (resin chair rail, etc.) Hope this helps someone. Cheers ya’ll!

    1. Just wanted to add that I also found this white lattice piece (outside band of clock) at Lowe’s just this week in case anyone is looking. 🙂

  8. Still on this PVC thing…I looked on Home Depot website and all i find in lattice is end cap and divider and those are only 48 in and are not flat…Anyone find this?

  9. This pvc lattice is a mystery to all the home depot employees…we looked at every piece of plastic type 8 ft pieces and did not find what you used…maybe a close up of the piece would help or a sku number…Really cannot find this stuff…please help
    Thanks

    1. I have found that pvc lattice before. I used it as baseboard in a wet space. I believe i found it with the non-wood baseboard molding “Lumber”. I remember being surprised that it was called lattice board.

  10. Oh my goodness! Thank you so much for sharing this. Our 5th anniversary is coming up and I wanted to make my husband something out of wood that we could share in our new home. This went perfectly with the wine bottle vases and cork candles I had already finished to decorate the mantle. I wish I could post a picture of my results here because (if I do say so myself) it’s FABULOUS! THANK YOU!

  11. Hi Mindi!

    I read that you bought the clock parts at Hobby Lobby, but the hands too? I can only find flimsy hands they sell at Hobby Lobby; the ones you glued hands to look more sturdy. Did you buy them at Hobby Lobby too? Thanks! Awesome clock!

  12. Where did you get the PVC white lattice you used for the outside of the clock? I can’t seem to find it at Home Depot or Lowes. They do have some but it has holes all around it. Thanks Linda

    1. Hi Linda, I actually found the PVC lattice in the very back of the store kind of past where all the moldings and trim are, I would start there and then ask. It should be in the trim/moldings area somewhere, in the plastic section…I hope that helps, good luck! Oh, and I found mine at Home Depot.

  13. I love this idea! It’s not question. But very difficult to buy anything about this project.
    I would like to ask, where can I bay faux metal band? I didn’t see any metal ring in the hobby lobby….
    So, now I’m so disappinted. I really love this clock. Any idea?+

  14. You sure hit the nail on the head with this one! It is now on my project list. Thanks for the DETAILED instructions. As I read, you answered every question that came to mind. I can’t wait to get started!

  15. Absolutely love the idea. I’ve made square and rectangular shaped clocks before for Xmas presents. Now I’m really thinking of making this for my mom for mother’s day. She has an outstanding back deck, and I think this will go great!

    I am concerned about how I would hang this, though. It seems quite heavy! Any tips?

  16. AHH I heart this! I have the top of a pallet that I am turning into a clock. I dont know if I will be able to think of things now after seeing this lol.
    I hope you had a great Easter!! I pinned and shared this!
    Jess

  17. Wow that looks fabulous. I enjoyed seeing a clock kit… I didn’t know about such. I have a large broken clock I picked up for free. Now I know I can repair it and update it. I’m glad you posted

  18. My wife sent this pin saying that she loved it so I set to work. I really appreciate the step by step instructions. Made this a pretty simple yet awesome project! I can’t figure out how to add a picture to the comment or I would post one. Also I made mine from pallet wood and some scrap sheet metal so I have only about $30 in it (although I feel the hands are a bit small on mine.) Thanks again!

  19. Hi Mindi!
    Love what you have done here! Would you mind letting me know the measurements of your clock hands? I’d like to see if I can find some larger ones, but having a reference number would be helpful. Thank you! And again, love your work!

  20. The Honey keeps telling me he’d like a big huge clock! I really need to get off my B…ehem, back-side and make one of these! You make it look so easy. 🙂
    Nice knock-off Mindi

    Merry Christmas to you!
    And Merry Christmas to you too Gail!
    I know I’m late… but, well, Gail, you know how I procrastinate. 😉 Patricia

  21. I love your “Pottery Barn” clock. I have huge walls that need HUGE pieces so I’m thinking I’ll flatter you by copying your clock. Any other ideas on bigger clock hands, after you’ve done it?

  22. Your copy cat rustic clock is amazing. I have been wanting to make a feature clock for my house. Thank you for sharing your talent with the world.

    Mei a.k.a. The New Vintage

  23. I have 2 questions
    1. Is the pvc piece you used perfectly round?
    2. How wide is the diameter of the metal ring? I am working on a project that requires 2 rings of 26″ diameter. Having a hard time finding what I need. Can you suggest anything?
    Thank you,
    Kristen

    1. Hi Kristen,

      The PVC piece is a long straight piece that I bought at 8 feet long. I just clamped it together at the ends and it made a circle. It looked good to me but I couldn’t guarantee that it is perfect. 🙂 I used it to trace my clock size and then nailed and screwed it around the clock (see post for details). As for your second question, the metal ring is 19 inches wide, it is the biggest one I could find at Hobby Lobby. I am not sure where you could get one bigger, but you could use the PVC Lattice to make 26 inch circles, although it might be hard for them to keep their shape without attaching them to something, so you would have to think of a way to secure the end pieces to keep it a circle. I guess it depends on what you need your rings for. I hope that helps!

      Mindi

Leave a Reply

Your email address will not be published. Required fields are marked *

This site uses Akismet to reduce spam. Learn how your comment data is processed.