• Skip to primary navigation
  • Skip to main content
  • Skip to primary sidebar
  • Start Here
  • Shop Favorites
  • About
    • Welcome To My Repurposed Life Home of Repurposed Furniture
    • More About Gail
    • Disclosure
    • Privacy Information
  • Gallery
    • Repurposed Furniture
  • Repurposed Items
    • Building Supplies
    • Miscellaneous Household Items
    • Picture Frame/Chalk Board
  • DIY
    • Home Reno
    • outdoor living
    • Painting
    • Shop Talk
    • Tips for Around the House
    • Build It
      • Furniture
      • Home Decor
      • Storage
    • Crafts
      • Dollar Store
      • Easy
      • Holidays Seasonal
  • Furniture
    • Chair
    • Desk
    • Dresser/Chest
    • Headboard | Bed Parts | Cribs
    • Kids Furniture
    • Table
    • Kids Furniture
My Repurposed Life® Rescue Re-imagine Repeat
menu icon
go to homepage
subscribe
search icon
Homepage link
  • About
  • Start Here
  • Project Index
  • Furniture
  • Subscribe
    • Email
    • Facebook
    • Instagram
    • Pinterest
    • RSS
    • Twitter
  • ×

    Home » Repurposed Furniture » Night Stand Makeover

    Night Stand Makeover

    Published by Gail | Published March 28, 2014 | Updated March 8, 2022
    As an Amazon Associate I earn from qualifying purchases.

    Pin
    Share
    Tweet
    My Love 2 Create does a fabulous job showing you exactly how to do a night stand makeover, including adding some great mid-century-modern legs.#MyRepurposedLife #MyLove2Create #upcycle #repurpose #nightstand #mcm via @repurposedlife

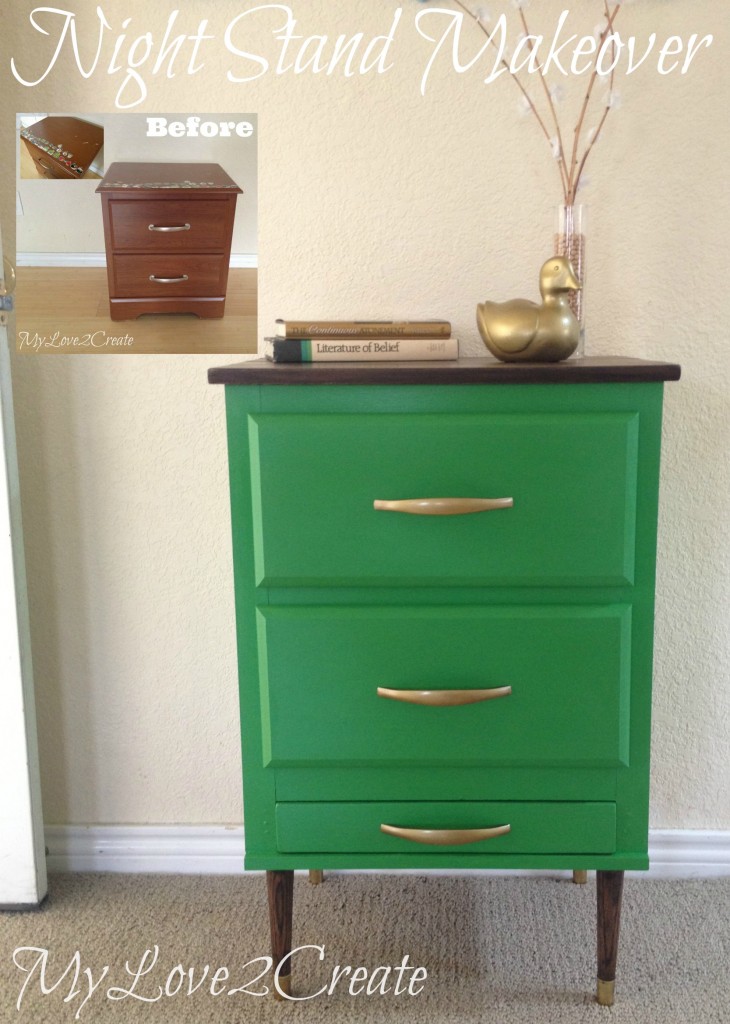
    Hello everyone! Today I am sharing a fun Night Stand Makeover.

    Night Stand Makeover after
    Night Stand Makeover

    So...

    Cheap Night stand before shot
    Free Night Stand

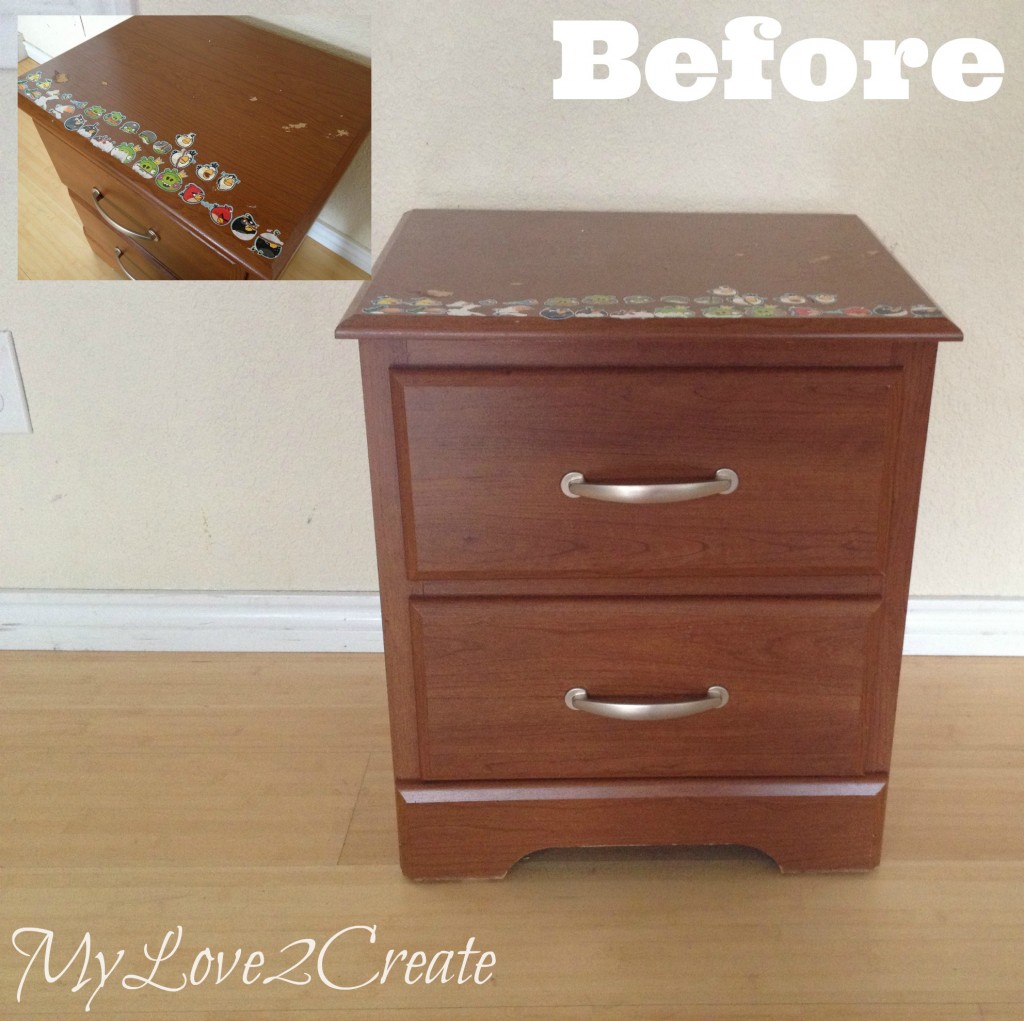
    This was a free find that I got on Free Cycle, you can google it for your area, it is a great way to get rid of free stuff and receive it. This night stand was in great shape except for the stickers on the top. Even though it is made from mdf, I knew I wanted to make it into a statement piece.

    Pry off bottom trim on night stand
    Prying off trim

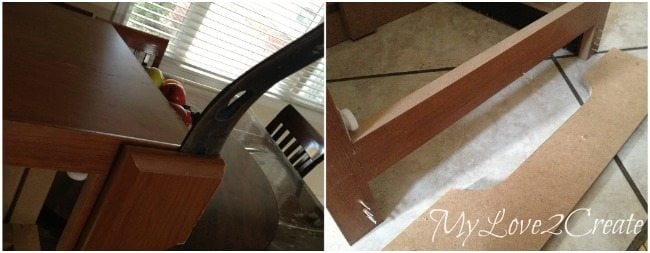
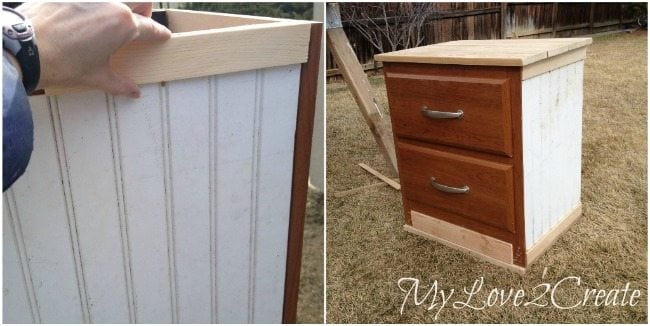
    I started by prying off the bottom trim. It wasn't too hard with a crowbar, but it left some lovely staples that I had to deal with.

    Roybi Multi tool to cut off metal
    Cutting off staples

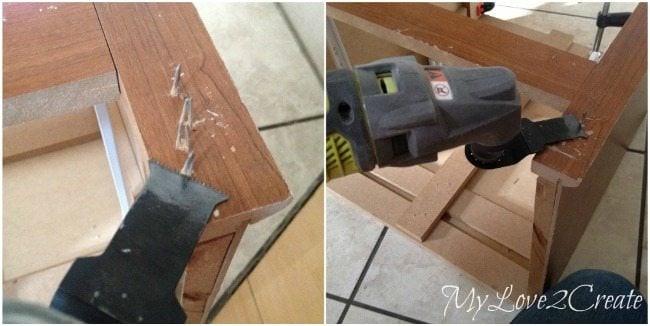
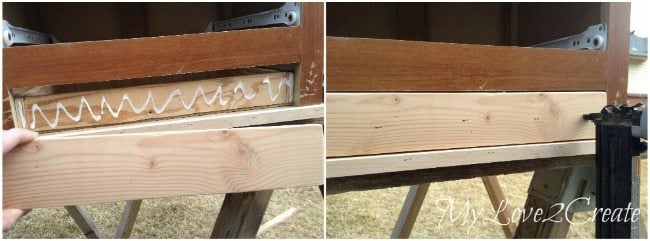
    I am always excited to use my new tools and I quickly grabbed my Roybi multi tool to do the job. Once I removed the staples I noticed the front trim had a lip on the side, so it didn't sit flush with the side piece. See it in the photo above on the right? That meant I really couldn't add different trim all the way around, but just to the front again....hmmm. I usually just wing things as I go and that is what I was doing here. I noticed when the trim was off that there was a nice space now maybe I could add a drawer?

    Drawer made from scraps
    Building Drawer

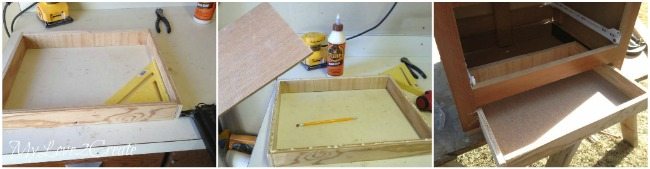
    So I went to the shed and found scrap pieces of plywood left over from cutting my Drawer Fronts in my Master Closet Makeover. I built a simple box with Gorilla Glue and nails from my nailgun. I had a thin piece of wood left over from the back of a hutch, that I cut to size for the bottom of the drawer. When that was attached I tried it out in the night stand, it fit perfect.

    Adding trim to bottom of night stand
    Adding Trim to bottom of Night Stand

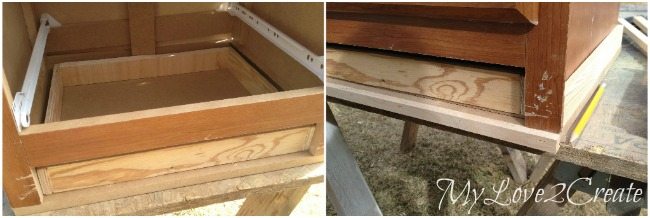
    You can see I left a space for a drawer front, I decided to put a small scrap piece of wood for some trim on the bottom so the drawer front wouldn't look funny with out some kind of bottom support. I just glued and nailed it on. But wait? Did you notice the night stand now has a bottom piece? Let's back up a bit.

    The top of the night stand now becomes the bottom
    Top of night stand now becomes the bottom

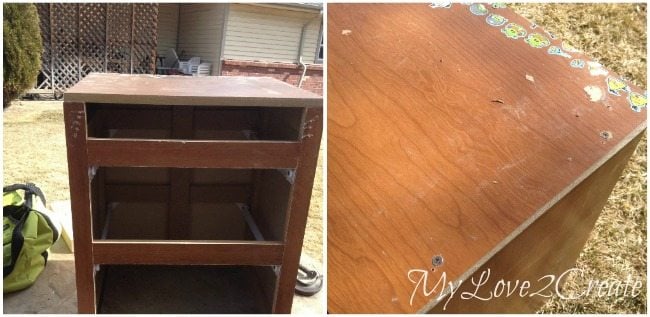
    I unscrewed the lovely stickered top piece and removed it and as I was doing that I realized that I would need a bottom piece if I was going to install a drawer, so I cut the top piece to size and glued and screwed it on to the bottom of the night stand! Sa-weet.

    Easy way to add a drawer front
    Adding a drawer face

    Ok, back to the drawer. To add the drawer face I did it the easy way. Put glue on the drawer front, position the drawer face where you want it and hold it there while you nail it on. Easy!

    Making a plank wood top for a night stand
    Making a plank wood top

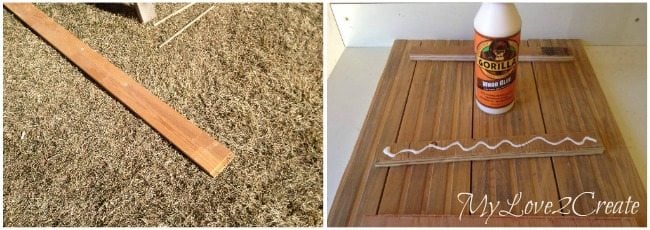
    Since I took off the old top, I need to make a new one. I decided to use this scrap piece of flooring I had picked up at some point. Garbage to someone but a treasure to me. It is beautiful wood. I needed at least four pieces to cover the night stand, so I cut them to the right length. It would be a little too long so I cut one of them with a jig saw, since I don't have a table saw. You can see it above, it is not as wide as the others. I used scraps to glue and nail on the back to attach them all together.

    Use scrap wood to attach planks
    Nailing on scraps to attach wood, and trimming back.

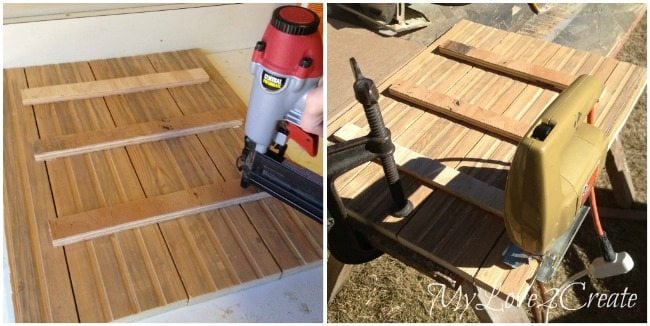
    After I nailed on the scraps, I wanted to clean up the back edge I cut so clamped it down and trimmed it again with the jig saw. I should have waited to cut it this way in the first place. Live and learn!

    Glue and nail on bead board
    Adding Bead board

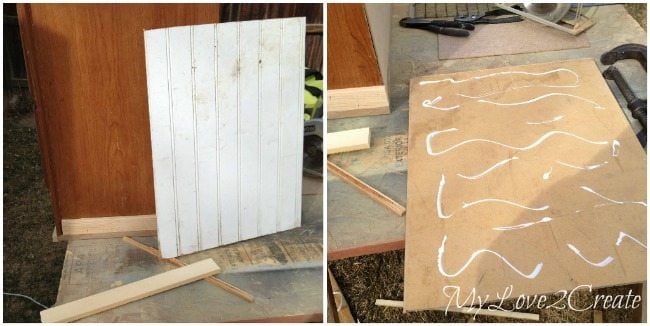
    While I was in the shed I noticed that my scraps of bead board left over from my desk hutch makeover, might fit the sides of the night stand. Yep! I only had to trim them just a little to make them fit. I grabbed some scraps and cut them to the right length, and nailed one on the bottom. Then I added some bead board, using just glue and nails again.

    Adding bead board and trim to night stand
    Adding top trim

    Last I added the top trim piece. I think this scrap wood was a stake or something, it had a tapered end, and I had a few to cut up. Here is the night stand with all the additions, I just placed on the top at this point to make sure it would fit.

    Vintage feet
    Free Vintage Feet

    Check out these feet, awesome!! Yes they were free! Short story....About a year and a half ago I went to pick up some free scrap wood from someone that was moving and getting rid of it. I was excited because they had mentioned it was from a wood worker, which is always something I perk up at. It means good wood. When I got there I grabbed tons of good scrap wood. The whole front yard was covered in stuff, the girl said I could have anything I wanted because it was all going to the junk yard. After some digging I found several treasures, including a box full of feet/legs, these were in that box. I was so glad I took the time to search, it was so worth it.

    Steel wool to buff metal on vintage feet
    Sanded feet and starting to buff

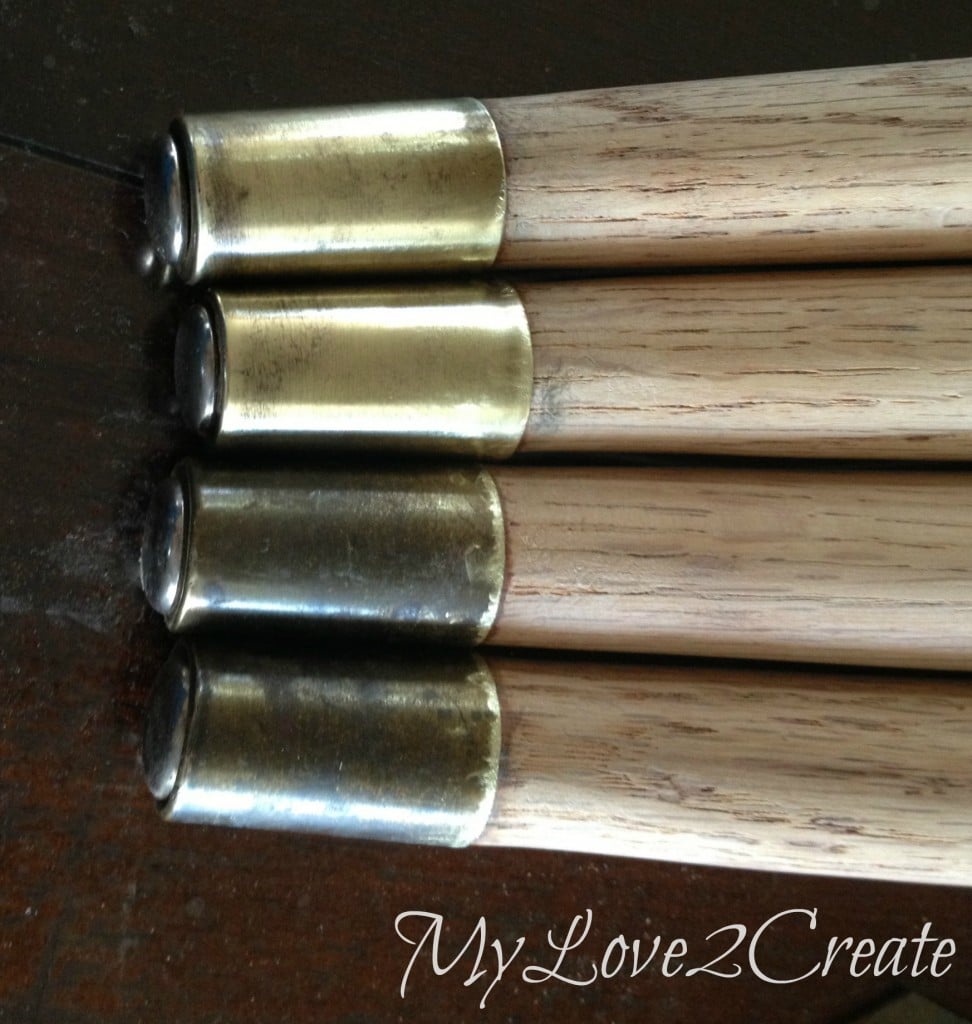
    I wanted to stain the feet the same as the top so I sanded them down, and then used 000 steel wool (because that is what I had) to buff the metal parts of the feet. You can see I have two done in the above photo. I choose not to polish it too perfectly, I like it looking a little rustic.

    Pre condition wood before staining
    Pre condition wood before then stain

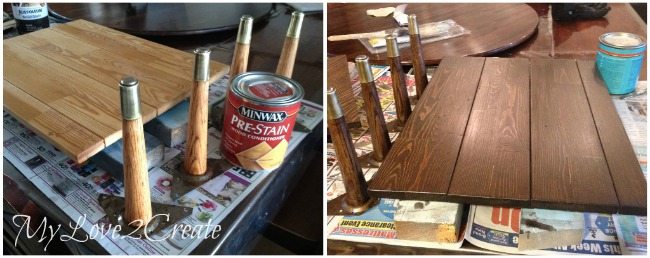
    I have found that I never regret using pre wood conditioner before I stain. It helps the stain go on evenly. I used Rusteloum's Kona, for the color, I have an obsession for dark stained wood. I finished it off with 3 coats of poly, sanding with 400 grit sandpaper after coats 1 and 2.

    Spray paint handles Gold
    Spray paint handles Gold

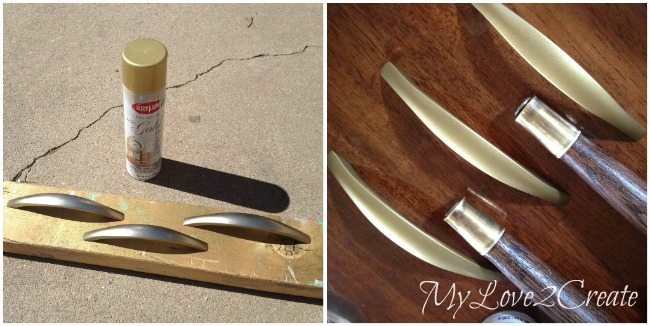
    For handles, I found these in my stash. I can't help collecting them when I find them at thrift stores for cheap, these were in a set of 5 handles for $2. I decided to try matching them to the feet, and I had this gold spray paint. It was a pretty close match, but I need to rustic them up a bit...

    Adding Stain to gold handles
    Adding Stain to gold handles

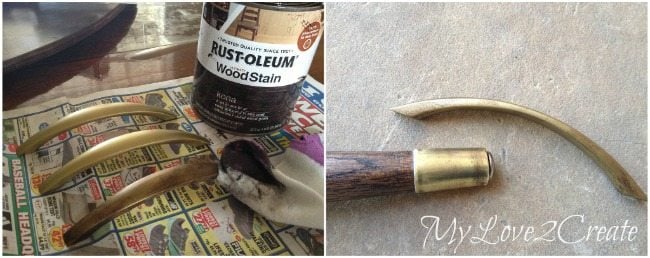
    So, I got out the stain and rubbed them down, let it sit for a minute or so and then rubbed off most of it. It worked! I sprayed the handles with a clear coat so the stain wouldn't rub off.

    Prime and paint
    Prime and paint

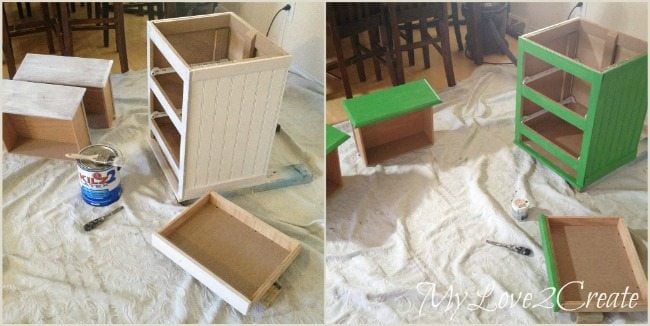
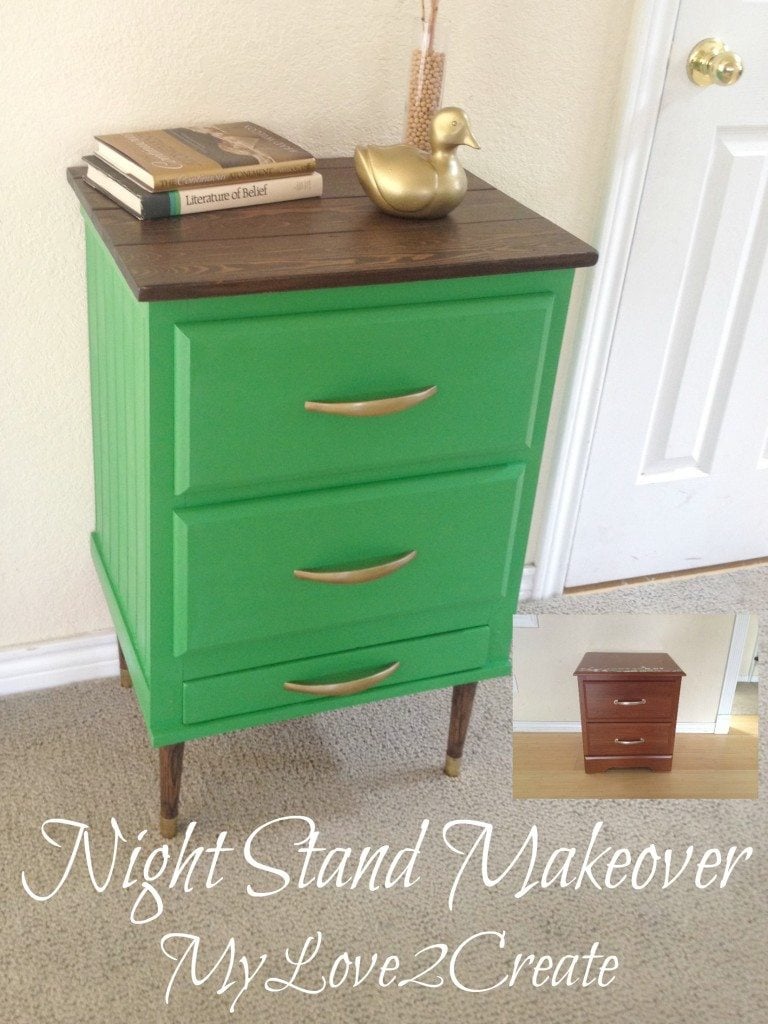
    I decided to go bold with this piece. It seems like I always pick the same colors. I have seen the Sherman Williams Envy on a few pieces of furniture on the internet and loved it. So I gave it a try, I primed first, then did two coats of the SW Envy. It is totally fun, and I am glad I tried it.

    Screw on top and legs for night stand
    Attaching feet and top to night stand

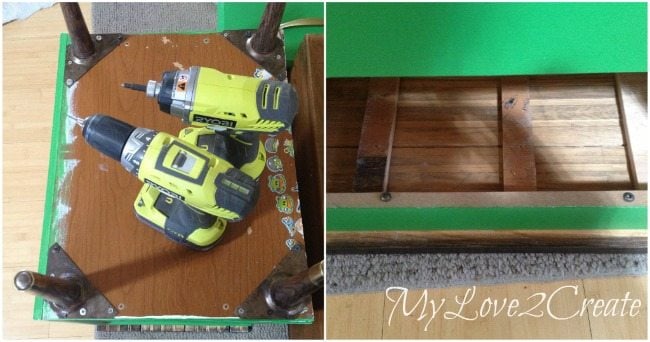
    To finish I used small screws to add the feet, pre drilling first. To attach the new top  I used the same screws that were used for the old top.

    Night Stand Makeover after
    Night Stand Makeover
    Night Stand Makeover after
    Night Stand Makeover

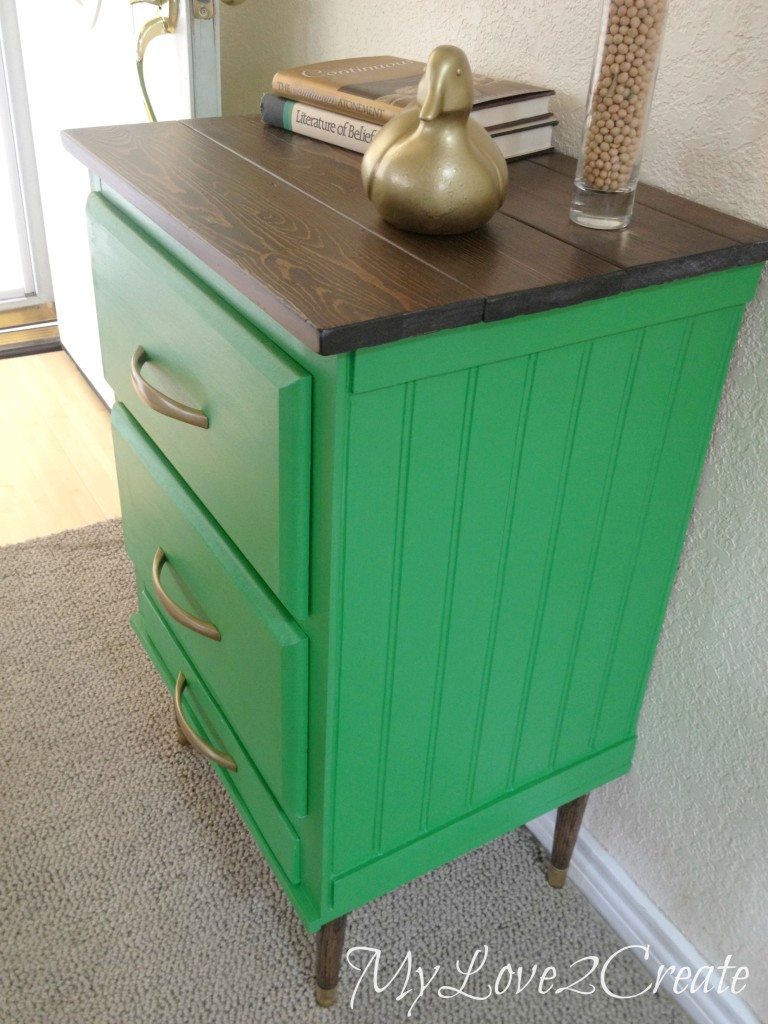
    The bead board really adds a nice touch, it is a fun way to fancy up a piece.

    Stained wood top
    Stained wood top

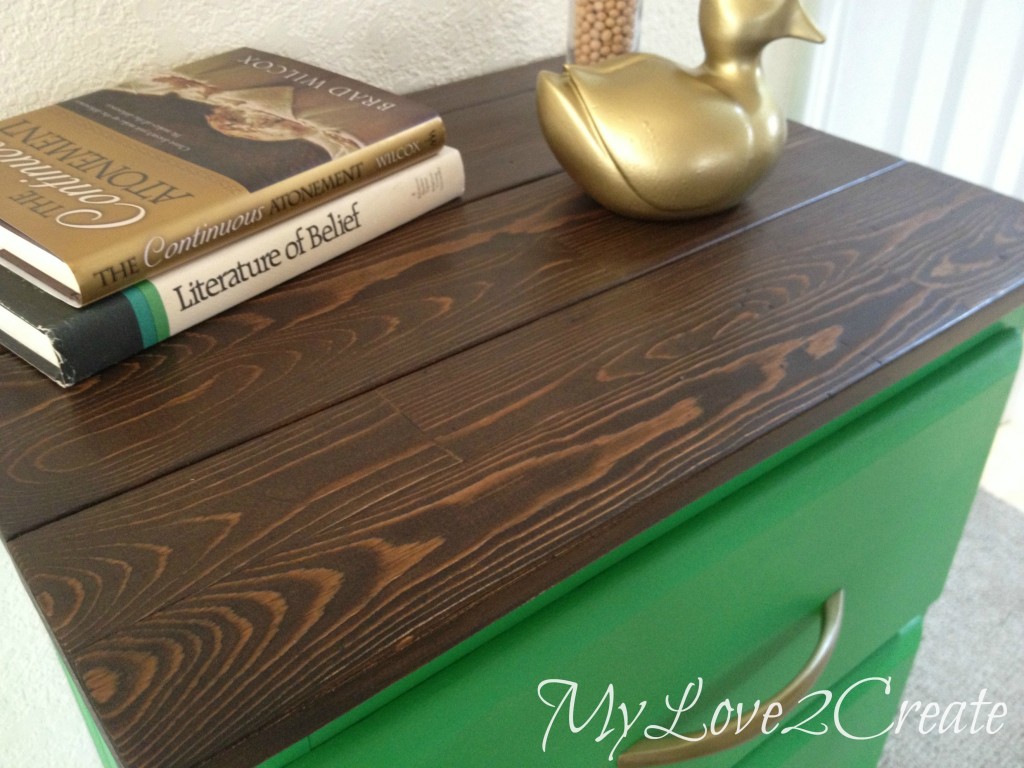
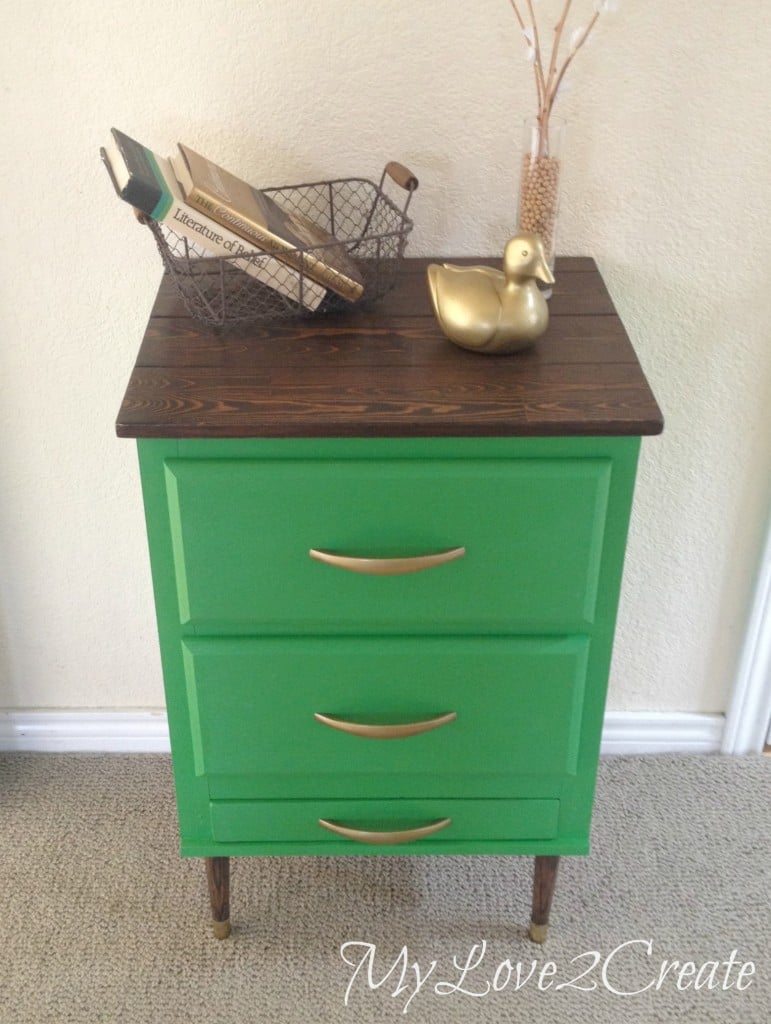
    Ahhh, the repurposed top is so pretty! Can you blame me for my weakness for dark stained wood?

    Stained vintage feet
    Stained vintage feet

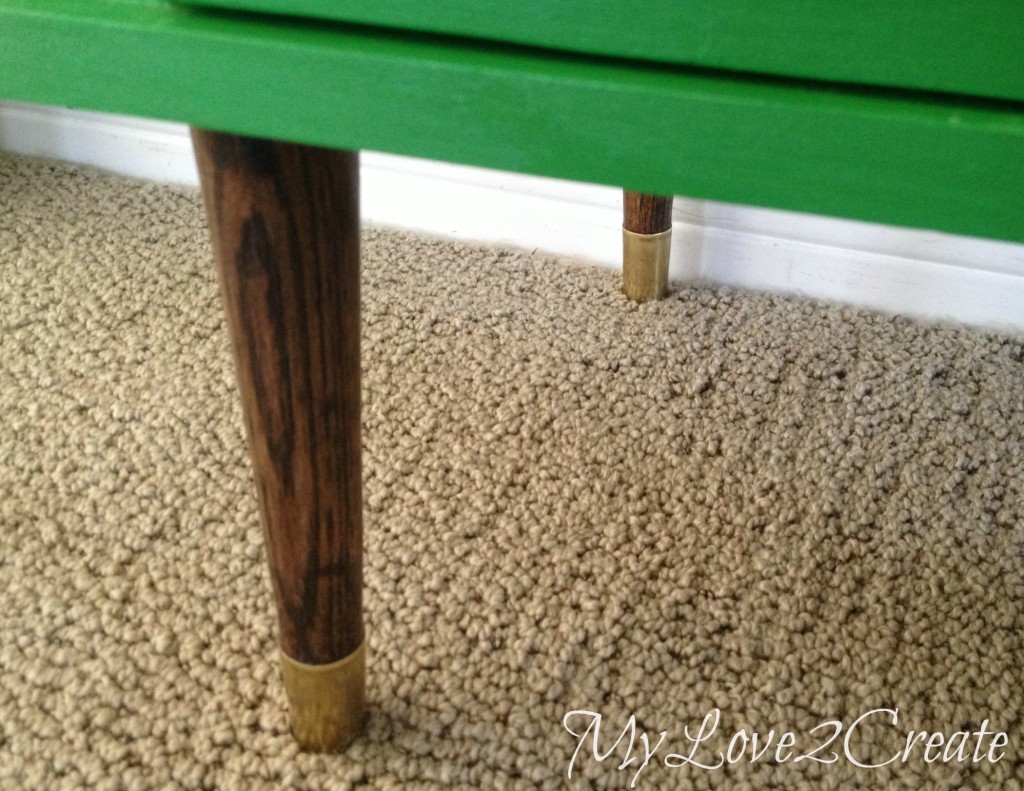
    It was fun to use the feet, I am glad I finally did!

    Night Stand Makeover after
    Night Stand Makeover

    Can you believe it is the same cheap piece? I love how you can transform something plain into something unique!

    Have you transformed anything lately?

    Hugs,

    Mindi

    More from Mindi, Kingsize Headboard Bench

    Pin
    Share
    Tweet

    Related Content:

    • Storage Bench Made From A Dresser
      Storage Bench Made From A Dresser
    • Repurposed Crib Dog Crate
      Repurposed Crib Dog Crate
    • Cheap Cabinet into Nice Bench
      Cheap Cabinet into Nice Bench
    • DIY Octagon Mirror | It's easier than you think
      DIY Octagon Mirror | It's easier than you think
    • How To: Turn a desk into a tall chest | Before and After Photos
      How To: Turn a desk into a tall chest | Before and After…
    • IKEA Tarva Hack Challenge
      IKEA Tarva Hack Challenge

    About Mindi

    Mindi is a wife, mother, runner, dancer, and a lover of all things fun and DIY.

    A few years ago she discovered blogs and fell in love with the idea that she could do things she had always dreamed of doing. Like build furniture from pallets, and make cool projects for her home.... Mindi was inspired by other bloggers that empowered her to create.

    Mindi decided to give back and possibly reach someone out there that has a desire to create like herself. She believes we all have that desire in some form or another, and we all DO create in our own way, every day. Whether it be crafty or not, even creating happiness in others is a gift that many share.

    Mindi loves to learn and use that knowledge to make beautiful and useful things for her home.

    Reader Interactions

    Comments

      See comments Cancel reply

      Your email address will not be published. Required fields are marked *

      This site uses Akismet to reduce spam. Learn how your comment data is processed.

    1. Malissa - Southern Sawdust

      March 29, 2016 at 12:55 pm

      What a transformation! I love that color but can't figure out how to use it in my home! Nicely done!

      Reply
      • gail@myrepurposedlife.com

        March 29, 2016 at 8:07 pm

        Didn't Mindi do a wonderful job! She's so good at what she does.

        thanks for stopping by and taking the time to leave a comment.

        gail

    2. Mara

      April 10, 2014 at 12:28 pm

      Hi, this is awesome! Caught my eye because my son's favorite color is green. Question for ya, do have any suggestions for painting lacquer? I have a blonde lacquer bedroom set that I'm tiring of....would love to paint it & add different hardware + feet. I'm just a wee bit timid to paint such big objects.

      Reply
      • gail@myrepurposedlife.net

        April 10, 2014 at 1:53 pm

        Mara,

        I would use chalk paint or DIY chalk paint made with Plaster of Paris. With a light sanding, either of those should work well! You can see my DIY chalk paint (primer) here: http://bit.ly/chalkyPAINTprimer
        gail

      • Mara

        April 11, 2014 at 6:31 pm

        Thank you for the suggestion, I'll check it out!

    3. Bruce Johnson

      April 09, 2014 at 2:48 pm

      Great use of the Minwax Wood Conditioner, Mindi. I feel the same way, it's always a good idea if you're not sure. Good luck with your future projects!
      -Bruce

      Reply
    4. Michelle

      April 01, 2014 at 3:53 pm

      I really like this! Great idea to add the third drawer and the vintage feet.

      Reply
    5. Iuliana

      March 31, 2014 at 1:18 am

      Mindi...I absolutely love how this turned out and the color is amazing!!!! I want to paint everything in my house this color!

      Reply
    6. Dee

      March 29, 2014 at 11:04 am

      Wow! It turned out fantastic!!!

      Reply
    7. Mary

      March 29, 2014 at 12:21 am

      I love the combination of the paint and stain. And, I'm in awe of the thought process that added the small drawer at the bottom. Very clever!

      Reply
    8. debbiedoos

      March 28, 2014 at 5:23 pm

      Now that's a makeover and a half! I love it. Great color too.

      Reply
    9. Krista @thehappyhousie

      March 28, 2014 at 1:32 pm

      Wow Mindi!! Amazing transformation!! You are so talented- it always impressed me what you can do!!

      Reply
    10. Tabath @ ChicByTab

      March 28, 2014 at 10:43 am

      Wow. Ugly duckling to swan. Please come share this on my Chic By You Link Party @ http://chicbytab.blogspot.ca/2014/03/chic-by-you-wednesday-link-party-5.html . Hope to see you there.\

      Reply
    11. La Verne @ hopeandsalvage.com

      March 28, 2014 at 10:29 am

      Awesome. Better than the original ever hoped to be. You have a gift, Mindi!

      Reply
    12. girlfromwva

      March 28, 2014 at 9:41 am

      I love it; and I really like those new legs! 🙂

      Reply
    13. cassie

      March 28, 2014 at 9:17 am

      love the color and those new legs!

      Reply
    14. Pam

      March 28, 2014 at 9:09 am

      What a beautiful springy and bright piece. Great job to My Love to Create.

      Reply
    15. Joanne@myuntangledlife.com

      March 28, 2014 at 8:52 am

      You did an amazing job on this piece! The transformation is quite impressive. Great job and I love it.

      Reply
    16. Katy

      March 28, 2014 at 7:03 am

      Beautiful! I love it!

      Reply
    17. Leslie

      March 28, 2014 at 5:58 am

      Great job! I can't believe it is the same piece.

      Reply
    18. kirby carespodi

      March 28, 2014 at 5:41 am

      This is GREAT! LOVE that you raised it with those awesome legs--what a score!

      Reply

    Primary Sidebar

    Hi, there! I’m Gail Wilson, the author and mastermind behind My Repurposed Life. I’m obsessed with finding potential in unexpected places and believe that with a little hard work and imagination, any old thing can be made useful again—myself included! I hope you’ll enjoy the journey and pick up a few tools along the way… literally!

    More about me →

    Join Our Mailing List

    ​

      Click the topics you're interested in below:

      Subscribing above means you agree to our Privacy Policy​

      Footer

      ↑ back to top

      SEEN ON

      Might I Suggest

      • Start Here
      • Furniture Makeovers

      Newsletter

      • Sign Up! for emails and updates

      About

      • Gail's Favorites on Amazon
      • About

      As an Amazon Associate I earn from qualifying purchases.

      Copyright © 2023 My Repurposed Life · Privacy Policy · Disclosure