Octagon Dining Table Makeover
As an Amazon Associate, I earn from qualifying purchases.
I was hoping this octagon dining table makeover was going to be a quick and easy project. It was not. I rolled it out to work on it, but before I could get pictures, we got a little rain shower.

After the table was a little damp, I covered it with a piece of vinyl wallpaper I use as a drop cloth. Why did I wait until after the table experienced some rain?
Damaged Octagon Dining Table

This is why! To protect their grandpa’s table, his family had used some sort of tablecloth or table pad. This job was not going to be easy. You can see by the rag on the table that I had already begun working on the top when I remembered to take some pictures.

I left the cover on the table for a little while, hoping that it would help the rainwater penetrate the ugly green fuzz that covered the table.
*this post contains affiliate links, read more here*
Trying To Remove Green Felt From Table

Because I didn’t want to scratch the table, I used a broken wooden slat instead of a metal scraper. This method did remove a portion of the ugly green fuzz, but not enough.

On to a sanding sponge—that wasn’t working so well either. Look closely to see more damage done to the table, mostly likely by hot dishes.
Orbital Sander Removes Green Table Pad Felt

So, I brought out the big guns, my orbital sander. The damage is a little more visible in this picture. I was using the dust brush to clear away debris as I was sanding. It’s looking better, but still a long way to go.
What Cleaning Products to Use on Felted Table Top

At this point, I was grabbing anything I could find in my arsenal. I generally use TSP, but I could only find the TSP Substitute. By this time, I was getting pretty frustrated with what I thought was going to be an easy octagon dining table makeover.

Then, I tried odorless mineral spirits. I’m sharing all of this with you so that you will know what didn’t work!
 When things are really dirty, I reach for Krud Kutter. It seemed like it was cutting through some of the tablecloth residue. But in the end, there was still too much remaining. I had planned to refinish the octagon table top. It’s not looking good for that!

Using a larger piece of shutter, I spread the Krud Kutter around, letting it do it’s work.
After each of the above steps, there was more sanding happening with the orbital sander. Eventually, the sand paper heated up and caused the tablecloth fuzz to become gummy.
Kwik Strip Removes Leftover Felt Easily

Finally, I made a trip to the store to pick up some Kwik Strip Furniture Stripper. Did you notice the sanded area on the top left of the image? THAT is when I decided this octagon dining table makeover would involve paint instead of refinishing.
Reviving Octagon Dining Table

While I was at the store, I decided to pick up a set of plastic scrapers, I didn’t want to gouge the wood. This is after two rounds of furniture stripper.

The furniture stripper directions recommend to wipe your project down with Mineral Spirits as a final step.
Table Top is Ready to Paint

Finally! It was ready to paint. Again, there was more sanding along the way. You can tell when a project is ready for painting by feeling it. I’ve often expected paint to disguise blemishes—IT DOES NOT!
Outdated Table Casters

Here’s where a good thought or decision may have gone wrong! I felt that the octagon dining table wouldn’t have a chance to be rehomed with the dated casters. However, removing the casters would cause the table to lose over 2” in height.

The plan was to add height to the dining table using this old table leg. I knew the wood needed to be a hardwood. You can see the casters have been removed, and the bottom of the table is ready to have height added.
New Feet Replace Outdated Casters on Vintage Table

I cut the table leg, for the . . . let’s call them feet. The feet will allow the table to get back the height that was lost by removing the casters. The holes were not centered front to back. I marked the template to reflect that.
Using an Irwin Quick Clamp to hold the feet, I marked, then drilled a hole in the new feet to match the original legs.

I have had this baggie of small dowels for years. I dug through it to find the proper size. Of course, there were only 3 of the size I needed. Rodney made the fourth dowel like he did for the shutters on the sugar shack .
Attaching New Feet to Table

After using Gorilla Wood Glue to hold the dowel in the feet, I also used the glue in the hole and on the base of the leg. At this point, I was really proud of myself for doing such a good job. I convinced myself that everything would blend and look good once I got it painted.
Not Shown:
I wiped everything down with Krud Kutter before painting. You never know what a piece of furniture was subjected to before you got it. Furniture wax? Grease? Nicotine?
Using a Paint Sprayer for Dining Table

Let’s just see a quick before and after of the table top. The octagon dining table had 2 leafs. However, because there are only 4 chairs, I opted to leave the table in it’s smallest configuration. I THINK I just couldn’t bring myself to deal with another fuzzy green mess!

As always, I start with the project upside down. However, I didn’t paint the underside of the table. But the base is upside down, notice the awkward feet pointing up to the sky.
Add Plaster of Paris to Make Primer

My favorite way to paint furniture! DIY Chalky Paint Primer made with satin wall paint, with Semi-Gloss topcoats. All applied with my favorite Super Finish Max. I used the blue nozzle for this project.

When all was said and done, I did three very quick and light coats of the chalk paint primer, with another 2 coats of semi-gloss paint on everything but the table top. Because the top of the table will take more abuse, I did three coats with the Finish Max, and two more coats of semi-gloss with a small roller. Sanding between each coat on the table top will give you a really smooth finish. I did not sand the rest of the furniture.
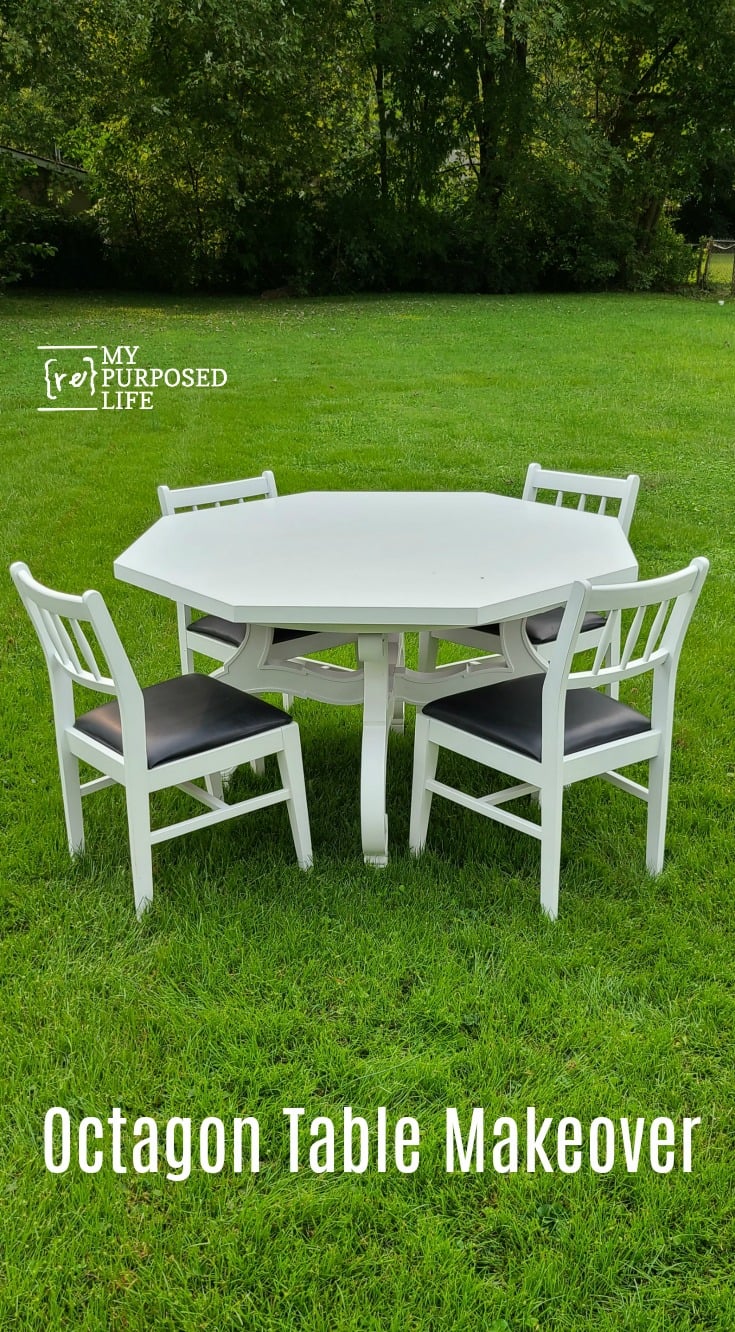
DIY Octagon Dining Table Makeover With Paint

Here is the finished project! Sort of! I believe in keeping it real. The chairs need to be recovered. This thing is a monster, now I know why it was on casters. Because I needed it out of the storage garage, I was in a rush to get it staged before I went on my latest camping trip.
How sneaky I am to stage it in the grass where you can’t see the feet? It wasn’t on purpose. I just thought it would look really pretty with the green background. I had to ask for help moving the table, so it is what it is for now until I can get help to move it again. In order to let it cure, I put it in The Sugar Shack so it’s out of the way.

As always, I’d love to hear your honest thoughts. I’ll update this post when I get some more pictures. As I said, I need to recover the seats, I’m thinking of sticking with black because I love the way it looks. Thoughts?
Would you have left the casters on? If I were keeping it, I may have replaced them with something more modern. But I already have a lot of money and time invested in this octagon dining table, I’m afraid I wouldn’t have been able to recoup my money when I sell it.
gail
I happened upon your page while refinishing a table I picked up on marketplace… It’s the EXACT same table, base and all, no felt on the top thankfully! Any idea the age of the table?
Susan,
Isn’t that wild that you have the same table. No, I’m sorry I have no idea of the age of the table.
gail
The black and white feels sterile. Maybe a patterned vinyl or fabric would look good. The workmanship you put into it should pay off. I really like it. I’m curious if the base is original to the table. You gave me a good idea for old silverware boxes. The Kwik Strip might make it easier to remove the felt linings. Those things are miserable to get clean.
Thanks Fran for your thoughts! I appreciate it.
I think the stripper might be helpful…. I’ve done those old silverware boxes, and you are right–they are tough!
gail
The green felt was because it was used as a game table. The casters on the chairs go with the game table. I’m sure many a poker game was enjoyed around this table in the octagon configuration. Not sure if I like the casters or not but will say as i age and have a tile floor those casters sure would help me pull my chair from the table. My chair legs get caught in grout lines constantly and it makes it difficult to pull away from the table.
The people I got the table from didn’t act like it was a game table. They were the original owners and told me it was revealed after they took of a table pad of some sort.
It did have two leafs, so that would make it no longer be an equal octagon…. whatever shape THAT would be called. LOL
When I was a teacher, I put teflon pads on the bottom of my chair (smaller than the kid’s chairs, so I could get my legs under the table). They were helpful for me to slide my chair around. Maybe that would be helpful for you?
gail
Amazing job, Gail
I do know the work you have put into this beast…and also how heavy this thing is…
Personally, I would just leave the casters off…the buyer could add felt pads to the bottom of those legs.
I do that to all my items, that way I can slide them easily all over my floors without any help…
Keep up the amazing work and sharing…
Shirley
Shirley,
Thanks for the comment! With the casters removed from the table, it lost a lot of height. A big girl may not have been able to rest comfortably with her legs under the table. 🙂
Imagine cutting off over 2″ of your own table….
gail
All that hard work paid off. It looks better without the casters. Beautiful job!
Thank you Terri, for stopping by and taking the time to leave a comment. It’s appreciated more than you know!
gail
Hi Gail. Would it be possible to flip the bottom of the table over, having the “feet” under the table. I think getting rid of the old casters was the only thing you could do, but they might give that, what’s that?, appearance. Otherwise it’s a really big sturdy table that will look great in a dining room
Jennie,
I considered that, and may look into it further before I offer it up for sale. As always, I appreciate your comments! Thanks for the input.
gail
Hi Gail, my first thought was that the green fuzzy’s was felt that is used for a card table.Could it have been used as a guys poker night card table toward the end of it’s life before the thrift shop part of it’s life?
Jan,
I don’t think it was an intentional green fuzz.
I picked this up from the original owners. I just can’t remember what they said left all that green fuzz.
thanks for stopping by and taking the time to leave a comment.
gail