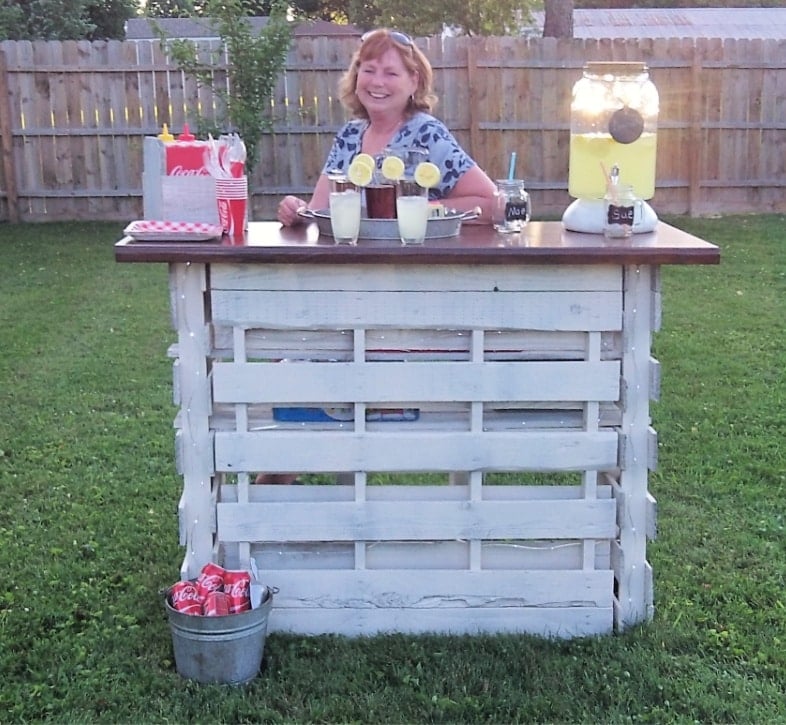
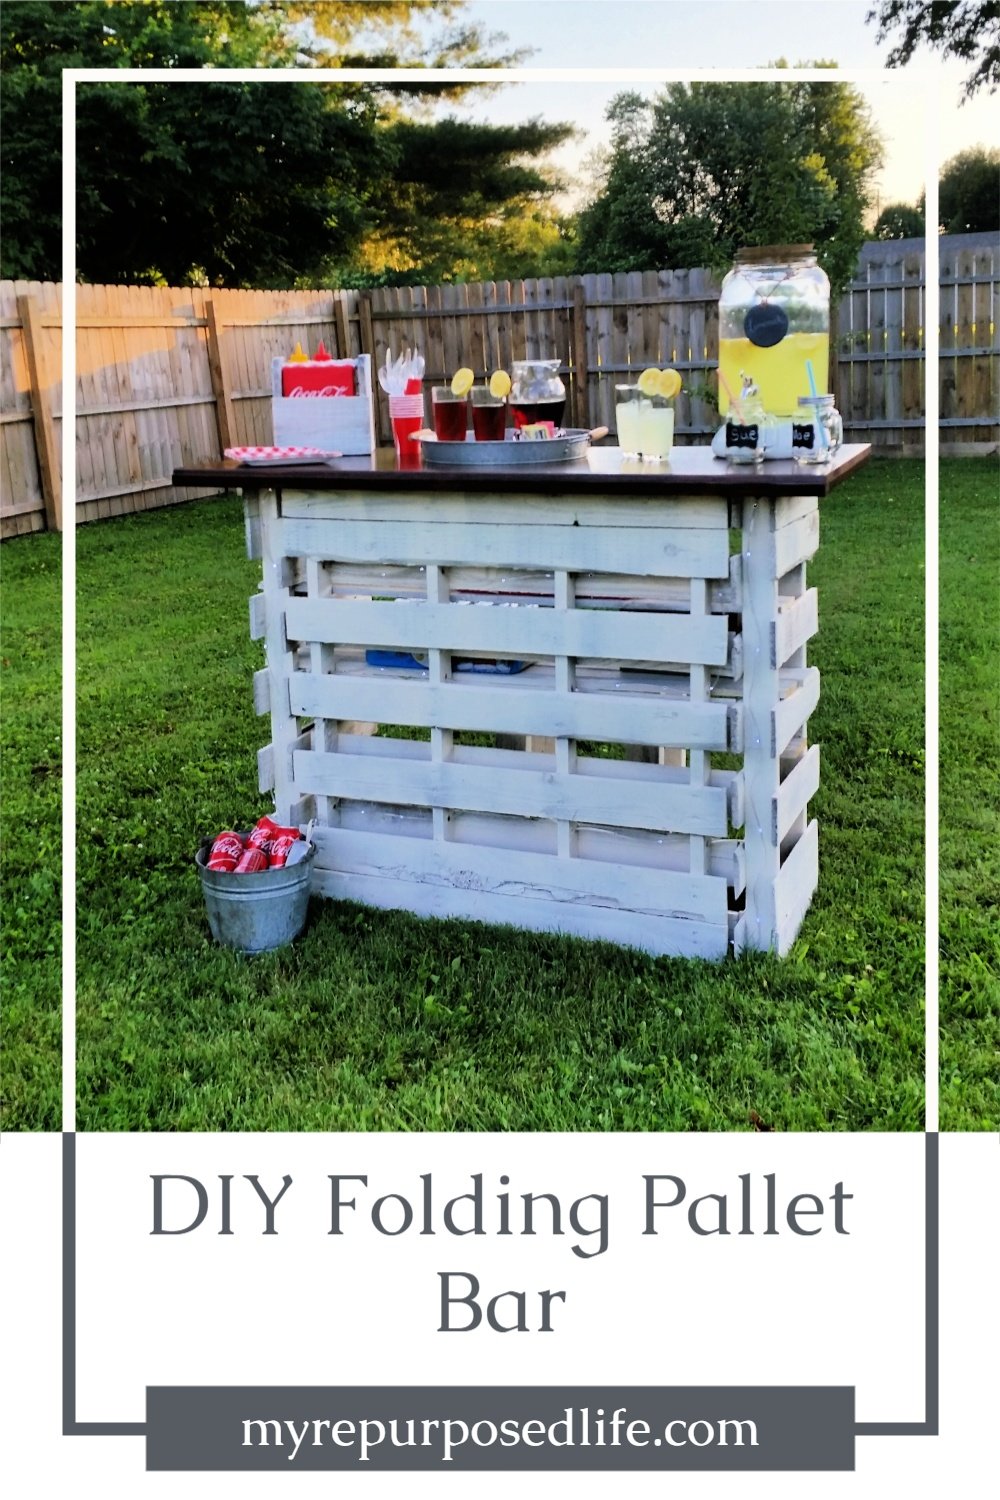
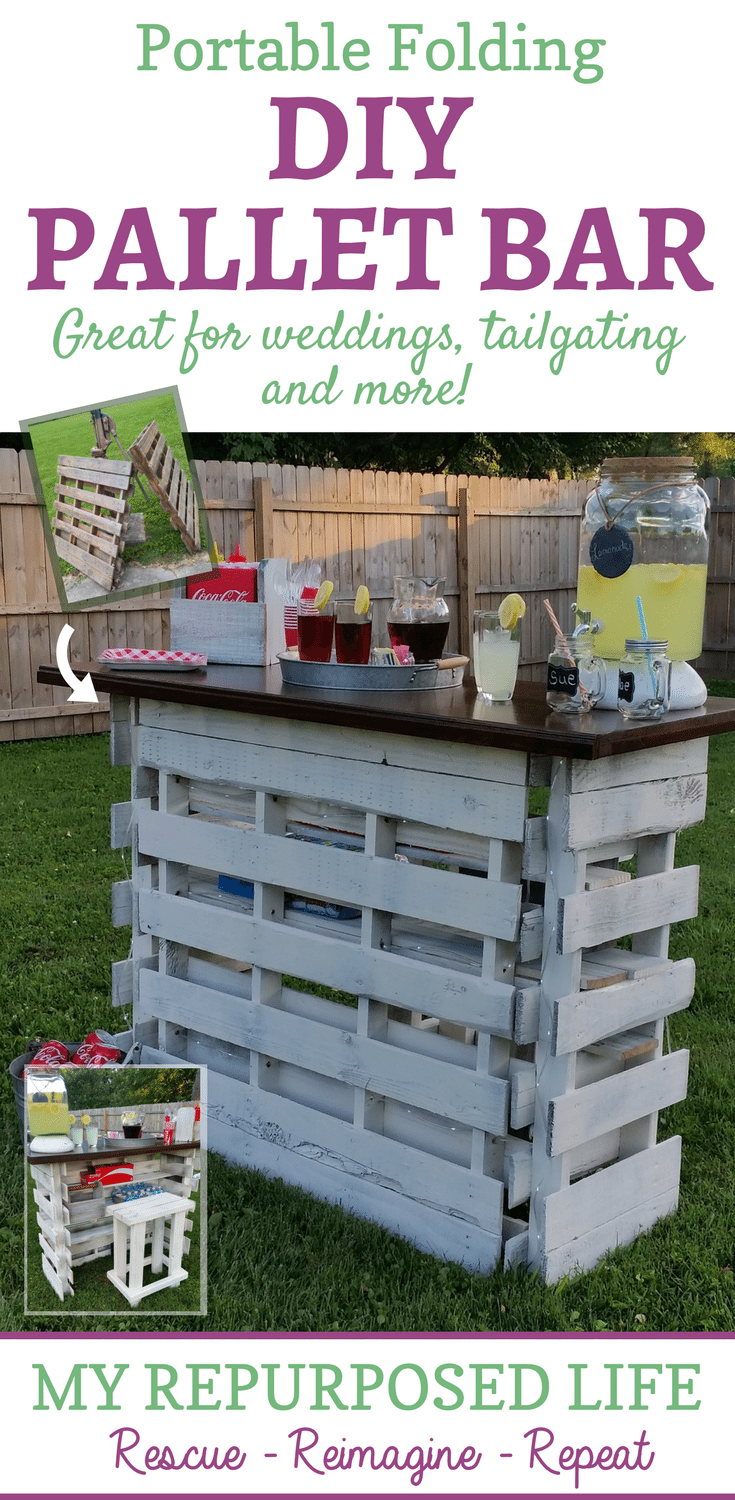
Portable Folding DIY Pallet Bar – great for weddings, tailgating and more!
As an Amazon Associate, I earn from qualifying purchases.
If you’re looking to take your outdoor entertaining up a notch, this portable folding DIY pallet bar might be just what you need! Made from reclaimed pallet wood and designed to fold flat when not in use, this bar is both practical and charming. Whether you’re hosting a backyard BBQ, tailgate, camping trip, or a special event such as a wedding, this space-saving solution is as functional as fun.
Not just a DIY pallet bar – but a portable folding pallet bar.
Everyone should have a DIY pallet bar! At first, I was stressing over June’s Power Tool Challenge theme. Summer Fun! Until I figured out I wanted to make a DIY pallet bar — not just any old pallet bar, but a folding, portable one that would be great for a wedding or outdoor event.
See how happy I am that the pallet bar is finished!

Let’s see how it all came together . . .
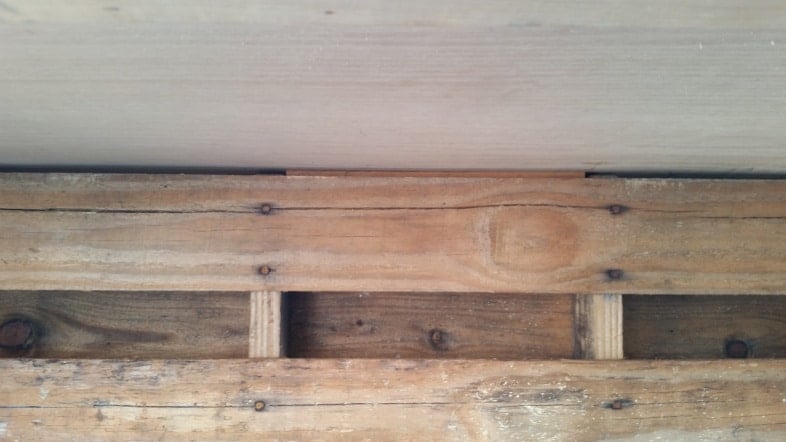
I forced myself to visit the back of the storage shed to scope out the existing pallets I had in storage.
You will need two pallets for this DIY pallet bar.

The pallets were so gross that I immediately cleaned them with the hose. I was trying to match up the pallets to see if they were similar because I had a unique plan. I rarely know what I’m going to do going in. Some changes took place, but for the most part, this portable pallet bar ended up just as I saw it in my head.
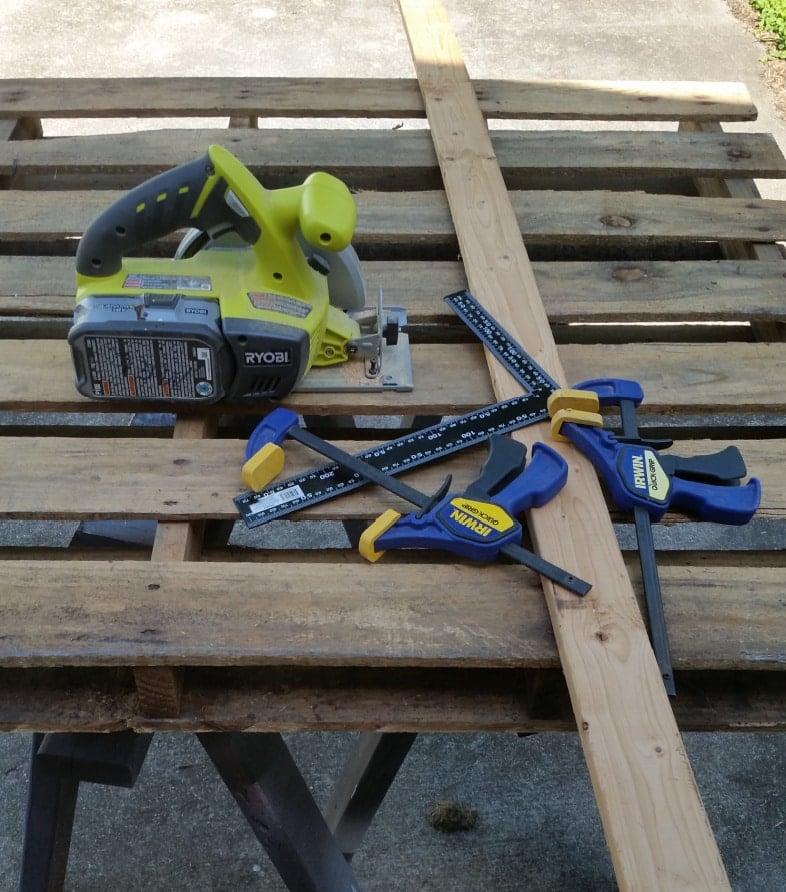
The plan was to cut one of the pallets in half. Using a spare 1x board, I could only clamp the wood (guide) in place once. I put it dead center, slid the circular saw on the right side, and returned the other way. Then, turn over and repeat.
Cut Pallet in Half
You must set the blade depth when using a circular saw to prevent kickback. (don’t ask me how I know—it’s a lesson I learned years ago in my 20’s)
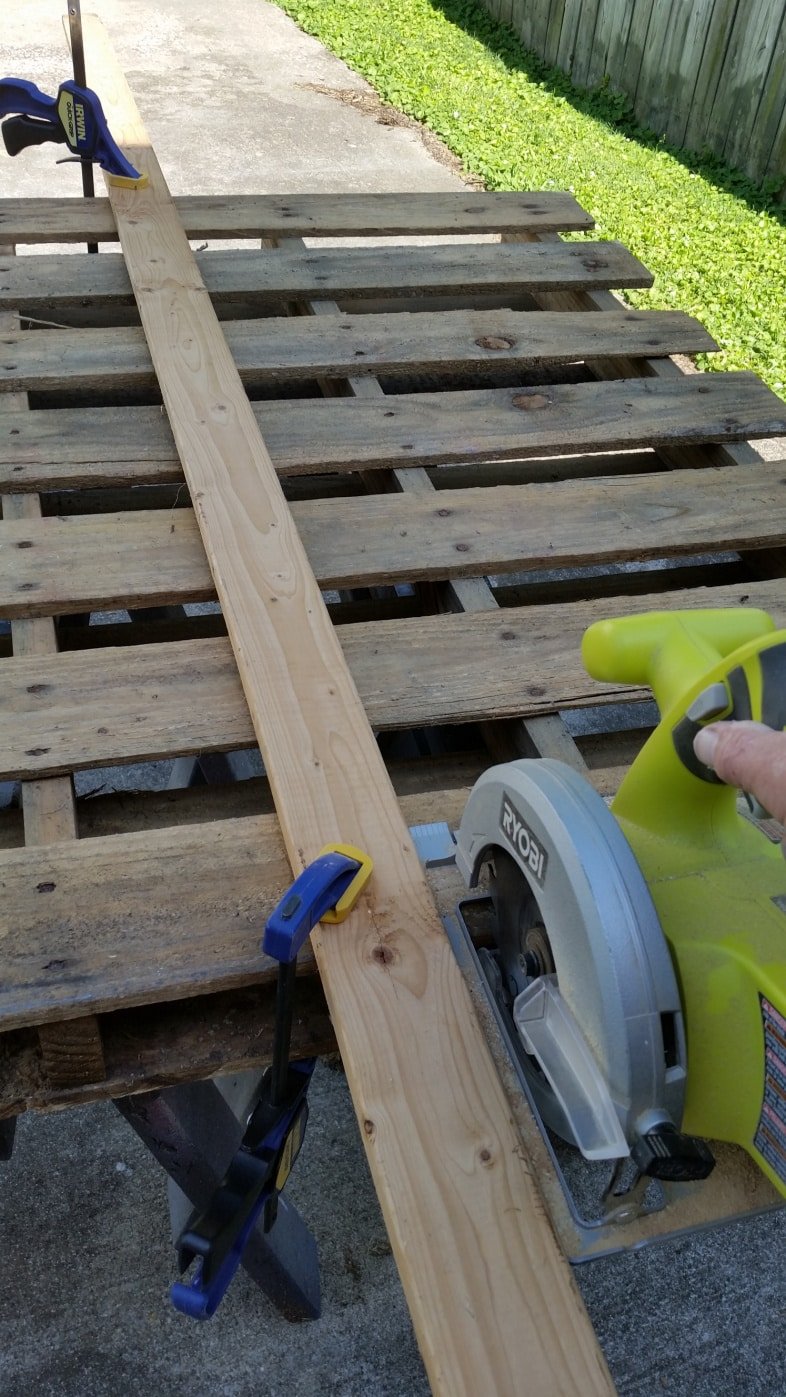
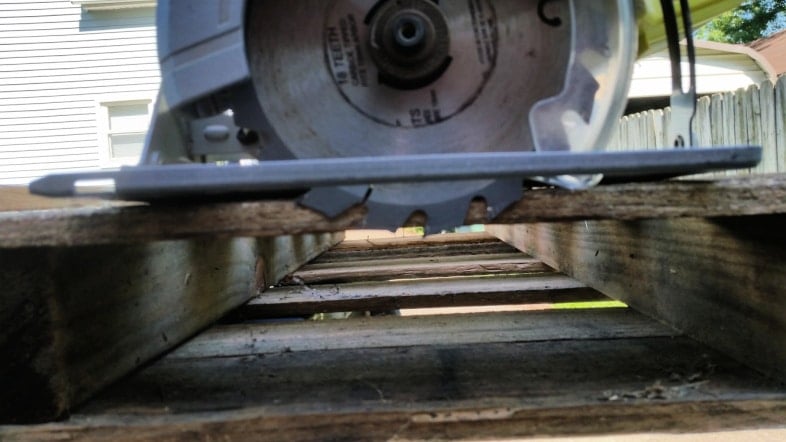
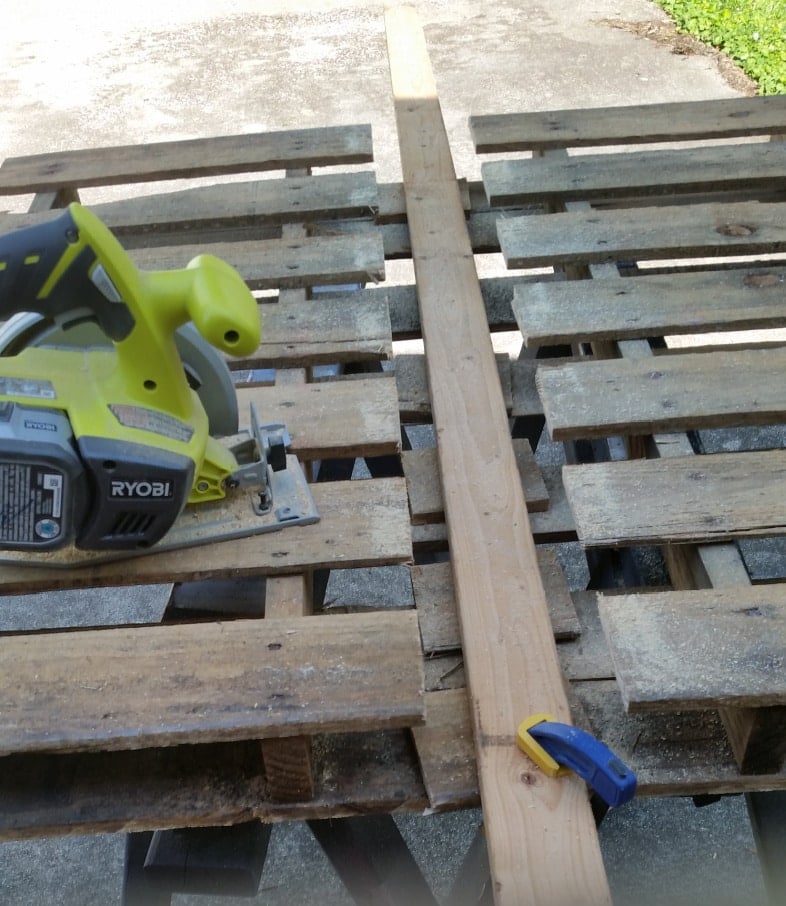
After examining all of the boards for nails and or screws, I used the guide to keep the circular saw on track. Then, I proceeded to cut the pallet boards. Note the clamps must be on the opposite side of the cutting area.
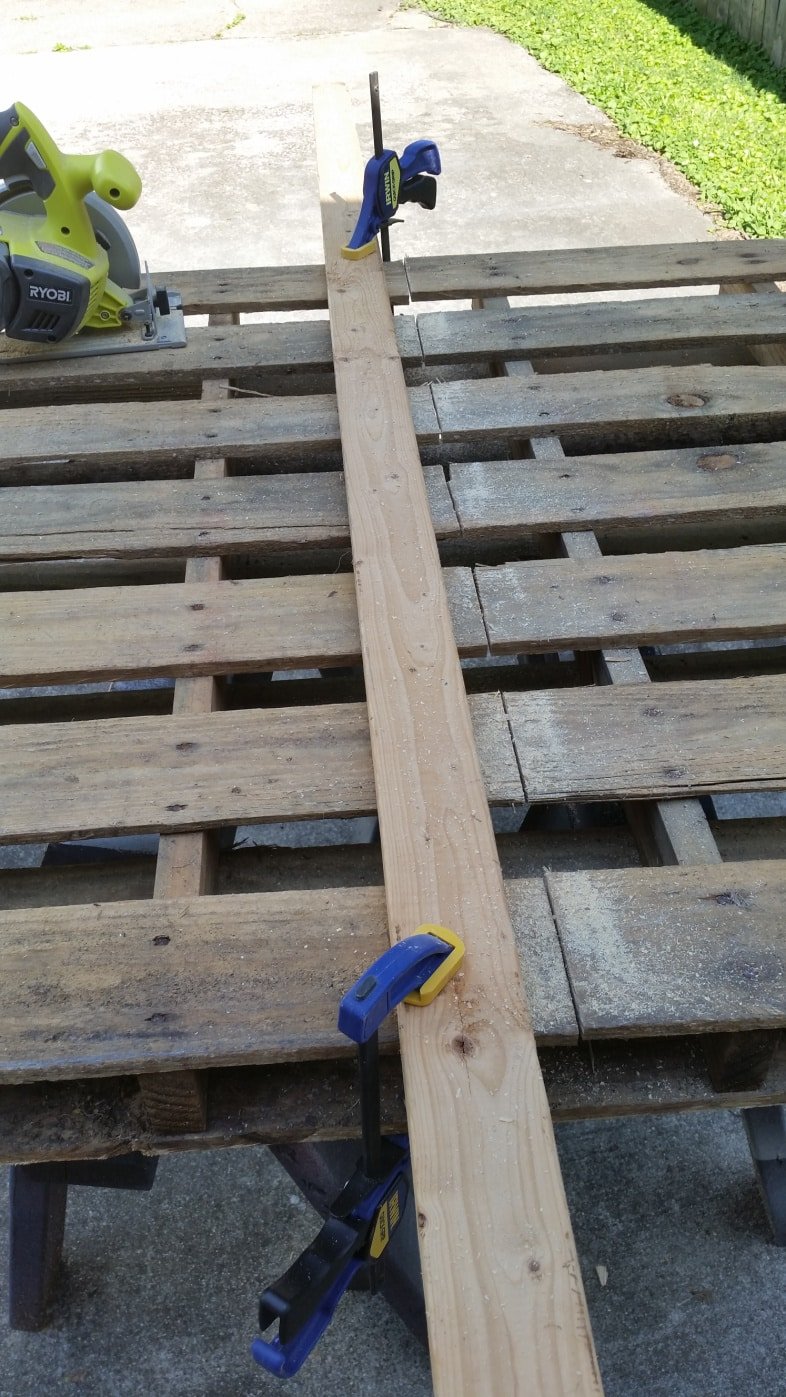
You can see that I have cut half of the pallet and am changing the clamps so I can come back from the other direction. If I changed the clamps and went in the same direction, the distance between the board and the blade would be much more significant, making the pallet’s halves unequal.
The board and all the scraps fell through as I approached the end. It’s time to flip it over and do the same on the other side. (not shown)
Add Each Half Pallet to the Whole Pallet
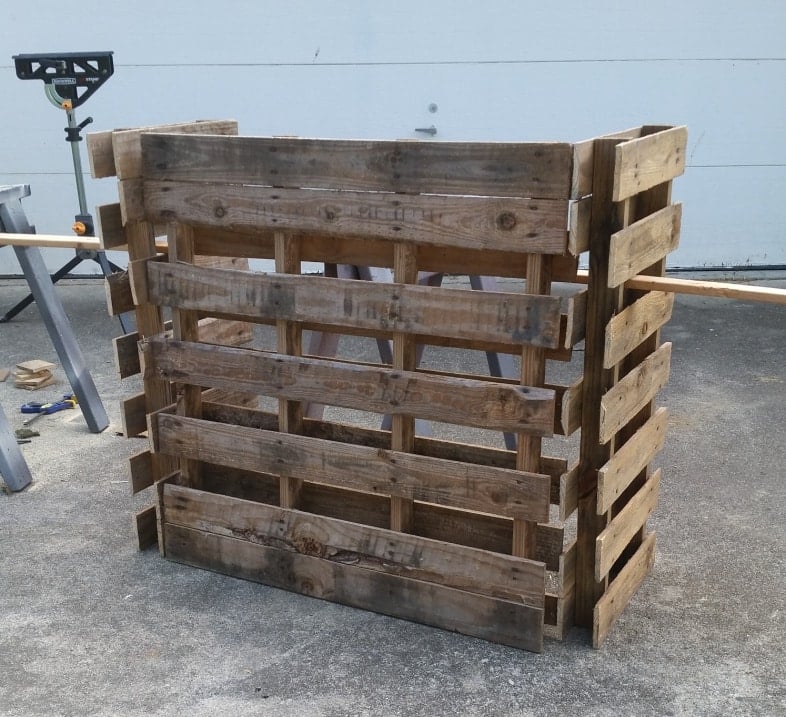
You can see how it will come together as I do a dry fit.
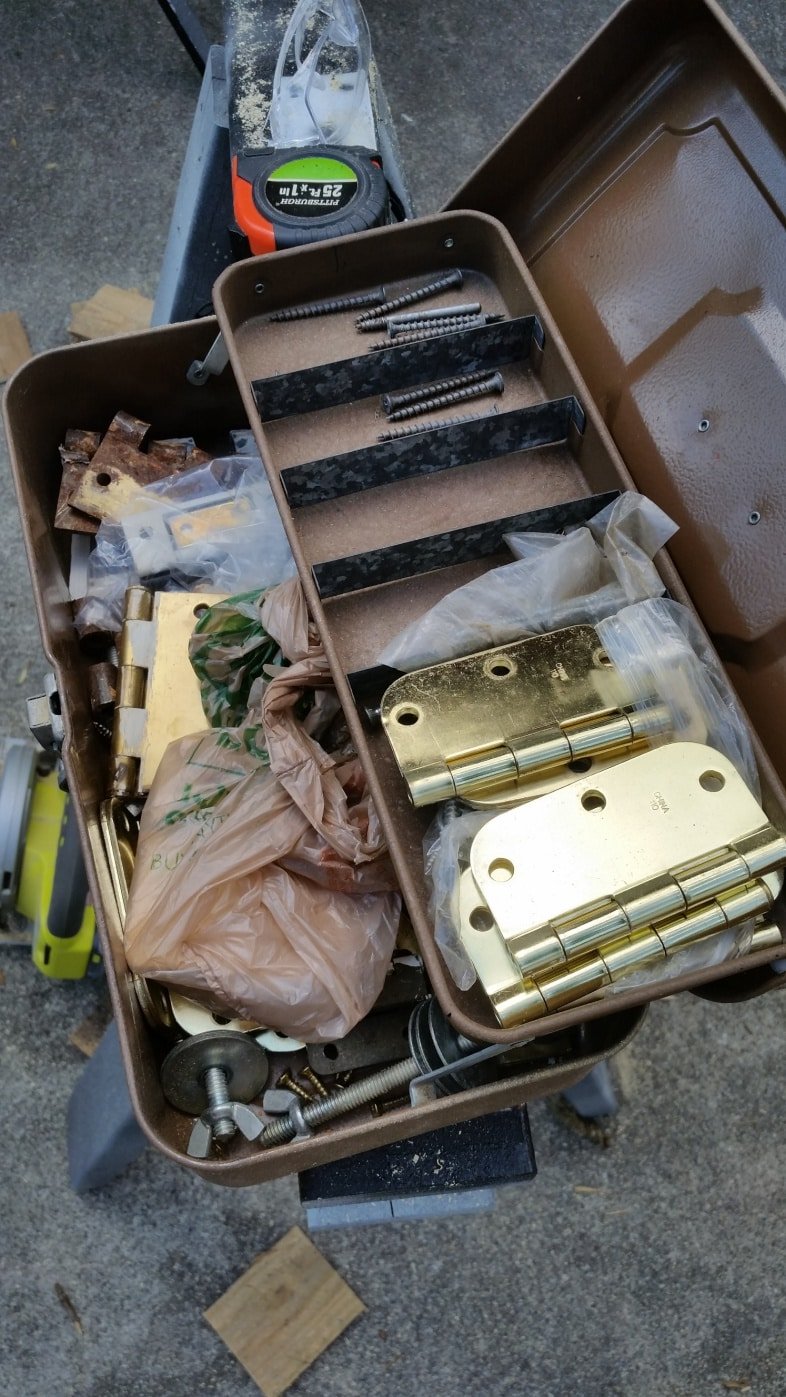
This is where the portability of the pallet bar comes into play. I have this old tackle box full of door hinges I got from a friend years and years ago. They changed out the color of their knobs and hinges, and I got all the old ones.
I searched online for a similar bar that folds up, and I could not find anything. Most pallet bars have this shape, and many are made with pallet boards, but I chose to make mine with one whole pallet and one pallet cut in half (well, a little smaller than half)
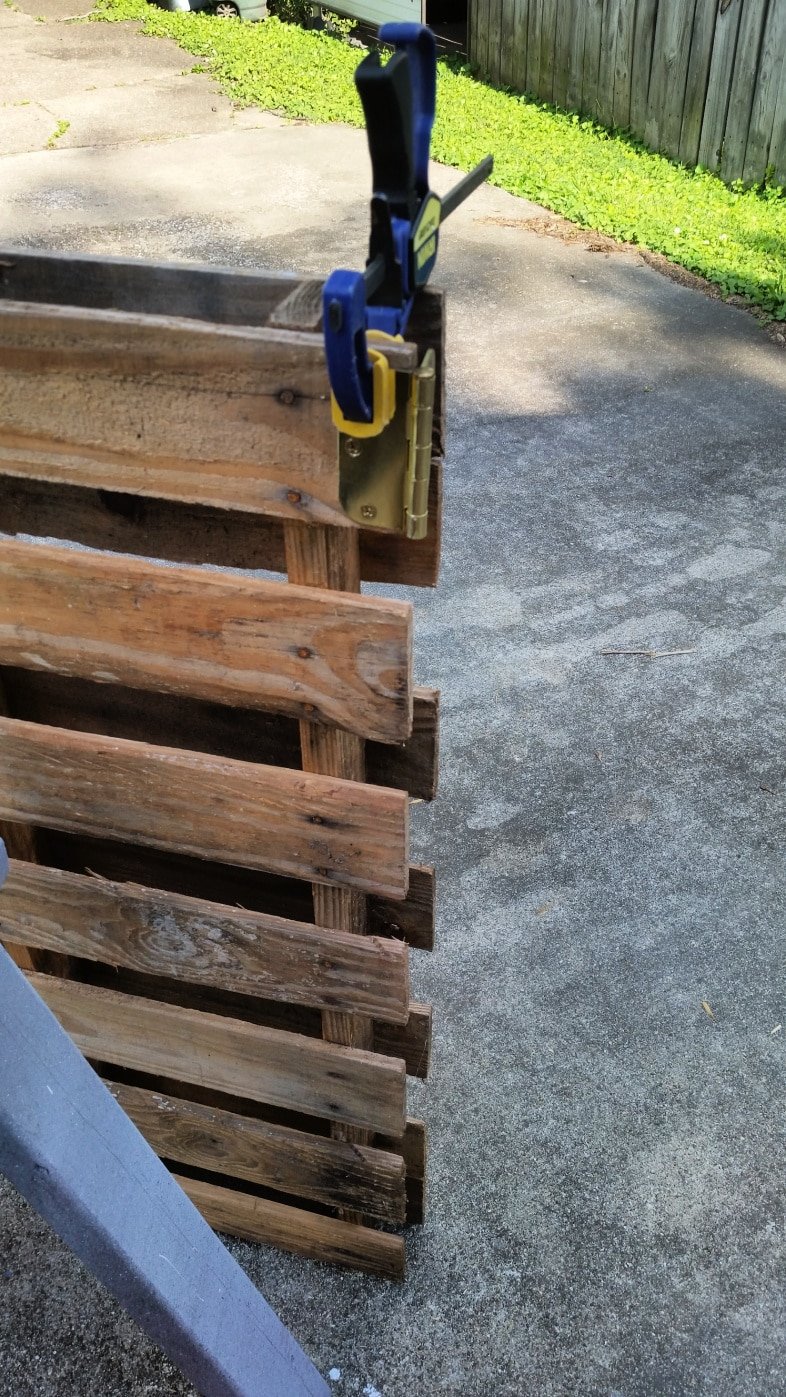
First, I did the left side and struggled with it, so I’ll show you how to add these hinges. Put all three hinges on the full pallet – folding each hinge back as you attach them. I used a quick clamp to help hold the hinge in place. I drilled pilot holes to ensure the pallet boards didn’t split. Having two drills going simultaneously is very helpful for this stage.
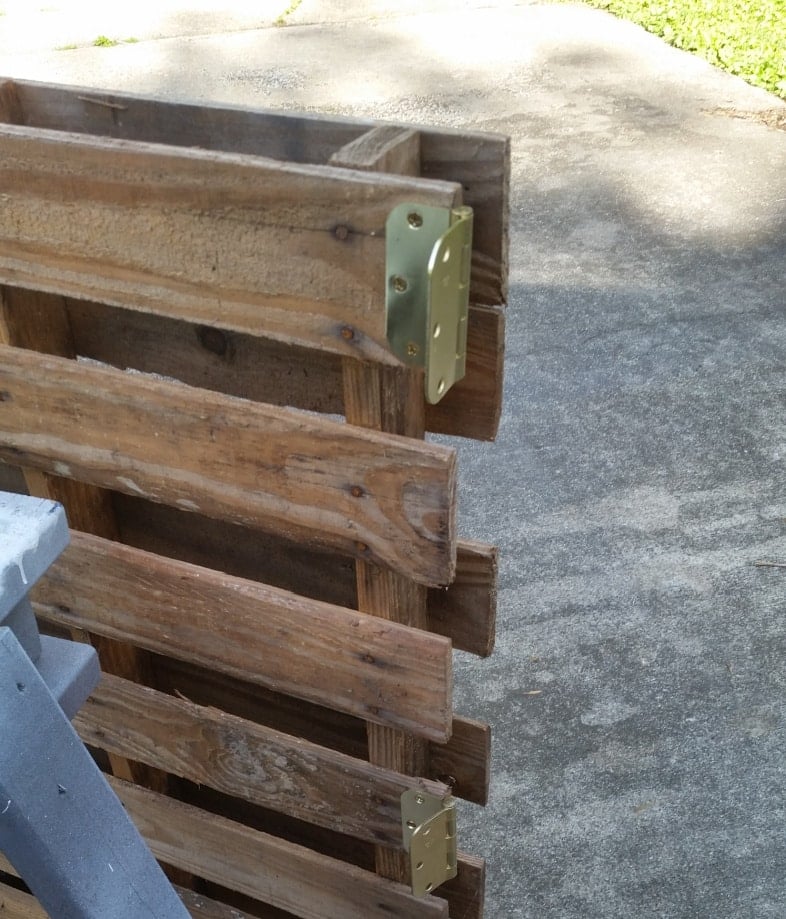
Fold each hinge inward and prepare to attach the side of the pallet bar.
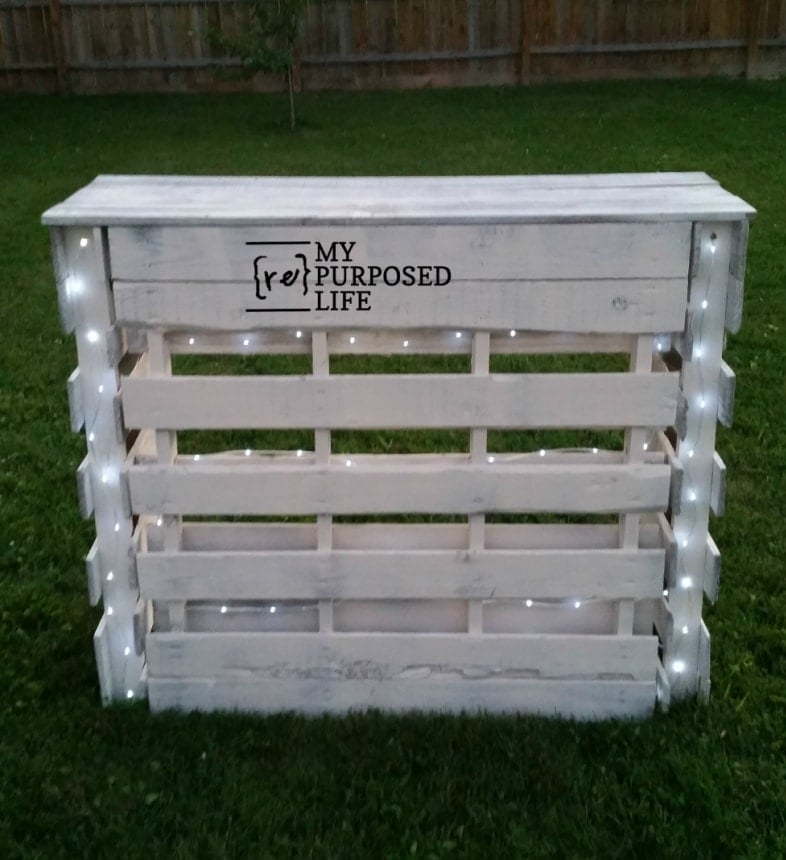
Pallet Bar Folds!
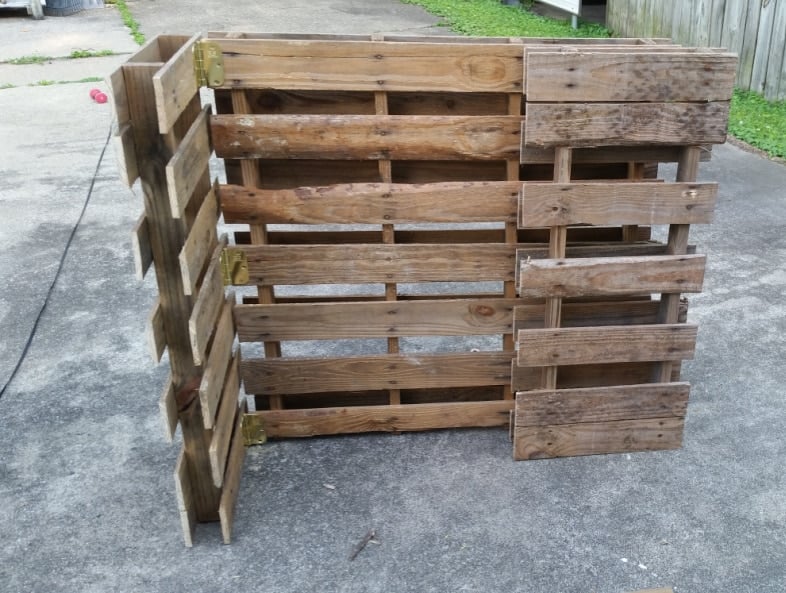
Voila! Oh my gosh! It’s just as I had imagined. Look how perfectly it will fold up! Full disclosure: It is cumbersome for one old gal to carry alone.
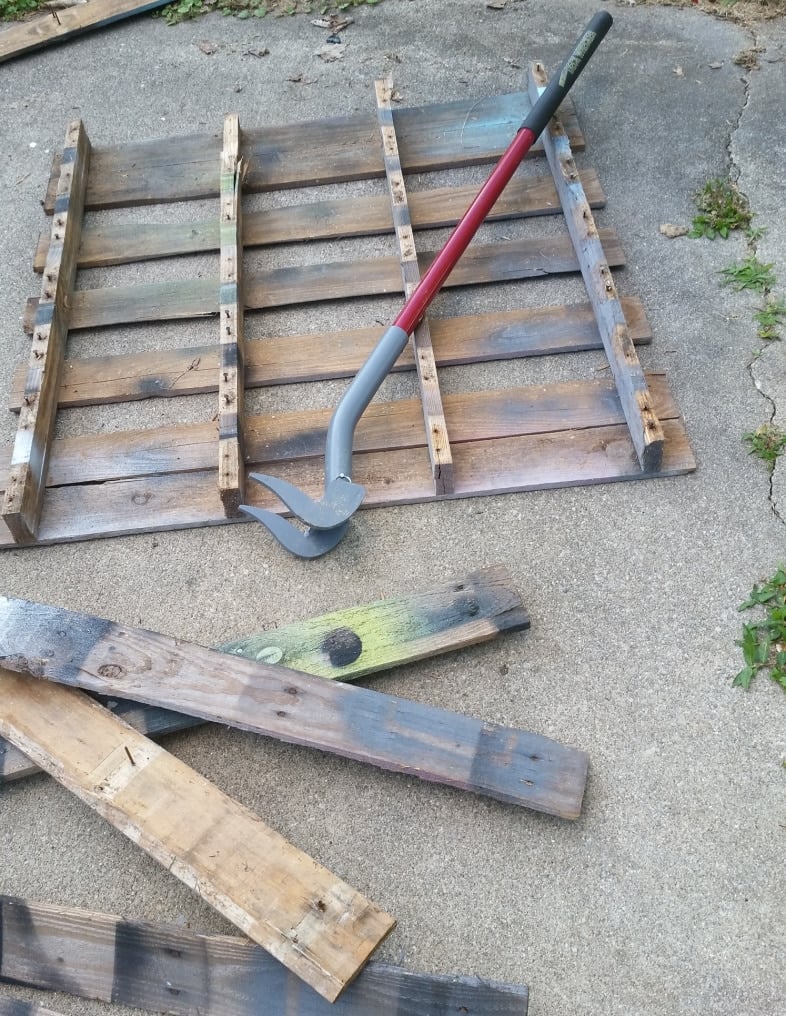
This is the third pallet shown at the top of this post. You can see that I had used this pallet for painting. I used my Duckbill Deck Wrecker to dismantle the pallet quickly and easily. I then de-nailed all the pallet boards. The plan was to use the boards to make the bar top.
See more Pallet Projects and tips for dismantling pallets by clicking here.
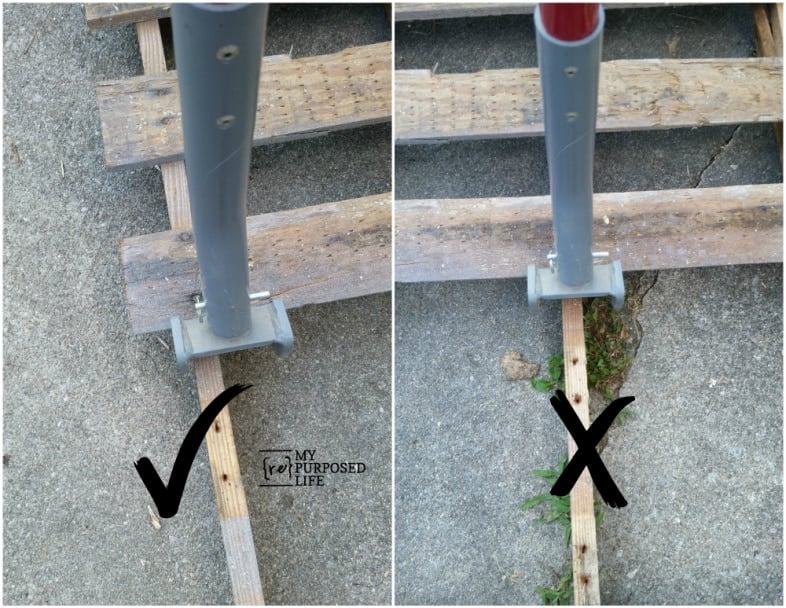
While discussing the Duckbill Deck Wrecker that quickly takes pallets apart, I want to ensure you know the best way to do so without splitting your boards. When you position your deck wrecker up against the brace board (on the left), the likelihood of your pallet board splitting is much less than if you center your duckbill deck wrecker over the brace board (on the right)
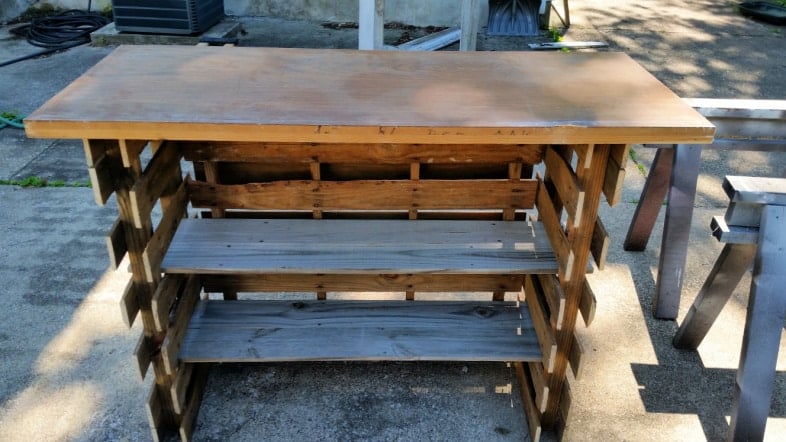
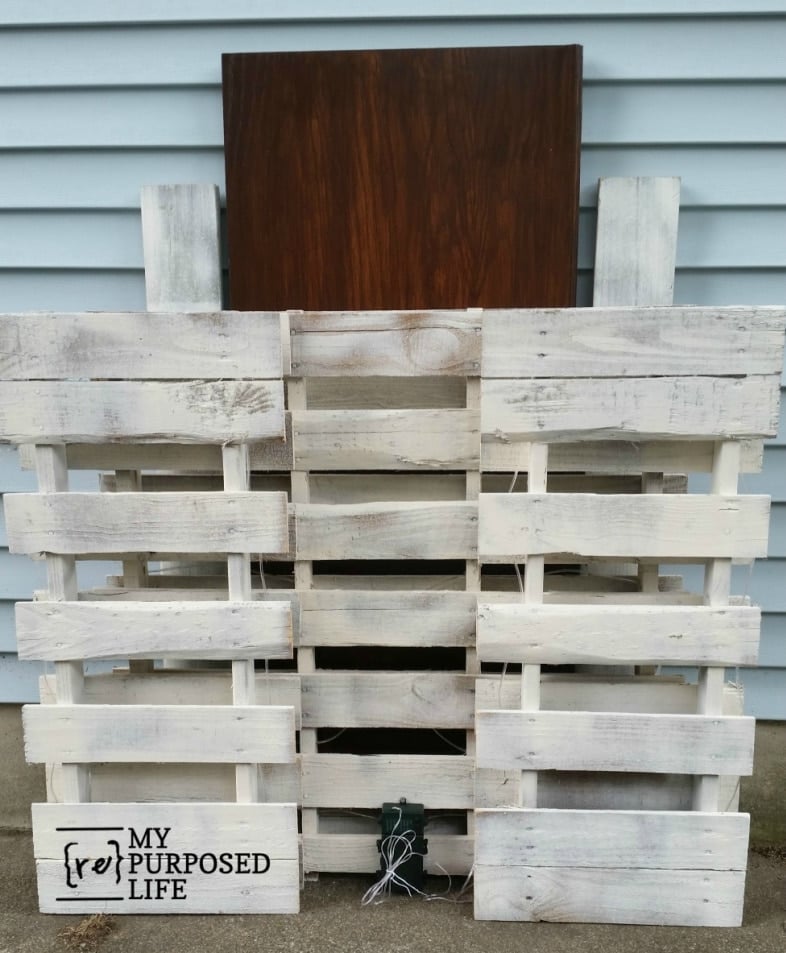
Yeah, that was a wasted hour. I don’t like how the portable bar top looks. But this image gives you a sneak peek at the adjustable shelving included with this folding pallet bar.
Pallet Bar Top
Plan B!

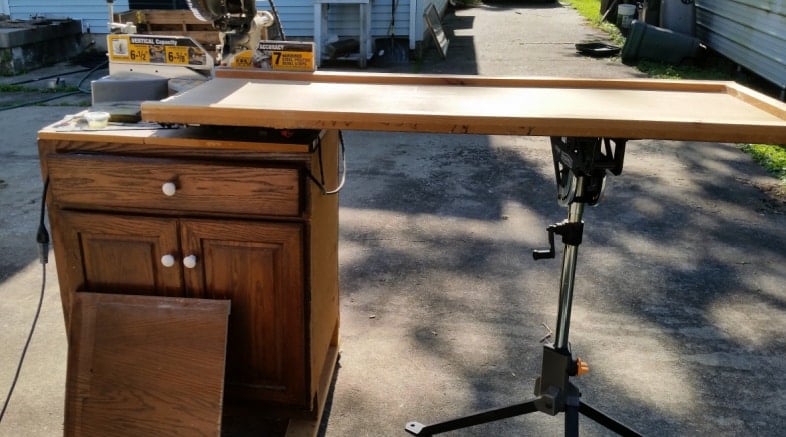
Years ago, I got a ginormous hutch from my cousin. I cut it in half. I used 1/2 of it to hold my sliding compound miter saw. (seen below) The other half of the cabinet became a craft table. This long piece leaning against doors was the top of that monster. I’ve never known what to do with it.

I dragged it out and placed it on the pallet bar to see if it would work.

This is part of the cabinet I got from my cousin. (home for my large miter saw) That jaw stand comes in handy for large jobs like this. I cut half of the top, then flipped it over to do the other half. You could use a jigsaw or a circular saw to get the same result.
Flipping the table top over and being VERY careful to avoid any screws and nails, I finished cutting the end off of the large plywood hutch top.
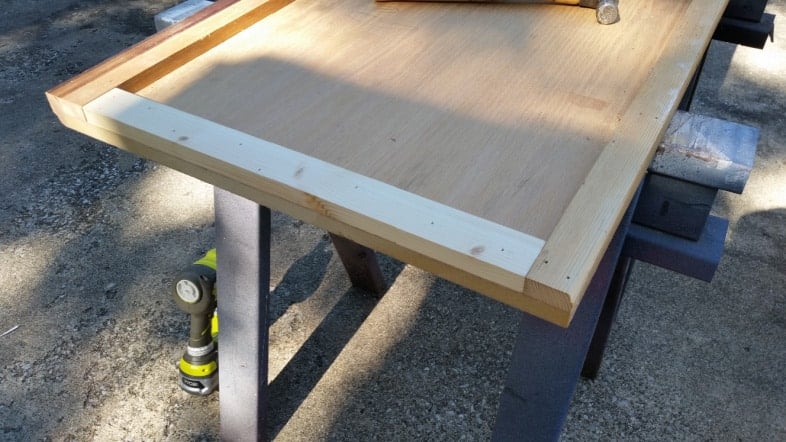
To make the cut-off end match the other end, I used a scrap 1x that I found.
I cut more fence boards to allow for adjustable shelves in the portable DIY pallet bar. At this point, I’m thrilled with how well it’s coming together, but I wanted to ensure that the top rested securely on the pallet bar.
Add Cleats to the Bar Top
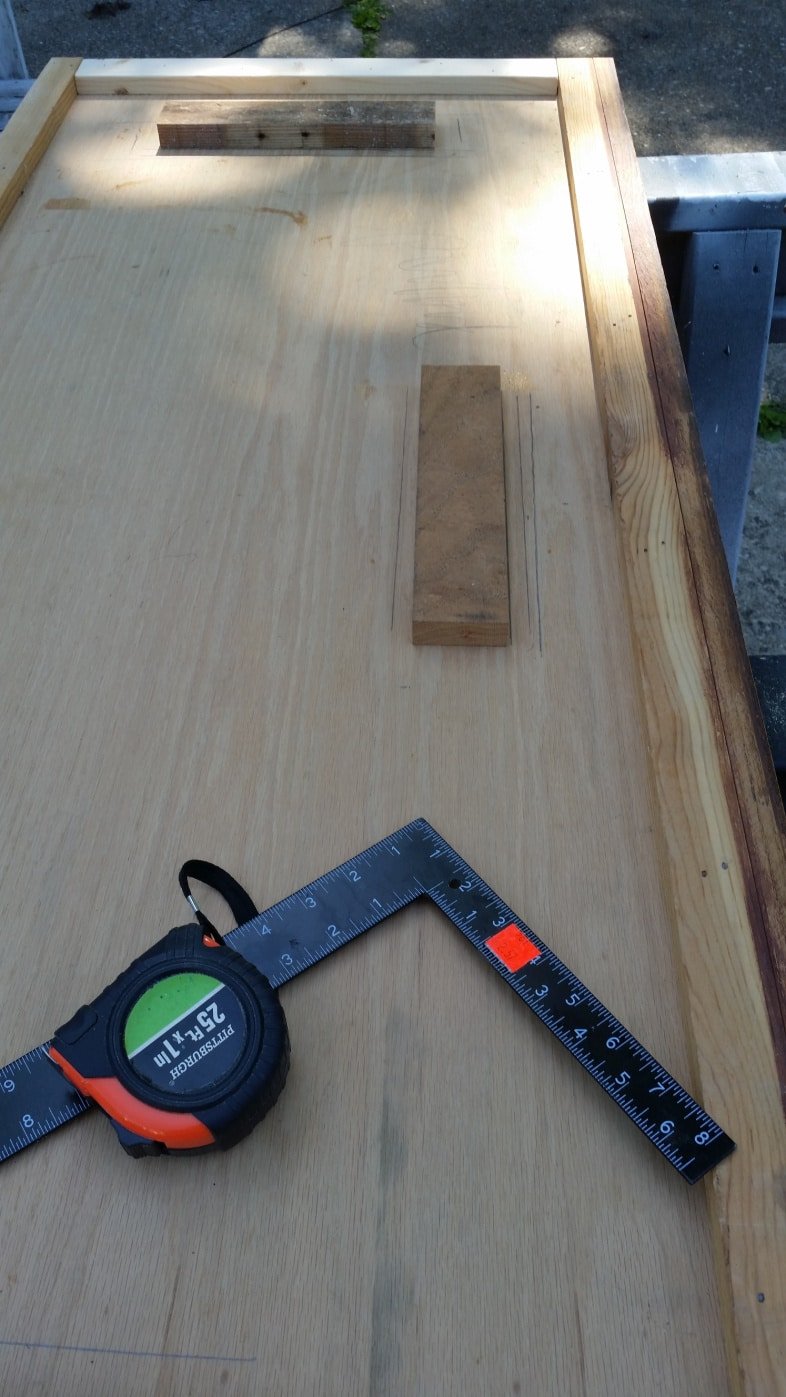
Using some of the scrap boards from the pallet I dismantled and another piece of hardwood, I made inserts to keep the pallet bar top from shifting once placed on the pallet bar. I attached the pieces with my nail gun, checked to make sure they fit okay; then secured them with some wood screws.
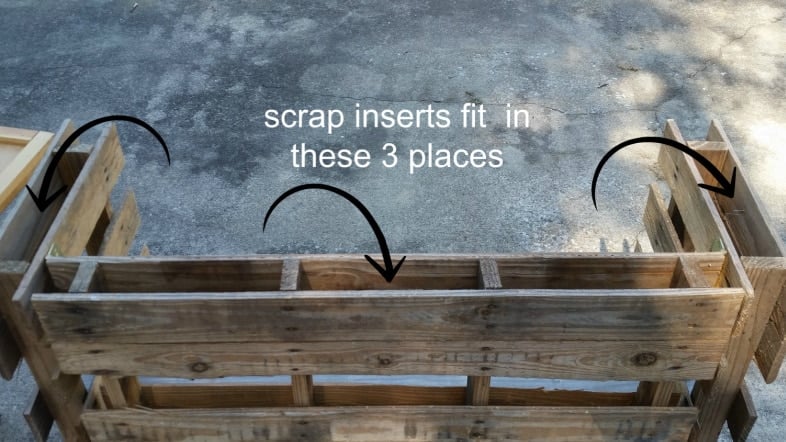
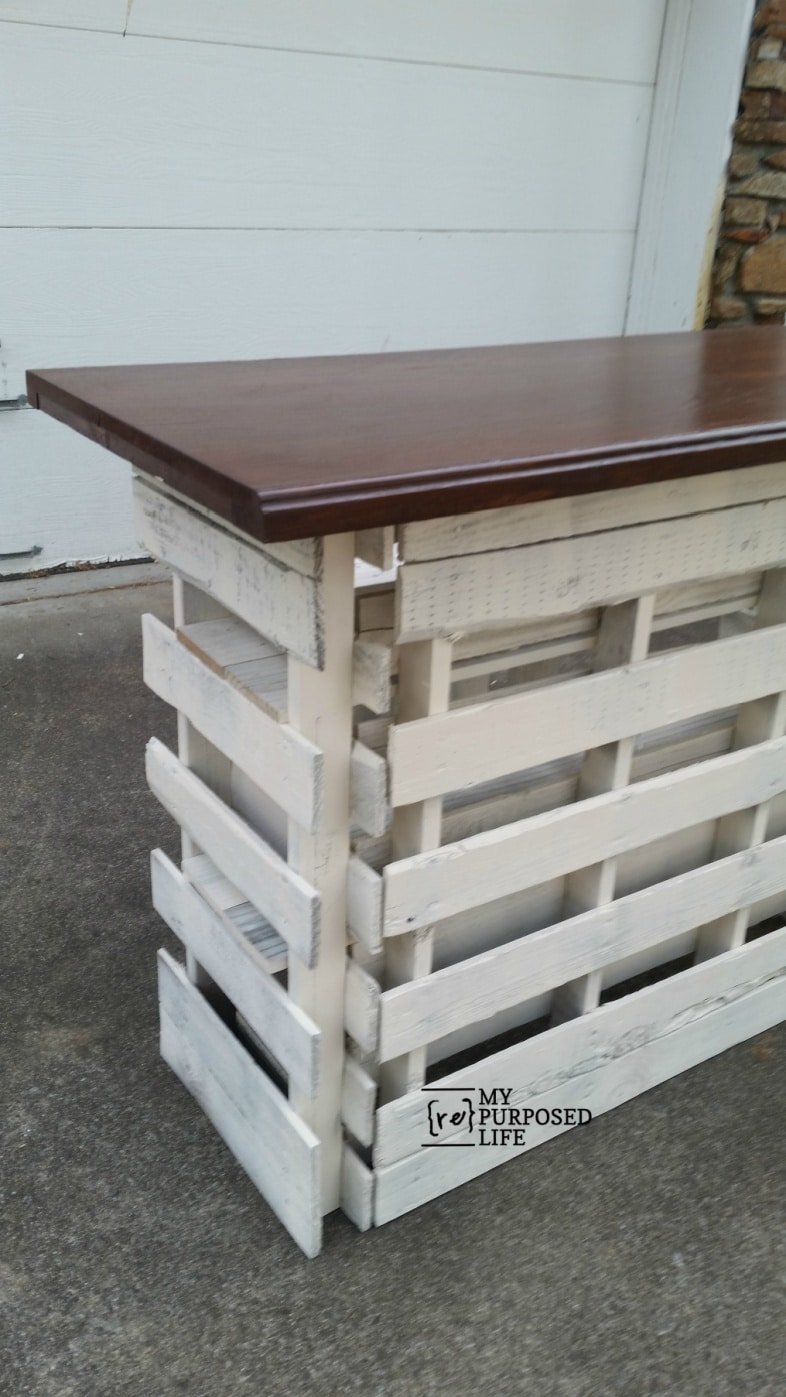
These are the three places where the inserts will rest to keep the pallet bar from shifting once it’s in place. They fit very snugly.
You’ll see in the video that they need to fit perfectly to secure the bar to the top properly.
If you look closely, you can see the insert here in the middle front of the pallet bar.

The portable bar is easy to move on my small furniture dollies. These things are a lifesaver.
Easy Stool for Pallet Bar
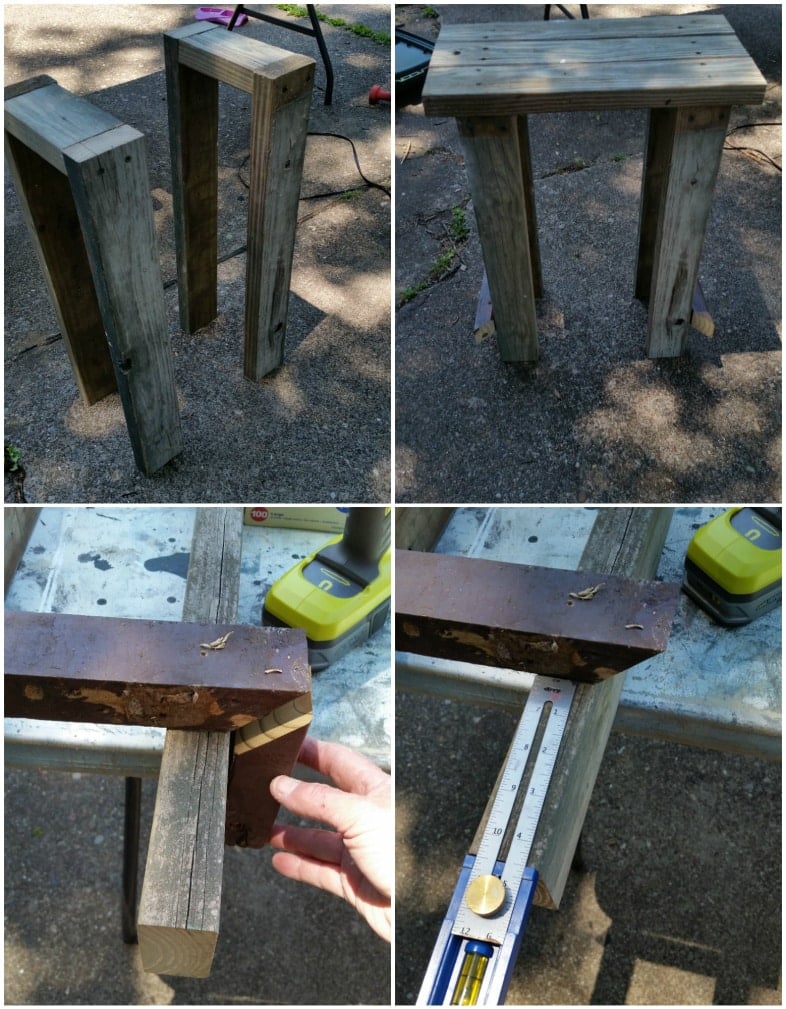
I made a DIY bar stool out of weathered 2x4s and some leftover 2x2s from my porch swing pergola. It’s a straightforward build. I used my Kreg Multi-Mark tool to place all the bottom braces uniformly.
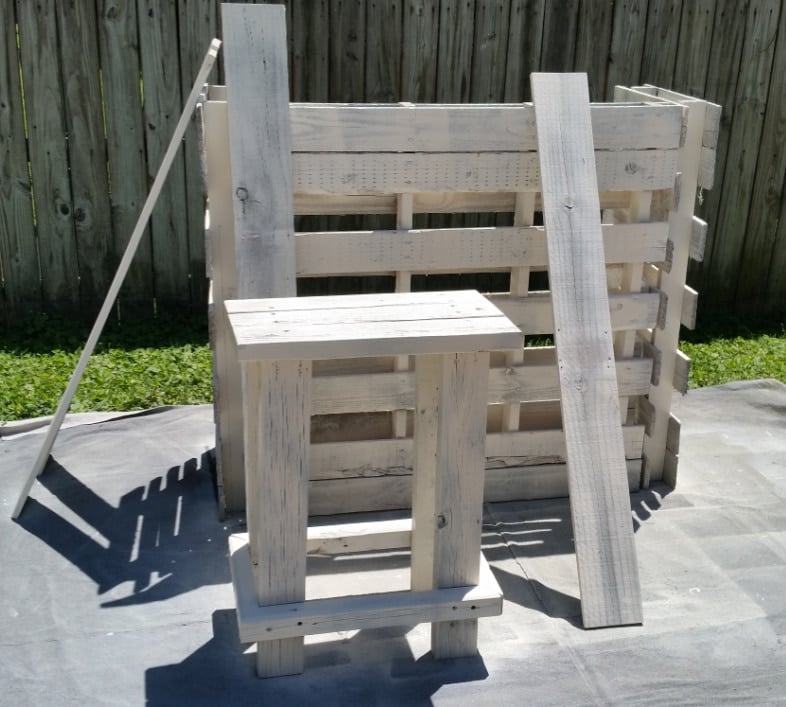
I painted all the DIY portable bar components with my Homeright Finish Max.
Stain & Protect Bar Top
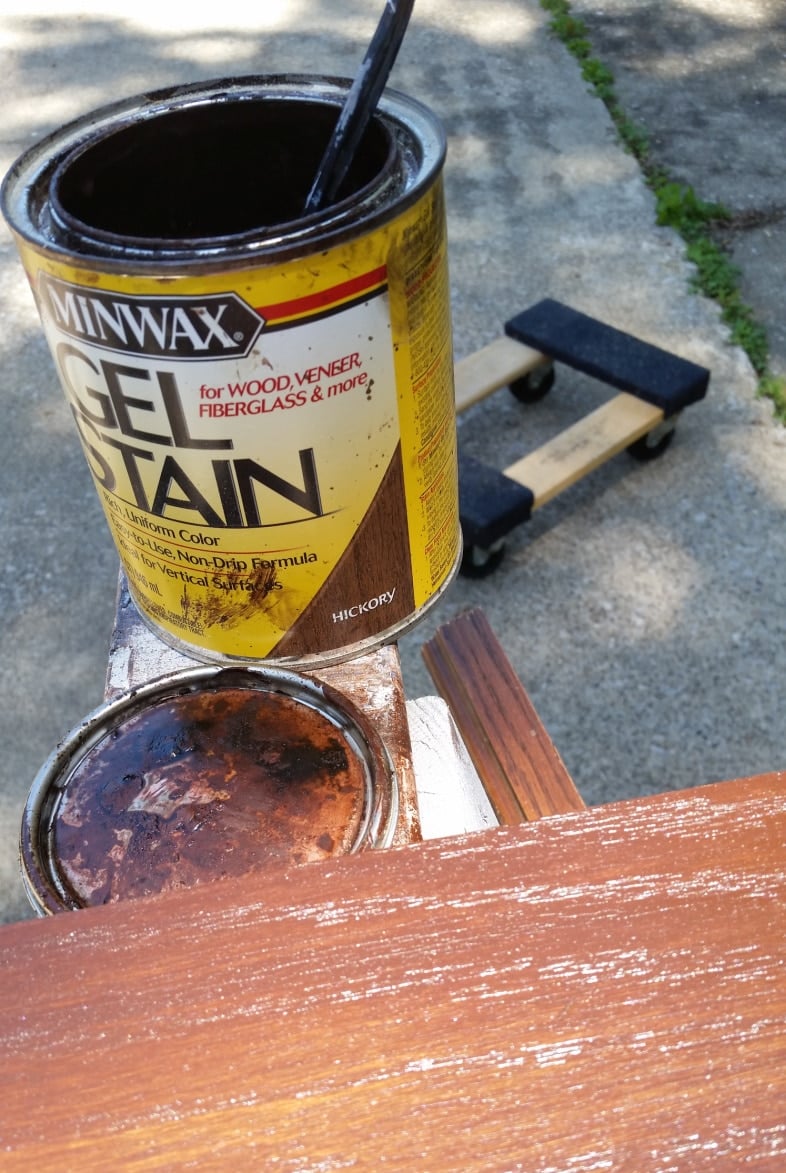
I used a Minwax Gel Stain to give the bar top a fresh new look. The color was Hickory.
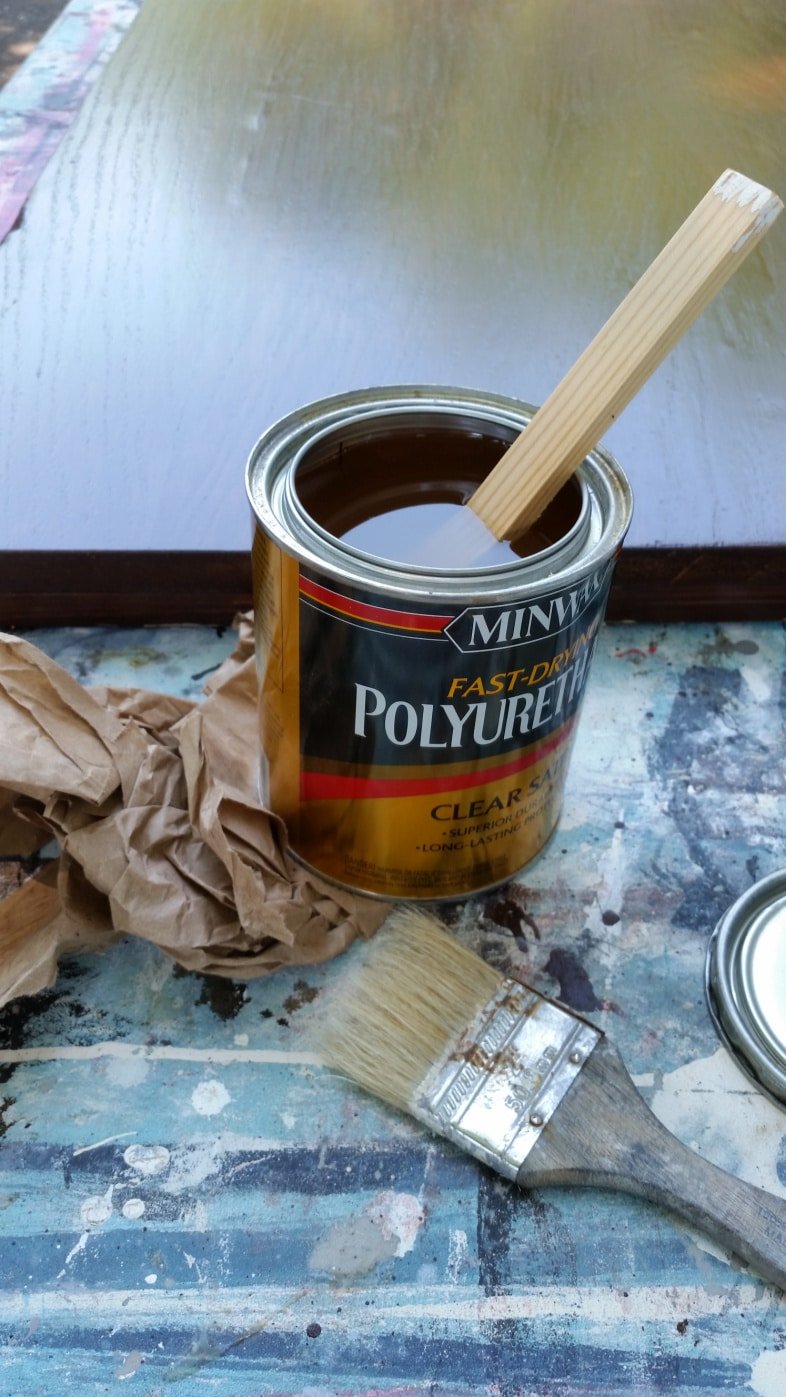
The bar top is NOT weatherproof, but I wanted to make it water-resistant because it’s a bar! I attempted to use my favorite Minwax polyacrylic for durability—BUT because the gel stain had such a shiny surface, the polyacrylic just sat on top of the wood stain.
Luckily, it’s water-based so that I could wipe it off with a damp rag.
When all else fails, read directions, Gail! The gel stain recommends Fast Drying Polyurethane. I sanded the top with brown craft paper, wiped it down, and used a cheap chip brush to apply the polyurethane. I did two coats following the directions in between coats.
Are you ready for the reveal? Or have you already scrolled down to see the “after”?
Don’t you want to make a foldable and portable DIY pallet bar? Everything but the top could stay outside in the weather.
Folding Pallet Bar

Wouldn’t it be perfect for an outdoor wedding or your next BBQ?
I LOVE Amazon Prime. I ordered these rope lights with same-day delivery.
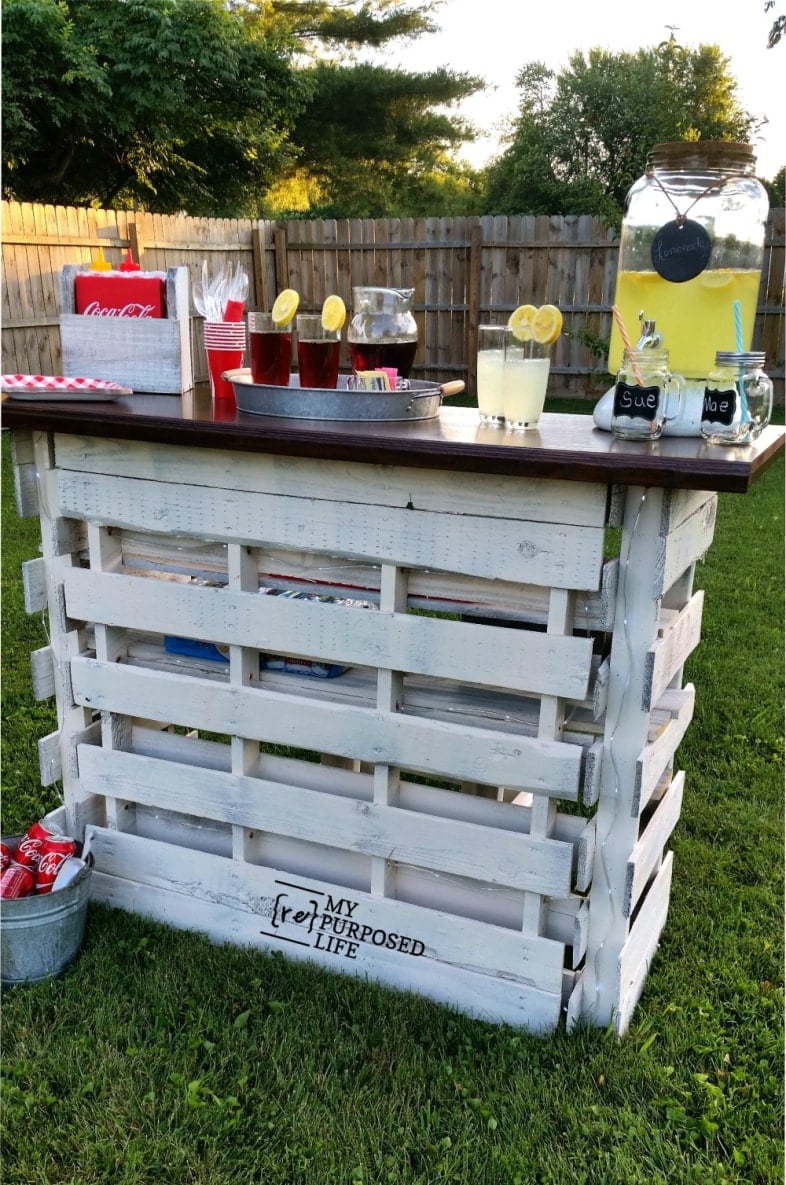
Here is the portable folding pallet bar all dressed up for a party!
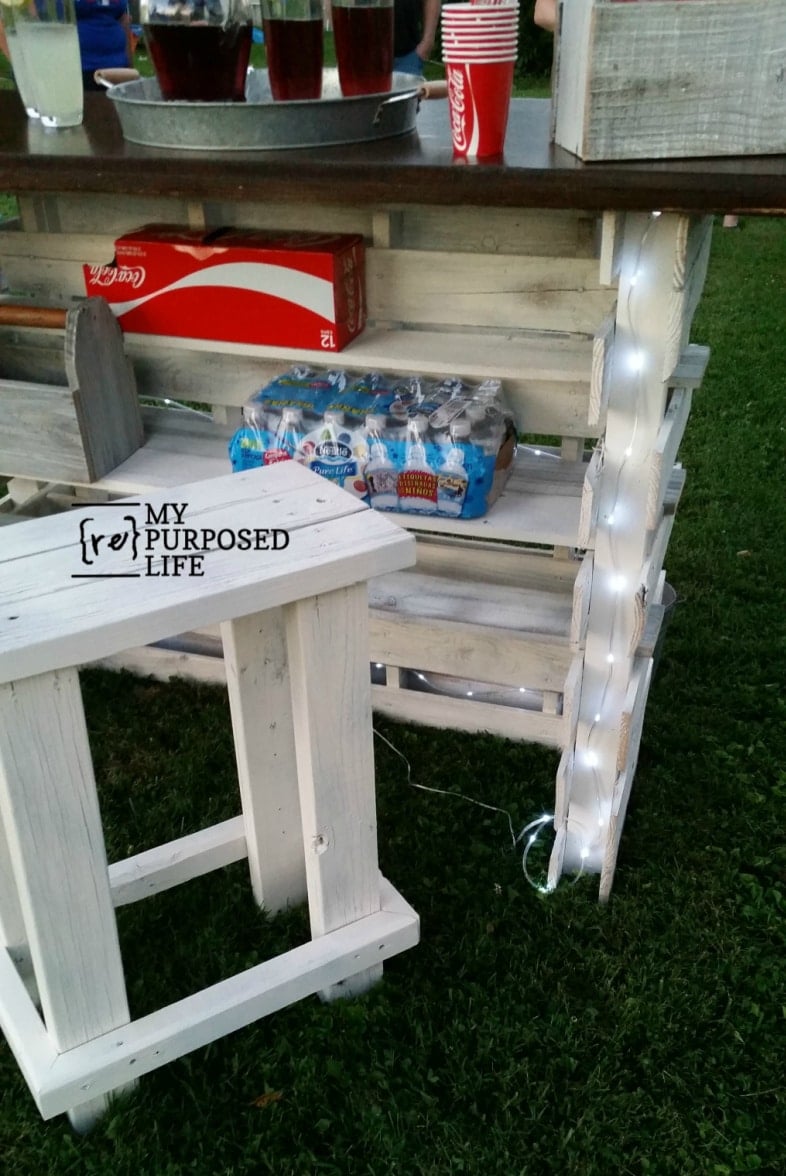
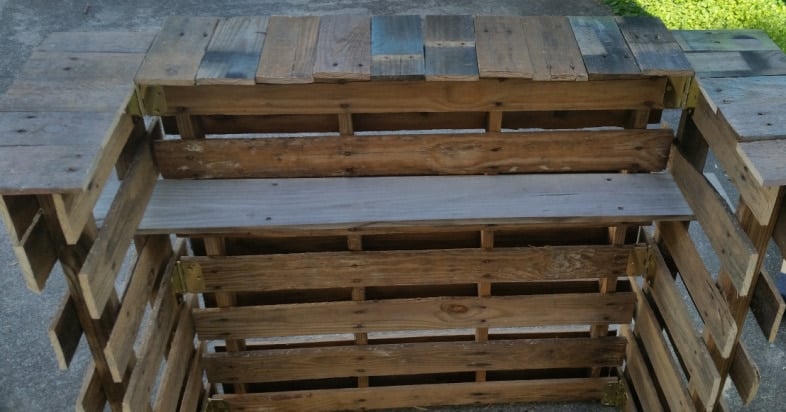
A view of the shelving area of the pallet bar—lots of storage area, completely adjustable to the owner’s liking.
There is one more option! The shelves can be placed on top of the pallet bar for a more rustic and weatherproof option.
This bar is so versatile—think weddings, reunions, birthday parties, outdoor events, and even tailgating. Move it to the front yard for the kiddos to sell lemonade.
The pallet bar easily folds away for storage, taking up very little room in your garage. Additionally, it’s very transportable in your SUV or pickup truck.

I hope I have inspired you to make your own portable pallet bar. It’s so easy to make, put up, and store!
Now, it’s time to check out all the Summer Fun projects from my friends.
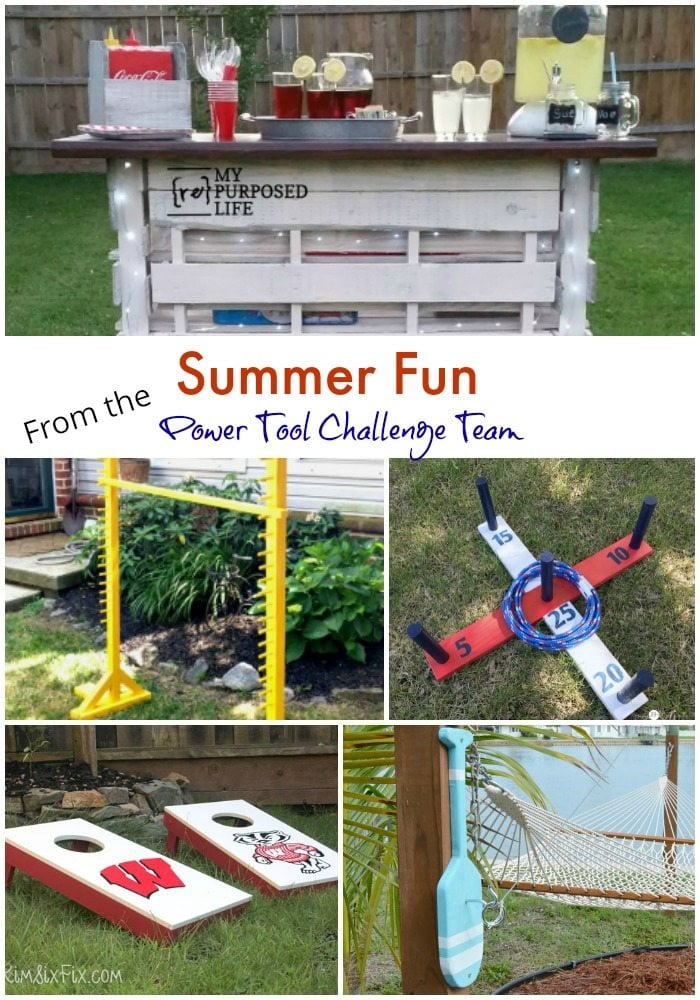
My Repurposed Life Portable Folding DIY Pallet Bar
Create and Babble Limbo Game Station
My Love 2 Create Ring Toss Game
The Kim Six Fix Cornhole Game From Cabinet Doors
H2OBungalow DIY Hook and Ring Game Tutorial
I’m recreating this for my wedding, but having a heck of a time getting the side pallets (the one cut in half) to hang straight. The pallets were in such good condition too. Did you struggle with the kind of thing at all? Trying to determine how much perfection I really need.
Hi Aisha!
Are you connecting the CUT side or the original side? I would recommend using the original portion of the HALF pallet.
Are you working on a flat surface? Hinges are funny beasts, I struggle with them too. I’m here to help in any way I can. You can email me pics if you’d like. Or reach out on facebook (messenger)
gail
I can’t believe the things you come up with to epicycle “stufff”.
Truly amazing project you have there. Not only functional but looks great too!
Keeping those pallets out of landfills ~ Genius!
Carol,
Thanks so much for checking out my folding pallet bar. It was fun, and much easier than it looks. The top was a little challenging, but I’m always trying to “use what I have”.
gail
Hi. Love this, wanting to have a table for a grooms cake when you use the shelves as table top, was it secured down or just laid on top ?
Nancy,
The top I used was very heavy. I made cleats on the underside of the top, so that the top could not shift. It rests in between wood to keep it secure.
I hope that helps.
gail
I can’t find anywhere that it gives the finished dimensions of the bar. I need to know because I’m limited on space. Love this bar and hope I can make it, with some help.
Rhonda,
I can’t really give you dimensions because I have no idea how large a pallet you will be using for your project. Pallets come in many different sizes. You will need to search for a pallet that fits your needs.
gail
What are the dimensions of the one you made?
I’m sorry, I don’t know. I sold it.
They were 2 pallets pretty equal in size. One full one, and one cut in half.
gail
What size pallets did you use? So excited to get started!!
Sylvia,
They were just regular sized pallets. It’s best if you can find two that are similar in size. I’m so happy I inspired you to make your own project! Keep me posted on how it goes.
gail
this is awesome! could you share the measurements on the stools?
I totally meant to measure the stool today, but I forgot. It’s crazy around here, I’ll try to get to it in the next few days.
gail
Hi Gail,
I love the pallet bar. Going to try to make one for a shower gift. What kind of white paint did you use? Paint or stain? It looks like the grain is still visible, which I love. Thanks so much for the idea!!
I used a whitewash effect on the pallet bar.
I thinned some regular latex wall paint with water and applied it with a cheap chip brush. 🙂
Hope that helps, good luck with your project!
gail
How do you keep the bar from falling forward?
Hi Patricia,
The bar is weighted enough that it firmly plants itself. The sides and the top offer enough stabilization that it isn’t a problem. I hope that helps.
gail
Wow Gail, that bar is perfect and i am about to embark on a similar project. I’m so glad you did it first so now I know what to do .) I love the size, the ease of making, the extra shelves, fact the top is different than sides using stain and poly, the weathered finish on the sides, the portability of it and all in all……the price (at least for me .) Did you put any paint or poly on the sides ? I didn’t see you add anything to them, i love them. Your pictures and videos tutorials are wonderful and so detailed that even school children could follow them. I was wondering, is it possible to pull the sides in flush with the front and add the hinges to the outside ?? I was thinking of doing black iron hinges and a black top but i have not had much experience using hinges so not sure about configuration of the sides, if it would work right and still fold up, i would think it would make the “inside” where shelves would be, a bit smaller but that would be ok with me if you think it would work. Sorry for the letter, i just love “ALL” your projects ! PURE TALENT .)
Thanks so much for your enthusiastic comment Diena! It makes me smile!
I hope this explanation will make sense.
I cut the pallet NEARLY in half. If you were to cut the pallet exactly in half, attach the hinges on the front, they may rest NEXT to the side of the front pallet, where mine rest BEHIND the front pallet. But as I type this, and see it in my head, I think the hinges would not allow the sides to swing all the way to the side, but only outward to make one very large front.
I honestly can’t wrap my brain around making it fold and open with hinges being seen.
let me know if you make this project.
gail
Haha, I’.m. glad I’m not the only one stumped about this. What about piano hinges, do they work both ways ?? I have seen hinges that work both ways on one of my diy shows, i think they were making a privacy screen, you know the kind with three panels that you can cover with batting and material, usually in bedrooms ? I think they used those kind of hinges so they could use both sides of the screen. Well I’m on the hunt for hinges and it will a couple weeks but i will try and post your a pick ! .) Thanks for your help, let me know if you figure it out, ok ?
Piano hinges won’t work.
I have small bi-folding hinges on my fireplace screen made out of small shutters. They are called “Double Acting Folding Screen Single Hinge”. The ones I used would be way too small for what you want.
If you have to use non-decorative hinges, why not just do them the way I did? 😉
gail
I thought maybe it would be cute if they were on the front and painted black or purchased black like wrought iron ones and then stain the top black and seal if with a Marine grade poly. We don’t have a covered deck and my poor hubby is getting really tired of hauling my white wicker chairs to the basement everytime it rains, lol
Being here on the Oregon Coast where you never know if it’s going to rain or not, I broke down this summer and bought furniture covers for all my chairs and I bought an offset umbrella and then a smaller one for the bistro table and 2 chairs so if it does sprinkle it won’t be too bad on the furniture. Winter though is a different story. Wish I had a Wisteria covered Pergola .) #dreamer Have a wonderful weekend Gail !
Thanks for the info Gail.
Just stopping in for some lemonade and to pin the pallet bar.
I absolutely love this, Gail!! Don’t you love when an idea comes to fruition?! It’s perfect and I could see this being something many people do for their own backyards! Well done, girlfriend! Pinning! 🙂