Queen Anne Tables Cut in Half
As an Amazon Associate, I earn from qualifying purchases.
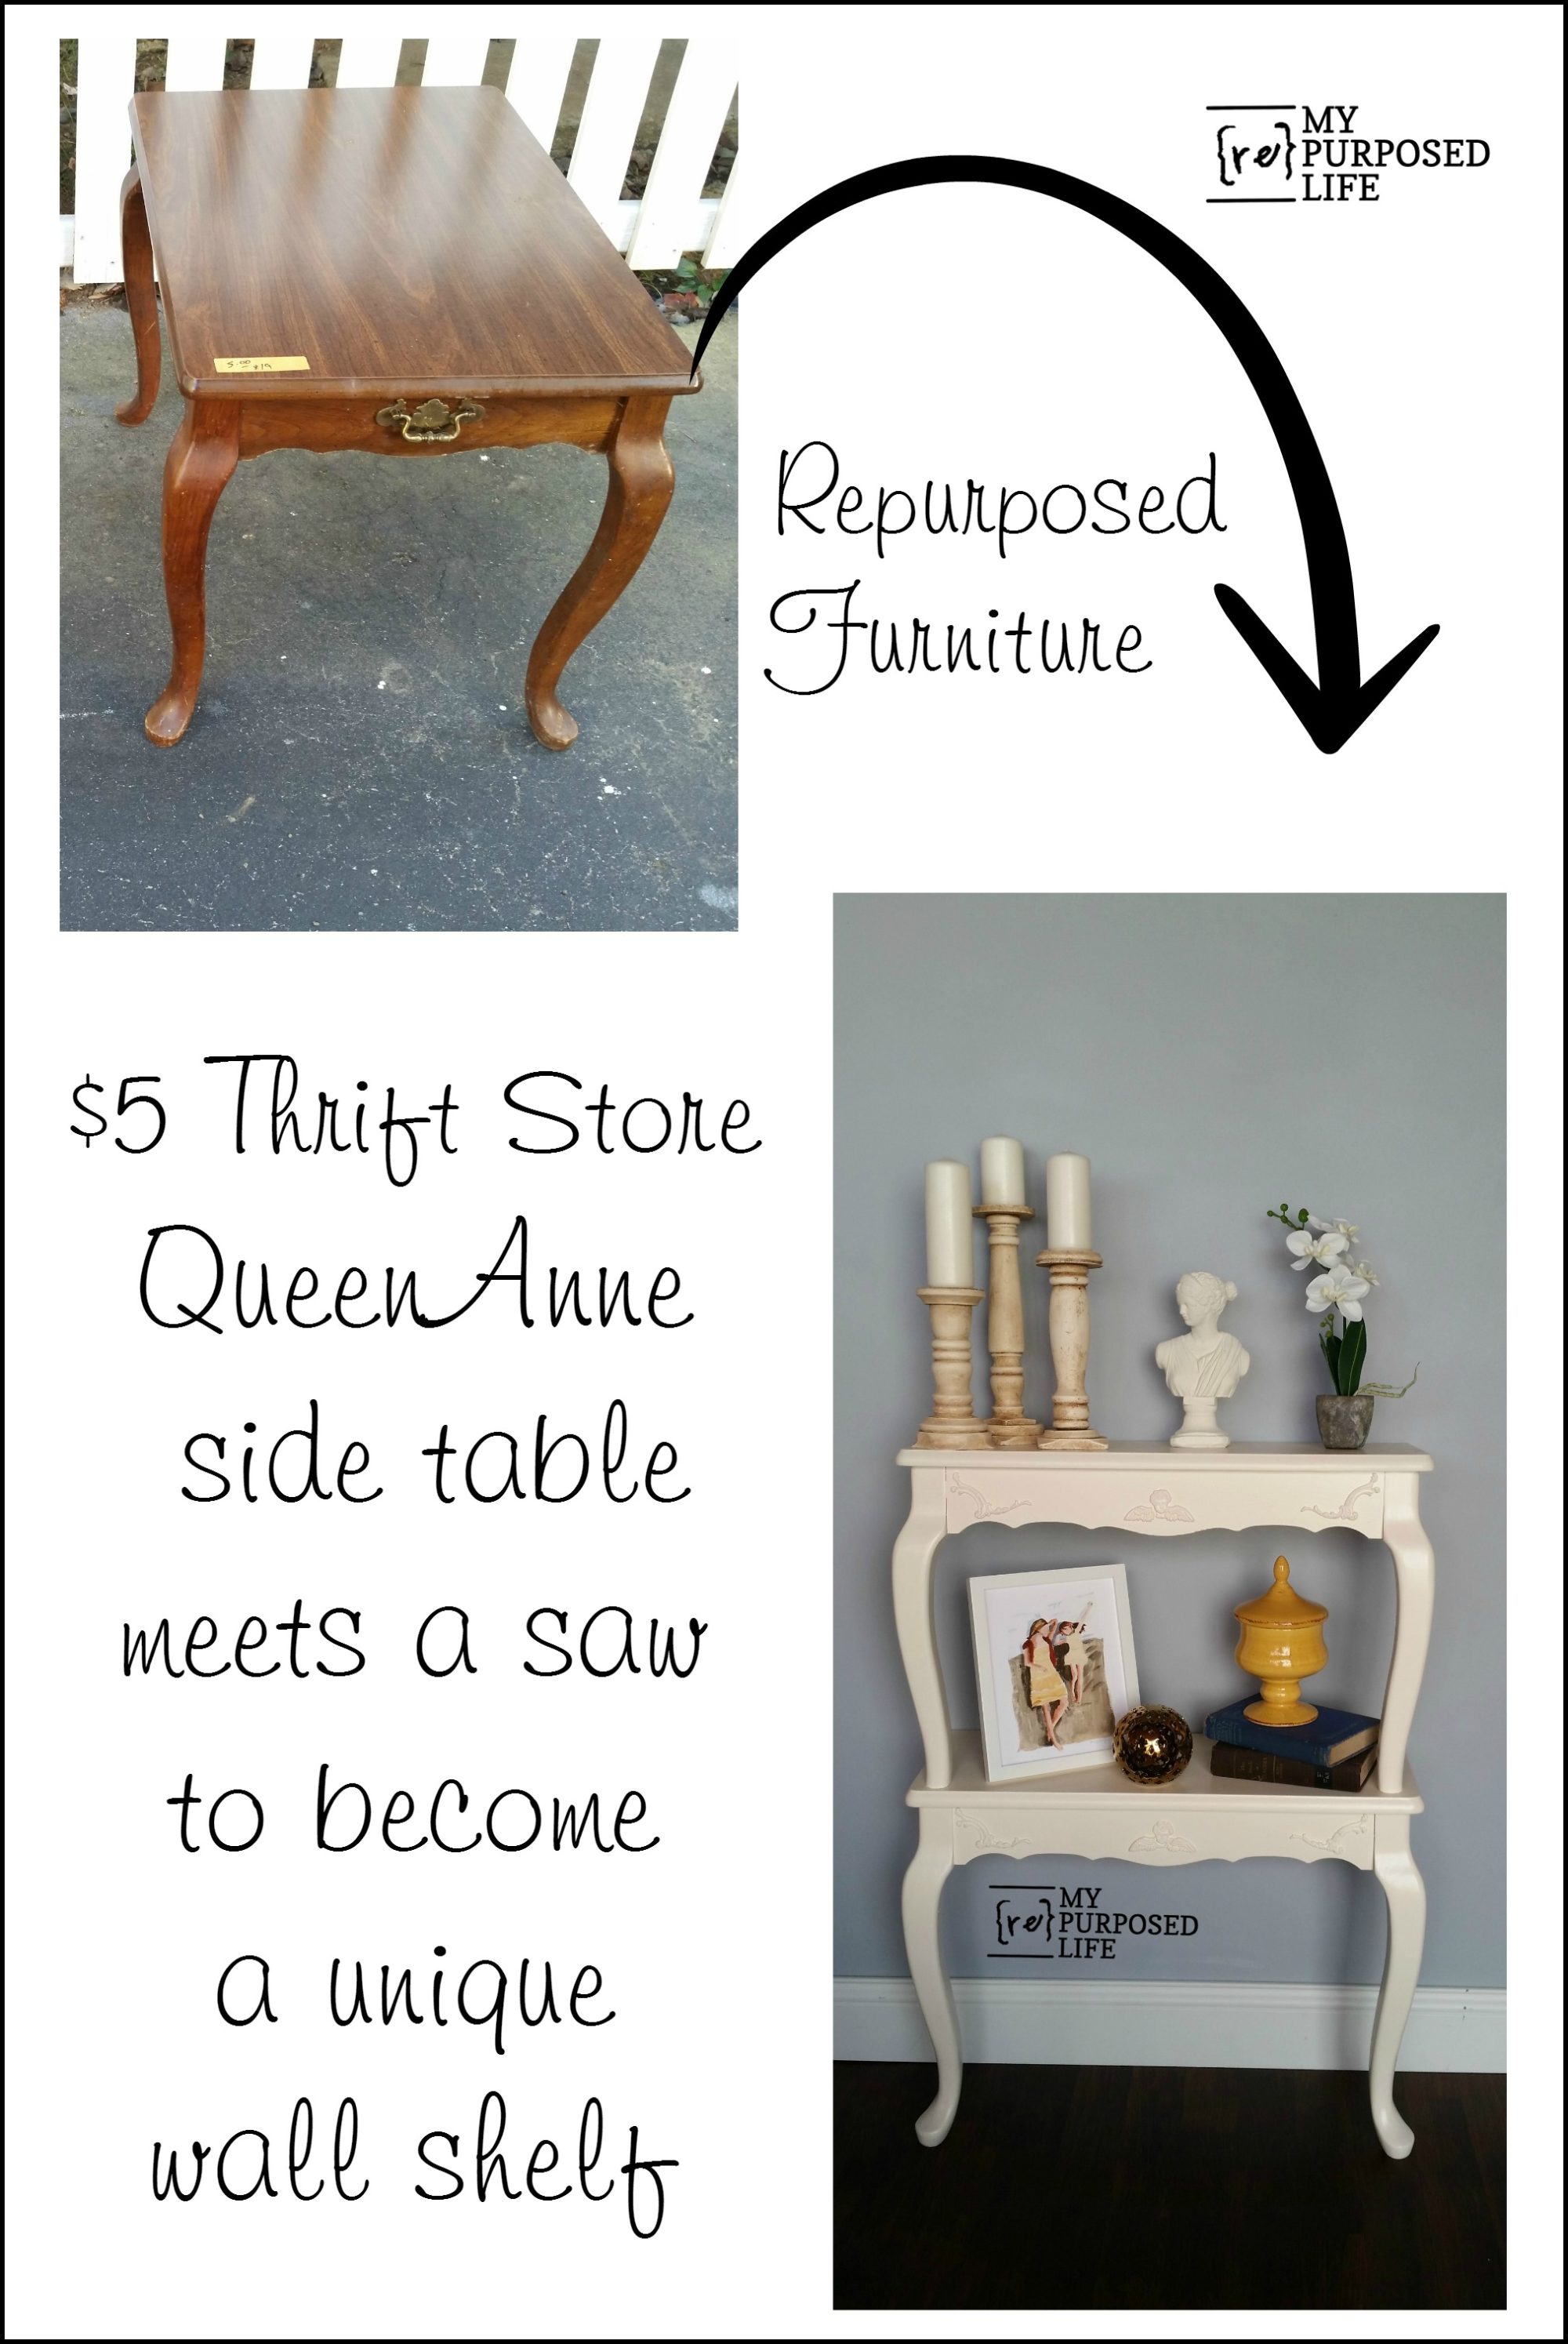
I think y’all know how much I love cutting up thrift store furniture. While looking at this pair of Queen Anne side tables, one of the vendors at Vendors’ Village called me out and said. “You’re thinking awfully hard on those tables, it’s a good deal and he just put them out”. hahaha I wasn’t trying to decide whether or not to buy them, I was trying to figure out how I would cut them up. ![]()
Thrift Store Queen Anne Tables
 After I told Joey what I had in mind and I decided to buy them, I wondered “why didn’t I have a flat cart, I ALWAYS use a big flat cart when I shop the back room”. Joey helped me get the first table in and the second one upside down, but it kept wanting to slide all around. Then Kevin (the booth where I got these tables) happened along, and helped us figure out THIS configuration to allow the tables to travel safely through the store and to my car.
Keep scrolling for great tips on how to achieve this project . . .
 The queen anne tables were in fair shape, and a good deal at $5 each.
*this post contains affiliate links*
Dismantle Tables

I knew I would cut the tables, but as I pondered the possibilities and which saw to use I felt it was best to remove the table top and cut them separately. It was seriously easy—just remove 4 screws.
Here’s the thing about saws, whether it be a table saw or a circular saw blade. You’re suppose to set the blade so that there is a small clearance beyond what you’re cutting. You can see that the skirt of the table would have needed considerable room to clear it. Then the table top would have a huge amount of blade protruding and that is not safe. Granted I could have cut up the skirt, across the top, and down the other side of the skirt. But That was a LOT of distance to travel across that table top and keep a straight line. Sometimes a few extra minutes makes it a smarter move regardless.
Cutting a table top on the table saw
 Cutting the table top in half lengthwise was so quick and easy on the table saw. Because of the kerf of the blade, I ended up sending the piece on the left through as well, and about 1/8” was cut off making the two pieces exactly the same size.
I love my self centering tape measure
 See how nice this self centering tape measure helps to find center of the queen anne table?
 ![]()
 I used a combination square to mark my center line.
Easy Cutting with a Jigsaw
 For table #1 I used my jigsaw to cut the table skirt in half.
NOTE: I put together table #1 completely then did table #2 a little differently.
Cutting a table in half


For table #2 I removed the legs and cut the skirt on my compound miter saw. PLEASE REMEMBER: remove the fake drawer hardware before attempting to saw this table in half.
 Notice that the front of the table will be supported with the original clips. The sides need to be stabilized somehow. After doing this next step, I moved the clips from their original holes to allow the sides to be flush with the back of the table.
Attach new table top with Kreg Jig Pocket Holes
 Adding a couple of Kreg Jig pocket holes is the perfect (easy) way to stabilize the sides of the table. If you don’t have a Kreg Jig, you can always use “L” brackets.
 I use so many pocket hole screws that I buy them by the thousands!
 The Kreg Multi-Mark helps me get the top spaced equally all around the skirt.
Testing how the tables fit
 Because there are no rear legs, doing a dry fit on the driveway was a good way to see how this was all going to come together.
 However, to see how they would look visually standing on top of one another, I had to use the diy picket fence as a “wall”.
The conclusion? The top table is too tall to rest onto the bottom table.
Back to the drawing board
 The decision was made to cut the feet off of the queen anne table legs. I did it on my compound miter saw, using a paint stick to try to make the leg a little more “square” so the cut won’t have an angle. Doing the first one was easy, getting the others to match was a little more challenging.
 I like the lower top table much better!
Now, I just had to figure out how to secure the top table to the bottom table. It seemed like it was not going to work for awhile.
 I used a sharpie to draw a circle around the bottom of the cut off table leg.
How to attach stacked tables together
 Removing the legs on the bottom table allowed me clearance to drill pilot holes in the center of the circle.
Bar soap aids in driving long wood screws
 I added some bar soap to some very long screws.
 This image gives you a better angle of how the top table will be secured to the bottom table. I used my favorite Gorilla Wood Glue for extra strength.
Bar clamps are helpful while wood glue sets up
 I used a bar clamp to hold the two tables together so I could secure the very long screws.
 These are the large wood screws I used.
 Countersinking the screws will allow me the room to reattach the legs to the lower table.
The queen anne tables are now stacked
 One more check to make sure that the screws put the table legs in the proper place.
 I love how they look from the side view.
 I used the Kreg Jig to make more pocket holes on a scrap 1x (1×2.5) to use as a cleat. Holes were drilled near the top of the board for the new owner to attach these unique queen anne table shelves to the wall.
 I used a countersink bit so the screws will lay flush with the cleat.
 You can see that the cleat won’t even be noticeable when the new shelving unit is installed.
 Not one, but two new Queen Anne tables shelves!
Time to paint
 I used a little oops paint to make some DIY chalky paint primer for my Homeright Finish Max. The color is sort of an off white. I got 5 gallons last year, and parted it out into this 2 gallon container so I could easily manage it.
 As always, I begin painting my new shelves upside down so I can get the underneath side.
 After those backsides dry a little, I tip the new table shelves over so I can continue painting the first coat.
 When doing the second coat using the paint without the plaster of paris, I stood the table shelves up against my easy diy sawhorses to get better coverage with my Finish Max. (I later filled the handle holes on the sides)
White queen anne tables
 I stood the table shelf up against the fence to see how it looks, and I decided it might need a little “something” else.
Paper Molded Appliques
 My IOD molds and a package of paper clay were the perfect addition for this project. This mold is Baroque #4. I filled the mold with a little extra paper clay, pressed it down really well, then used a large putty knife to scrape off the excess. After removing the excess, I used my finger to smooth out the remaining paper clay, then removed the mold before it “set up”.
 I find it best to make up the entire package when I open it. These are the other designs I made, flipping them over a few times as they dried.
Glue paper appliques onto tables
 I poured out some Gorilla wood glue to dip the pieces in, but found that painting the glue on with my finger was a much better option.
 You can see that the paper clay is in the process of drying. It turns whitish as it dries. I chose to attach the embellishments while they were still setting up.
 These little cherubs were a fun addition to the center of each table (shelf).
 A quick coat of paint (by hand) all over the table shelves blends the appliques in. I considered glazing the pair, but decided to take them to the booth to see if they sell “as is”.
 I really love the way these shelves came out.
 I’m not sure if I will sell them as a set, or as a single. What do you think? If I’ve inspired you to think outside the box, please Pin It!
gail
Check out the picture where I talk about the countersink bit. I drilled holes so that the tables could be screwed directly to the wall from underneath. Similar to this cleat table.
https://www.myrepurposedlife.com/diy-console-table-made-from-a-table-leaf-and-odd-table-legs/
gail
Check out the picture where I talk about the countersink bit. I drilled holes so that the tables could be screwed directly to the wall from underneath. Similar to this cleat table.
https://www.myrepurposedlife.com/diy-console-table-made-from-a-table-leaf-and-odd-table-legs/
gail
Check out the picture where I talk about the countersink bit. I drilled holes so that the tables could be screwed directly to the wall from underneath. Similar to this cleat table.
https://www.myrepurposedlife.com/diy-console-table-made-from-a-table-leaf-and-odd-table-legs/
gail
Check out the picture where I talk about the countersink bit. I drilled holes so that the tables could be screwed directly to the wall from underneath. Similar to this cleat table.
https://www.myrepurposedlife.com/diy-console-table-made-from-a-table-leaf-and-odd-table-legs/
gail
Check out the picture where I talk about the countersink bit. I drilled holes so that the tables could be screwed directly to the wall from underneath. Similar to this cleat table.
https://www.myrepurposedlife.com/diy-console-table-made-from-a-table-leaf-and-odd-table-legs/
gail
Check out the picture where I talk about the countersink bit. I drilled holes so that the tables could be screwed directly to the wall from underneath. Similar to this cleat table.
https://www.myrepurposedlife.com/diy-console-table-made-from-a-table-leaf-and-odd-table-legs/
gail
Check out the picture where I talk about the countersink bit. I drilled holes so that the tables could be screwed directly to the wall from underneath. Similar to this cleat table.
https://www.myrepurposedlife.com/diy-console-table-made-from-a-table-leaf-and-odd-table-legs/
gail
Check out the picture where I talk about the countersink bit. I drilled holes so that the tables could be screwed directly to the wall from underneath. Similar to this cleat table.
https://www.myrepurposedlife.com/diy-console-table-made-from-a-table-leaf-and-odd-table-legs/
gail
Check out the picture where I talk about the countersink bit. I drilled holes so that the tables could be screwed directly to the wall from underneath. Similar to this cleat table.
https://www.myrepurposedlife.com/diy-console-table-made-from-a-table-leaf-and-odd-table-legs/
gail
Check out the picture where I talk about the countersink bit. I drilled holes so that the tables could be screwed directly to the wall from underneath. Similar to this cleat table.
https://www.myrepurposedlife.com/diy-console-table-made-from-a-table-leaf-and-odd-table-legs/
gail
Check out the picture where I talk about the countersink bit. I drilled holes so that the tables could be screwed directly to the wall from underneath. Similar to this cleat table.
https://www.myrepurposedlife.com/diy-console-table-made-from-a-table-leaf-and-odd-table-legs/
gail
Check out the picture where I talk about the countersink bit. I drilled holes so that the tables could be screwed directly to the wall from underneath. Similar to this cleat table.
https://www.myrepurposedlife.com/diy-console-table-made-from-a-table-leaf-and-odd-table-legs/
gail
Check out the picture where I talk about the countersink bit. I drilled holes so that the tables could be screwed directly to the wall from underneath. Similar to this cleat table.
https://www.myrepurposedlife.com/diy-console-table-made-from-a-table-leaf-and-odd-table-legs/
gail
Check out the picture where I talk about the countersink bit. I drilled holes so that the tables could be screwed directly to the wall from underneath. Similar to this cleat table.
https://www.myrepurposedlife.com/diy-console-table-made-from-a-table-leaf-and-odd-table-legs/
gail
Check out the picture where I talk about the countersink bit. I drilled holes so that the tables could be screwed directly to the wall from underneath. Similar to this cleat table.
https://www.myrepurposedlife.com/diy-console-table-made-from-a-table-leaf-and-odd-table-legs/
gail
Check out the picture where I talk about the countersink bit. I drilled holes so that the tables could be screwed directly to the wall from underneath. Similar to this cleat table.
https://www.myrepurposedlife.com/diy-console-table-made-from-a-table-leaf-and-odd-table-legs/
gail
Check out the picture where I talk about the countersink bit. I drilled holes so that the tables could be screwed directly to the wall from underneath. Similar to this cleat table.
https://www.myrepurposedlife.com/diy-console-table-made-from-a-table-leaf-and-odd-table-legs/
gail
Check out the picture where I talk about the countersink bit. I drilled holes so that the tables could be screwed directly to the wall from underneath. Similar to this cleat table.
https://www.myrepurposedlife.com/diy-console-table-made-from-a-table-leaf-and-odd-table-legs/
gail
Check out the picture where I talk about the countersink bit. I drilled holes so that the tables could be screwed directly to the wall from underneath. Similar to this cleat table.
https://www.myrepurposedlife.com/diy-console-table-made-from-a-table-leaf-and-odd-table-legs/
gail
Check out the picture where I talk about the countersink bit. I drilled holes so that the tables could be screwed directly to the wall from underneath. Similar to this cleat table.
https://www.myrepurposedlife.com/diy-console-table-made-from-a-table-leaf-and-odd-table-legs/
gail
Check out the picture where I talk about the countersink bit. I drilled holes so that the tables could be screwed directly to the wall from underneath. Similar to this cleat table.
https://www.myrepurposedlife.com/diy-console-table-made-from-a-table-leaf-and-odd-table-legs/
gail