• Skip to primary navigation
  • Skip to main content
  • Skip to primary sidebar
  • Start Here
  • Shop Favorites
  • About
    • Welcome To My Repurposed Life Home of Repurposed Furniture
    • More About Gail
    • Disclosure
    • Privacy Information
  • Gallery
    • Repurposed Furniture
  • Repurposed Items
    • Building Supplies
    • Miscellaneous Household Items
    • Picture Frame/Chalk Board
  • DIY
    • Home Reno
    • outdoor living
    • Painting
    • Shop Talk
    • Tips for Around the House
    • Build It
      • Furniture
      • Home Decor
      • Storage
    • Crafts
      • Dollar Store
      • Easy
      • Holidays Seasonal
  • Furniture
    • Chair
    • Desk
    • Dresser/Chest
    • Headboard | Bed Parts | Cribs
    • Kids Furniture
    • Table
    • Kids Furniture
My Repurposed Life® Rescue Re-imagine Repeat
menu icon
go to homepage
subscribe
search icon
Homepage link
  • About
  • Start Here
  • Project Index
  • Furniture
  • Subscribe
    • Email
    • Facebook
    • Instagram
    • Pinterest
    • RSS
    • Twitter
  • ×

    Home » Home Reno » Review-Giani Granite Paint for Countertops

    Review-Giani Granite Paint for Countertops

    Published by Gail | Published December 12, 2011 | Updated May 14, 2021
    As an Amazon Associate I earn from qualifying purchases.

    Pin
    Share
    Tweet

    See the bottom of this post for another NEW update

    update-laminate-counter-with-paint


    If you’re new around here, I should show you  how my kitchen looked this time last year:
    100_7366

    100_8694I painted my oak cabinets white, and I even painted my vinyl floor. Did you notice the utensil holder and knife block? I painted them with Krylon Stainless Steel paint.

    100_9215I also added a board and batten back splash. I wanted to update my countertops, but it wasn’t in the budget.
    But Giani Granite BOMBAY  changed all of that!
    .

    Bombay Black
    Complete Kit:

    • IronCoreTM    Primer-Base Coat
    • Pearl Mica Mineral
    • Black Onyx Mineral
    • Bronze Mineral
    • Automotive Polyurethane Topcoat
    • 6” GIANITM roller arm and two roller pads
    • 4” GIANITM granite paint sponge
    • 2” Foam Brush
    • Black practice poster board
    • Paint by Number DVD for beginners
    • Illustrated Instructions

    Giani Granite

    Let’s begin with Giani Granite Paint!

    Giani Granite 151The first thing I had to do was remove any silicone caulk, because it’s not paintable.


    Giani Granite 156The next step was to tape off everything with ScotchBlue painter’s tape. I used a large baggie for my faucet and small baggies for my handles.


    Giani Granite 157I started applying the primer with the roller.


    Giani Granite 159The coverage was really great!


    Giani Granite 162I did a light second coat. It only calls for one coat, but I’m a 2 coat primer girl.


    Giani Granite 167Looking good!


    Giani Granite 170I gathered all of the items from my kit. I cut the sponge into smaller pieces.
    I practiced on the poster board, but I didn’t take any pictures of that.


    Giani Granite 172If you ever do anything like this, you know that sometimes you forget you’re a blogger. I didn’t snap many pictures, and the ones I did take are poor quality.


    Giani Granite 174In the DVD (which I watched twice) the lady tells you that you get more depth with more layering. It called for me to do the Pearl Mica Mineral  first, then the Black Onyx Mineral, with the Bronze Mineral being last. I did that, but then I added a little more of the Black Onyx and then added a little of the Pearl Mica. I don’t think there is a wrong way to layer. It’s all a personal preference. I used VERY little of the Bronze Mineral.
    You work in about 2 ft. sections, with all 3 colors before you move onto the next 2 ft. section. You do not do all one color, then the second, and third color.

    Giani Granite 176I believe this is after one coat of the topcoat.

    Giani Granite 179When I removed the tape I did have a little bleed, but I really believe it was operator error. When I added my board and batten backsplash there was quite a gap, which meant more than the usual amount of caulk.

    Please ignore the toaster in the sink. I had not used my sink for a couple of days (had everything covered with tape and baggies) but I wanted some toast and  couldn’t put the toaster on the countertop.


    Giani Granite 181The finish is perfect. I am not a real “glossy” person. I’m generally more of a matte finish girl. I applied 2 coats of the topcoat, then scored the tape and removed it.

    Giani Granite 184I will give my countertops a good deal of time to cure. Anytime I paint something, I let it cure really well, and this will be no exception.


    Giani Granite 185I have to tell you that I have had this kit for quite a while. I kept putting it off because I thought I wouldn’t be able to accomplish it with good results.


    Giani Granite 186It’s pretty difficult to take a picture of such a shiny surface!

    Giani Granite 187I LOVE the way it shows off my painted cabinets!

    Giani Granite 196Here you can see that I definitely need new appliances! My stove and fridge are so dated! This is a quickly staged photo because I need to wait a couple of days before I put my stuff back on the countertops.

    Giani Granite 199In these photos I have not re-caulked yet.

    Giani Granite 207I have caulked (late Sunday night) but haven’t taken any pics yet.

    Giani Granite 212Do you love them as well?
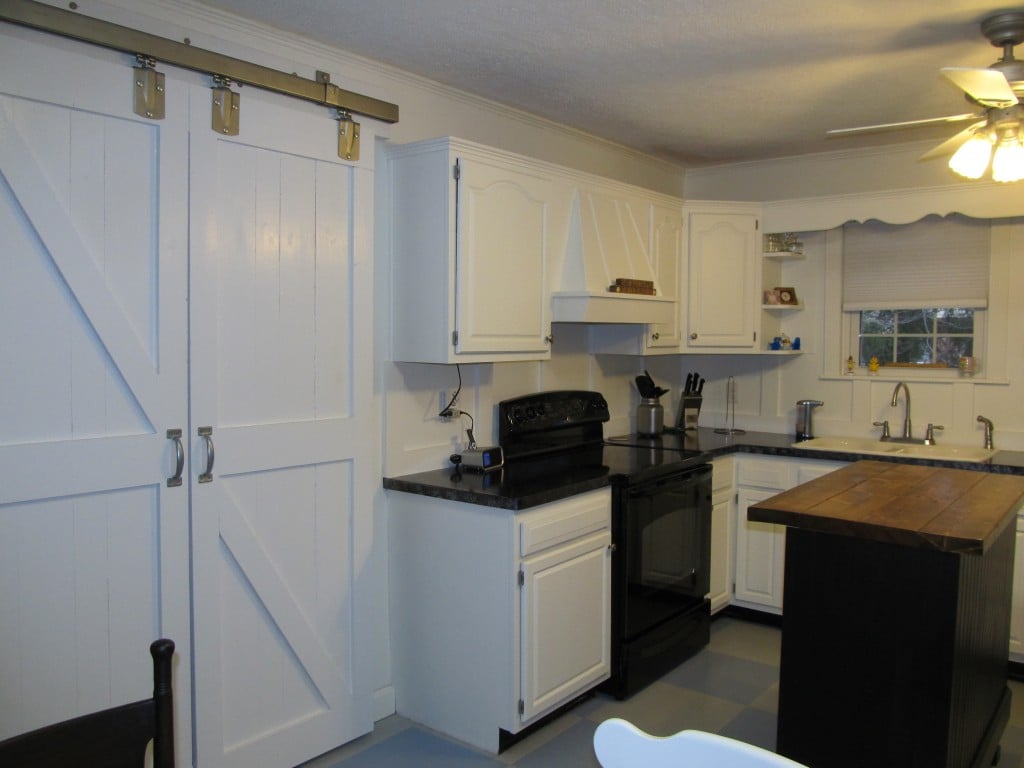
    updated-kitchen

    UPDATE:  It's been over 2 years since I painted my counter tops and I STILL love them! They've held up great, with only a little wear near the sink where I stand to wash dishes on a daily basis. 😉    I finally got new appliances, and you  can also see I've added a DIY kitchen Island and Barn Doors. I've also updated the color of the floor.


    After TEN years, I repainted my countertops, see that post here:

    gail
    Disclosure: Although Giani Granite supplied me with a kit to review, my opinions as always are my own. I received no compensation to write this post.


    Pin
    Share
    Tweet

    Reader Interactions

    Comments

      See comments Cancel reply

      Your email address will not be published. Required fields are marked *

      This site uses Akismet to reduce spam. Learn how your comment data is processed.

    1. Jo Kosobucki

      February 14, 2019 at 7:21 am

      This has been a really helpful post to read. Thanks you! I'm considering this for our home and wonder if you STILL, after all of these years, would recommend this product. I've heard that just puddled, standing water will ruin it and many types of soap will also cause damage. Our original countertops (from 1986, when the house was built) are not very aesthically pleasing. 🙂 But they are, at least, intact. Thanks so much for reading and responding!

      Reply
      • Gail Wilson

        February 14, 2019 at 9:33 am

        Funny you should ask this Jo! I am just about to replace those old counter tops. They have served me well.

        I never had problem with water marks.
        Once I left a tub of cleaning wipes upside down to disperse the liquid. I left them for over a day, and the liquid did eat all the way through to the original counter.
        That being said, if you don't want the hassle and expense of new cabinets, this is well worth the time effort and expense to "stretch" your counters. I want butcher block. If I liked granite or something similar, I would have no issue repainting these counters again. 🙂
        I hope that helps!
        gail

    2. jennifer

      February 10, 2016 at 8:38 am

      sorry let me elaborate on that... did you sand the counters first? it didnt say in the steps but i imagine you would have to unless this is a special pain that is ok with slick surfaces...

      Reply
      • gail@myrepurposedlife.com

        February 10, 2016 at 8:46 am

        It was a long, long time ago. I remember cleaning the counters really well. This paint (primer) is so incredibly FLAT, that it adhered really well. It's still hanging in there really well.
        There was an oops recently. I had some lysol wipes that all the cleaner had settled to the bottom. I turned the container over for about a day, and when I moved it, it had eaten down to the primer. NOT the counter, that primer was still there! I intend to repair it someday. 🙂

        gail

    3. jennifer

      February 10, 2016 at 8:32 am

      how did you get the paint to stick so well over the laminate?

      Reply
    4. Elisabeth

      August 30, 2015 at 8:09 pm

      My husband's friends did this in their house, and he said the countertops have a bumpy texture. Is yours like that or is it smooth like granite? Wondering if they just didn't sand it well enough...

      Reply
      • gail@myrepurposedlife.com

        August 30, 2015 at 8:18 pm

        Elisabeth,

        That's a great question. Today, as I was wiping the counters, to the left of the sink.... I wiped, then dried it off, and actually ran my hands across the counter. It was perfectly smooth-still! After all these years. It still makes me smile, and seriously, just today I was appreciating it.

        gail

    5. Trish Davenport

      August 28, 2015 at 7:54 am

      You are one brave lady. Your many jobs are a beautiful testament to what one can do on their own. But I'm still laughing at the toaster in the sink part. Beautiful finish to a gorgeous kitchen.

      Reply
    6. Gail D.

      July 31, 2015 at 12:36 am

      I have a ticky little grammatical error to point out. The idiom is not to "relish in," it's "to relish." So above, it would correctly say, "Gail relishes the the chance..." I always appreciate it when someone helps me express myself better.

      Reply
    7. Trish Davenport

      October 13, 2014 at 11:51 am

      Thank you for the link to your DIY counter tops. I am now totally convinced that you are a "Die Hard" DIYer. Your
      work is so well executed. The entire kitchen make-over is fantastic. You did so good girl. you are a pro.

      Reply
    8. Linda

      May 15, 2014 at 11:52 pm

      LOVE how u did the counter tops... I totally have to do that to mine... where did u get the kit? and honestly, how difficult was it? I love everything you do...

      Reply
      • gail@myrepurposedlife.net

        May 16, 2014 at 8:50 am

        Giani sent me the kit. I believe it is available at Walmart now, and of course online. I think the prices is around $80, a lot cheaper than the Rustoleum kit.

        It was very easy. I was nervous about getting a good "pattern" because I had never done any painting like this, but they include a DVD and after watching it, I felt good about trying it.

        They have held up great, I still love them, and will keep them until I get a new sink (someday) If you hate your counters like I did, what do you have to lose? 🙂

        gail

    9. Mary

      February 19, 2014 at 10:06 pm

      It is amazing how different your kitchen looks just by painting cabinets and counters. It looks so modern and bright! Thanks for sharing your experiences. It gives us hope that we can do it too.

      Reply
    10. Sue

      February 19, 2014 at 8:47 pm

      Hi Gail......your counter tops are fantastic! You always impress me with all you do!

      Reply
    11. Rose Sanabria

      February 19, 2014 at 4:07 pm

      I have been toying with an idea for my kitchen too. Simply waiting for money from heaven. You have done what I want to do. Paint the cabinets, and paint the counter tops. Good show. I am a older and I live alone, so I have to think carefully what I can accomplish. You make it look easy. I love the Island idea too.

      Reply
    12. Keira

      January 07, 2014 at 11:59 am

      Hello Gail,
      I just discovered your diy website and love it. I am looking forward to jocking your style and repeating these projects. This is a great idea and since my family and I are moving into a home that does not have updated counter tops this will be an excellent alternative.

      Reply
    13. Nikki

      May 21, 2013 at 1:55 pm

      WOW! I love the countertops now! We live in a double wide trailer and all the countertops throughout the house are this ugly lavender/blue/grey color - yuck. We can't afford to get new ones installed so I've just been living with them. But now I have hope that they can look gorgeous!! So glad I found this page today. ( :

      Reply
    14. Anonymous

      January 29, 2013 at 4:04 pm

      This comment has been removed by a blog administrator.

      Reply
    15. Anonymous

      January 12, 2013 at 4:45 am

      What an inspiration. I always wanted to paint my counter tops, an inexpensive option to buying the real stuff. You make me want to forge ahead and take on the challenge.Awesome Job!!
      Saundra

      Reply
    16. Betty

      January 05, 2013 at 11:28 am

      WOW! Truly amazing,Gail.I also have Oak Cabinets in my kitchen and I am tired of them.I had thought about painting them white a while ago and now that I have seen yours I will defnitely consider it more. I painted a wood bedroom set, white, quite a few years ago. I used Melamine Paint and it still looks like new with no scratches. Do you think Melamine Paint would work on my Oak cupboards?
      Also I was wondering.Are you now going to paint the blue squares in your floor black??LOL

      Reply
    17. Anonymous

      December 07, 2012 at 4:56 am

      I'm so happy to know about this product and that you are still happy with it after a year. My kitchen counter is grand central station and I'm not sure I can be so gentle with it. Guess I'll think about it after I find out the cost of the kit. Thanks again.

      Reply
    18. Racheal T

      November 21, 2012 at 3:38 am

      Howdy! I just did this to my counters as well. I've researched but I can't find an answer...what do you clean your counters with? The Giani site says to not use abrasive cleaners(like Bleach spray) but I want to make sure my counters don't have germs on them. Thanks! 🙂 Racheal

      Reply
    19. S.Haze

      July 18, 2012 at 7:19 pm

      How long since you did this and have you experienced any problems with it? Peeling etc like the one commenter had?

      Reply
    20. Kristen

      June 15, 2012 at 12:58 pm

      Can you paint appliances with the stainless steel look like what you did with the butcher block?

      Reply
    21. Anonymous

      May 17, 2012 at 4:10 pm

      Hi there! I'm new to pinterest but I wanted to say if your appliances work well, you can also paint those. I painted an oven and stove using engine paint bought at an auto store such as napa, auto zone, or some place similar. THe cans are fairly cheap and come in many colors.

      Reply
    22. Megan

      January 31, 2012 at 2:48 pm

      I had seen an advertisement about painting countertops to look like granite in a Lowes circular, loved the idea, but was very leery about how it would turn out...it looks terrific, now that you have had some time to live with it and use it, I am wondering how it is holding up? I worry more about the maintenance of it than the actual process and first look.....

      Reply
    23. Debbiedoo's blogging and blabbing

      January 11, 2012 at 7:46 pm

      Finally did it Gail! I love how mine turned out as well. Great stuff!~

      Reply
    24. Vanessa

      December 31, 2011 at 2:22 pm

      Oh. My. Goodness. I had no idea that this was possible! And here I've been thinking that I would never get new countertops because we would have to buy new. And it's sold at Walmart! I'm adding this to my list of things to do this year. 🙂

      Reply
    25. Full Circle Creations

      December 14, 2011 at 3:41 pm

      Great job! Love the way it looks! I painted counter tops several years ago and they look very similar to yours. Thanks for sharing!

      Holly

      Reply
    26. Stephanie

      December 14, 2011 at 1:26 am

      Seriously! This is the best job ever. I love how the black grounds the room. You can go with any accent color with the black and the white, that is the beauty of it. Love, love love it. Can't wait for those appliances 🙂

      Reply
    27. Connie

      December 13, 2011 at 7:37 pm

      Oh my gosh...this is awesome!!! I have a kitchen full of horrible old white linoleum counter tops, this is the answer!!!! Thank you so much for the review!!!

      Reply
    28. Meari

      December 13, 2011 at 4:47 pm

      I've always wondered how well those kits work. Your kitchen looks really good.

      Reply
    29. Cousin B

      December 13, 2011 at 5:15 am

      I'm picking my jaw up off the floor.....You did beautiful work on those cabinets and the countertops are amazing! I may have to get the nerve up to try that.... THANKS FOR SHARING!

      Reply
    30. E

      December 13, 2011 at 2:30 am

      Oh my gosh Gail these turned out great !! I didn't know such products existed 🙂 Elaine

      Reply
    31. Patricia P.

      December 13, 2011 at 2:20 am

      Great job. The counter tops are amazing!

      Reply
    32. It's Just Me

      December 13, 2011 at 12:33 am

      Gail your counters turned out just beautiful. I love how the cabinets pop now. What a difference : )

      Reply
    33. Carwin Candids

      December 12, 2011 at 10:23 pm

      Beautiful!!! Your kitchen looks amazing! You have done a wonderful job! I am very impressed!

      Thanks for sharing!
      Mindi

      Reply
    34. Vanessa

      December 12, 2011 at 9:01 pm

      Hi, Gail

      You kitchen looks great! Love the counter and its sure an easy way to change the look. Once you let it cure, do you know if you will be able to sit anything hot or cold on the counter without the paint peeling away? Not hot like off the stove. Just wonder?

      Have a great week.

      Vanessa

      Reply
    35. Sommer

      December 12, 2011 at 8:45 pm

      Gail I am so freaking glad you did this first lol. I got this kit almost two weeks ago and have decided to wait until after christmas to start the project because I am so nervous of the outcome! I can't wait to try it out and do my review! Your counter tops look fabulous!

      Reply
    36. My Cottage Charm

      December 12, 2011 at 8:42 pm

      Those turned out fab...I just love the difference it made in your kitchen! 🙂
      OH..and yes I did get a lot of gifts out of one cake...albeit a very large cake..it was awesome! I have got to get that recipe from my mom and share it...it's unreal how good that thing is!
      Love ya
      Missy
      PS..I'm still shocked how fast you got that Christmas card...I mailed it out the day before!

      Reply
    37. Aly

      December 12, 2011 at 8:07 pm

      WOW! That sure beats my orange '50s boomerang countertops that we can't afford to replace.

      Reply
    38. rebecca

      December 12, 2011 at 7:08 pm

      ok, i did this about a year ago to my counters. it is now starting to peal and chip and is driving me crazy! are you goign to try any other sealer or just what came in the kit?
      rwvanvoorhis at gmail dot com

      Reply
    39. Cassie @ Primitive & Proper

      December 12, 2011 at 6:14 pm

      HOLY MOLY!!!!!!! what a difference, gail! that paint did an amazing job and makes the kitchen look SO much nicer! i love love love it!

      Reply
    40. Proper Prim

      December 12, 2011 at 6:04 pm

      Gail... you totally outdid yourself on this job. I can't stop admiring it... I sooooo want to do this now.

      I was going to replace my countertops but I think I could save some bucks and do this instead.

      I am with you about the shiny... I am a matte girl too, however I don't mind my countertop and floors being shiny. It screams clean to me for some reason...lol.

      Hugs, Deb
      Great job my friend.

      Reply
    41. Layn @ reignalayn.blogspot.com

      December 12, 2011 at 5:23 pm

      Looks great! Can't wait to see more pics. Love the white cabinets. Your kitchen looks so much more airy/open.

      Reply
    42. I Play Outside The Box

      December 12, 2011 at 5:18 pm

      OMG, you kill me girl!! That looks fabulous!! Can't wait to see more pictures.

      Reply
    43. Anna@Directions Not Included

      December 12, 2011 at 5:10 pm

      Um, wow. That is all I can come up with...wow.

      Reply
    44. Korrie@RedHenHome

      December 12, 2011 at 5:01 pm

      You've inspired me, Gail! I think I am going to start my countertops tonight. Surely no one is going to come look at our house in the two weeks before Christmas!

      Reply
    45. Attempting Aloha

      December 12, 2011 at 4:43 pm

      I, too, have had the kit sitting on my shelf, afraid to bust it open...you've given me courage! It looks great!!

      Aloha,
      Charlie

      Reply
    46. Suzanne@Meridian Road

      December 12, 2011 at 4:42 pm

      You did an amazing job! To me, your counters look just like granite! They do look great with your white cabinets.
      I have some dated appliances, too. I'm going to keep them until they don't work anymore.

      Reply
    47. Gloria Fox @ Potentially Beautiful

      December 12, 2011 at 4:28 pm

      Your countertops look awesome! What a great alternative if you can't afford to change them. Thanks for the tutorial!

      Reply
    48. Meg I am.....

      December 12, 2011 at 3:57 pm

      Using the Giani system on my counter tops AND my SIL's is first up on my "to-do" list after Christmas!!

      Love how yours turned out!!

      http://megschmitt-neveradullday.blogspot.com/

      Reply
    49. jamie

      December 12, 2011 at 3:50 pm

      nice job! they look great! can't wait to see them next week. 🙂

      Reply
    50. Its So Very Cheri

      December 12, 2011 at 3:23 pm

      It looks awesome Gail.

      Cheri

      Reply
    51. Shannon

      December 12, 2011 at 3:17 pm

      They look great!!!

      Reply
    52. Rachel

      December 12, 2011 at 3:02 pm

      That's pretty awesome, I didn't know you could do that

      Reply
    53. Paige (Final Clothes-Out)

      December 12, 2011 at 2:23 pm

      I have to say, I'm always a little nervous when people talk about painting their countertops, but these look good! When everything is completely dry and re-staged, you should take a long shot of the whole room. I want to see the whole look. 🙂

      Reply
    54. Toqua's Crafts

      December 12, 2011 at 1:22 pm

      WOW! What an amazing job with AMAZING results! It looks great Gail. Enjoy your *new* kitchen!

      Reply
    55. ohiofarmgirl

      December 12, 2011 at 12:53 pm

      It looks wonderful and I have debated whether this is for me. One question I have is about the fumes. I am wondering since I have breathing issues with strong fumes. Dianntha

      Reply
    56. Feral Turtle

      December 12, 2011 at 12:16 pm

      Your kitchen is amazing! I love what you have done with it. Your countertops look stunning with the white cupboards. What a wonderful job you have done! Merry Christmas!

      Reply
    57. Stitch a Wish Designs

      December 12, 2011 at 12:11 pm

      Awesome job and they totally look "real"! Way to go!

      Reply
    58. Sue

      December 12, 2011 at 12:06 pm

      Gail, once again you stomped me with an awesome product. If my old counter-top would have been so scratched up with cracks too, this product would have been worth a try!
      Thanks or sharing another awesome project!
      Have a wonderful week,
      Sue

      Reply
    59. Debbiedoo's blogging and blabbing

      December 12, 2011 at 12:04 pm

      AWESOME! I have this kit too and can't wait to use it in our bathroom. Yours turned out fantastic Gail!

      Reply
    60. Terri

      December 12, 2011 at 11:50 am

      Wow, what a great addition to your beautifully redone kitchen. Nice job!!

      Reply
    61. Sharon

      December 12, 2011 at 11:49 am

      I have been telling every one about this since I seen you talk about it this weekend. And I showed this to my hubby this morning. He likes it and said, he is so unhappy with our Mobile home counter tops. He is willing to give this a try. So yep, with your new counters, You need black appliances. Our cabinets are the same color as your prepainted cabinets and we have black appliances. And plan to go with the same color you did. It will look great.

      Reply
    62. Ann

      December 12, 2011 at 11:47 am

      Your new countertop looks great. I'd never heard of that paint before. Excellent job!

      Reply
    63. Renewed Upon a Dream

      December 12, 2011 at 11:37 am

      Oh my gosh I had no idea something like this existed! It looks really good! I'm not surprised that you had the kit for a while but put off doing it for fear of not being able to pull it off, I would be SO scared! If it didn't turn out well you'd be kinda out of luck on your countertop! Not cheep! But, it turned out really well I think! Very nice for a small investment to hold you over until the funds are available for the real thing!

      Reply
    64. A To Zebra Celebrations

      December 12, 2011 at 10:34 am

      holy smokes!! this is amazing!!! I must do something with my countertops 🙂 ~nancy~

      Reply
    65. Mariaelena

      December 12, 2011 at 10:32 am

      WOW!!!...I'm a new follower to your blog this morning. You did such a good job on your countertops...amazing...and very patient...what a big job that is..I hope you enjoy it for years to come...:)..we just painted our kitchen cabinets..final reveal soon...pls visit so you can see the result!!...Happy decorating, Mariaelena

      Reply
    66. Amanda

      December 12, 2011 at 9:32 am

      Bloomin' heck misses! What a stunning transformation, you did a wonderful job on the counters. I the all white cabinets too, so airy.

      Reply

    Primary Sidebar

    Hi, there! I’m Gail Wilson, the author and mastermind behind My Repurposed Life. I’m obsessed with finding potential in unexpected places and believe that with a little hard work and imagination, any old thing can be made useful again—myself included! I hope you’ll enjoy the journey and pick up a few tools along the way… literally!

    More about me →

    Join Our Mailing List

    ​

      Click the topics you're interested in below:

      Subscribing above means you agree to our Privacy Policy​

      Footer

      ↑ back to top

      SEEN ON

      Might I Suggest

      • Start Here
      • Furniture Makeovers

      Newsletter

      • Sign Up! for emails and updates

      About

      • Gail's Favorites on Amazon
      • About

      As an Amazon Associate I earn from qualifying purchases.

      Copyright © 2023 My Repurposed Life · Privacy Policy · Disclosure